Drawing Diego of Kambal Karibal | Art 118
Hola!
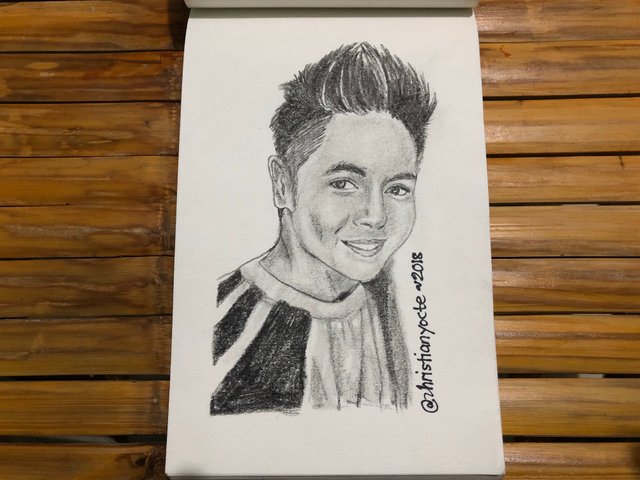
Welcome to my 118th art blog. Today, I would like to introduce you to one of the most popular male young stars in the Philippines. His name is Miguel Tanfelix. You may wonder why I named this portrait as "Diego". Well, he played and was called as such in his recently concluded TV show. He started showbiz when he was still a child after joining a reality show in GMA. He didn't win but he managed to give himself a break through his dedication, perseverance and love on his craft. So, wherever we are, whatever we do, when we give our all with love and perseverance we will surely reach our goals. Again, here's my 118th art... ENJOY!
Drawing Process:
If you are an avid follower of mine, you might have already seen the pattern that I follow when I draw portraits using graphite pencils. But I believe that there is a possibility that new Steemians come to my blog. So, I think it is still proper and appropriate to discuss how I made this. Another thing is that, if I only post a picture or a video of my artwork, this platform doesn't separate from Instagram, Facebook and Youtube. But Steemit is far different from the mentioned sites.
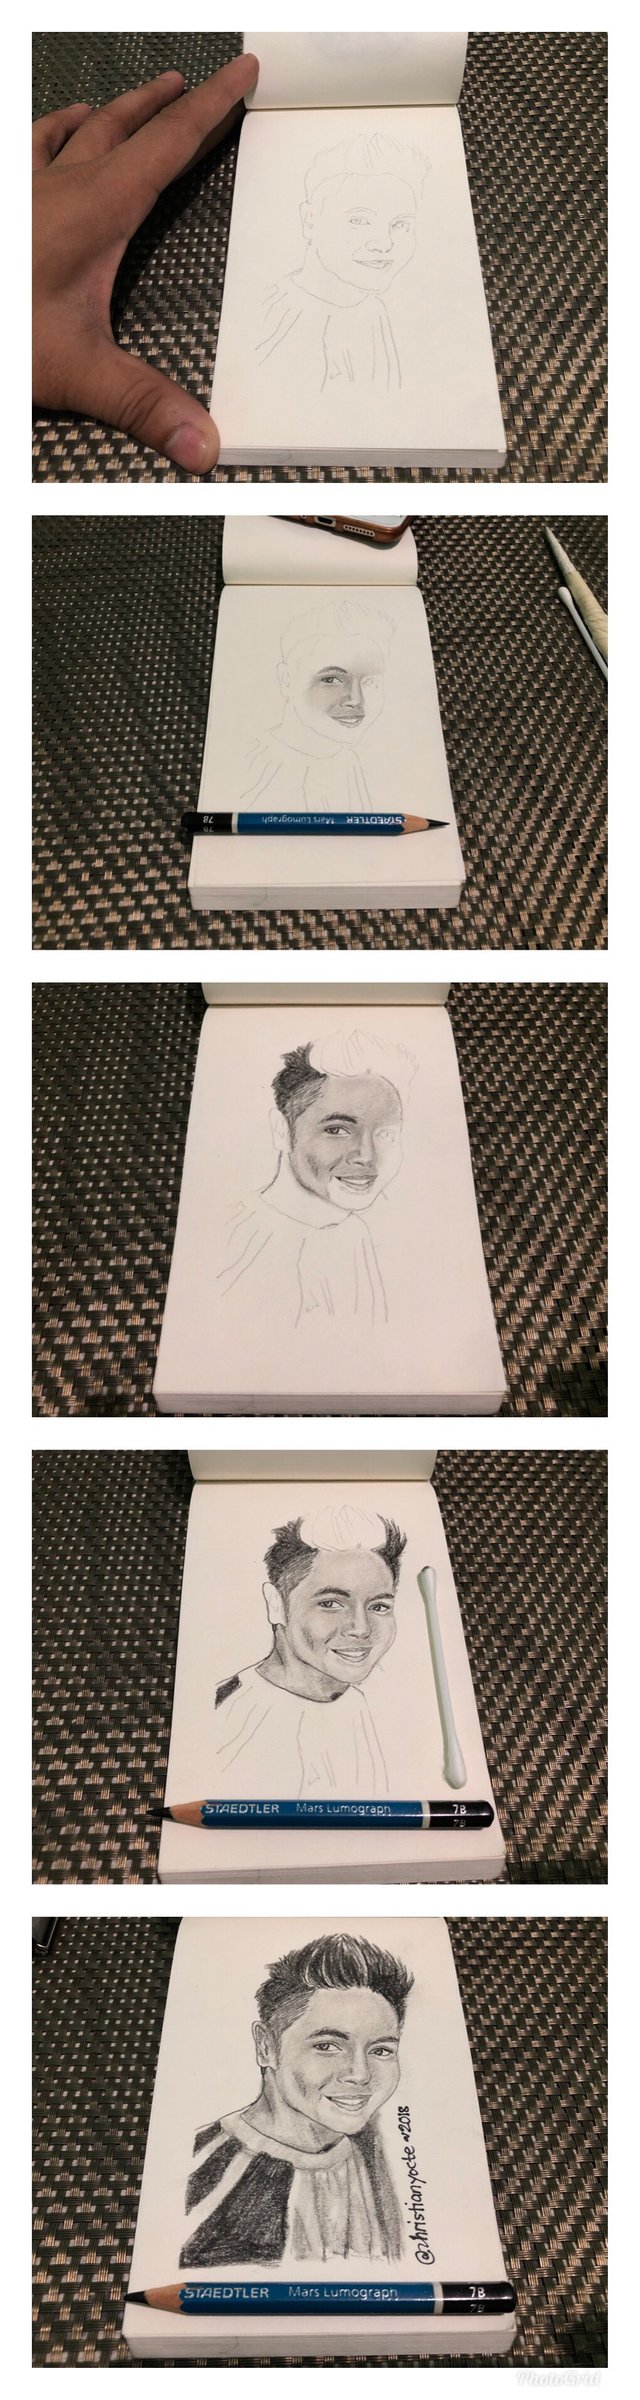
First, I sketched the outline of the subject using a pencil. I do not hold the pencil with so much pressure so that if I would have adjustments later, I can erase it easily. So, when I was satisfied with the outline, I proceeded to the next step which is the rendering. It is important in any medium that you as an artist know how important the tonal values are. So, before I rendered I first identify which part of the drawing should be dark and which part should be light. After having that in mind, I started rendering and smudging using cotton buds and a tissue. This helps prevent your hands by getting dirty. It is also not advised to use fingers for smudging because the oil in your hands may transfer to your drawing paper which has a greater chance of getting very dirty which cannot be erased easily. I continued the process until the end of all the portions of drawings. After performing those things, I used a kneaded eraser which looks like a clay. I like to use it in highlighting some parts of the drawing because you can reshape the eraser to have a thin tip or in any form depending on your need. You can also go back to your subject to add details. So, to wrap it all, we started with sketching and outlining, then rendering and smudging, and finally erasing and high lighting some parts of the object, and finally, detailing. Enjoy the process pictures!
Final Words
I hope you had fun reading this blog. If you liked it please do not forget to upvote. Also, if you have some thoughts in mind, please let me know by commenting it below. Lastly, if you want to see more art blogs from me, you can click any link/number below:
117 116 115 114 113 112 111 110 109 108 107 106 105 104 103 102 101 100 99 98 97 96 95 94 93 92 91 90 89 88 87 86 85 84 83 82 81 80 79 78 77 76 75 74 73 72 71 70 69 68 67 66 65 64 63 62 61 60 59 58 57 56 55 54 53 52 51 50 49 48 47 46 45 44 43 42 41 40 39 38 37 36 35 34 33 32 31 30 29 28 27 26 25 24 23 22 21 20 19 18 17 16 15 14 13 12 11 10 09 08 07 06 05 04 03 02 01
View post on Elegance
A place to show your skills
Fantastic drawing! Your picture really brings him to life. I swear, I almost expected him to move or laugh. What a great job!
Wow. Really? Thanks for the conpliments
What a handsome young man, I’ve never herd of him, such a great portrait drawing ❣️Blessings