Drawing like a pro - 112, -Drawing petals /Dibujando pétalos - (#club100)
Hi friends!
In the lesson The geometry of flowers I showed you how you can start drawing flowers from a geometric base (I suggest you read that post before you start exercising the next sample).
To show you the basics of the drawing, I'll go as slow as possible to give you the chance to train at the same time as these posts.
I'll also try to show you some of the other different styles and techniques you could achieve if you're not interested in realistic drawing or if your goal is to use drawing as a study for other media, like oil painting for example.
Dibujar es un proceso reflexivo y lento si deseas hacer dibujos realistas, porque es una combinación de observación, conocimiento de tus herramientas y materiales de dibujo además de habilidades de dibujo.
Desarrollar habilidades de dibujo es solo cuestión de tiempo y perseverancia. Tanto la observación como la destreza manual se desarrollan ejercitando el dibujo con la mayor frecuencia posible.
En la lección La geometría de las flores te mostré cómo puedes comenzar a dibujar flores a partir de una base geométrica (te sugiero que leas esa publicación antes de comenzar a ejercitar con esta publicación).
Para mostrarte los conceptos básicos del dibujo, iré lo más lento posible para darte la oportunidad de entrenar al mismo tiempo que salen estas publicaciones.
También intentaré mostrarte algunos de los otros estilos y técnicas diferentes que podrías lograr si no estás interesado en el dibujo realista o si tu objetivo es usar el dibujo como un estudio para otros medios, como la pintura al óleo, por ejemplo.
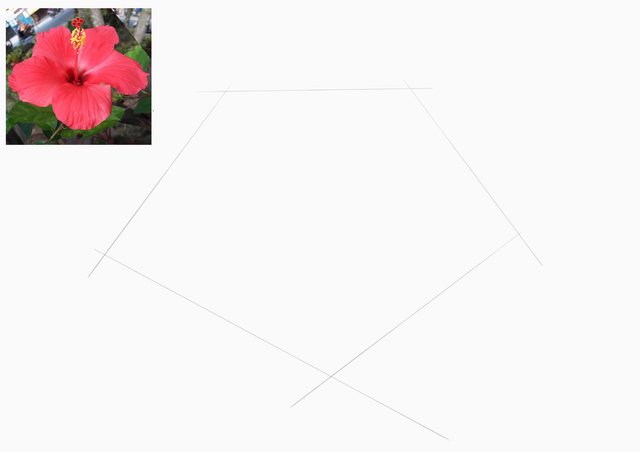
This time I show you the reference image that we will use for our drawing. So you can see how the base for the drawing emerges.
The first step is to draw the geometric shape, which will allow us to define the flower. As you can see the shape is very regular like most flowers and this is great because we can also practice our sense of symmetry and regular shapes.
En esta oportunidad les muestro la imagen de referencia que usaremos para nuestro dibujo. Así puedes ver cómo surge la base para el dibujo.
El primer paso es dibujar la forma geométrica que nos permitirá definir la flor. Como puedes ver, la forma es muy regular, como la mayoría de las flores y esto es genial porque también podemos practicar nuestro sentido de la simetría y las formas regulares.
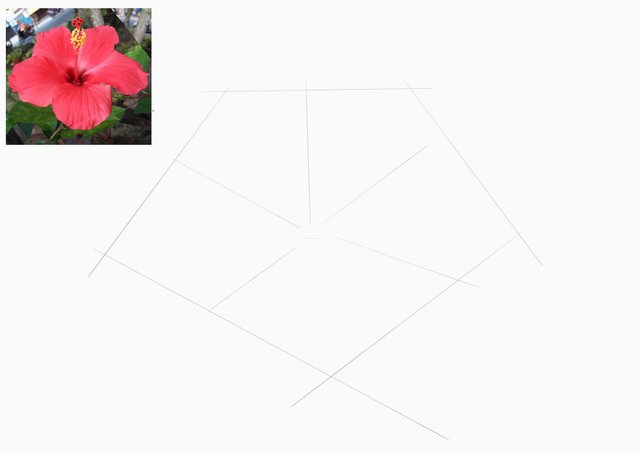
We will then go on to define where the petals converge, after observing our model, of course. This will be the centre of the flower as well.
Luego, después de observar nuestro modelo, pasamos a definir dónde convergen los pétalos. Este será el centro de la flor también.
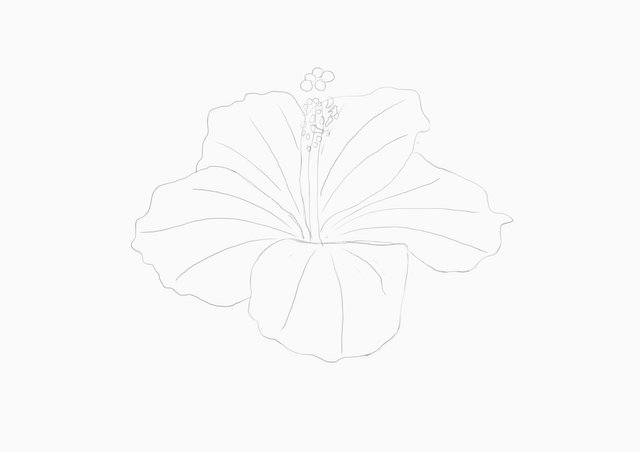
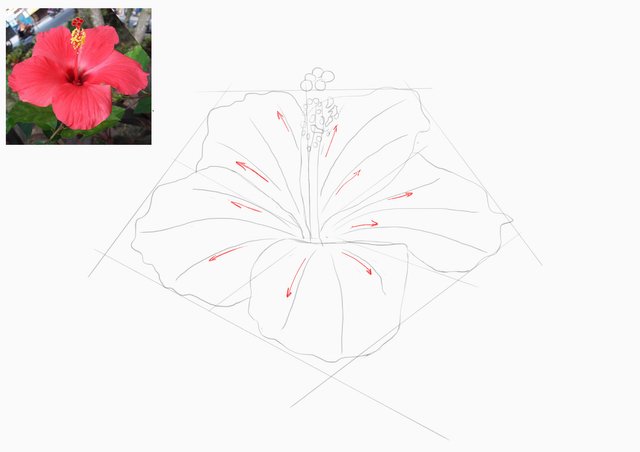
All the helplines drawn before allow us to draw the petals, following the shapes of the reference image.
Todas las líneas de ayuda dibujadas anteriormente nos permiten dibujar los pétalos, siguiendo las formas de la imágen de referencia.

We now draw the central lines of the petals to give them their curvature. Just a thin, smooth centre line for each petal.
Ahora dibujamos las líneas centrales de los pétalos para darles su curvatura. Sólo una línea central delgada y suave para cada pétalo.

By drawing lines on both sides of the central lines that we have already drawn, we are able to symmetrically divide the shape of the petals to further accentuate their curvature.
Dibujando líneas a ambos lados de las líneas centrales hemos dibujado anteriormente, podemos dividir simétricamente la forma de los pétalos para acentuar aún más su curvatura.
Here the first helplines are erased, which allows us to better compare our drawing with the reference image.
It is important that the inner lines can show the curve of the petals.
The way you do your drawing is also very important if you want to achieve a good finish. See this post about how to use your drawing tools: 5-lesson
Aquí se borraron las primeras líneas de apoyo, lo que nos permite comparar mejor nuestro dibujo con la imagen de referencia.
Es importante que las líneas internas puedan mostrar la curva de los pétalos.
La forma en que haces tu dibujo también es muy importante si quieres lograr un buen acabado. Mira esta publicación sobre cómo usar tus herramientas de dibujo: 5-lesson


I wish you a very nice day and good exercise!
Te deseo un gran día y muy buenos ejercicios! Recuerda, siempre puedes enviarme tu dibujo para obtener una evaluación o algunos consejos adicionales para seguir mejorando tus dibujos y, por supuesto, para recibir mis más sinceras felicitaciones cuando tu dibujo esté bien hecho.
Lo siento, no hay premios involucrados, sólo la acción de aprendizaje mutuo y mi voto a favor.
Well, our friend @arcoiris is back with his magnificent watercolour lessons.
Here are the links to the previous related posts.
1 - 2 - 3 - 4 - 5 - 6 - 7 - 8 - 9 - 10 - 11 - 12 - 13 14 - 15 - 16 - 17 - 18 - 19 - 20 - 21 - 22 - 23 - 24 - 25 - 26 - 27 - 28 - 29 - 30 - 31 - 32 - 33 - 34 - 35 - 36 - 37 - 38 - 39 - 40 - 41 - 42 - 43 - 44 - 45 - 46 - 47 - 48 - 49 - 50 - 51 - 52 - 53 - 54 - 55 - 56 - 57 - 58 - 59 - 60 - 61 - 62 - 63 - 64 - 65 - 66 - 67 - 68 - 69 - 70 - 71 - 72 - 73 - 74 - 75 - 76 - 77 - 78 - 79 - 80 - 81 - 82 - 83 - 84 - 85 - 86 - 87 - 88 - 89 - 90 - 91 - 92 - 93 - 94 - 95 - 96 - 97 - 98 - 99 - 100 - 101-Lesson - 102-Lesson - 103-Lesson - 104-Lesson - 105-Lesson - 106-Masterclass - 107-Lesson - 108-Lesson - 109-Lesson - 110-Lesson - 111-Lesson
Also, thanks to @xpilar for making these initiatives possible with their great support.

Lovely hibiscus structure :)
Saludos amigo @jorgevandeperre
Muy buen procedimiento, creo que tendré que practicar con estos modelos para después pasar a las rosas, no me gustó mucho como quedó mi reciente dibujo, estaré atento a sus buenos tutoriales.
Dominar las técnicas de dibujo requiere de una buena dosis de resistencia al fracaso y de estar siempre dispuesto a recomenzar. Ánimo!
TEAM 1
Congratulations! This post has been upvoted through steemcurator04. We support quality posts , good comments anywhere and any tags.thank you very much!!