Drawing like a pro - 26, Masterclass - One point perspective (Power up 100%)

Hi friends!
I will try to go little by little, trying to be as clear as possible because we need to understand the concepts contained here and put them into practice in order to develop our sense of volume and space and its representation through drawing.
(Front perspective)
Because this way of representing our world comes from the study and observations made with a scientific and mathematical spirit, we must agree on certain conditions and rules, both in the way we observe and in the way we represent what is observed.

1
We will observe with one eye.
Looking with one eye allows us to eliminate our stereoscopic vision, thus eliminating depth perception.
When we observe:
The first condition, we will be looking with only one eye, straight ahead, without turning our head or turning our eyes to the right or left.

When we draw:
We will make a horizontal line on our drawing paper representing the height of our view, that is the level of our eye. We will call this line horizon line or eye-level.

2
We will establish a vanishing point.
When we observe:
We stay stand in the centre with respect to what we observe.

When we draw:
We will mark that point that we are looking at (central with respect to us) in the centre of our horizon line or eye level. We will call this: vanish point

3
When we raise or lower our eye height (that is, if we look from a higher or lower point), the horizon line or eye level will also rise or fall respectively.
When we observe:
If for example, instead of standing on the ground we now climb a ladder and look straight ahead. Our eye level or horizon line will be up at the height of our eye.

When we draw:
We will draw our horizon line or eye level at the top of our sheet.

When we observe:
If, on the other hand, we sit on the ground and look straight ahead (let's not forget that we do all of this in compliance with the condition we established at the beginning, that is, look with one eye, etc.) our eye level will also drop accordingly.

When we draw:
Our horizon line this time we will place it at the bottom of the drawing sheet.

4
Lines parallel to the horizon line or eye-level do not change their direction regardless of their location.
Lines perpendicular to the horizon or at eye-level line will also not change their direction regardless of their location.
The oblique lines that define an object will be directed towards the vanishing point.

Exercise
The goal of this lesson and the following exercise is to give you confidence in drawing lines, parallel lines, lines to a defined point, etc. in the way shown in previous drawing lessons. That means: drawing freehand with pencil and paper.
The second and no less important goal is to help you gain a sharp sense of space and depth represented through drawing.
Do this exercise as follows:
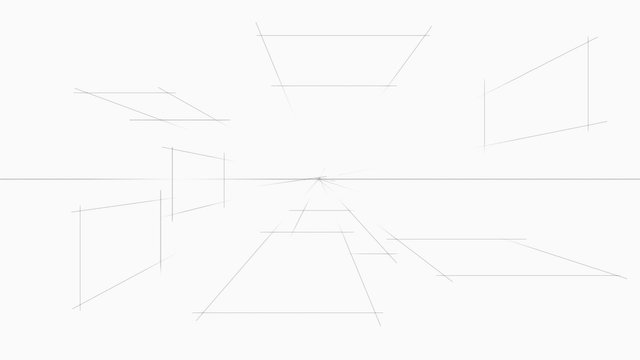
- Draw the horizon line (eye-level) and the vanishing point roughly in the middle of your drawing sheet.
- Draw a line parallel or perpendicular to the eye-level line where you want.
- Then, draw two strokes to the vanishing point starting from the ends of the line you drew earlier.
- To finish, draw another line, parallel and close to the initial line you drew.
- Repeat this process as many times as you want, with horizontal and vertical lines as shown in the example.

- Erase the lines going to the vanishing point leaving rhombuses like the ones drawn here.
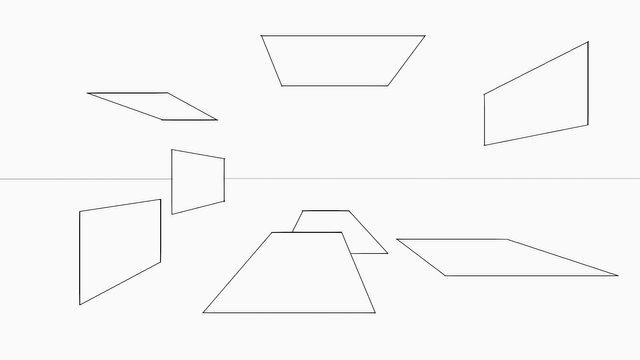
- Pay attention to the overlapping shapes in my drawing, (below the horizon line in the middle). Try to do the same thing in different places and with different orientations.

Redraw the shapes and erase all remaining lines so only the shapes and the horizon are visible.
Repeat this exercise with the high positioned eye-level and also with the low positioned eye-level. (Point 3)

I wish you a very nice day and good exercise!
Here are the links to the previous related posts.
1-Introduction - 2-Introduction - 3-Introduction - 4-Introduction -
5-Introduction - 6-Lesson - 7-Lesson - 8-Lesson - 9-Lesson - 10-Lesson -
11-Masterclass - 12-HW Contest - 13-Lesson 14-Lesson - 15-Lesson -
16-Lesson - 17-HW results - 18-Masterclass - 19-HW Contest - 20-Lesson - 21-Lesson - 22-Lesson - 23-HW results - 24-Lesson - 25-Lesson
100% SP (manual transfer to SP)
#club100

Thank you for this explanation, now it makes sense, love those lines, they will definitely help me to draw architecture, I love to do architecture and cities.
You post is nominated for „Visual Art“ Support Program, @booming account upvote. Only the posts that are not cross posted, original and posted from Xpilar community page If your post gets approval, then you get upvote within few days. Good luck!
Hi Stef, if you have any questions, don't hesitate to ask me. I'll be pleased to try to give you an answer if I can.
Thank you very much for the nomination!
Great lesson, Jorge. You explain everything very well. I'll try to apply your lesson to photography of urban architecture, it's interesting :)
Hi friends, glad to see you! Great, I'm sure you'll get excellent results.
My Pleasure :)