VCV Rack - 1st Setup, Multi-Outputs and Audio Interface
What Will I Learn?
- You will learn how to create your first modular synthesis setup in Rack.
- You will learn how to configure your outputs from VC Mixer to sound through both computer speakers.
- You will learn how to configure your Audio Interface module.
Requirements
To complete this tutorial learners will need to have the following:
- The software application VCV Rack installed
- Access to the Internet
- An account created on www.vcvrack.com
- Fundamentals plugin installed
Difficulty
This tutorial is at an Beginner level.
Description
Learn how to create your first modular synthesis setup
It is not difficult to create your first modular synthesis setup. I will step you through the process and you will be making sound in no time.
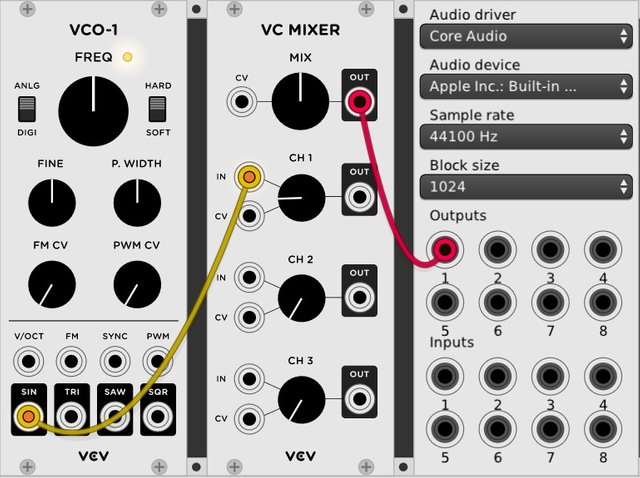
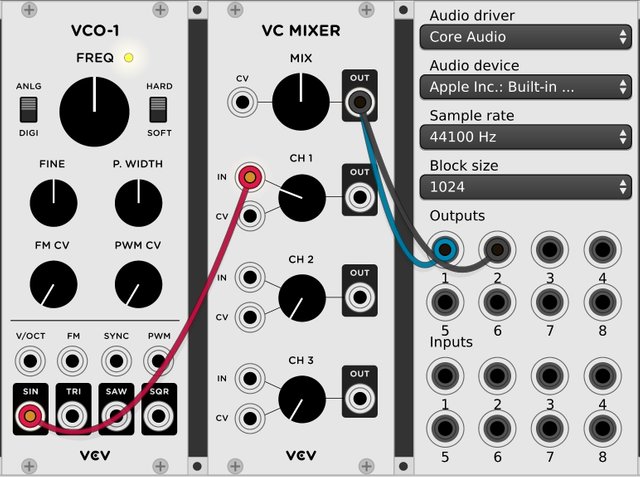
First you will you will need to load three modules into Rack: VCO-1, VC Mixer, and Audio Interface.
Next configure the Audio Interface to the correct settings for your system.
Click and pull a patch cable from the Sine Wave jack (SIN) of VCO-1 to IN of Channel 1 on VC Mixer. Pull a patch cable from the MIX OUT of VC Mixer to the 1 jack of Audio Interface.
The last thing you need to do is turn up the volume of CH 1 of the VC Mixer.
That is it, you should have sound. If you do not then check the setting in your Audio Interface to insure that they are correct.
How to configure your outputs from VC Mixer to sound through both computer speakers.
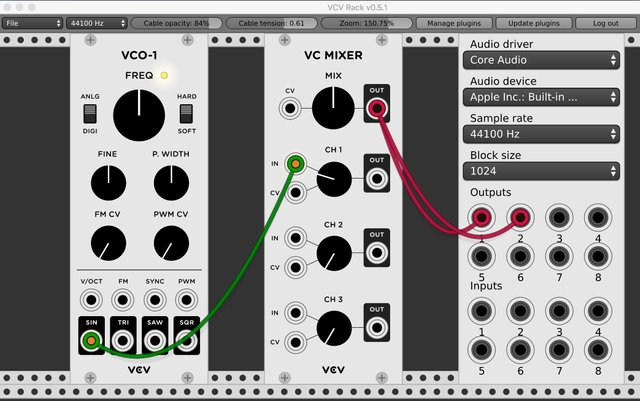
To get sound from both speakers of your computer you need to connect the MIX OUT from VC Mixer to Outputs 1 and 2 of your Audio Interface.
First click and drag a patch cable from Output 1 of the Audio Interface to MIX OUT on VC Mixer. Next click and drag a patch cable from Output 2 of the Audio Interface to MIX OUT on VC Mixer. Notice that two cables can plug into the same plug at the same time. You should now have sound in both speakers.
How to configure your Audio Interface module.
We just learned to create your first sounds in Rack. As part of that process you would need to configure your Audio Interface. This is quite easy, but may require some trial and error.
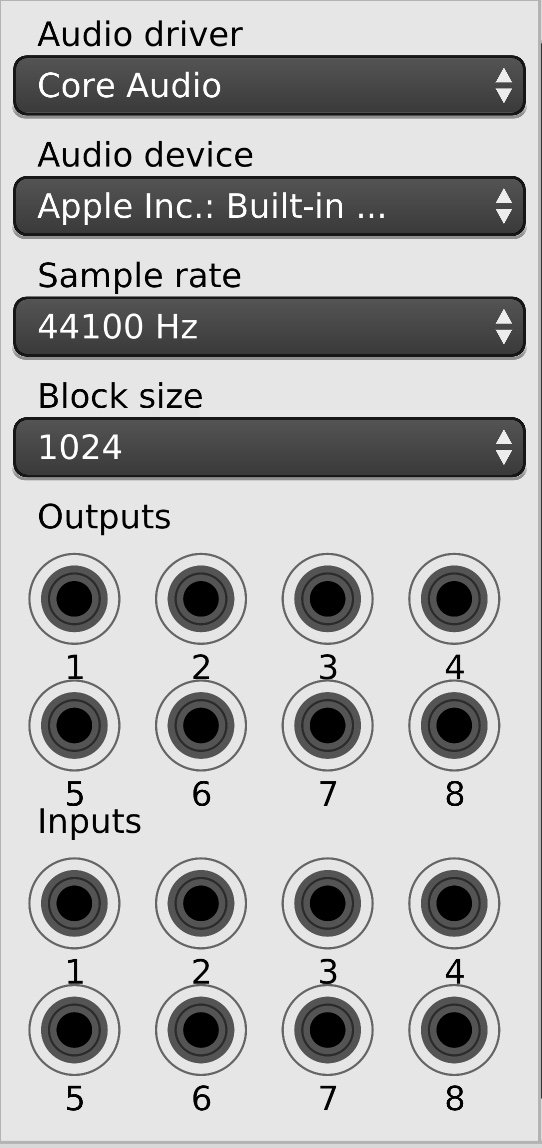
Audio Driver and Audio Device will be unique to your system. So I suggest you see what options are provided to you in the pull-down menus and see what works for you.
I usually have my Sample Rate set to 441000Hz. You may want to use different sample rates based on the project you are doing. We will not be cover what sample rate is in this tutorial as it is a standard variable which is explaned very well in numerous Internet sources.
Block Size relates to your buffer and can be used to control any latency or lag you experience. If you are experiencing any lag you can use adjust this setting to find what works best for you.
Audio Interface gives us 8 Output and 8 Inputs. Depending on your hardware some or all of these will function. In a typical computer setup with no third-party audio device Outputs 1 and 2 will be left and right speakers.
See the tutorial video for a demonstration of this process.
VCV Rack is an open source application, which means that it is free for everyone to use. Please consider going to the developers' website and show your support for the project - http://www.vcvrack.com
I hope you enjoy this tutorial. If you have any specific questions for me feel free to leave it in the comments of this post and I will do my best to get back to you with an answer.
Cheers,
@buckydurddle
Video Tutorial
Curriculum
Learn VCV Rack Modular Synthesis Series
VCV Rack - Modular Synthesis, Plugin Manager, Customize UI
Rack - VC Mixer, Patching, & VCO-1 to VC Mixer
Learn Hydrogen Drum Machine Series
Hydrogen - Rhythmic Resolution
Hydrogen - Effective Beat Making
Hydrogen - Song Editor, ADSR, Importing DrumKits from Respositories
Hydrogen - Humanize (Velocity, Timing & Swing)
Hydrogen - New Instruments, Loading Samples & Multiple Sample Sounds
Hydrogen - Beat Counter, BPM & Other Tempo Tools
Learn Helm Series
Helm 1st Oscillator Video Tutorial
Helm 2nd Oscillator Video Tutorial
Learn Audacity Series

If you would like to learn how to use the open source sound recording and editing software Audacity then have a look at these tutorials:
1 How to Create a New Audacity Project
2 How to Open or Import Audio Files in Audacity
5 How to Save an Audacity Project
7 How to Set Input Volume Levels
8 How to Export MP3 and WAV Files
9 How to Select and Delete Sound
ACTIVITY 1 - My First Recording
10 How to use Undo and History in Audacity
12 How to Use the Time Shift Tool
13 How to Use the Change Pitch Effect
ACTIVITY 2 - Make Your Voice Sound Like a Chipmunk
14 How to Use the Fade In & Fade Out Effects
15 How to Download Sound Samples from the Internet
16 How to Use the Amplify Effect
ACTIVITY 3 - Multitrack Recording in Audacity - Beatbox
21 How to Use the Change Tempo Effect
22 How to Use the Equalization Effect
ACTIVITY 4 - How to Mess Up a Piece of Music
25 How to Remove Vocals from a Recording
SETUP - How to Install the LAME Encoder
Logo - http://tytel.org/helm
Logo - https://www.audacityteam.org/
Logo - http://www.hydrogen-music.org/hcms/
Posted on Utopian.io - Rewarding Open Source Contributors


You are doing some interesting tutorials!
Thanks @melinda010100 Nice to hear from you :)
Thank you for the contribution. It has been approved.
You can contact us on Discord.
[utopian-moderator]
Thanks @deathwing. I appreciate all your efforts.
Very nic .I liked it
Good tutorial for beginner, and also its really helpful thanks!
Thanks @olatun
Cheers,
Bucky
it is a wonderful concept, i love this
Hey @buckydurddle I am @utopian-io. I have just upvoted you!
Achievements
Community-Driven Witness!
I am the first and only Steem Community-Driven Witness. Participate on Discord. Lets GROW TOGETHER!
Up-vote this comment to grow my power and help Open Source contributions like this one. Want to chat? Join me on Discord https://discord.gg/Pc8HG9x