Audacity Tutorials 14 & 22 of 25 - How to use EQ and Fade-In Fade-Out in Audacity
EQ or Equalizer is used more than any other sound treatment. In future tutorials I can show how to use the EQ in the mixing and finishing processes, but today we will be covering the basics of the EQ. We will also be learning about the Fade In and Fade Out functions. These two are used in EVERY project I do. - very useful.

This video tutorial #14 of #22 in this series. You can see a full list of the available Audacity tutorials at the end of this post.
14 How to Fade In and Fade Out in Audacity
Procedure:
Fading sound in at the beginning of a recording and out at the end can make your recording projects sound very professional.
Open an Audacity project and use the Selection tool to select the portion of sound you would like to fade. Both Fade In and Fade Out effects will spread the fade equally over the entire selection you make. So if you make a short selection then the fade will be quick. If you make a long selection the fade will be slow. Once you have made your selection go to the EFFECT menu and choose either Fade In or Fade Out.
22 How to Use Equalizer (EQ) in Audacity
Procedure:
Audacity gives us many useful effects that allow us to change the way our projects sounds - Equalization is one of those effects. Equalization, or ‘EQ,’ allows us to change the tone of your sound by increasing or decreasing the volume of a certain frequency range (pitch). For example, a recording may have too much bass. You can use the Equalization effect to reduce the amount of bass.
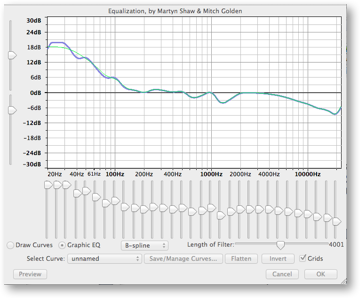
To use Equalization you first need to select the portion of sound you wish to change. Next go to the EFFECT menu and choose EQUALIZATION. You should now see the Equalization window.
A good place to start in this window is with the SELECT CURVE pull-down menu. Here Audacity provides a number of presets for you to try. Explore these and note how each preset changes the sound of your project. As you select different presets you can click OK to hear how it sounds. If you do not like the sound just go EDIT->UNDO to go back to your unchanged sound.
Once you have explored the presets you can click the GRAPHIC EQ button and try moving some of the sliders to make a custom EQ curve. The sliders to the left are low frequencies and the sliders to the right are high frequencies.
Explore the Equalization effect to find settings that best work for you. When you find some settings that work, you may want to save the Equalization effect settings within the plugin by clicking SAVE AS. You can come back to this setting in future projects by using the SAVE/MANAGE CURVES… button.
Learn Audacity Series
The following is a list of all the Audacity tutorials and activities found in this video series
TUTORIALS
1 How to Create a New Audacity Project
2 How to Open or Import Audio Files in Audacity
3 What are Audacity Tracks
4 Audacity Transport Controls
5 How to Save an Audacity Project
6 How to Record
7 How to Set Input Volume Levels
8 How to Export MP3 and WAV Files
9 How to Select and Delete Sound
ACTIVITY 1 - My First Recording
10 How to use Undo and History in Audacity
11 How to Use the Zoom Tools
12 How to Use the Time Shift Tool
13 How to Use the Change Pitch Effect
ACTIVITY 2 - Make Your Voice Sound Like a Chipmunk
14 How to Use the Fade In & Fade Out Effects
15 How to Download Sound Samples from the Internet
16 How to Use the Amplify Effect
17 How to Edit Metadata
18 How to Multitrack Record
19 How to Use a Click Track
ACTIVITY 3 - Multitrack Recording in Audacity - Beatbox
20 How to Make Silence
21 How to Use the Change Tempo Effect
22 How to Use the Equalization Effect
23 How to Reverse Sound
24 Stereo Mono
ACTIVITY 4 - How to Mess Up a Piece of Music
25 How to Remove Vocals from a Recording
SETUP TUTORIALS
SETUP 1 How to Install Audacity
SETUP 2 How to Configure Recording and Playback Hardware
SETUP 3 How to Install the LAME Encoder
PROJECTS
PROJECT 1 - Create a Halloween Soundscape
PROJECT 2 - Interview a Superhero
PROJECT 3 - Create a Radio Play

Posted on Utopian.io - Rewarding Open Source Contributors
Thank you for the contribution. It has been approved.
You can contact us on Discord.
[utopian-moderator]
Hey @buckydurddle I am @utopian-io. I have just upvoted you!
Achievements
Community-Driven Witness!
I am the first and only Steem Community-Driven Witness. Participate on Discord. Lets GROW TOGETHER!
Up-vote this comment to grow my power and help Open Source contributions like this one. Want to chat? Join me on Discord https://discord.gg/Pc8HG9x
Great job Bucky!! great Tutorials! :)