DRAW BETTER TODAY!!!! Simple Tools to Easily Analyze Your Subject Accurately
What's Really Going on in a Drawing?
Despite what a lot of people seem to think, the ability to draw isn't some magical present that is bestowed at birth. It is a skill that can be acquired by literally anybody with the right direction that will put in the time. Your ability to draw has very little to do with the skill of your hands and everything to do with how you analyze what is in front of you. So how do you analyze what is in front of you?
We are going to go over some fundamentals in reference to drawing and give examples of the application. Here you will see more of a representation of what is being thought about, and what is being looked for rather than seeing any technique. Repetition is the key. Practicing the fundamentals will make you a master. Drawing takes tons of observations. You have to find some overall truth and record it, then build onto that with more observed truths.
I hope you all enjoy and get a lot of value from this post. I have been working on this for weeks putting together all the graphics to make it all easy to visualize
Who Are You Going to Believe, Me or Your Lyin' Eyes?
No matter what we would like to believe, our senses just aren't that trustworthy. Even if you don't consider the fact that we neither see the full spectrum of light nor hear the full spectrum of sound, we are faulty instruments for receiving input. The failure to realize this is one of the top 5 reasons people struggle to draw. We aren't infallible.
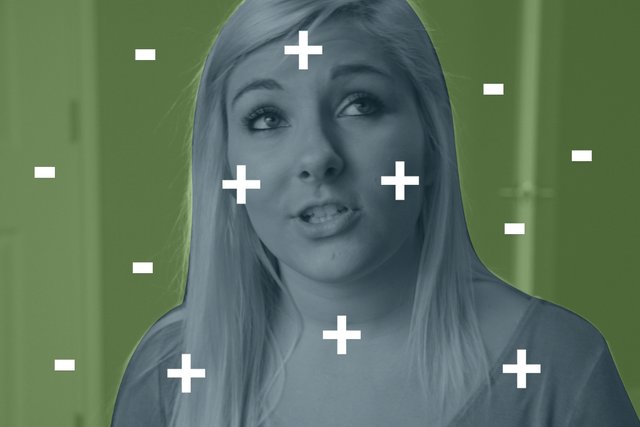
Your sight's comparative functions can be easily fooled. Everything inside the visual field is contextual. How you perceive one thing to be is largely determined by what is next to it, or around it. Being given a simple cue for perspective, for instance can make your size comparisons all out of whack if you don't measure. I will cover more on all the ways we get tricked in another post.
For now just trust me when I say that what you are looking at is not how it appears to you. So not only are you going to need to hone your sight, you are going to need to quantify everything. So how do we develop the tools to help us more accurately record the world around us? We measure.
So what exactly do we measure? Where something is. What Size Something is. What axis something is on. What shape something is.
Make yourself infinitely visually familiar with common measurements such as the ones listed below and more. Being able to spot these relationships on the fly will make drawing so much easier. You will see yourself improve almost instantly. However like I said, what you think you are looking at and what is actually present can differ greatly. So measure.
How do you measure? First make sure you are consistently measuring from the same distance. To take a measurement stand firmly with your arm stretched all the way out in front of you and use your thumb to mark on your pencil the length of the object. Then without moving from your position, keep your arm stretched out and compare this measurement to other masses around it. How do they compare? This will help you to develop a unit of measurement for the project. A common unit of measurement for portraits is the eye.
Really take some time to familiarize yourself with common size relationships. Being easily able to call out if one part is 3/4 the length of another, or 5 times as long as another, etc. will improve the speed and accuracy of your drawing greatly. Call it out then test it by measuring
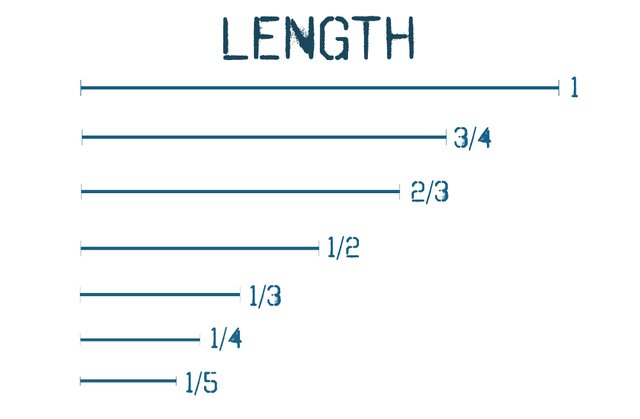
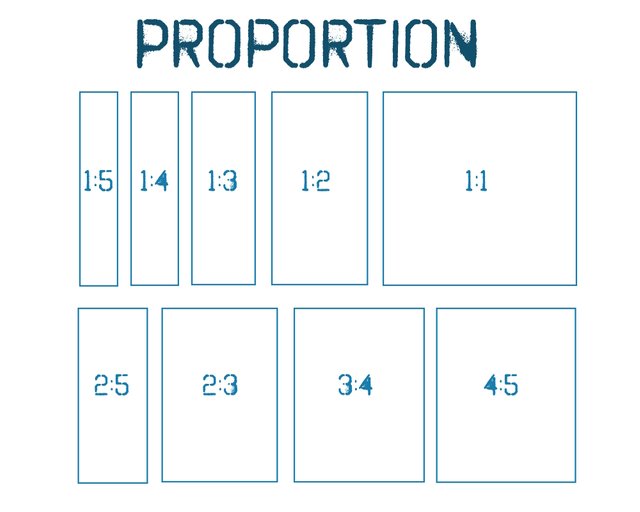
So you have looked at length. Now how does length compare to width? These proportions will give you accurate masses from which you can begin to carve the image. Memorize these common proportions so you can easily spot them, but again you need to measure to test yourself. Can you honestly tell the difference in the last two rectangles, 3:4 and 4:5 is there actually a difference? Although it might not appear so I promise that the proportions of the rest of your drawing will depend on you being able to tell the difference. So while intimately familiarizing yourself with these proportions will greatly improve your drawing, you still need to measure to be certainly accurate.
360 Degrees of Uncertainty
So you have memorized some common size comparisons now what? You aren't just dealing with size but also axis and contour so you need to remember some angles. Don't worry you don't have to remember all 360. Getting within 5 degrees would be pretty accurate assuming that your lines aren't more than a foot long which only leaves 72 increments.

I'm just kidding. Not about the 5 degrees part, but the whole 360. You don't need to memorize seventy-two 5 degree increments of 360 degrees. You just need to memorize nine 5 degree increments of 45 degrees. It is really simple when you break it down. Anything over 45 degrees just needs to be referred to a different reference plane. Fore example, look at the angles below here. They are all based off of a horizontal line and move up in 5 degree increments to 45 degrees.
You wouldn't measure up to 50 degrees from the horizontal plane, because then you are just opening yourself up to a bigger space and more room for error. Instead you would just base that angle from the vertical plane and see that it isn't 50 degrees from horizontal, it is 40 degrees from vertical. So with these nine 5 degree increments you can cover all seventy-two 5 degree increments of 360 degrees. The horizontal guide covers 180 degrees and the vertical guide covers 180 degrees. So memorizing these 9 angles can get you accurate with a margin of about 2.5 degrees error for the entire 360 degrees.

Some of you might be thinking. This is stupid, everything so far is obvious, but I'm telling you almost all the problems you are having drawing lie in the basics. This is the most basic. Measure your shit. Alright now moving on I would say please don't just pass over what you have read so far. If you memorize these basic building blocks you will find that drawing is already much easier with less effort.
Alright so let's move on to take a look at how to apply some of these basics to analyzing a drawing. What you will see below are not all necessarily linear steps to take in order although some of them should happen before others. A lot of these process that are happening at the same time, observations that occur simultaneously. Just remember, ideally you want to move from the most general and inclusive observations down to the smaller more specific observations. Understand that there is a hierarchy, larger containers holding smaller containers of information. Working this way makes it easier to correctly record the relationship between dominant and subservient masses which will give your drawing more unity.
Space
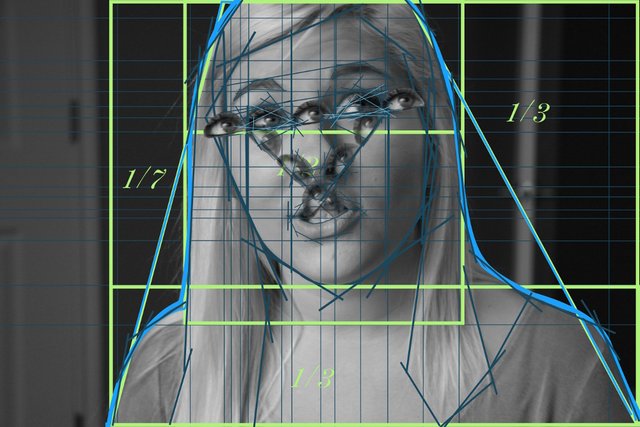
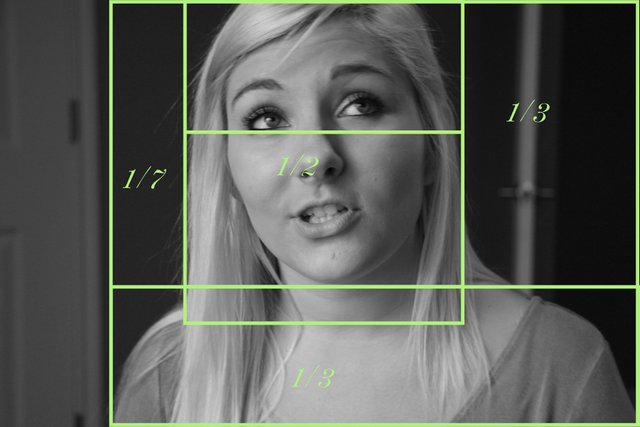
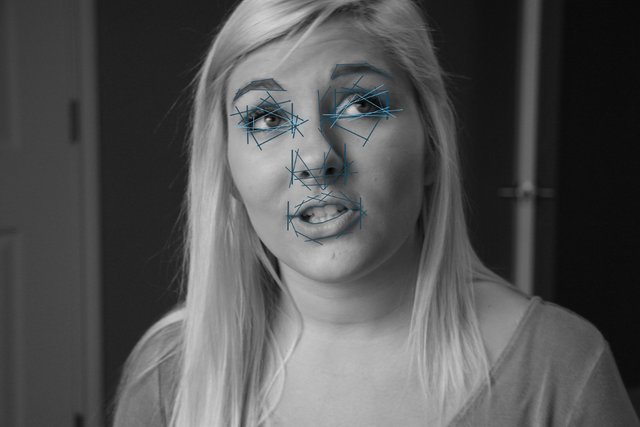
The most basic thing we can say about this reference photo is that the subject, Alyssa, is taking up some space. So how much? If you look at the furthest reach of the subject horizontally and vertically you can measure it to see that the space she inhabits is about 4 units tall by 5 units wide. So now that we decided what space is taken then we can begin to carve her figure out of the appropriate space. Working from the most general observations to the most specific is the best way to ensure accuracy and unity.

Chop off Unnecessary Matter
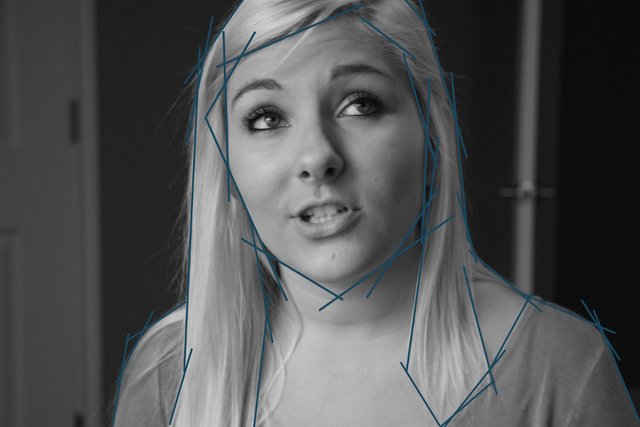
In some ways learning to sculpt clay dramatically improved my drawing ability, not just from my understanding of form, but also my ability to see in a certain way. One way to sculpt this would be to start with a block then draw the outline within the block and chop away the rest. That is pretty much what we are doing here, separating the subject from the surrounding space.
In this particular reference two lines further refine the form from the overall space block. Moving up and to the right 15 degrees from the bottom left corner of our 4:5 box and moving up and to the left 28 degrees from the bottom right corner of the box we have come that much closer to accurately describing the contour of our subject.

Down to a Few Small Shapes
Now with that refinement out of the way there are just a few small shapes that will give us the rest of the contour


The Container It All Fits In

Positive and Negative Space
There are other ways to go about reaching this same conclusion. The secret is to get something "true" down on the paper as a foundation to build on. Until then everything just seems wishy washy floating out into infinite space. You could have simply used the negative and positive space by itself to reach the same conclusion, but I have found gradually chopping away unnecessary space makes judging the proportion and shape of the figure much more accurate.
If you aren't familiar with positive and negative space then simply put it is this: What we generally look at when trying to draw an object is the object itself which is the positive space. The negative space is everything else. However if you look at the surrounding space as an object itself it gives you another reference to analyze the proportion and shape of the contour.
Visualize it Already Drawn
I can't quite explain why this works so well, but visualizing it already drawn out on your paper in your medium really helps make accurate judgements . It is almost as if some part of you knows and can see what exactly is there and should be there, but the active conscious you is the one messing it all up. So visualize it already there. See it before you make your mark. This is especially helpful in judging contours.
Further Division
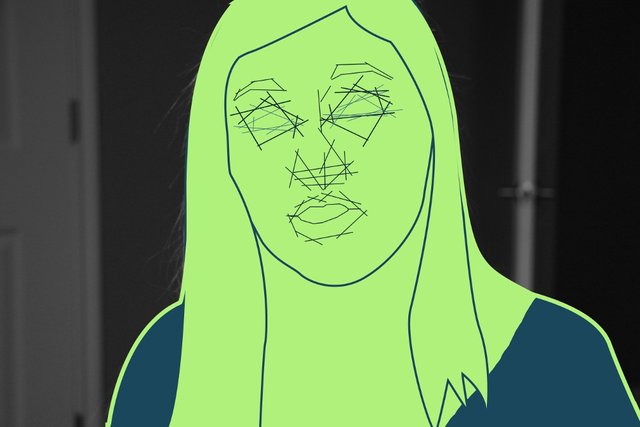
These measurements can be used to check against your original outline. These observations should also be happening at the same time you are placing the subject in the original 4:5 box. The measurements that are important at this point are placing the height of the chin and the lowest part of the lowest eye. You can see that the head is 1/2 the width of the entire box. Moving up from the bottom the face is divided roughly in thirds. The bottom third is the placement of the chin. The second third which is actually just over a third is where the bottom of the lowest eye is.
Chopping it Up
Now break up your main mass into the medium sized masses that are subservient to the largest mass. Simplify the curves into their respective angles.
Now you have your medium masses in place you can make them more naturally be translating your angles into curves and end up with something like this. 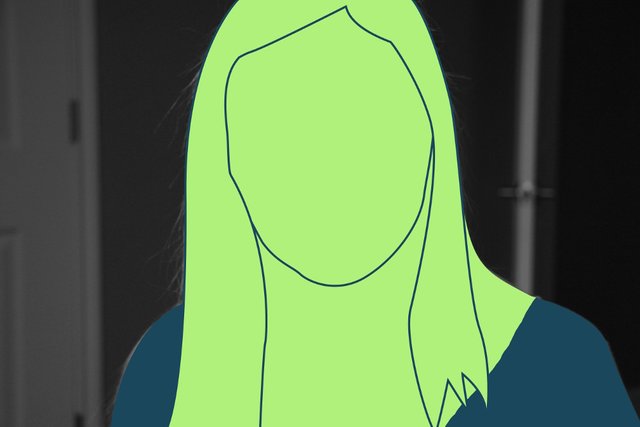
Placing Your Features
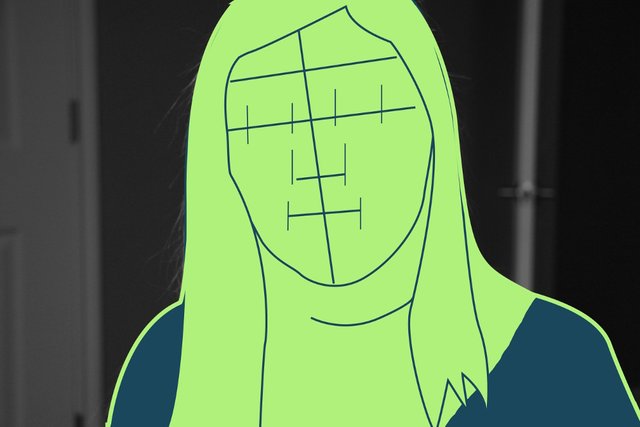
Since you know where your facial features will be packaged it is time to determine where they sit in the packaging. We know from earlier that the lowest point of the lowest eye is just above two thirds of the way up from the bottom. So you can place a mark there and determine the angle that best describes the relationship of the eyes to the face, or you could use horizontal guidelines to figure out how much higher the other eye is and determine the spacing of the eyes.
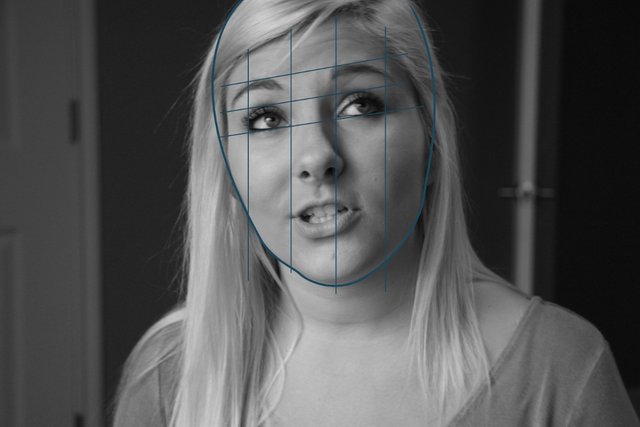
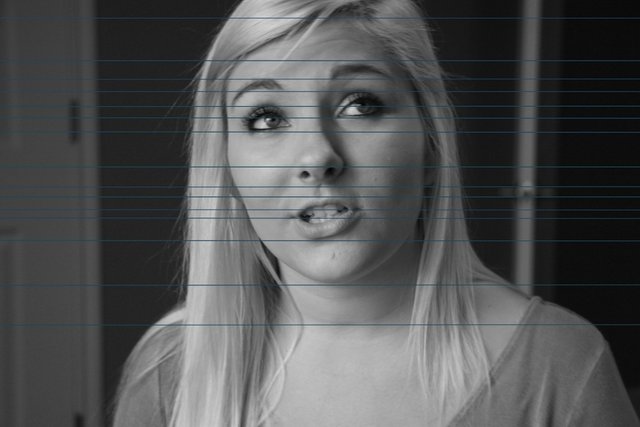
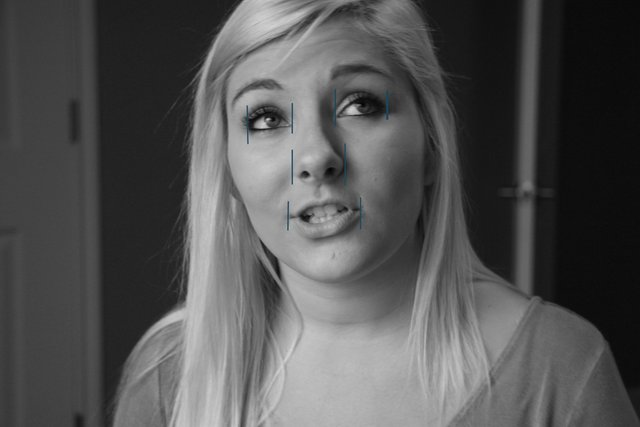
Horizontal and Vertical Guidelines
Use your pencil or some other straight edge to compare where features fall in space horizontally and vertically.
 Unit of Measurement
Using the eye as a unit of measurement you can see that the face is roughly four and a half eyes wide at the level and angle of the eyes.
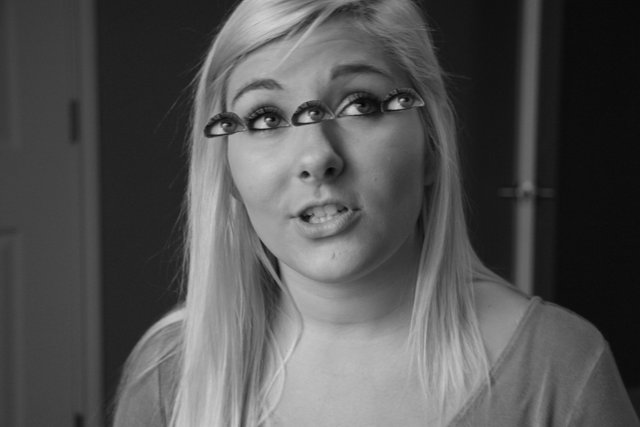 Once you have placed your eyes you can use a line running from the tops of each eyelid and measure two eyes down the axis of the face to find the bottom of the nose.
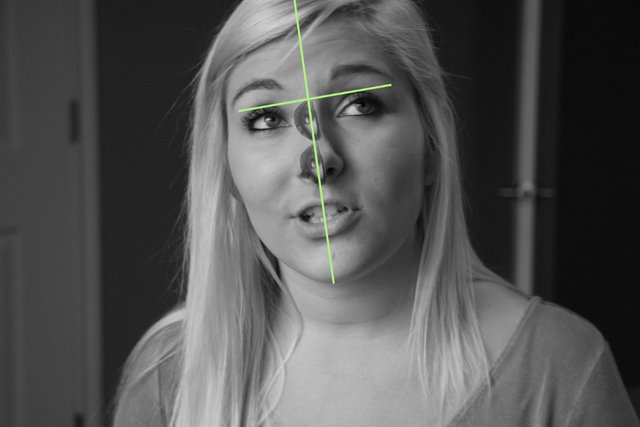
You can measure one eye up from the chin and find the lowest part of the bottom lip 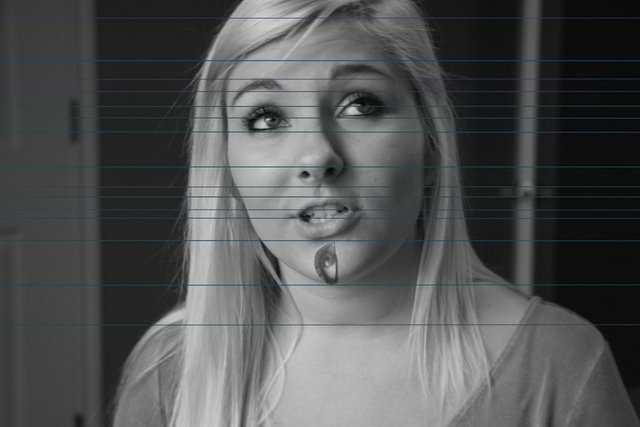
Finding the Lip by Angles
The reason I am not being very consistent about the way I am measuring things is to show you that there are multiple ways to arrive at the same place. The general idea is simply to start at the most general observations and work toward the most specific in order to have maximum unity. Also to show that you just have to put something true down and then you have the foundation to build the rest of the truth.
Running a line through to the outside corners of the eyes you can use the angle to not only find the center of the top lip but also reinforce the placement of the nose. Move 45 degrees down and to the right from the outside corner of the lowest eye. Then Move 35 degrees down and to the left from the outside corner of the highest eye. Where those two lines meet will give you the center of the top lip. A little higher up those same lines will give you the outside edges of the nose.
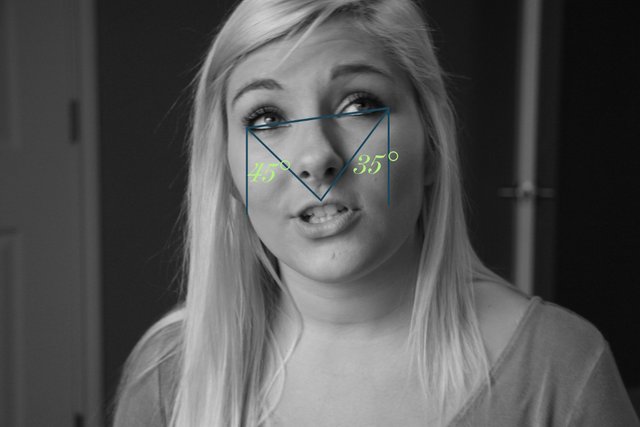
You can test those line by using the eye as a unit of measurement. The line coming from the lowest eye should be about two and three eighths of an eye. The line coming from the highest eye should be about two and a half eyes.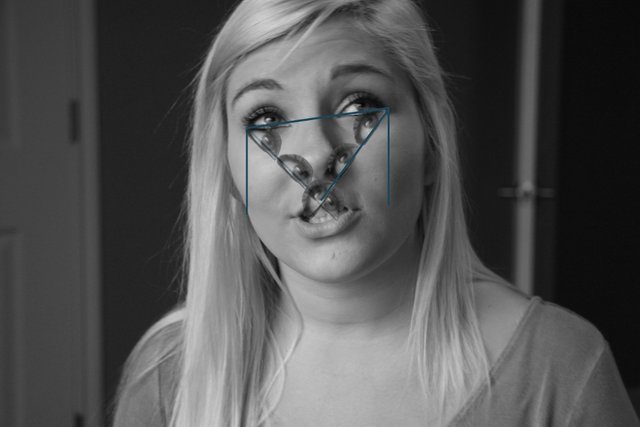
Feature endpoints
So using a combination of horiz./vert. guidelines, angles, eyes as measurement the main features start and endpoints have been marked. Now it is time to put those features in there.
Shaping the Main Features
Now that we know the start and endpoints of the features and everything is place it is time to shape it all up. This is no different than finding the overall outline of the body or earlier shaping out the medium masses. Now it is time to do the same to the smallest masses. Not only are you looking at the angles pertaining to each shape, but also the way that these lines relate to other features if they were to continue.
Translate those angles into their respective curves and add some shading and there you have it.

If you enjoyed this post I hope you upvote, resteem, and follow me. Comment with any insights, suggestions, questions, or complaints. If you know someone that needs to see this then send them this way.

SPEED PAINTING of My Latest Pet Portrait (VIDEO)
WINNING Practices for Your Art Business: If You Aren't Doing These Things You are Wasting Time and Energy
As An Artist How to Improve the Commission Process For You and Your Clients
You Get What You Pay For- How To Get The Most
Latest Commission- Charcoal Drawing
Latest Commission In the end of the Year Art Sale. See How Much You Can Save
Pelicans in the Sun- A Photo Series Of Last Night's Sunset
GREAT NEWS!!! Huge End of the Year Art Sale, and I am now accepting Steem and Steem Dollars
Portrait Painting Tutorial- A Walk-through of the "Cereal Killer" Oil Painting Series
Sketching on the Graveyard Shift- A Collection of Portrait Sketches
Photo Realism- Why I Am Done Simply "Recording" Images
Fluid Paintings Round 3 (with video)
W.I.P.- Oil Paint Portrait I am Working On
Migraine Madness- A Series of Oil Paintings Portraying Migraines
Fluid Paintings Round 2 (With Video)
Abstract Explosionism- Painting With Guns (With Video)
Fluid Paintings Round 1 (With Video)

 |
 |
 |


Interesting post. Very educational. A very beautiful sketch you got there.
Thank you
this is craziness such an amazing study!! and good to know such things it will help me in drawing faces
Glad you found it helpful. Stay tuned because there will be many more tutorials like this. This is basically a rough draft of what will belong to a larger resource that I am putting together for arists.
People ask me about how to do a number of these things on a regular basis. Way to condense and illustrate the information in a readable, repeatable manner. Re-Steemed for my art friends and followers. Upvoted and followed you today. Thanks for your inputs!
Glad I could help. I plan on refining this and adding quite a bit as the rest of the book comes together. Thanks for your support.
A very thorough article again.
It still feels a little incomplete to me, but I will fix that soon enough. I'm just trying to take consistent steps toward creating the resource I wish I would have had when I first got started with art.
I still haven't had the chance to watch those color mixing vids. I'm trying to set aside a whole day to just sit around and mix paint. Have a good one buddy
Wao...such an incredible article ... I love this and thamks for this .. Its gonna help many people with their artistic works
Thank you, and you are very welcome. Im glad to hear you found value here. Stay tuned there are going to be more resources for artists coming soon.
High quality post @art-mess , it deserves a bookmark!!!
Thank you
Great explanation. Props.
Thank you.
Again really good work :) Congratz Friend i m sure we will see you on top :) Just need time for it. Keep same like this
Thank You!
I am totally showing this to my kid. Thank you.
Up-voted, re-steemed, and followed.
Great. I hope it really helps. There is more on the way. Thanks for the support
Awesome post for sure!! Such an in depth study of how you can benefit from so much by practicing/abiding some rules and guidelines hehehe :D
Thank you. I thought it would be a good reference for those wanting a surefire way to improve their ability to analyze an image. Anyone with eyes and a means to measure can draw this way, but as I'm sure you know there are other, more "organic", ways to approach your subject that are accurate most of the time. Have a great day.