Tutorial (Godot Engine v3 - GDScript) - Physics (Verlet vs RigidBody)!
 Tutorial
What Will I Learn?
Hi, welcome back!
I posted an update last week to state why I'd not continued recently with any of my tutorials. This was due to a combination of real-life work and prototyping the Invader movement for the 'Space Invaders' clone (as being built in the Beginner's Tutorial set).
As part of the prototyping, I stumbled across several different types of Physics implementation; I'd assumed there was only one way to do 'gravity' physics, how wrong could I be?
Why did I even bother looking at physics engine? After all, Godot Engine has its own!
This statement is true, but for me, to accept and partially to understand how the engine works, I wanted to refresh my Physics understanding.
Further to this, I have a need to develop a few effects that won't rely on the inbuilt physics engine but rather, require a physics "feel".
Yes, the inbuilt physics engine provides an amazing capability, especially given it utilises hardware acceleration! I.E. If you export to the PC and you have a modern GFX card, it is going to calculate the physics way faster than any CPU code can!
IF however, you are building a game that is more 'Sprite' based; i.e. it does not rely on physics, creating a hybrid is hard! I.E. the "Space Invaders" clone would work as utilising the physics engine, but actually, it'd be overkill! (my opinion)
The game doesn't need all the collision detection and spatial awareness it contains. It is possible to hook custom code to it but there is a need to tread carefully. It is important to protect timings and avoid delays.
In a nutshell, the Physics engine is too heavyweight for the needs for this game; but is most likely appropriate for others!
In my search for Physics information, I stumbled on this brilliant youtube video - Coding for Maths tutorial! There are 3 parts, watch them all! The speakers' tone, speed and the quality of education are second to none! What are you waiting for?
Everything in that tutorial is reflected in the Verlet code below, that I've re-engineered into a Godot Engine usable form; I believe he is using Javascript in the video.
I don't wish to be called out for plagiarism, that is NOT my goal. Therefore, this material is attributed to the 'Coding for Maths' set.
However, I felt a need to provide this code in Godot Script form, because it will be used as the basis for several other tutorials, i.e. I have a swing/chain bridge type effect and a swinging rope! These could easily be adopted into a non-physics game (I have ideas for them! I.E. in the cut-the-rope form and a few platform type ideas)
By laying the foundations here, with the Box example that is in the video, I'm going to set out the principles for your use; if you do not have a need to use the out-of-the-box features!
I will also provide a detailed explanation of how to use the in-built Physics too! So you can see them and compare the difference. In that way, you can decide on whether the out-of-the-box capability is the right option! If you don't believe it is, you have other choices, please remember that.
Assumptions
- You have installed Godot Engine v3.0
- You are familiar with GDScipt
You will
- Add a Verlet Box
- Add an out-of-the-box physics box
- Add a GUI
Requirements
You must have installed Godot Engine v3.0.
All the code from this tutorial is provided in a GitHub repository. I'll explain more about this, towards the end of the tutorial. You may want to download this
Add a Verlet Box
Please watch the first and second video. I have re-engineered the code into Godot Script. You may download this from the GitHub repository (see below) or you will need to piece the following script together:
extends Node2D

onready var SCREEN_SIZE = get_viewport().size
A new VertletBox was created as a Node2D and a script added, hence the extends
The screen size is obtained when the Node is ready
var points = [
    { pos = Vector2(0,0), oldPos = Vector2(0,0)},
    { pos = Vector2(100,0), oldPos = Vector2(100,0) },
    { pos = Vector2(100,100), oldPos = Vector2(100,100)},
    { pos = Vector2(0,100), oldPos = Vector2(0,100)}
]
A dictionary, like the Javascript version in the tutorial is used to store the point positions; both current and old
var sticks = [
    { p0 = 0, p1 = 1 },
    { p0 = 1, p1 = 2 },
    { p0 = 2, p1 = 3 },
    { p0 = 3, p1 = 0 },
    { p0 = 0, p1 = 2, hide = true }
]
A second dictionary, to store the sticks (links between points) is used.
var smoothing = 5
var bounce = 0.9
var gravity = 0.2
var resistance = 0.98
var friction = 0.90
The environment variables are set:
- Smoothing being the number of iterations to allow the sticks and points to settle
- Bounce being the adjustment after a collision with a wall or floor
- Gravity being the velocity adjustment of a box down
- Resistance being the 'air resistance' as the box travels in the air
- Friction being the adjustment as the box travels over the floor
func _ready():
    pickThrow()
    calcSticks()
The ready function picks a velocity to move the box initially (i.e. throw it)
It then calculates the position of the sticks, placing additional entries into the dictionary, such as calculating the length between them
func pickThrow():
    randomize()
    points[0].oldPos.x = randf() * 250.0
The pickThrow function sets the x-axis of the old position of the first point to some random value; this forces the 'sticks' to shuffle themselves and causes an initial momentum
func calcSticks():
    for stick in sticks:
        stick.p0 = points[stick.p0]
        stick.p1 = points[stick.p1]
        stick.length = stick.p0.pos.distance_to(stick.p1.pos)
        $Frame.add_point(stick.p0.pos)
For each tick, get the distance from the first point to the second and store it back in the dictionary as well as adding the point to the child node named "Frame" (which is a Line2D Node). The Line2D does exactly what is in its name, by constructing a line or set of lines based on configured points; therefore each required point is added to it (5 of them) resulting in a box to be formed
 func _process(delta):
    updatePoints()
    for i in range (smoothing):
        updateSticks()
        constrainPoints()
    renderFrame()
The frame process function is identical to that in the video tutorial. The points are updated, the sticks and points are allowed to sort themselves out over a number of smoothing iterations. Finally, the frame is rendered
func updatePoints():
    for point in points:
        applyMovement(point)

func applyMovement(point):
    var velocity = calcVelocity(point)
    point.oldPos = point.pos
    point.pos += velocity
    point.pos.y += gravity

func calcVelocity(point):
    var velocity = (point.pos - point.oldPos) * resistance
    if int(point.pos.y) == SCREEN_SIZE.y:
        if int(point.oldPos.y) == SCREEN_SIZE.y:
            velocity *= friction
    return velocity
The updatePoints function is spread across three. The first loops through each point and calls the applyMovement (easily deduced)
The applyMovement then calls the calcVelocity function, to do exactly that! The current position is stored in the old. The velocity is then added to the pos and Gravity is added on top (as per the video explanation)
The calcVelocity function uses the Verlet way to calculate the velocity by subtracting the old position from the current position and multiplying it by any air resistance. A check is made to determine if the point before and now, where touching the floor, if so, apply the friction! I.E. if the two are the same as the screen height, it must have travelled along the floor and no vertical movement was had.
func updateSticks():
    for stick in sticks:
        var d = stick.p1.pos - stick.p0.pos
        var distance = stick.p1.pos.distance_to(stick.p0.pos)
        var difference = stick.length - distance
        var percentage = difference / distance / 2
        d *= percentage
        stick.p0.pos -= d
        stick.p1.pos += d
The first function in the smooth iteration readjusts the sticks to ensure their lengths comply; as per the video
func constrainPoints():
    for point in points:
        screenBounce(point)

func screenBounce(point):
    var velocity = calcVelocity(point)
    bounce(point, "x", SCREEN_SIZE.x, velocity)
    bounce(point, "y", SCREEN_SIZE.y, velocity)

func bounce(point, axis, size, velocity):
    if point.pos[axis] >=0 and point.pos[axis] <= size:
        return
    rebound(point, axis, size, velocity)

func rebound(point, axis, size, velocity):
    point.pos[axis] = (size if point.pos[axis] > 0 else 0)
    point.oldPos[axis] = point.pos[axis] + velocity[axis] * bounce
The second part of the iteration ensures points remain onscreen; with a bounce, as per the video
func renderFrame():
    for i in range (sticks.size()):
        $Frame.set_point_position(i, sticks[i].p0.pos)
After the smoothing iterations, the final call is to render the points. This is achieved by setting the original positions in the child Line2D Node (Frame) to the newly calculated positions. By doing so, the rectangle moves and is shown onscreen.
The new Scene VerletBox can be attached to any display scene and it will fall to the ground as expected.
As stated, the BEST explanation is provided in the video; so please do watch that.
I've provided this code to demonstrate how it works in Godot Engine. I'm going to return to this over the next few tutorials but felt readers should become familiar with this technique. There are others, but I like how it is explained. Taking its concepts, transferring them into Godot's becomes easier.
Add an out-of-the-box physics box
To implement a box in the physics engine, a few new Node types have to be used and learnt. Let's start from the beginning!
The documentation is a good place to look.
We will create a RigidBody Node, that will fall to the floor with physics, i.e. as did the Verlet Box.
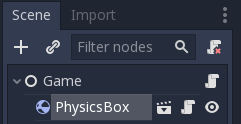
Create a new Scene and add a RigidBody as the root Node and name it what you like (I called mine PhysicsBox):
As you can see, we also need to add a CollisionShape2D next. This is mandatory because a little yellow triangle is shown in the RigidBody until one is. The collision shape defines an area that is used to determine a collision; without it, physics doesn't work in the engine! This is the distinguishing point I'm making between Godot's out-of-the-box engine and the Verlet implementation. Godot requires specific Nodes to work.
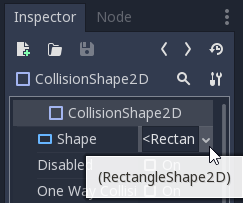
Add the CollisionShape2D and then look at the Inspector:
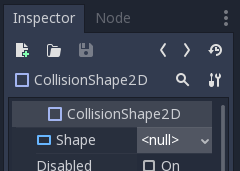
Click the Shape property and select RectangleShape2D:
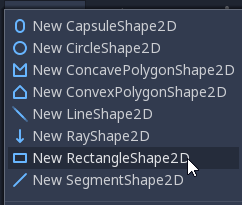
As you can see in the options, you can define the shape as a Rectangle, Circle, Capsule or even define a convex or concave shape. Your choice should always reflect the shape you are adding to the real world. When their shape areas overlap, collisions occur, hence they should encapsulate the image perfectly!
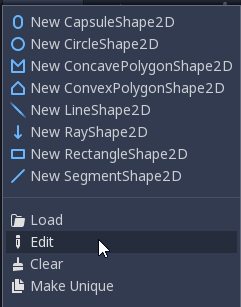
Now the RectangleShape2D is added, we need to define the size of the shape, thus click the pull-down option on the right:
..and select Edit:
Please edit the extent and set it to 50 x 50 (the size is half the final size):
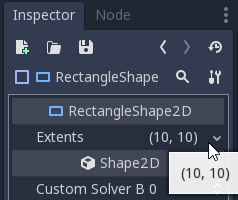
We will define a 100 x 100 pixel Box, thus 50 x 50 is the correct extent.
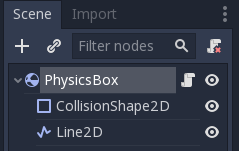
Finally, we need to add the Line2D shape. This could be a Sprite or another Node2D, but this matches the Frame Line2D shape in the Verlet Box Node.
When added, go to the Inspector and click on Points property that shows Vector2:
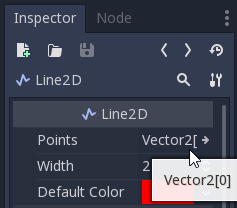
This will open a second panel that allows us to define 5 points. Set the size to 5 and provide the following configuration into the array:

If you click the RigidBody node and look at the 2D View:
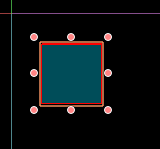
You should have a box outline with a shaded centre (the collision area). Mine is red and has a thin border, as I set these in the Line2D Inspector window.
Congratulations, you now have a Godot Engine Physics node! If you drop it into a Game Scene, watch what it does:
..oh! It drops from the sky and disappears off the bottom of the screen!
The Godot Engine does not have a 'Floor' per say. It is open-ended for developers to use as they see fit.
Walls and Floors
If you need a floor or walls; or both, you will need to build them with other physic Nodes!!! Hence why there is one readily available, known as StaticBody2D!
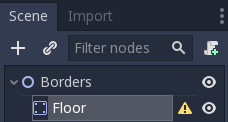
We're going to create a floor and the left/right borders. Open a new scene and add a Node2D as the root Node (I named mine Borders). This is what we want to form:

What you are looking at, are three strips of Static Bodies, which ensure no moving Physic's bodies shall pass by them; i.e. they act like lines of bricks!
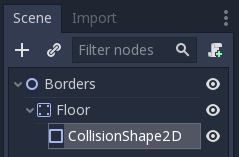
Add a StaticBody2D and name it 'Floor'. You'll note a yellow triangle appears (again), to let you know you need a Collision Shape:
So, let's add one:
As with the Collision Shape for the Box, set it to Rectangle and set its extent to 512 x 10 (half of screen width and we'll have a wall of 20 pixels in height)
Finally, set the Position property of the Floor StaticBody2D to 512 x 610:

The Body will then appear below the bottom of the screen, but perfectly in parallel to it.
Try adding the Borders Scene to the Game Scene, like so:
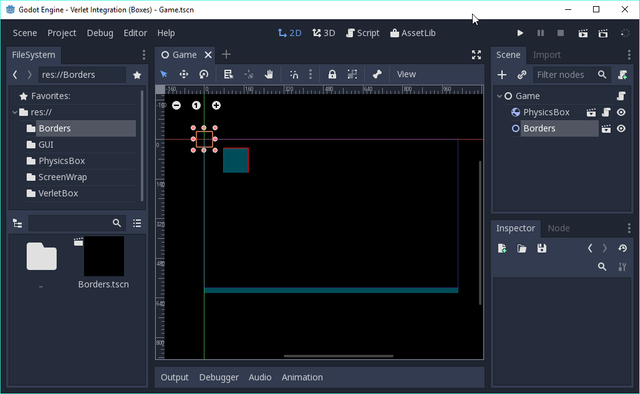
Try rerunning the Game:
The box now bounces nicely!!! The Floor is doing its job.
Throwing the box
In the Verlet box code, a throw function ensures that each new box receives a slightly different speed and direction, each time. Let's implement this in the RigidBody2D Box. Please attach a Script and add the following code:
extends RigidBody2D

func _init():
    angular_velocity = randf() * 5.0
    linear_velocity = Vector2(randf() * 700.0, 0.0)
Extend the RigidBody2D class
Set the angular velocity (spin) to something between 0.0 and 5.0
Set the linear velocity (direction) to something between 0.0 and 700.0 pixels per second in the horizontal axis and default vertical to zero.
Rerun the game:
...ah! We need borders on the Left and Right, or the box drops off!
Add Left/Right Borders
Two more Static Bodies should be added to the Borders Scene, much like that for the Floor. I'll let you figure this out, but here are the details:
- Left : Extents (10, 300) and Position of (-10, 300)
- Right : Extents (10, 300) and Position of (1034, 300)
NOTE: DO NOT BE TEMPTED to duplicate the floor Node to make the other two. If you do, they all inherit the same CollisionShape2D, which is elongated for the floor width; therefore they will not work in the borders. You need to add each of these individually (or you can duplicate the LeftBorder to make the RightBorder if you wish).
This now works:
... you can just see the box bouncing off the right border!
Add a GUI
Given we now have two different forms of Physics, we 'could do' with a GUI. I.E. several buttons that can be clicked to produce a random Box and another to clear them!
Create a new Scene and name it GUI. Add three 'Buttons':
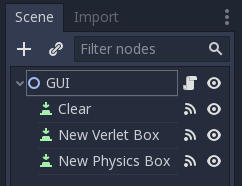
Name them as I:
- Clear
- New Verlet Box
- New Physics Box
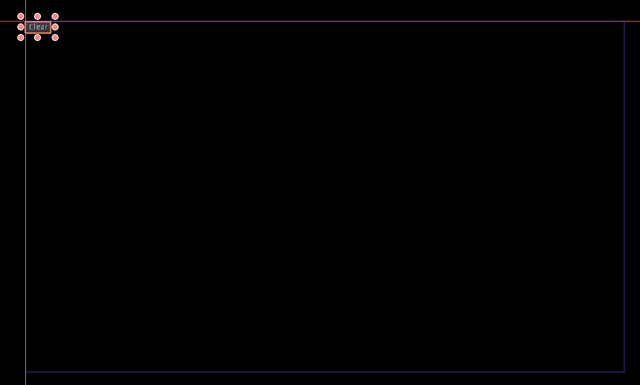
Set their Rect properties as such:
- Clear - (0, 0)
- New Verlet Box - (100, 0)
- New Physics Box - (300, 0)
Click the Clear button and set its text to 'Clear':

This is what is shown in the Game:
Attach an empty Script to the GUI Node and then we will wire the 'clicked' function from each button to the GUI Node script.
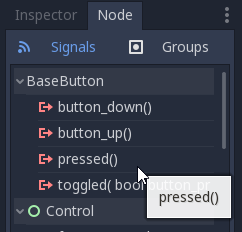
In the Inspector pane, switch to the Node table and double-click the pressed() function:
A new window will pop-up, asking you which Node to connect to, so select the GUI:
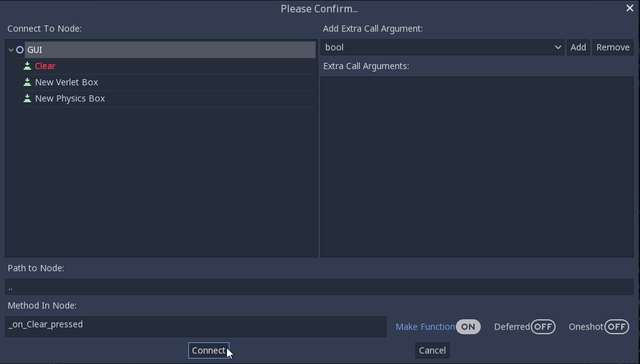
...and click the 'Connect' button.
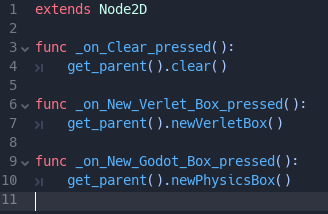
The script of the GUI Node will open, with a new function _on_Clear_pressed() added. Let's set it to call its parent's clear function.
In the other two buttons, connect their pressed() functions in the same way. The script should then look like this:
We now need to add the GUI Node as an instance to the Game Node and add these three functions into its own script:
extends Node
Extend a base Node
const VERTLET_BOX = preload("res://VerletBox/VerletBox.tscn")
const PHYSICS_BOX = preload("res://PhysicsBox/PhysicsBox.tscn")
Declare constants that have preloaded the two Box Scenes
func clear():
    for box in $Boxes.get_children():
        box.queue_free()
The clear function looks for all children of the Boxes Node2D Node (you need to add this). By adding this Node, we can ensure all new Boxes are added to it with the safe knowledge that if we remove any child, we clear ALL of them. If you cleared the children of the Game Scene, we'd remove the GUI and Border Nodes!
func newVerletBox():
    $Boxes.add_child(VERTLET_BOX.instance())
The newVerletBox creates a new Verlet Box and adds it to the Box node
func newPhysicsBox():
    $Boxes.add_child(PHYSICS_BOX.instance())
The newPhysicsBox creates a new Physics Box and adds it to the Box node
Try rerunning the game:
The different types of boxes get created!
As you should see, the Godot Physics Nodes interact with each other, via collisions! That's the purpose of them. If you want collisions, this implementation is EXACTLY what you need.
For the 'Space Invaders' clone, we require a simple Sprite based system that is under our complete control; in terms of their position and collision. Using the Physics engine 'could' work, but it would introduce complexity that is not required. We 'could' adopt a hybrid solution, but this too would be more complex than simply designing a Sprites with Area2D's solution; much like the bespoke Verlet physics code.
Don't be afraid of doing your own thing; but do assess inbuilt features first, before you dismiss them entirely!
Finally
This tutorial has taken me much longer than I expected!
I hope it provides you lots of useful information.
As stated, I intend on expanding this code, deriving a 'chain bridge' and 'swinging rope' example.
Hopefully, you've watch the principles of the Verlet Integration in the brilliant youtube videos!
Please do comment and ask questions! I'm more than happy to interact with you.
Sample Project
I hope you've read through this Tutorial, as it will provide you with the hands-on skills that you simply can not learn from downloading the sample set of code.
However, for those wanting the code, please download from GitHub.
You should then Import the "Verlet Integration (Boxes)" folder into Godot Engine.
Thank you for the contribution. It has been approved.
You can contact us on Discord.
[utopian-moderator]
Hey @sp33dy I am @utopian-io. I have just upvoted you!
Achievements
Community-Driven Witness!
I am the first and only Steem Community-Driven Witness. Participate on Discord. Lets GROW TOGETHER!
Up-vote this comment to grow my power and help Open Source contributions like this one. Want to chat? Join me on Discord https://discord.gg/Pc8HG9x
I just found your Godot tutorials, they are absolutely fantastic! I've been wanting to learn Godot for a while now and these are exactly what I need. You're clearly investing a lot of time on these, Thank you.
Oh, that's fantastic news! I don't get much feedback, other from the Mods. Welcome, and do let me know if you want me to touch on specific topics. I'm new in relative terms (just under a year invested) to Godot, but I'm extremely pleased with it.
I'll let you know if there's any requests that come into mind once I finish going through all of your tutorials. Keep making them please, Godot tutorials are great. Especially now with the release of Godot 3.
Follow, I follow back, let's support each other 😊
I'm surprised by the number of votes on this Post, so thank you! I've tried to fix some of the grammar mistakes, but I'm sure there are plenty more.