Tutorial (Godot Engine v3 - GDScript) - Move your Sprite!
.png) Tutorial
Tutorial

What Will I Learn?
This tutorial builds on the last tutorial that explained how to create your first Sprite!.
I shall show you how to add scripts to your Sprite and make it whizz around the Screen!
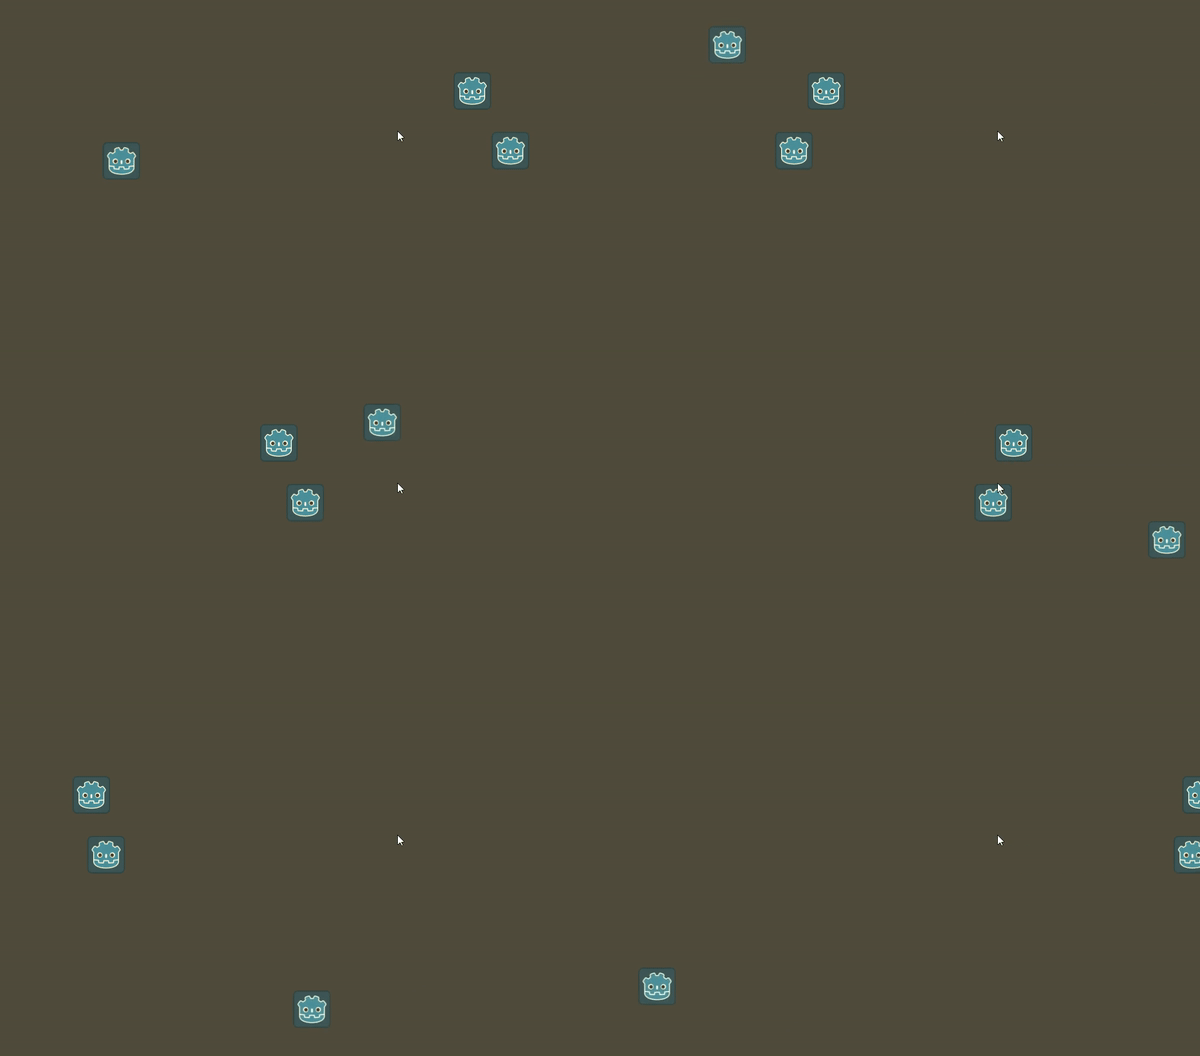
This is MUCH more exciting than the last tutorial!
Assumptions
- You have installed Godot Engine v3.0
- You've completed the previous tutorial to create your first sprite and that you understand how Scenes and Nodes are constructed
You will
- Become familiar with high-level concepts of programming; base concepts
- Understand how to find the Godot Engine Script (GDScript) documentation
- How to add a Script to a Node
- Make a Sprite fly off the screen
- Make a couple of Sprites bounce of the side walls of the screen
- Make a new Sprite bounce of the four walls of the screen
Requirements
You must have installed Godot Engine v3.0.
All the code from this tutorial will be provided in a GitHub repository. I'll explain more about it, towards the end of this tutorial.
High-Level programming concepts
I've been programming for over 38 years now! I started way back when I was fast heading towards double-digit age, having received my first computer, an 8-bit Commodore Vic-20. I'd been nagging my parents all year until I finally received it for Christmas! From that moment on, my life has been dedicated to bits and bytes. I love everything about computers, but mostly, games!
Programming, requires dedicatation. It's a Skill that you have to learn through practice. ...and Practice, practice, practice! Much like learning a foreign language or a musical instrument, it requires dedication and a LOT of hard work.
I managed to learn with limited resources! I waited eagerly every month for the next issue of the Computer and Video Games magazine, in the hope it would bring me another game listing to type in and learn from, or for an article explaining how to program a particular feature. How the world has changed with the internet!
I received a solitary book with the machine, along with a few tapes. In the space of a year, I'd written my own interpretation of Pacman; with keyboard characters for the graphics and random ghosts (I had no idea about AI at the time, so they were entirely jittery and tended to stay in just a few spots).... but boy, did I have fun?
As you are reading this, let me reassure you of one thing. If you persevere by trying and then trying again, you will learn to code! The best way to learn is remember the old adage of try, fail, learn and then try again!
Computer languages have not really changed in the last 38 years; a bold statement! Much like music, there are new tastes, flavours and specialities, but they all work in a similar way! That's because the computer chips fundamentally work in a few standard ways that have not changed; albeit, some now have clever functions that make them appear to be far more excotic than they really are.
I'm going to break these languages into a few basic building blocks that once you understand their main purpose, learning specifics about them becomes so much easier (or so I personally believe):
If you understand the basic art of programming, please feel free to skip to the GDScript documentation section
Variables
A computer is simply a glorified calculator. It works by processing Bits. Bits are used to represent a human form of a number or language letter (for example), but the computer can only recognise them as pulses of electricity across copper connections or as magnetic +/- charges, store in a storage components.
Bits form things such as Bytes or Words; again, these are human terms that are used to give meaning to what the combination of Bits represent. The number of bits in them dictate how big a value they can hold (their length is their limit). You really don't need to understand this specifically for now, but you should be aware that as a concept, these exist. Each is termed a 'type', a representation type, for example a byte holds 8 bits, which can represent 0 to 255 (i.e. 2^8 or 11111111). The byte can also represent characters on a keyboard, because it is large enough to do so, i.e. 32 in byte represents 'a' and so forth.
What you do need to understand is that eventually everything has to be stored in Memory. Memory holds the data of your executing program. Turn the computer off, and you lose the volatile memory, hence your program's working memory is lost forever (actually, even this is changing, but let's not go there)!
In programming, memory areas are termed Variables.
Variables are like a post box; allocated a unique address and given space to store content, i.e the letter or letters sent to it will be deposited into it and kept for safe keeping until it is opened and the items within, retrieved.
In Godot Engine, as well as most (if not all) other languages, there will be support for:
- Integers : whole numbers
- Floats : numbers with fractions
- Strings : a length of characters that are often alphanumeric (but not limited to)
- Boolean's : is a truth holder, i.e. it will hold a true or false value; often represented as 1 or 0
- Null : an absence of a value
- Many others
The Godot Engine team have provided excellent documentation, therefore I do not plan to rewrite what they have given you!
Instead, please click through to the documentation and search down for "Basic built in-types".
The final note on variables, I'll touch on Scenes and Nodes further down. However, think about them for a minute.
...what do you think they are?
Computation
All computers, like calculators perform Calculations. They use values held in variables to calculate results, i.e. to add or subtract, to determine if something is logically true or false, or simply to append another character to the end of a word string.
Logic
Computers LOVE logic! They are well versed in being able to check if something is True or False; given they are told HOW to determine the fact. After which, they can easily act on that determination.
Please look at the operator list, which includes things such as & (and), | (or) and == (equals comparison)
Conditions
Have you ever wondered why computers are classed as dumb calculators but are capable of mimic'ing many aspects of human behaivour, such as Alexia or Siri? If you were to look under the covers of this impressive technology, you'd only find code that simply makes a True / False decision, based on facts presented to it at any given moment in time.
In programming, these are often termed 'IF' / 'THEN' / 'ELSE' statements.
for example, if 'sky' == 'blue' then 'be happy' else 'be sad'.
Please become familiar with the IF statement
Loops
The power of computers is in its ability to avoid getting bored! It loves monotomy! Hell, it lives to go round and round in circles. Languages have looping constructs, so that a game can loop over and over and over again in a Runner, Shooter or any other game you can think of. It's the speed and precision to do this, makes computers more reliable than humans, at times.
In GDScript, you should become familiar with While and For loops.
GDScript documentation
The Godot Engine team have provided excellent documentation for GDScript.
Please refer to this single page for all the basic information you will need, for now, of the scripting language.
There are a LOT more concepts than I've touched on in the High-Level concepts above. There is one that I've avoided, Scenes and Nodes. I asked you to think about these in the above concepts.
Classes are a description of an Object, that can be created at execution time. I.E. in the editor, you added a Sprite. The Sprite Object that shows at execution time is constructed from the Sprite Class (a Blue-print as it were). The Class may contain Script, references to Textures as well as to other Classes. Given this, Nodes and Scenes are constructed Classes at run-time.
A Class is like the receipe instructions for your favourite food dish (of your chosing). The receipe lists what is required, how to mix the ingredients, how long to cook for and how many it will serve. In programming, this is identical. The Sprite class has this recipe:
- Requires a Texture image (which you supplied).
- It had a Position that you could alter (a property variable)
- Has many other features, yet to be touched on, such as rotation, opacity, etc
The next sections will start to touch the recipes of the Sprite. By making it move, by adding Scripts to it's formula and then for you to see the effects at at execution time.
Add your first Script to your first Node
Finally! After all that, we'll do some coding! Let's make things flash around the screen, as that is far more rewarding than reading (writing for me)!
I recommend you go to the file system, copy your last project folder into a new folder. Name it 'Moving Sprite' and then import it into Godot Engine (you should be able to do this by yourself now). By copying it, you preserve your last work, which is a good habit to get into.
In the editor, we should see the sprite:
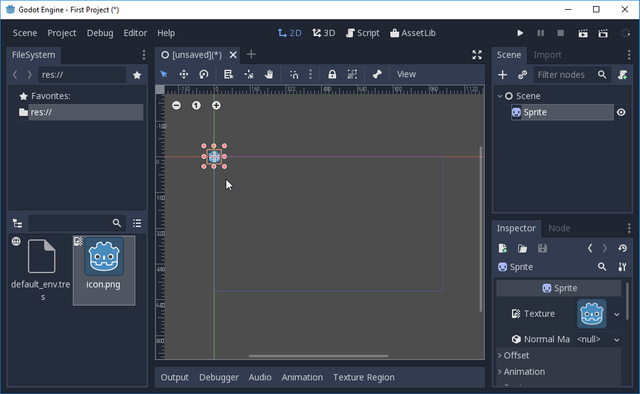
Drag the Sprite into the middle of the screen, to ensure it is centered (ish).
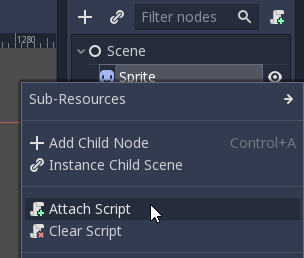
In the Scene & Node panel, right click the Sprite and select Attach Script.
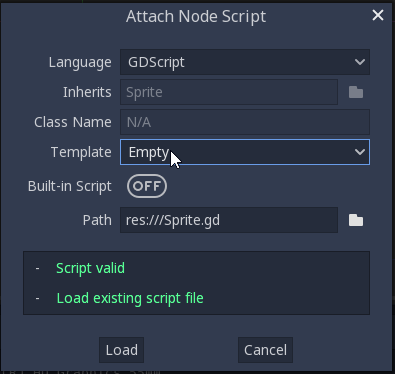
The Attach Node Script dialogue will appear.
Please ensure you click the Template option and change it to Empty before proceeding
Finally, click the Load button.
The view will change to the script and you should see the following:

If you have more lines than this, you failed to set the template option to Empty. Don't panic! Simply delete all the lines up to the Extends line at the top, i.e. you need a single line
The Extends simply tells the Script that we are using a Sprite class (i.e. extending it).
You need to add the following lines (cut and paste in, BUT, there will be something for you to check, further below):
var direction = Vector2(10,0)

func _process(delta):
    position += direction
Once pasted in, you should see this:

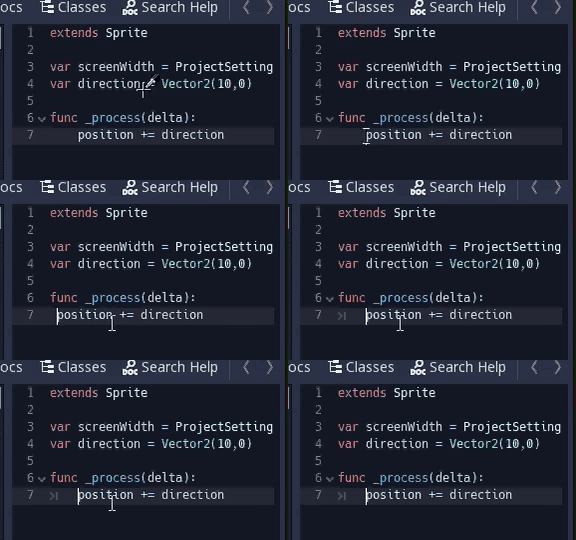
NOTE: scripting has a specific requirement that is often broken by cut and paste. If you look in the above screenshot, line 7, you need a tab character
If the character is missing in that line, you need to delete all the spaces proceeding the word 'position' and then press tab once to correctly to indent the instruction to the correct place. All lines must be indented correctly with tabs, because the indentation instructs the script as to the context of the instructions. Please get familiar with checking for these tab markers in the script.
Let's execute the script. What happens?
... For me, it goes whizzing off the screen:
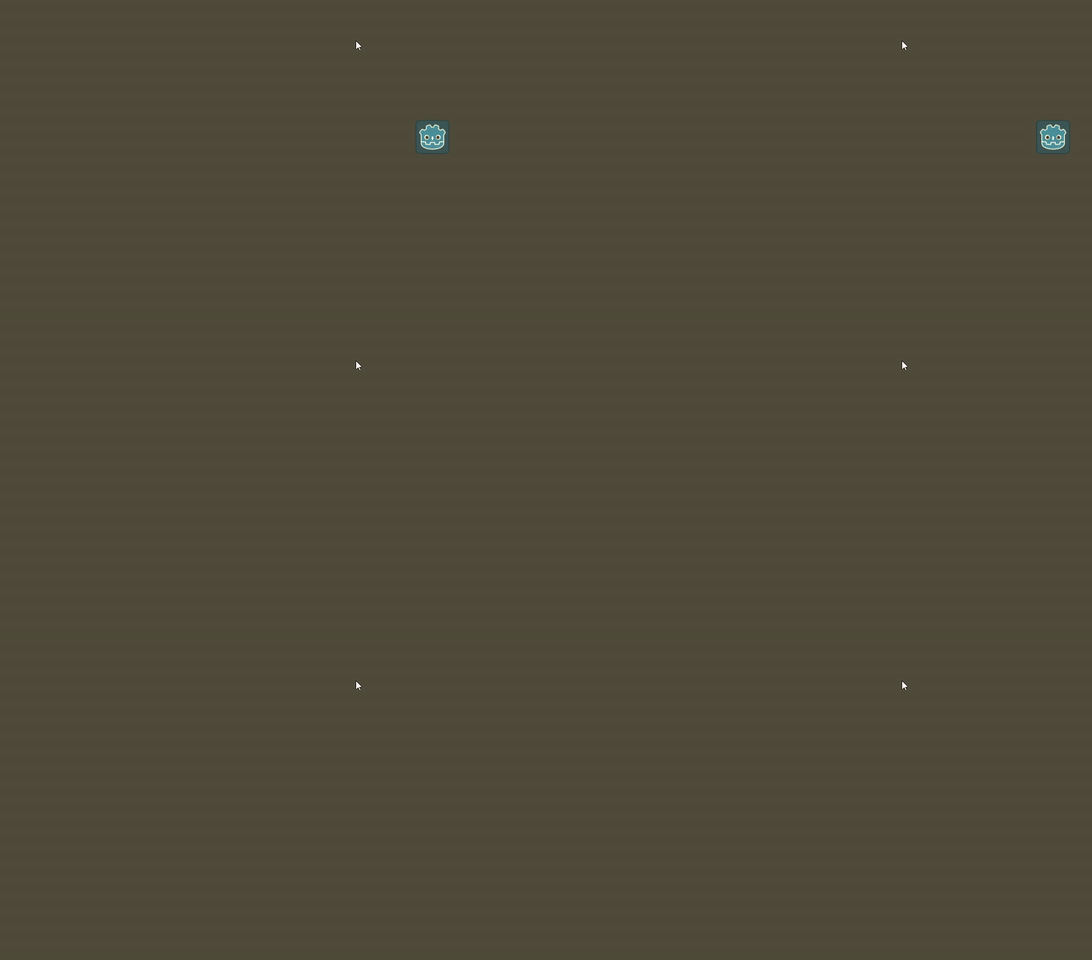
In fact, what that sprite is doing, right now, is continuing to move to the right! It's still moving, as I type; well until that is, I click the Stop button in Godot Engine or I close the game window.
Let's examine the script:
- Line 1 is the extends statement, for which defines this script as extending a Sprite
- Line 3 creates a variable named direction and is assigned a Vector2(10, 0) value. A Vector2 is a mathematical structure for holding an (X,Y) coordinate; consider how graphs function.
- Line 5 is known as a Function (func for short). A function is a group of instructions that perform a specific task. In this example, process(delta) is a built-in function that all Nodes inherit. It is automatically called by Godot Execution regularly, therefore the function is called multiple times. The delta in brackets is an incoming variable that can be ignored for now.
- Line 6 adds the direction to the Sprite's position variable (found in the Node Inspector under Transform)
In essence, the Godot Engine regularly calls the process function, which in turn, simply adds the direction (which is +10 units in the X coordinate) to the Sprite's position; hence it goes whizzing off on the right hand side of the screen, never to be seen again!
This wont do, let's get control of that sprite!
Bounce sprites off the Screen walls
Make sure you close the execution window first, or your changes will not save!
In the editor, let's duplicate the first sprite by right clicking the Sprite and selecting duplicate from the pop-up menu.
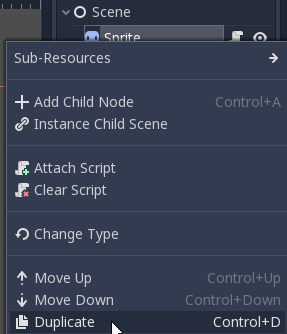
If you look back at the 2D view, you'll find the second Sprite is positioned directly over the first one. That's because it made an identical copy of the first, including its position, the texture reference and even the script you gave it!
Move the new Sprite to a different place on the screen and re-execute the code.
They should both go whizzing off the screen, in parallel! Which is good, because it proves you now have an exact copy, but our goal is to make them bounce off the walls of the screen; as if we've just fed them some sugar!
Open up the script of Sprite2 by clicking the open script 
icon.
I need you to amend the script to look like:
extends Sprite

var screenWidth = ProjectSettings.get_setting("display/window/size/width")
var direction = Vector2(10,0)

func _process(delta):
    position += direction
    if position.x >= screenWidth or position.x <= 0:
        direction = -(direction)
It should look like this in the editor:

Remember those tabs are important! IT is painful having to fix that after a paste, but that's how this editor and script require it.
Try running the script again, what happens?
... Yes, they should now be bouncing off the walls! Let's examine the code
- Line 1 remains as-is.
- Line 3 is a new variable named screenWidth (no prizes for guessing what it will hold!) and is filled with the setting value from the Project Settings panel (I refer to this in the last tutorial). The display/window/size/width has the concrete value for the width of the screen when it opens (try changing it in the Project Settings window!)
- Line 4 is the same direction variable.
- Line 6 is the same function process_.
- Line 7 still adds the direction to the Sprite's position.
- Line 8 is a new condition. It checks the Sprite's x position to see if it crosses either side of the screen (i.e. 0 - left or screenWidth - right)
- Line 9 is indented (tabbed) in from Line 8, therefore this will only execute if the previous line was true. When true, it reverses the value in direction, i.e. it switches from (10,0) to (-10,0) and back to (10,0) and so forth, each time the sprite touches a border.
Both sprites now do the same thing, because the second Sprite was a duplicate of the first. They could be given different behaivour, if the second Sprite had been created as a new Sprite and given been given its own script; but you can see that one simple script is able to make two independent sprites move independently.
Let's add a new, independent Sprite! Let's give it the capability to bounce of all four sides of the window!
Bouncing Sprite off four walls of the screen
Please:
- Right click the Scene and add a new Sprite (as instructed in the previous tutorial); which will become Sprite3 (or you can rename it).
- Drag the Sprite to a position on the screen.
- Drag over the texture to the sprite (as per previous tutorial).
- Right click the new Sprite and Attach a New Script.
You'll then want to paste the following script in:
extends Sprite

var screenHeight = ProjectSettings.get_setting("display/window/size/height")
var screenWidth = ProjectSettings.get_setting("display/window/size/width")
var direction = Vector2(-5,-2.3)

func _process(delta):
    position += direction
    if position.x >= screenWidth or position.x <= 0:
        direction.x = -(direction.x)
    if position.y >= screenHeight or position.y <= 0:
        direction.y = -(direction.y)
The code should look tabulated like the following screenshot:
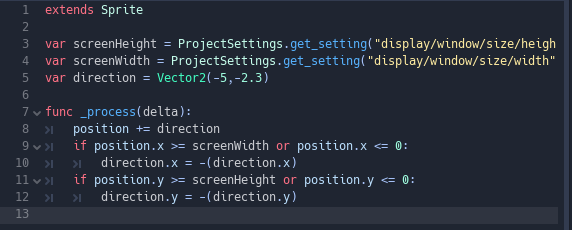
Try running now! What happens?
... You should see the original two Sprites bounding of the side walls, and the new one should bounce around the walls in a clockwise motion.

Let's examing the code, to understand what is happening:
- Line 1, still extending a Sprite.
- Line 3, this retrieves the Screen Height and places it into screenHeight variable.
- Line 4, is the retrieval of the screenWidth.
- Line 5, is the direction for which I've altered the speed and direction.
- Line 7, remains the same process function.
- Line 8, adds the direction to the Sprite's position.
- Line 9, checks the Sprite's x position as to whether it hits a border.
- Line 10, if it does, the direction in the x coordinate is reversed.
- Line 11, as with Line 9, but a check in the y position (top/bottom borders).
- Line 12, if the top or bottom borders are touched, then the direction in the y coordinate is reversed.
I hope that this is starting to make a little sense to you, it should do, with practice!
You are seeing the Sprite being used to it's full potential!
It exposes variables (such as position) which can be updated by the script. That position happens to be a Vector2, i.e. has an X and Y on the screen. We are merely updating that with a new X and Y direction. When the Sprite touches a border, we determine which was crossed and reverse the direction of the associated coordinate (i.e. Left and Right are X and Up and Down are Y).
Try experimenting:
- with the direction value, you should be able to get different speeds, by increasing and decreasing the values.
- with the direction you should be able to change the direction to anti-clockwise.
- Add another duplicate Sprite
- Add another new Sprite and try some of your own experiments?
- See if you can hide a Sprite (Hint, look for an Eye icon next to the Sprite!
That's all for this time, but I hope it has fired you up for writing scripts!
In the next tutorial, i'm going to show you how to dynamically allocate a block of sprites. I'm going to guide you through the creation of a simple 'Space Invaders' clone. The first objective will be to plot the Invaders in their tight formation and instructing them to move and drop on each border; go ahead and think about the problem yourself, if you like! You could manually add the formation for now.
Sample Project
I hope you've read through this Tutorial, as it will provide you the hands on skills that you simply can't learn from downloading the sample set of code.
However, for those wanting the code, please download from GitHub.
You should then Import the "Move Sprite" folder into Godot Engine.
Finally
I hope this tutorial is of help to you.
My next article will explore the concept of creating Sprites by script! We'll aim for a pack of Space Invaders being drawn and make them gradually work their way down the screen.
Please do feel free to comment and ask questions! I'm more than happy to interact.
Other Tutorials
Beginners
Competent
Posted on Utopian.io - Rewarding Open Source Contributors


This is great, it's just a shame 3.0 doesn't work on my laptop, haha. I think I've already got the basics of movement down in Godot (with a Kinematic2D sprite, at least), but I'm definitely going to look back over this and see what I can get working in my version the next time I'm playing around with Godot.
Thank you for this, Godot can never have too many tutorials and I'm delighted to see some here on Steemit.
Hi, dagda,
Great to hear from you. I'm enjoying writing these tutorials. Trying to find the right level of the pitch is difficult though. I.E. I think this one is a little too basic. I will touch on physics at some stage. I just want to show the real basics right now. How do you do X or Y to get Z. It's a shame about he laptop! Is there a bug or is it not modern enough?
You shouldn't worry much about being too basic, there's always going to be someone who might benefit from it. I still have to look at basic tutorials to remind myself about what I'm doing, why I'm doing it, and how it works.
Yeah, my laptop is fairly old and wasn't all that great to begin with either, haha.
Thank you for the contribution. It has been approved.
Seriously, whenever someone asks me for a an example of what a tutorial series should be I will refer to yours! I will say it again; keep up the amazing work!
You can contact us on Discord.
[utopian-moderator]
Hey @sp33dy I am @utopian-io. I have just upvoted you!
Achievements
Suggestions
Get Noticed!
Community-Driven Witness!
I am the first and only Steem Community-Driven Witness. Participate on Discord. Lets GROW TOGETHER!
Up-vote this comment to grow my power and help Open Source contributions like this one. Want to chat? Join me on Discord https://discord.gg/Pc8HG9x