Tutorial (Godot Engine v3 - GDScript) - Custom TileMap
.png) Tutorial
Tutorial

What Will I Learn?
This tutorial will show you how to create a Custom TileMap system within Godot Engine v3.0, using its GDScript language. It provides code behind the Diary of Crazy Miner - Day 1 post.
Assumptions
- You understand the basics of GDScript
- You understand Godot Engine's editor and Tree/Node design
You will learn
- How to create an abstract class for the base Tile
- How to extend it into a customised Tile implementation
- How to implement the Map for storing arbitrary Tiles
- How to implement a TileMap of the Tiles within a Map instance
- ...and finally, how to iniate the TileMap on screen
Requirements
You will need Godot Engine v3.0 installed, as well as a strong grasp of the GDScript syntax.
This Tutorial explains the design and implementation of TileMaps, rather than the use of the Godot Engine. Please look at my other, and future, tutorials for help in that respect.
Tutorial
I've been creating a game and been blogging a daily diary on Steemit. As part of that process, I'm extracting elements of it that I feel the community might enjoy using. Given the game is planned to be a commercial one, albeit, published by my company, I can't afford to give the actual code nor artwork away.
Thus, I've extracted elements of the code, repackaged it with Freely available graphics.
in this instance, I need to attribute Jesse Freeman, who has kindly provided his artwork with a license of "for any use"
I've literally taken this as the license agreement and reused the artwork so that I could deliver this tutorial quickly.
TileMaps
TileMaps are often used in 2D style games for fixed maps. Godot Engine provides an inbuilt system, but whilst designing Crazy Miner, we felt a custom version would be more suited to our requirements.
A custom version also allows the code to be moved to different engines and languages; given they have the same inheritance capabilities.
The final fact that supported this decision was that the Crazy Miner game would have a small map, therefore any inefficiences would not be a factor of the implementation.
Design of objects
The design for Crazy Miner was provided in the diary, but for simplicity purposes, i've redrawn it:

The design is simple, and each object is explained in the following sections. It is easier to describe the process working from the right (Abstract Tile) through to the left, TileMap.
Tile (Abstract)
The Tile object is an Abstract class, for which all other Tiles extend from; which provides them an initial base set of capabilities.
- It automatically creates a child Sprite and names it Texture
- It exports a variable for setting the Tile's Type (i.e. specifc name type)
- It exports a variable for setting the child's sprite texture, i.e. to the look of the Tile that is overriding the Abstract class
- It also exports a Passable boolean, which will be used in a future tutorial
The code is provided in the GitHub repository, but is shown below:
tool extends Node2D

export (String) var type
export (Vector2) var cellPos = Vector2(0, 0)
export (Texture) var texture setget setTexture

export (bool) var passable = true

func setTexture(newTexture):
    texture = newTexture
    update()

func update():
    if has_node("Texture"):
        $Texture.texture = texture

func _init():
    var sprite = Sprite.new()
    sprite.name = "Texture"
    add_child(sprite)

func _ready():
    update()
As can be seen, there are four main functions:
- An init that will create and add the Sprite to the extended class
- A function to set the texture when the exported variable is set
- An update function which is called by the setTexture and the ready function when the Tile is first shown
Note: this code is stored in Tile.gd of the path /Objects/Tiles/Tile. No scene is created for it, because we will not be creating an instance of it. This could be implemented, but is not needed.
Tiles (Floor)
The next object to create are the concrete Tiles, for which has been aptly named FLOOR. These objects will extend the abstract Tile class and provide the sprite texture and type name. It will also add additional functionality beyond that of the base class, for example, initialising the dimension of the sprite map texture.
The Tiles are placed as Node2D objects into the Game scene, therefore, the Floor Tiles have to be created as a scene (see screenshot further down). They are then instanced by the Game scene; thereby producing the map.
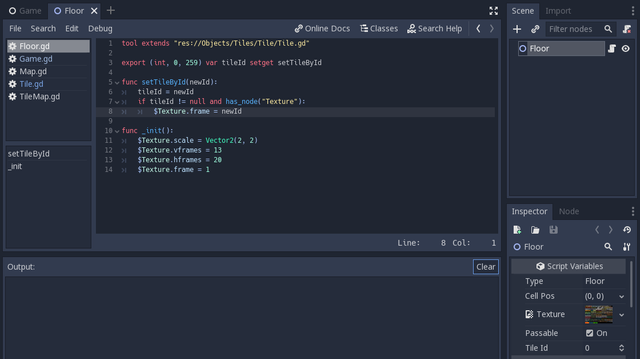
The Floor is created as a Node2D and given a Script with the following code:
tool extends "res://Objects/Tiles/Tile/Tile.gd"

export (int, 0, 259) var tileId setget setTileById

func setTileById(newId):
    tileId = newId
    if tileId != null and has_node("Texture"):
    $Texture.frame = newId

func _init():
    $Texture.scale = Vector2(2, 2)
    $Texture.vframes = 13
    $Texture.hframes = 20
    $Texture.frame = 1
As shown, the implementation is very basic:
- The script extends the abstract class Tile
- It exports a variable for picking the tileId from the Sprite Map (i.e. cell 1 through to cell 259)
- A function which sets the tileId value into the child 'Texture' sprite (inherited from Tile.gd)
- ...and an initial function to double the scale the sprite texture, set the number of sprites horizontally and the number vertically, as found in the Sprite Map source file
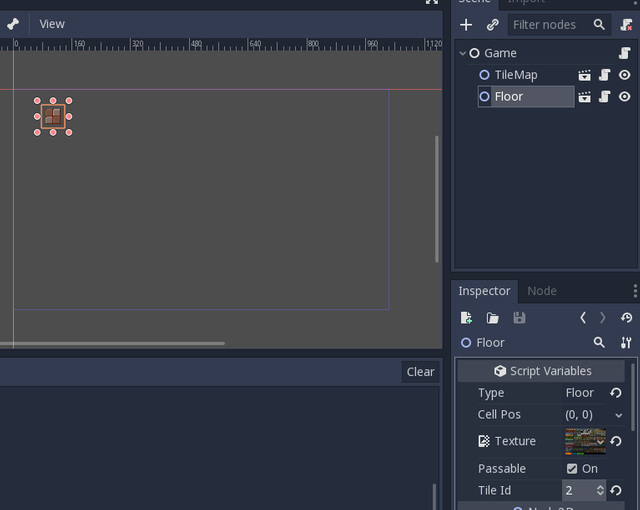
This is easier to see in the following screenshot:
The texture Sprite Map and the Type Name are shown in the above screenshot, against the Scene Floor object of the Inspector. They could be coded into the Floor script, but are easier to maintain in the inspector, allowing for change in the future.
The Floor scene may now be added to any other Scene, included the Game scene, if it is, it will show:
You now have a powerful way to create Tiles!
Map (of Tiles)
The next object in the design to is the Map object. The Map's purpose is to store all Tiles put into it and retrieve them when requested. It does this by creating an X by Y sized Array, in which each cell is a dictionary of any type of object.
A dictionary is used, because multiple objects may be stored in the single map cell, which allows for overlapping (z-order for example) and for fast determination of game state at particular points in the game.
However, there is a known design quirk with this solution to be noted. We use the 'Type Name' to store the tiles, therefore, no more than one instance of each Type may be held in that dictionary (because the name would overlap).
If you require more than one of the same type, you would need to add a unique identifer to the Type Name (which is why Godot Engine automatically adds digits to the end of object names during runtime).
The Map object is NEVER shown directly on the Game scene, therefore it is created as a Node.
You should examine the code:
extends Node

export (Vector2) var size = Vector2(1, 1) setget setSize

var map = []

func setSize(newSize):
    size = newSize
    resize()

func resize():
    map = []
    for address in range (size.y * size.x):
    map.append({})

func calcAddress(cellPos):
    return (cellPos.y * size.x)+cellPos.x

func put(cellPos, type, object):
    if onMap(cellPos):
        map[calcAddress(cellPos)][type] = object

func get(cellPos, type):
    if has(cellPos,type):
        return map[calcAddress(cellPos)][type]
    return null

func has(cellPos, type):
    if onMap(cellPos):
        return map[calcAddress(cellPos)].has(type)
    return false

func remove(cellPos, type):
    if has(cellPos, type):
        map[calcAddress(cellPos)].erase(type)

func onMap(cellPos):
    if (cellPos.x < 0 or cellPos.x >= size.x):
        return false
    if (cellPos.y < 0 or cellPos.y >= size.y):
        return false
    return true
This object has many more functions, but they are all trivial in implementation:
- An arrary named Map is declared
- A resize function will reallocate the array, based on the exported size variable. It adds an empty dictionary {} into each cell
- A utility function calcAddress converts a Vector2 into a Scalar address. This is easily calculated by multiplying the Y by the number of cells horizontally and then adding the X. This negates the need to have more complex Arrays and memory is kept this way in physical ram
- Four functions then perform Get, Put, Has and Remove functions. They all look pretty similiar, but perform different actions on the cell
- The last function is the onMap, which checks the bounds of the cell falls within the Map. It's not strictly required by this tutorial, but the game requires it when Monsters and the Player is added. This function will ensure erroneous calls are ignored
For the Crazy Miner game, and this Tutorial, the memory requirement is low, therefore this object works extremely well. It is also fast, given the cell look-up and then the dictionary access. There are ways to optimise this solution, but the balance and choice has been weighted between code style/maintenance and performance need.
TileMap
The last object in the design is the TileMap, which is created as a Scene, and is added as an instance to the Game Scene.
The TileMap is added as a Node2D and is allocated a child instance of Map; therefore it is granted the storage required for the Tiles to be added to the TileMap.
Its script shares similarities with the Map object:
extends Node2D

export (Vector2) var mapSize setget setMapSize
export (Vector2) var tileSize

func setMapSize(newSize):
    if has_node("Map"):
        $Map.size = newSize

func put(cellPos, tile):
    positionTile(cellPos, tile)
        add_child(tile)
        $Map.put(cellPos, tile.type, tile)

func positionTile(cellPos, tile):
    tile.cellPos = cellPos
    tile.position = cellPos * tileSize

func get(cellPos, type):
    return $Map.get(cellPos, type)

func has(cellPos, type):
    return $Map.has(cellPos, type)

func remove(cellPos, type):
    var object = $Map.get(cellPos, type)
    if object != null:
        $Map.remove(cellPos, type)
        remove_child(object)
The script is formed from:
- Exports for the dimension of the map and the Tile sizes (required to calculate screen positions)
- It features the same Put, Get, Has and Remove calls that Map features; in fact, these functions delegate down to the Map object functions
Importantly, the Put function attaches the Tile to the TileMap object, which results in it appearing on screen. The remove function disconnects the Tile, to ensure it disappears from the Game scene.
Game scene
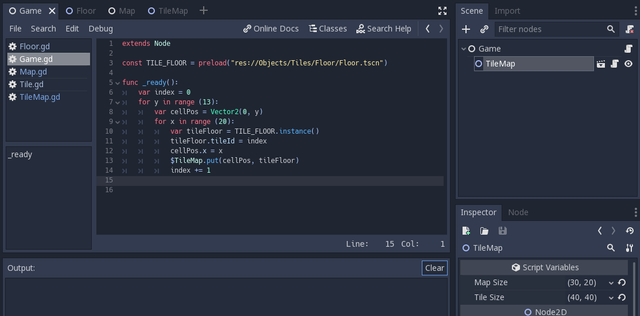
The last part of this code is the Game scene. This has a TileMap instanced and positioned on the screen. The Map and Tile dimensions are set in the Inspector.
The Game scene script allocates each of the Tiles in turn and places them into the TileMap; this results in them being displayed on screen:
extends Node

const TILE_FLOOR = preload("res://Objects/Tiles/Floor/Floor.tscn")

func _ready():
    var index = 0
    for y in range (13):
        var cellPos = Vector2(0, y)
        for x in range (20):
            var tileFloor = TILE_FLOOR.instance()
            tileFloor.tileId = index
            cellPos.x = x
            $TileMap.put(cellPos, tileFloor)
            index += 1
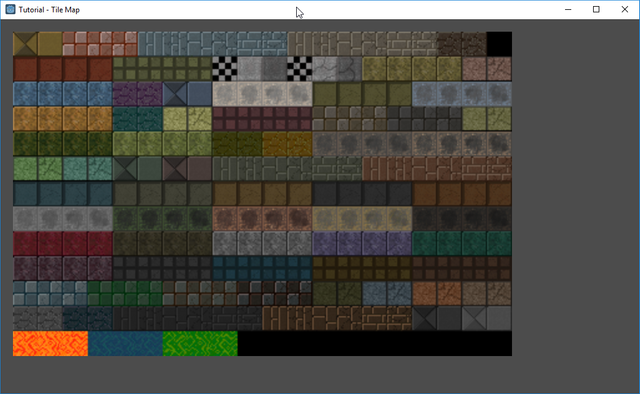
The function simply loops through the 20 x 13 cells and instances a new TILE_FLOOR object (which is preloaded). This is then put into the TileMap.
The result of which can be seen below:
The source for this demonstration can be found in the GitHub project. Download the 'Custom TileMaps' folder and then open it with Godot Engine v3.
Final
I hope this tutorial has helped you. Please do feel free to comment and ask questions. I plan to write more articles, if there is demand.
Other Tutorials
[TBW] To be written
Posted on Utopian.io - Rewarding Open Source Contributors
Your contribution cannot be approved because it does not follow the Utopian Rules.
Godot Engine repo
The contribution doesn't follow the rules:
You can contact us on Discord.
[utopian-moderator]
Thank you for the contribution. It has been approved.
You can contact us on Discord.
[utopian-moderator]
Many thanks for the help today.
Hey @sp33dy I am @utopian-io. I have just upvoted you!
Achievements
Suggestions
Get Noticed!
Community-Driven Witness!
I am the first and only Steem Community-Driven Witness. Participate on Discord. Lets GROW TOGETHER!
Up-vote this comment to grow my power and help Open Source contributions like this one. Want to chat? Join me on Discord https://discord.gg/Pc8HG9x