Tutorial (Godot Engine v3 - GDScript) - Bullets!
.png) Tutorial
Tutorial
What Will I Learn?
This tutorial builds on the last, which explained how to add the Player Ship.
In this article, you will learn to add bullets to the game!
Assumptions
- You have installed Godot Engine v3.0
- You've completed the previous tutorials
- You should be familiar with Scenes, Nodes, creating instances and a basic grasp of GDScript syntax and documentation
You will
- Change the Alien image
- Add a Bullet
- Set the Z index correctly
- Give the Bullet a velocity
Requirements
You must have installed Godot Engine v3.0.
All the code from this tutorial will be provided in a GitHub repository. I'll explain more about this, towards the end of the tutorial.
Let's change the Alien Sprite
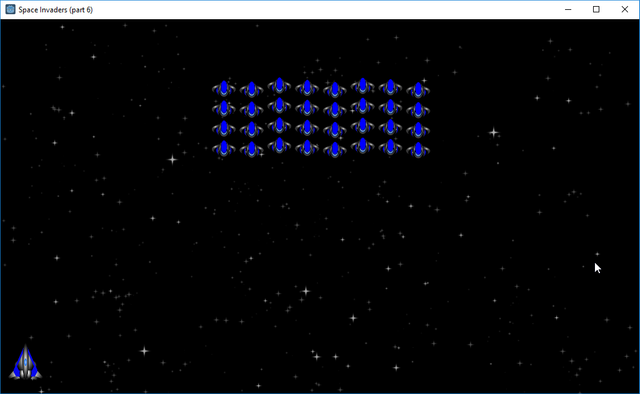
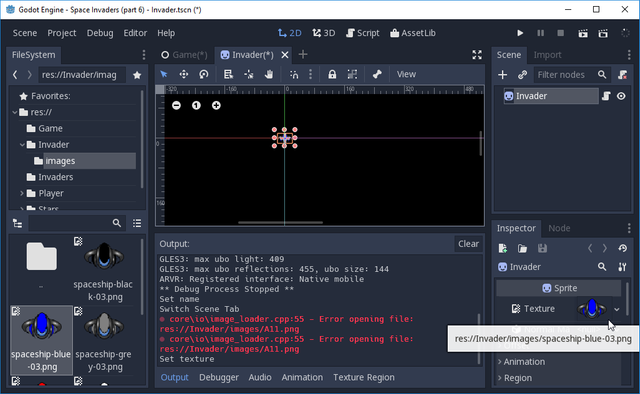
Given the change of Sprites, courtesy of Carlos Alface, I would like us to get the Alien ship in line with the Player ship.
In the Alien images folder, let's get rid of A11.png and instead, copy in all the spaceship_[colour]_03.png files from the SpaceshipsPack-09 archive.
When you run the game, the proportions are now good:
Add a Bullet!
In order to kill those pesky Invaders, we need the ability to fire a bullet! Before we can fire it, I guess we ought to construct one first.
Please:
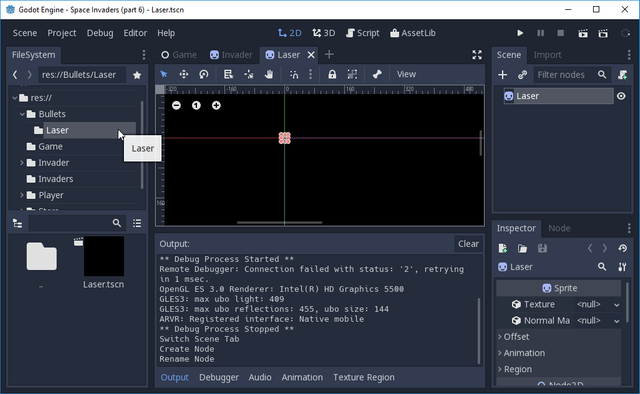
- Create a new Scene
- Add a root Sprite named Laser
- Save the Scene as Laser, but please put it into a subfolder of Bullets named Laser
I expect us to add lots of different Bullet types; therefore, having a parent folder with the specific child types is a good structure.
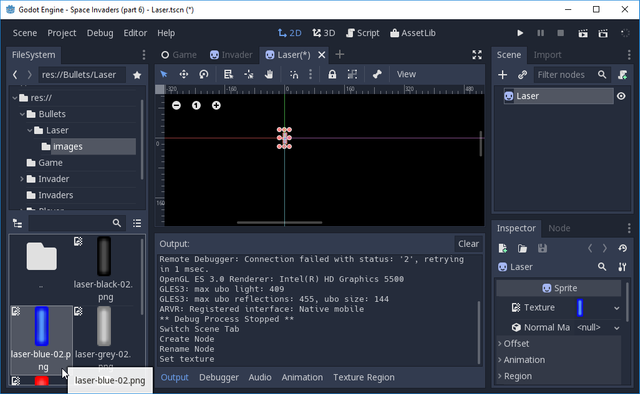
Please create an images folder inside Bullets/Laser folder and copy in the laser_[colour]_02.png files in from the SpaceshipPack-09 archive (hint, they are in the Lasers folder).
Copy of all those colours because we'll be using them all later!
Assign the Blue Laser image to the Laser root Sprite.
We now have our Laser Bullet, but it's not usable right now! Can you think why?
Fire! "we need weapons, Jim!"
In order to see the Laser Bullets, we need them to be produced when the Player clicks the Fire button (which will be Spacebar for now).
Let's add this control in:
- Open the Game Scene
- Open the Game script
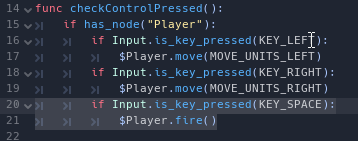
- Add the following few lines to the checkControlPressed function:
        if Input.is_key_pressed(KEY_SPACE):
            $Player.fire()
As seen in the editor:
These instructions detect when the user presses the Spacebar and orders the Player node to fire! Thus, we need to add the fire function to the Player node:
- Open the Player Scene
- Open the Player script
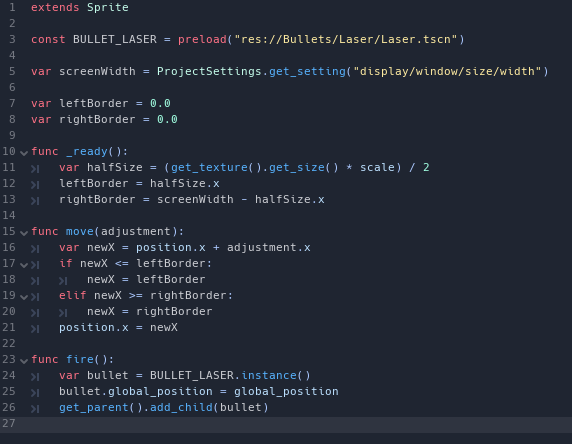
- Add the following fire function:
func fire():
    var bullet = BULLET_LASER.instance()
    bullet.global_position = global_position
    get_parent().add_child(bullet)
As can be seen in the editor:
Let's examine the function, but it should start to become familiar to you:
func fire():
Declare the fire function (no parameters)
var bullet = BULLET_LASER.instance()
Create a new instance of the Laser Scene as a node; this uses a constant added at the top of the script (see below)
bullet.global_position = global_position
Move the new bullet position, globally to the screen, to where the Player node currently is. These two nodes are positioned centrally, therefore the bullet will end up centred to the Player
get_parent().add_child(bullet)
Get the parent node, which will be the Game Scene (as this is the parent to the Player node) and add the bullet there.
This is important! We've previously made the decision that the Game Scene will be the overall dictator to the objects in play, therefore attaching the bullet to it, delegates the management of them to it. It also means that if the Player is destroyed, the bullets will continue to reap destruction on the Invaders.
As mentioned above, and seen in the editor screenshot, I have added the following constant:
const BULLET_LASER = preload("res://Bullets/Laser/Laser.tscn")
This type of constant has been discussed in previous tutorials, but to recap.
We instruct the Player class to preload the Laser class so that it can create instances of it. You need to ensure the exact path is supplied as a parameter to the preload function call.
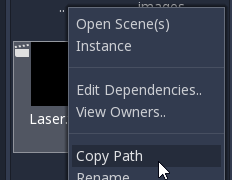
The editor helps you here!
- Right-click the Scene file in the lower window of the FileSystem tab of the editor
- Select Copy Path
- Copy the text buffer into the editor!
Let's try running it!
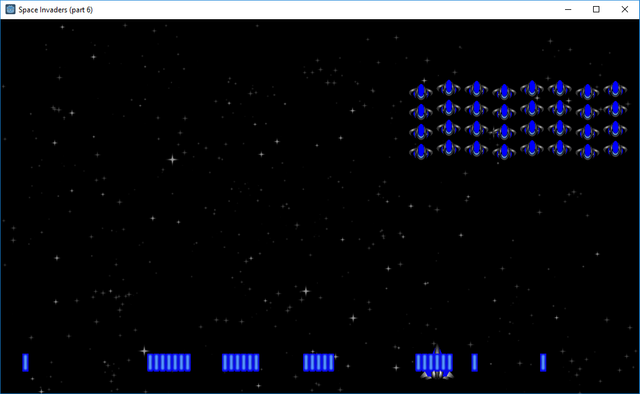
... Ah! This is why we test! There are two problems:
- The Bullets remain ABOVE the Ship, but actually, we want them to start from underneath
- The Bullets don't fly anywhere! We need to instruct them to move
The first problem is easy to fix, by changing the Z index order of the sprites. However, the second requires code to be added to the Bullet.
Z Index
Although our game is in a 2D form with an X and Y axis, Godot Engine provides the 3rd dimension for 2D games, i.e. Z-axis.
The Z-axis determines how one Sprite overlaps another! I.E. the Sprite with the highest Z index is laid in front (nearer the player's screen).
To fix our first problem, we need to set the Invader and Player Sprites to be higher than the Laser. I've decreed the Bullet should be defaulted to zero and the other two to be set at 500 (but I could have chosen 1 or 1000, as long as the value is greater than zero)!
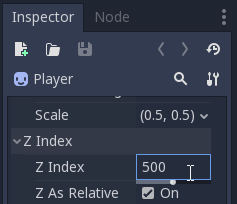
- Open the Player Scene and click the root Sprite
- In the inspector window, Search down for Node2D>Z Index
- Set the Z Index to 500
Do the same for the Alien Scene Sprite. You won't need to change the Laser Sprite because it will have defaulted to zero.
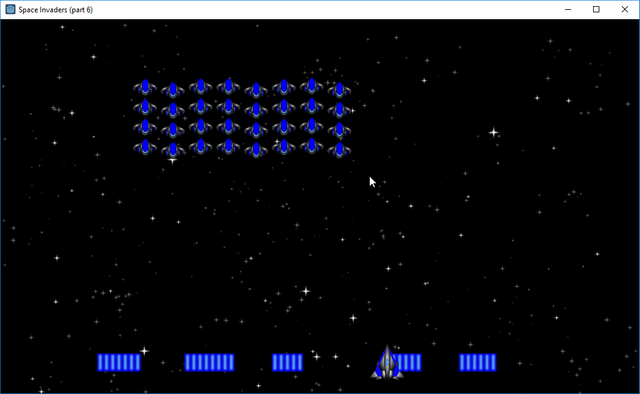
Rerun the game and you'll find the bullets remain under the Player ship:
Give the Laser Bullet a velocity!
The second issue is resolved by providing a velocity to the Laser bullet until it goes off screen or strikes an Invader.
- Open the Laser Scene
- Attach a script to the root Sprite
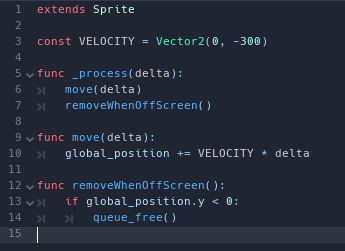
- Insert the following code:
extends Sprite

const VELOCITY = Vector2(0, -300)

func _process(delta):
    move(delta)
    removeWhenOffScreen()

func move(delta):
    global_position += VELOCITY * delta

func removeWhenOffScreen():
    if global_position.y < 0:
        queue_free()
As seen in the editor:
Let's examine the code:
extends Sprite
We extend the Sprite Class
const VELOCITY = Vector2(0, -300)
Set a Velocity for the bullet; which is 300 pixels per second in the negative Y-Axis (i.e. up!)
func _process(delta):
    move(delta)
    removeWhenOffScreen()
For every frame, Godot will call this function. We want the bullet to move and then for its position to be checked to determine if it is still on the screen. If not, it should be removed from the Game Scene.
func move(delta):
    global_position += VELOCITY * delta
Move the Laser Bullet by the Velocity, spaced by the delta time that has passed since the last frame; therefore ensuring it glides smoothly at its designated speed.
func removeWhenOffScreen():
    if global_position.y < 0:
        queue_free()
On each call, check whether the Laser Bullet has gone off the screen, as denoted by its global_position.y property. If it has, tell Godot to remove the Instance from the tree
Try running:
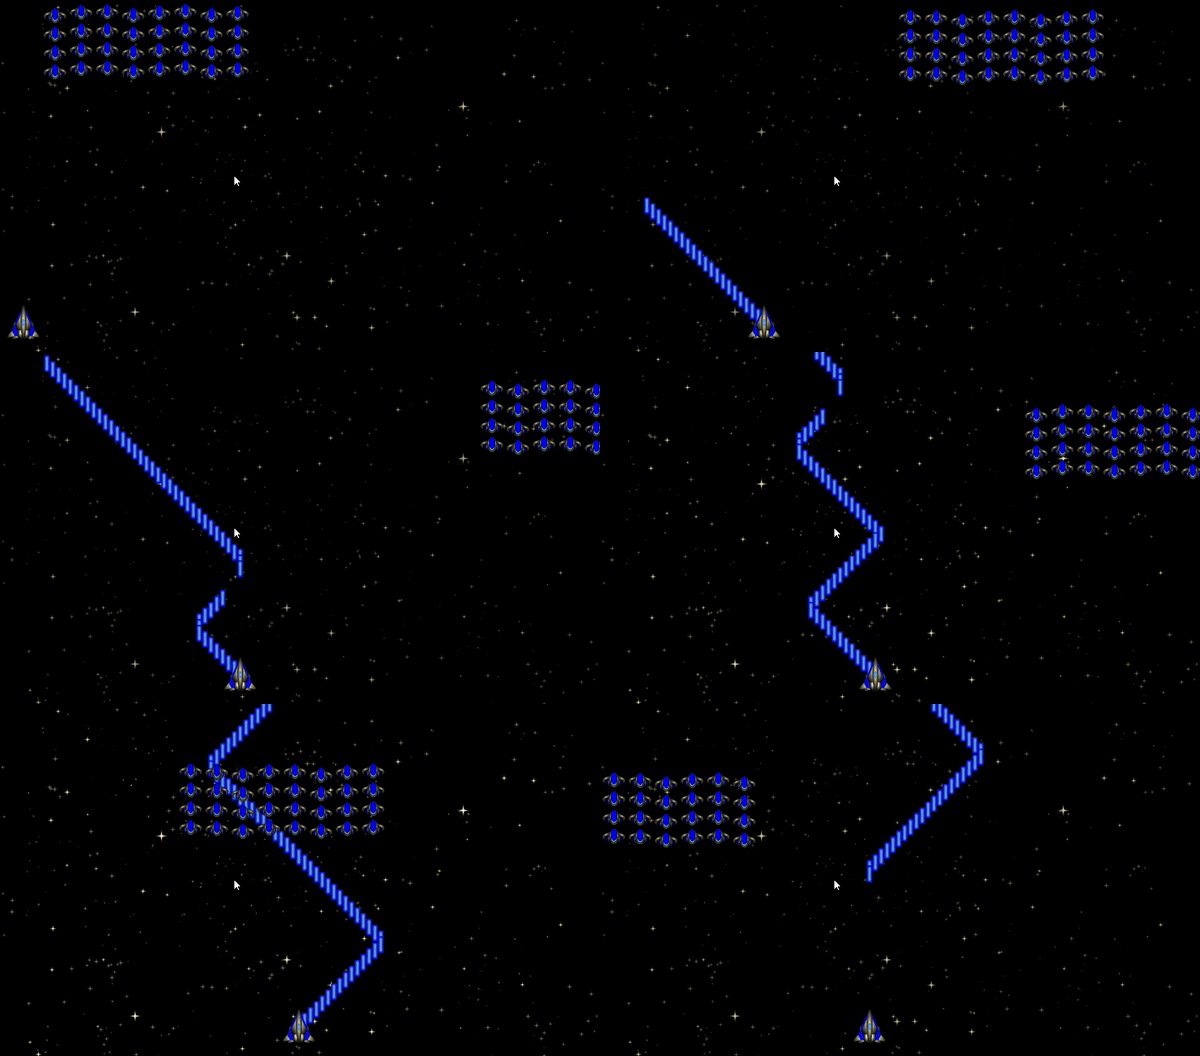
...Success, although it's a little FAST!
Let's introduce a fire rate limit! After all, the Ship needs to reload.
The last sentence is IMPORTANT. The 'Ship' will reload. Given this, we delegate it the task of determining when it can fire again! We could make the Game Scene responsible, but actually, if the Ship is destroyed, the delegated responsibility would make no sense existing in the Game Scene.
Mapping delegated responsibilities is VERY important. It allows you to place function within the Class/Object that should own it.
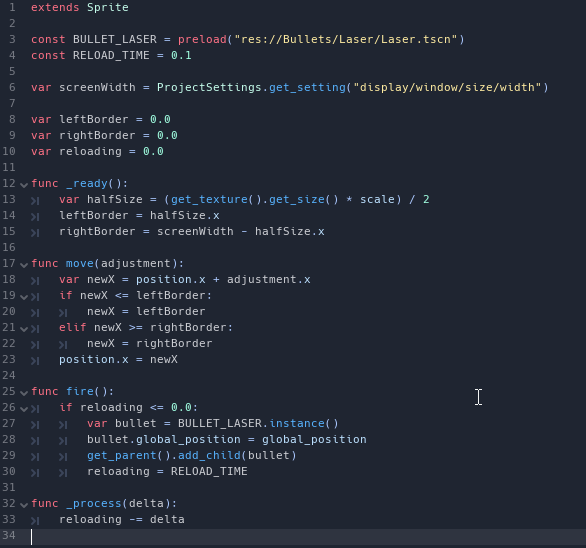
- Open the Player Scene
- Open the Player script
- Add a constant value to represent the speed of reloading, in seconds, so a tenth of a second:
const RELOAD_TIME = 0.1
- Add a variable to contain the remaining time of a reload, after firing the last Bullet:
var reloading = 0.0
- Modify the fire function:
func fire():
    if reloading <= 0.0:
        var bullet = BULLET_LASER.instance()
        bullet.global_position = global_position
        get_parent().add_child(bullet)
        reloading = RELOAD_TIME
A check has been added to allow the fire IF the reloading variable is zero or less. If the Bullet is fired, the reloading variable is set to the time it takes to reload.
- Add the following process method, that is called by Godot for every frame:
func _process(delta):
    reloading -= delta
- Every frame, decrease the loading time variable by the delta time since last call. Note: the reloading variable will become negative, when the player doesn't fire, hence the condition in the fire method checks for zero or less than that.
As seen in the editor:
Try rerunning:

... much BETTER ! We can now control the rate of fire. We 'might' choose to play with this, during the game, i.e. to make it harder or easier!
Finally
That concludes this issue. My next article will address collisions! We need the Bullets to destroy the Invaders and the Invaders to destroy the Player!
Don't forget to check out the game on itch.io. I'm publishing the game in advance of tutorials, so it is worth you checking it out periodically! You'll be able to guess what is coming up in my posts!
Please do comment and ask questions! I'm more than happy to interact with you.
Sample Project
I hope you've read through this Tutorial, as it will provide you with the hands-on skills that you simply can't learn from downloading the sample set of code.
However, for those wanting the code, please download from GitHub.
You should then Import the "Space Invaders (part 6)" folder into Godot Engine.
Other Tutorials
Beginners
Competent
Posted on Utopian.io - Rewarding Open Source Contributors

Thank you for the contribution. It has been approved.
You can contact us on Discord.
[utopian-moderator]
Thanks Roj.
Hey @sp33dy I am @utopian-io. I have just upvoted you!
Achievements
Suggestions
Get Noticed!
Community-Driven Witness!
I am the first and only Steem Community-Driven Witness. Participate on Discord. Lets GROW TOGETHER!
Up-vote this comment to grow my power and help Open Source contributions like this one. Want to chat? Join me on Discord https://discord.gg/Pc8HG9x
@sp33dy, No matter approved or not, I upvote and support you.
Thanks dude! Much appreciated. Some say I need all the help in the world!