Tutorial (Godot Engine v3 - GDScript) - Your first Sprite!
.png) Tutorial
Tutorial

What Will I Learn?
This tutorial builds on the last, which explained how to install Godot Engine v3.0.
I've also explained how to install one of the template games, which touches on some of the principles found in this article.
What I'm going to show you is how to construct this:
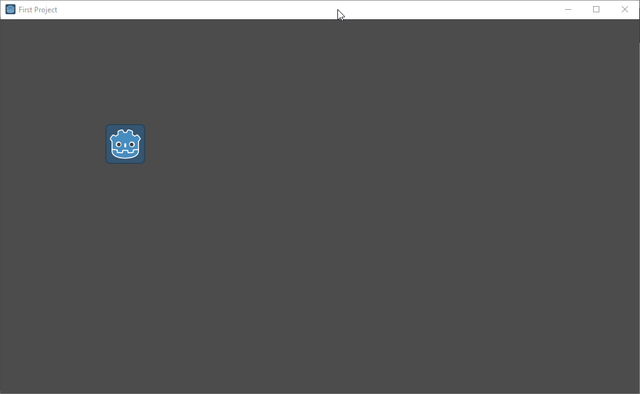
Not exciting, but you will know HOW to add an Image and Run it!
Assumptions
- You have installed Godot Engine v3.0
You will learn
- How to create a new project
- Become familiar with the basic panels of the editor
- Become familiar with Scenes and Nodes
- Create your first Scene with its first Node
- Saving your Scene
- Become familiar with Project Settings
- Execute the Scene to see it display
Requirements
You will need Godot Engine v3.0 installed.
You can also download the sample from the GitHub repository. I'll explain how to install it, towards the end of this tutorial because I hope you will learn how to do so, under your own effort as that is the best way to learn!
Create a New project
In the last tutorial, I left you looking at the Project Manager:
My Project Manager has many more project in it now, therefore any screenshots you see will differ to yours, based on what projects you have added or created so far.
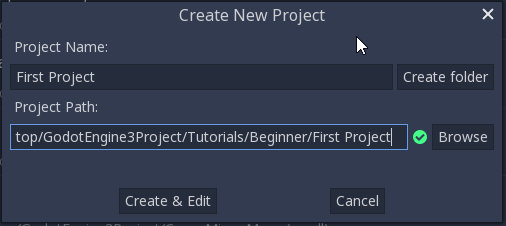
To create a new Project, simply click the  button found on the right.
Let me know in the reply section if you would like me to explain this window in more detail. I've deliberately kept this brief because I'm unsure how much detail you need!
Several screens shall flash before your eyes and eventually, the editor shall show:
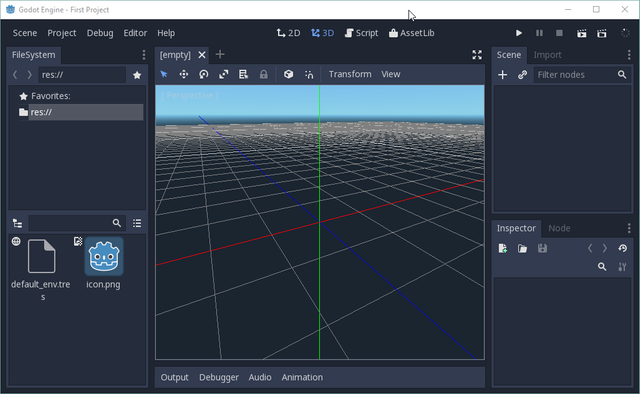
Editor familiarisation
Before you can start creating your masterpiece, it is best you learn the very basics of the editor. I've provided an overlay of the areas you should be familiar with:
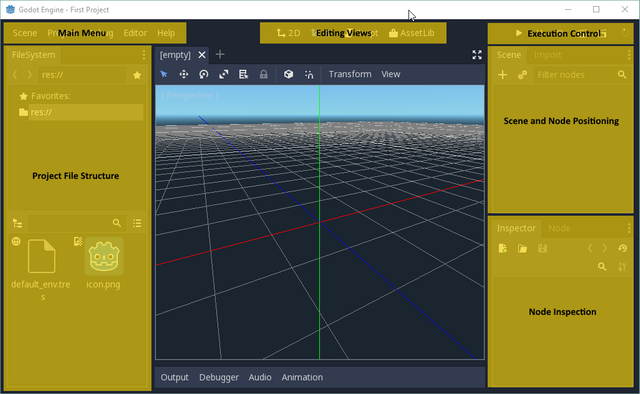
- The top left has the Main Menu. Here you can open settings, save the project, exit and so forth. I'll instruct you when you need to use these, but have a click and see what options show under each.
- The left-hand panel shows the File structure of your project. As you add content to your project, they need to be stored in the file system; this window reflects them. If you need to open an asset, you can navigate here and double-click to open. You should note that Godot Engine provides you with a default icon.png; we'll be using it!
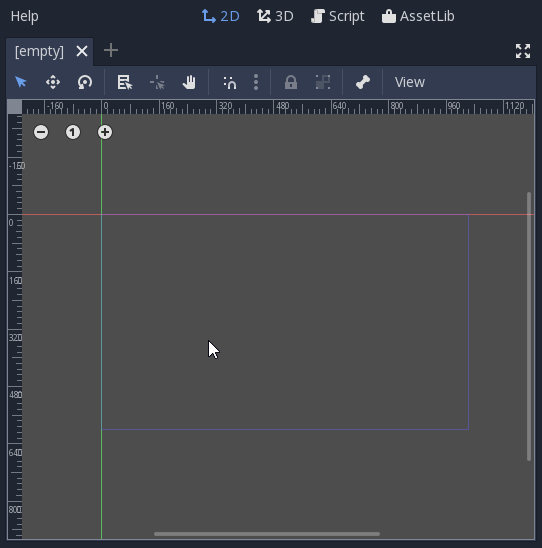
- The top centre panel provides the 'most' important controls in my opinion. There is only a few, but each affects the Editing View, changing its context for the mode you are working in. I.E. the editor starts in 3D, as it assumes that is what you will be building. The screen below shows the 3D view of the world. If you click 2D, it is switched for the 2D perspective (move your mouse over the panel and use your scroll wheel to zoom in and out):
You should see an outline frame for the current 2D window.
I stated earlier that this, in my opinion, is the most important control panel because it enables you to change to the Script view; which is where I spend most of my development time in.- You'll find the controls to start, pause and stop your project in the top-right. Please note that I may have additional icons here because I have installed additional options for running in a Browser etc. I shall cover these in a future article. Note: It is important to remember that until an executing Scene is stopped, trying to save edits will be prevented by locks from the running files.
- The panel under the execution start buttons reflect your project structure that will execute. Your project will consist of Scenes and Nodes, for which is explained in the next section.
- Finally, the panel in the bottom-right allows you to edit Node properties that you add to your Scene; please see an explanation further down.
This may look and feel intimidating, but don't be put off!
It all becomes VERY familiar after a few uses. There are moments when I found panels would open full screen, which left me puzzled as to what I was doing, but persevere with it and I assure you it becomes easy to use.
Scenes and Nodes
Godot Engine is extremely powerful but remains relatively simple to use and build with. Why?
Its design and implementation are constructed around the concept of 'Trees'. Mother nature is great at using simple structures to build amazing things, i.e. Beehives and their use of hexagonal structures, plants and their branching of stems, ... and Trees!
Let's consider the anatomy of a tree. I've simplified them here into their powerful model:
- A solid foundation (Root)
- A trunk that grows up from the foundation and supports structures above it
- Branches that grow out from the trunk and twigs that spurt growth from branches
- Finally leaves grow at the end of the twigs and effectively give it glorious colour
In Godot Engine, and importantly, in Computer Science, Tree model's are used to model complex data structures. For example, these data structures can be used to create game world models, used for efficient sorting, for finding items efficiently and a plethora of other uses. 3D modelling would not be as easy as it is, without Tree Models!
Godot uses Tree's to form patterns of objects that will whizz around the screen, make sounds, detect a collision between shapes or animate still pictures and therefore creating the illusion of movement.
In the screen panels above, you'll notice that I reference Scenes and Nodes. Nodes can be considered an object which will form the Trunk, the Branch & Twigs and the Leaves.
A Node is generic! It can be a single item, such as a Leaf, OR it will contain child Nodes, i.e. it could be the Trunk with Branch child Nodes or Branches with Twigs as children.
The machine uses memory references to link each Node, so that code can traverse the structures and produce the effect requested.
Where do Scenes fit into this Model? A Scene can be considered in two ways:
- They are like the Scene of a play or television programme. It is EVERYTHING that is required to show the Scene, i.e. the chairs the characters will sit on, the background panels displaying the scene of New York and the Characters themselves.
OR- It is the 'Root' Node that contains all the children, i.e. Trunk, Branches, Twigs and Leafs that form the scene to view, show or interact with.
In a Godot project, a scene may be an Introduction video at the start of your game or be the main menu or the game world itself.
However, it is important to note that a Scene is just a Node with a structure (Tree) of children. Therefore, a Scene may contain Branches of Scene's too; but this is an advanced topic, therefore I shall touch on it in a future tutorial (i.e. instances).
My job is to show you how to make use of the MANY predefined Nodes that are available to you. You then build a game Scene, selecting the Nodes you require and then to execute it.
I will show you how to create a base Scene, add a Sprite node and then execute it.
Create your first Scene and add a Sprite!
OK, are you ready? Trust me, this is very simple if you've understood the last section.
IF you didn't, please re-read it and if you are still struggling, please contact me via the reply section
In the editor window, ensure you have switched to the 2D view because we are going to build a 2D scene.
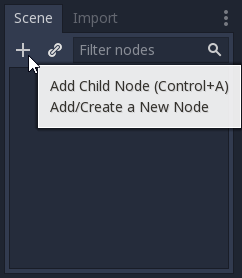
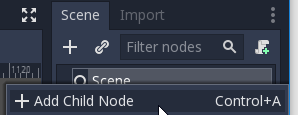
Move your mouse to the Scene and Node panel and click the '+' button.
Hint: If you hover your mouse over any button, as I have in the screen capture, you will find the editor will provide a hint to its purpose! Try hovering over buttons you are unfamiliar with.
The editor will open a large list of Nodes that you can add to your scene:
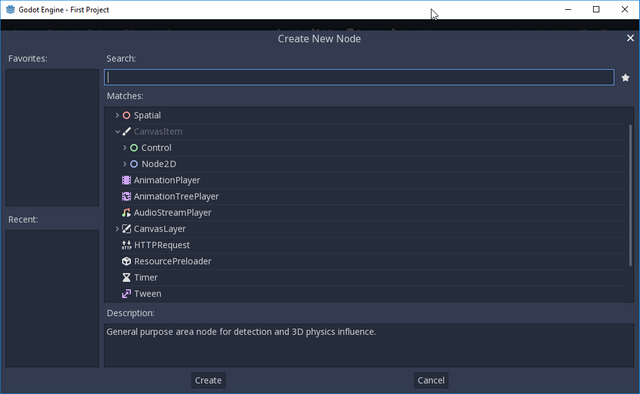
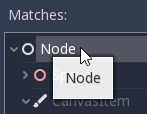
You'll note that Spatial is shown at the top of my screenshot, so I had to scroll the list upward until I found the Top Level Node, named Node. That's what we want!
The 'Node' Node is your Root! All other Nodes are derived from this; i.e. all specific nodes, such as Spatial, Sprite, etc all inherit their base abilities, functions and design from this Node. They have to because Node contains the ability to link to children, thereby enabling a Tree structure to be formed.
Either double-click the Node item in the list, OR click it once and then the Create button found towards the bottom of the panel.
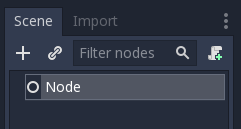
Your Scene and Nodes panel should now contain your new Node!
Let's rename it!
Double click the Node in the panel and you'll enter edit mode on it. 
Change its name to Scene.
Well done! You now have a base scene with a simple Node as a Root called Scene.
It is customary to give all Scenes a top-level Node because a Tree is formed from ONE root (in the real world, a Tree only has more than one Branch because of a freak of nature). A Godot Engine Scene requires a single Topmost ("Root") Node to work from, this is your new Node named Scene.
It is possible to use a different type of Node as the "Root", but for now, that shall be ignored because again, it is an advanced topic.
From our Root Node Scene, we wish to show something in our 2D world! Let's add a Sprite.
A Sprite, from the documentation (click the link) is a Node that displays a 2D Texture, i.e. an image, which might be in a png format.
Let's add the Sprite Node, which can be achieved in one of two ways:
- Click the Node in the Panel, to highlight it as the Node to receive the click and then click '+'
You will likely have many nodes in a future Scene, therefore you have to instruct the panel as to which Node is to receive the new child.
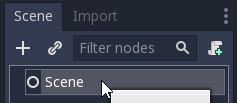
OR- Alternatively. Right-click the node you are adding the child to and then use the context-sensitive pop-up menu to select Add Node
In the search box, type Sprite, you will notice the list change as you do:
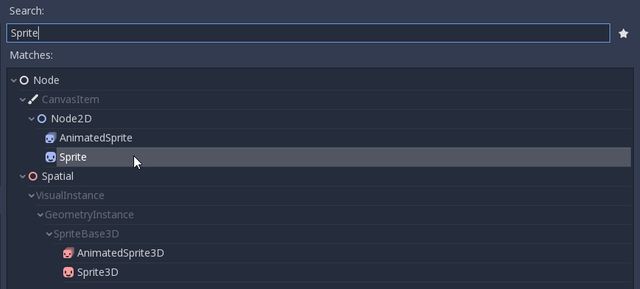
Double click OR select and click the Create button at the bottom of the panel.
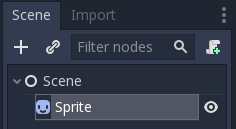
You'll return to the main editor panel and will see the Sprite has been added to your Scene Node structure
We need to give the Sprite an image!
Let's take the Icon.png that is already in the project file system. When you select a Node in the Scene and Node Panel, the Node Inspector panel below will show a list of all the properties that belong to that specific Node. i.e. if you click Sprite, you will see a 'Texture' and Normal Map properties listed.
Assigning an image is as simple as Dragging the icon.png over and dropping it onto the Texture entry slot in the Inspector properties:
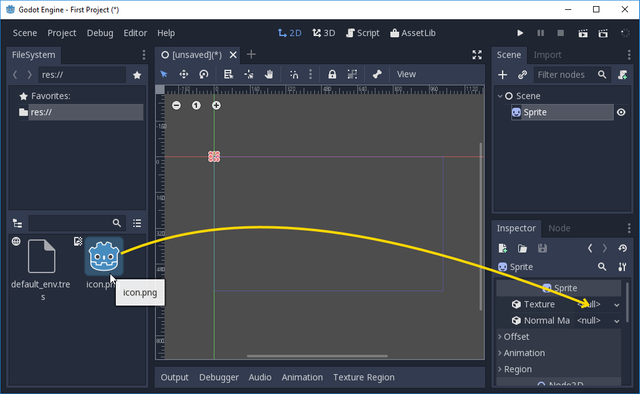
Things will now change in the 2D world window, as well as the Inspector; which will now show the assigned sprite:
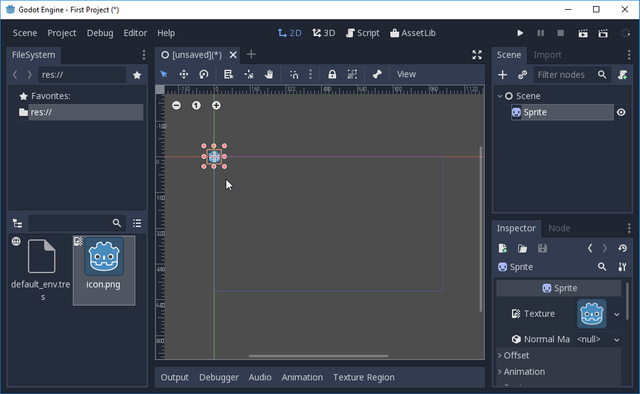
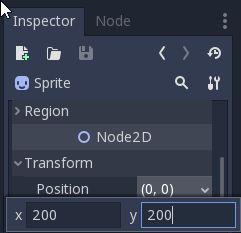
The Sprite now exists in your World! You can drag it to somewhere more appropriate.
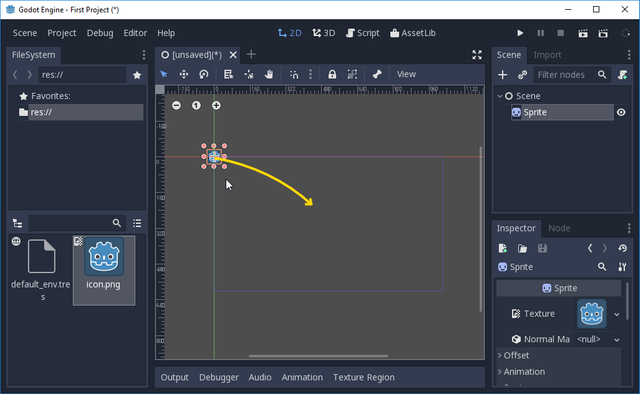
Hint: make sure you press return after entering values, or they will not be accepted!
Well done, you have now created your first Scene with a Sprite node!
Save your scene!
Saving is your friend! If you don't save, don't be surprised when you lose changes if the environment crashes (it happens a lot because it's the risk of development)!
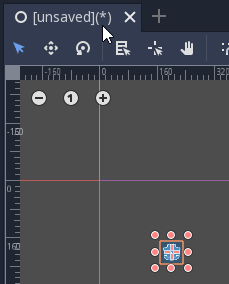
The 2D world informs that you need to save the current scene, because it shows it as a (*)!Use the Main Menu and select Scene > Save As
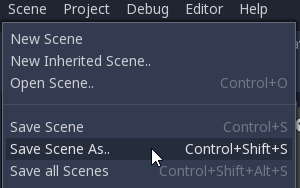
You will be presented with the now familiar file system pop-up window. However, this time, it is pre-associated to your project folder. You just need to provide a filename for your Scene.
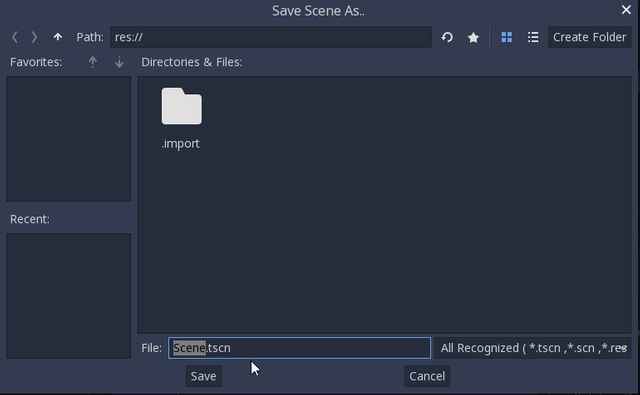
BEST PRACTICE: It is a good practice to put Scene's into their own folders, but this is not necessary for this Tutorial. I will write a Best Practice post in the future
Congratulations, you now have saved your first Scene!
Project Settings
You've now created a Scene that Godot 'could' show when it is executed. However, how does Godot Engine know which Scene to show? Your game may consist of many Scenes, i.e. Introduction video, Main Menu or Game.
You need to instruct Godot Engine as to which Scene you wish to execute, by setting the Project Settings option. Use the Main Menu and select Project > Project Settings.A wealth of settings are presented, but we are only interested in Run, so click it:

You'll see a 'Main Scene' property and Folder icon.

Click it and select File. Now select your Scene file by selecting and clicking Open, OR double-click it:
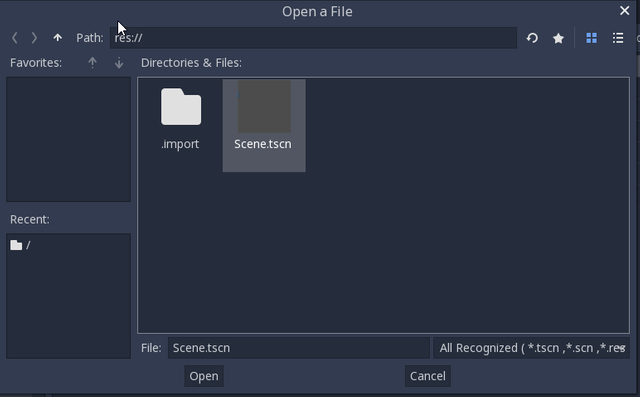
The Scene will be added to the settings panel and you can close it once it looks correct.
Congratulations, you now instructed Godot Engine which scene to run!
_Further research: When you have some spare time, have a look around the Project Settings. You can find all sorts of options, such as Screen Display size, what to show as the start-up Boot splash image, etc, etc.
Execute Scene
You can now easily start the execution of your Scene by clicking the Play icon OR pressing F5

If you have configured your Project Settings correctly, you should be presented a new window with the following:

Success? Hopefully!
If you did not succeed. Check:
- Your Node structure contains the Node and Sprite.
- Check you have assigned the icon.png to the Sprite Texture in the Inspector
- Check you have saved your Scene
- Check that Project Settings has your Scene set as the Main Node to start with
If it still doesn't work, try the GitHub source instructions OR contact me via the reply section below.
Sample Project
I hope you read through this Tutorial, as it will explain the fundamental terms you need to know, the editor functions you'll use and provide you hands on skills that you simply can't learn from downloading a sample set of code.
However, for those wanting the code, please download from GitHub.
You should then Import the "First Project" folder into Godot Engine.
Experiment by yourself!
Why don't you now try using the Engine by yourself?
- Try adding a few more Sprites
- Try importing your own Texture (hint, drag your image file into Godot Engine or into your file system of your Project)
- Try adding different Nodes (i.e. Label is a good start)
- Try adding Nodes as children, i.e. add a Sprite to a Sprite. Look at what happens when you move the top Sprite? I'll discuss this in a future tutorial
Final
I hope this tutorial is a help to you.
My next article will explore the art of Scripting, in order to move a Sprite!
Please do feel free to comment and ask questions! I'm more than happy to interact.
Other Tutorials
Beginners
Competent
Posted on Utopian.io - Rewarding Open Source Contributors



Hey @sp33dy I am @utopian-io. I have just upvoted you!
Achievements
Suggestions
Get Noticed!
Community-Driven Witness!
I am the first and only Steem Community-Driven Witness. Participate on Discord. Lets GROW TOGETHER!
Up-vote this comment to grow my power and help Open Source contributions like this one. Want to chat? Join me on Discord https://discord.gg/Pc8HG9x
Thank you for the contribution. It has been approved.
I love how in-depth your tutorials are and how clearly you explain everything! Once again, it was a pleasure reviewing your contribution!
You can contact us on Discord.
[utopian-moderator]
You've got upvoted by
Utopian-1UP!You can give up to ten 1UP's to Utopian posts every day after they are accepted by a Utopian moderator and before they are upvoted by the official @utopian-io account. Install the @steem-plus browser extension to use 1UP. By following the 1UP-trail using SteemAuto you support great Utopian authors and earn high curation rewards at the same time.
1UP is neither organized nor endorsed by Utopian.io!