How to create your own knobs (part2) / Wie du eigene Griffe erstellst (Teil2) [EN/DE][🇬🇧/🇩🇪]


There are many ways to create knobs and many materials to use.
Band saw, jigsaw, belt sander, hand tools, wood, metal, plastic etc.
I show you three tools (CNC, scroll saw, hole saw) and two materials
(birch plywood and acrylic). In my case I used scrap material from
previous projects.
Click if you missed part 1. (Theory)

Practice
CNC


I created the toolpaths and the g-code in Autodesk Fusion360
and used the following parameters.
- Feed Rate 762mm/min
- Depth per Pass 0,7mm
- Spindle Speed 16200 U/min
- Bit 1/8 in Solid Carbide Downcut Fish Tail
The [T1] "Center toolpath" is only a little helper for the drill press
to find the center of the knob.
With UGS I transferred the file to the machine.
In this example, I am using 12mm birch plywood.
Scroll saw

I printed out the fusion sketch and glued it to a piece of wood.
The rough cut was done with the jigsaw and the final cut on
the scroll saw.
Here I'm using 16mm Film Coated Plywood.
Drill


No matter if it was done with the saw or the CNC, the next station
was the drill press. With a forstner bit i created the hole for the
hexnut. 18mm x 8,5mm for a M10 hexnut.
Then I changed the bit to a 10mm bit and drilled through whole object.
Vize


I used my vize and pressed in the hexnut into the wood. I did this in very
small steps and with a 90-degree rotation from the workpiece after each
pressing procedure.
Easy, but effective.
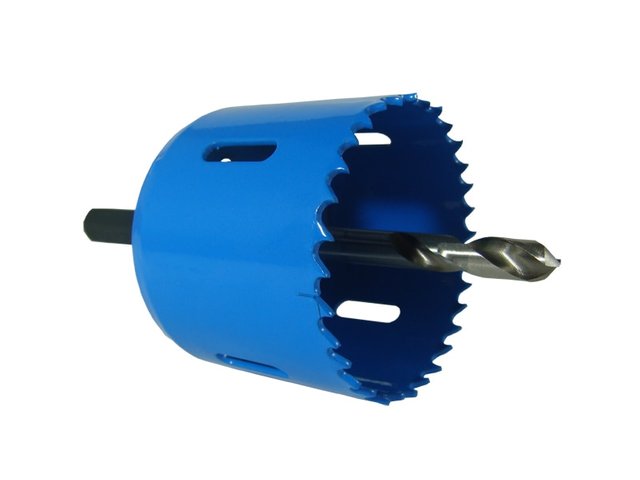
Hole saw


Different to the other two ways I used here a round knob design.
I use the hole saw to cut out the knob. Because I am using acrylic,
I cannot press in a screw or hex nut. Therefore, I cut a M10 thread
directly into the acrylic.
I use the drill press for that, but always in manual mode. I rotate the
spindle by hand and after each half rotation, I move the drill down a little bit.
Why?
With this setup, I don't have to take care about the alignment bit to workpiece.
It’s always a perfect 90-degree angle.
Finishing


Just a little bit of sanding for a smooth surface.
Done.

What’s next?
Good question, we will see.
Servus and cu next time!

Es gibt viele Möglichkeiten Griffe zu erstellen und dabei unterschiedliche
Materialien zu verwenden. Bandsäge, Stichsäge, Bandschleifer, Handwerkzeuge,
Holz, Metall, Kunststoff usw.
Ich zeige euch drei Werkzeuge (CNC, Dekupiersäge, Lochsäge)
und zwei Materialien (Birkensperrholz und Acryl).
In meinem Fall habe ich Restmaterial von vorherigen Projekten
verwendet.
Klick hier, wenn du Teil 1 verpasst hast. (Theorie)

Praxis
CNC
Ich habe die Werkzeugwege und den g-Code in Autodesk Fusion360
erstellt. Verwendet habe ich die folgenden Parameter.
- Vorschub 762mm/min
- Tiefe pro Durchgang 0,7mm
- Spindeldrehzahl 16200 U/min
- Bit 1/8 inch Vollhartmetall Fischschwanz mit Downcut
Der[T1] "Werkzeugweg Center" ist nur ein kleiner Helfer für die
Bohrmaschine um die Mitte des Griffs zu finden.
Mit UGS habe ich die Datei auf die Maschine übertragen.
In diesem Beispiel verwende ich 12mm Birkensperrholz.
Dekupiersäge
Ich habe die Skizze aus Fusion 360 ausgedruckt und auf ein Stück
Holz geklebt. Der Grobschnitt wurde mit der Stichsäge und der
Feinschnitt mit der Dekupiersäge gemacht.
Hier verwende ich eine 16mm Siebdruckplatte.
Bohrmaschine
Egal, ob mit der Säge oder der CNC, die nächste Station war die
Bohrmaschine. Mit einem Forstnerbohrer habe ich das Loch für die
Sechskantmutter gebohrt. 18mm x 8,5mm für eine M10 Sechskantmutter.
Dann einen 10mm Bohrer eingespannt und durchgebohrt.
Schraubstock
Ich habe meinen Schraubstock benutzt um die Sechskantmutter in
das Holz zu pressen. Ich habe das in sehr kleinen Schritten gemacht
und jedes Mal das Werkstück um 90-Grad gedreht.
Einfach, aber effektiv.
Lochsäge
Im Gegensatz zu den anderen beiden Varianten habe ich hier einen
runden Knopf erstellt.
Ich benutze die Lochsäge, um den Griff auszuschneiden. Weil ich Acryl
verwende, kann ich keine Schraube oder Sechskantmutter eindrücken.
Deshalb habe ich, direkt in das Acryl, ein M10-Gewinde geschnitten.
Dafür verwendete ich die Bohrmaschine, aber immer im manuellen
Modus. Ich drehte die Spindel von Hand und nach jeder halben Umdrehung
bewegte ich den Bohrer ein wenig nach unten.
Warum?
Bei dieser Variante muss ich mich nicht um das Ausrichten des Bits zum
Werkstück kümmern. Es ist immer ein perfekter 90-Grad-Winkel.
Fertigstellung
Nur ein wenig Schleifen für eine glatte Oberfläche.
Geschafft
Was kommt als nächstes?
Gute Frage, wir werden sehen.
Servus bis dann!

Join our Discord Channel to connect with us and nominate your own or somebody else's posts in our review channel.
Help us to reward you for making it ! Join our voting trail or delegate steem power to the community account.
Your post is also presented on the community website www.steemmakers.com where you can find other selected content.
If you like our work, please consider upvoting this comment to support the growth of our community. Thank you.
We have a woodworking community here on steemit and would welcome you. We have a discord channel, link here: Woodworking on Steem Discord Channel
This post has received a 3.13 % upvote from @drotto thanks to: @patternbot.
Hier ist Ihr Glückskeks:
Ein Kühlschrank hält Lebensmittel länger frisch, wenn Sie den
mitgelieferten Netzstecker in eine Steckdose stecken.
@PatternBot supportet:
or is it like this:
Hi,
yes the first one.
However, to be honest this is not my preferred way to create knobs.
You have to be very carefully and the whole process while take some time.
You need
In my opinion the better way to create round things, is to use a router. The cut quality is also good, but its easier and faster. I tried this last year with a 30mm circle. Works very well.
Something like this.
Source
(Sorry for the German example)
np, I manage to understand German. Talking is worse.
I just use a lasercutter for round things ;-)
Those drill saws seem to wobble to much. Probable you have them in different price classes.
Well done @theguymasamato! You successfully guessed the match result.
Click on the badge to view your Board of Honor.
Do you want to know your current ranking? Read this post
Do not miss the last post from @steemitboard:
SteemitBoard World Cup Contest - France vs Croatia
Well done @theguymasamato! You successfully guessed the match result.
Click on the badge to view your Board of Honor.
Do not miss the last post from @steemitboard:
SteemitBoard World Cup Contest - Final results coming soon
Congratulations @theguymasamato! You have received a personal award!
Click on the badge to view your Board of Honor.
Do not miss the last post from @steemitboard:
SteemitBoard World Cup Contest - The results, the winners and the prizes