How to Create Your Own Digital Movie Library from DVDs and Blu-rays for Free! - Step-by-Step Guide (Free Software Series Part 3)
Welcome back to the Free Software Series!
If you've missed previous installments (pun very much intended), check them out here:
- Part 1: Free Software Tools to Make Your Life Easier
- Part 2: Take Control of Your Videos, Music, and Images With These Free Software Programs!
Today I'd like to show you how to achieve one of my personal favorite things that is possible with home computers: turning your physical DVD and Blu-ray library into a digital one.

With the advent of Netflix, Amazon Video, Hulu, and other streaming video services, purchasing movies on physical media is becoming a thing of the past. This seems hard to believe since I grew up watching Disney movies on VHS tapes, and it was revolutionary when DVDs came out because you didn't have to rewind them.
Nostalgia aside, having a digital movie gives several advantages that will make it worth your time:
- When you want to watch a movie or TV show, you don't have to go searching for the disc.
- You don't need a disc player. Since most modern televisions have smart capabilities built in, you will be able to watch your movies directly from a hard drive or flash drive via your TV's USB port.
- There are no menus or previews. You simply select the movie and it plays.
- Your movie collection is mobile. Want to watch a movie at your parent's house but they don't have a Blu-ray player? No problem. Just carry the movie file on a flash drive with you and plug and play (assuming of course that their TV supports such a function).
- As long as you remember where you stored the file, you have the movie. There's no risk of losing the disc or accidentally selling your favorites at a yard sale. The movie is yours forever.
- No Internet Connection required. Many movies come with a digital copy included, which you can redeem via an online service such as Vudu or Ultraviolet. These movies require an Internet connection to view, however, and often downloading the file to your computer requires the use of 3rd party software. Performing your own rips allows you to play the file whenever you want, regardless of whether you're connected to the Internet, which can be useful in areas with no Wifi or on long flights.
Hopefully some of these advantages have piqued your interest, so here's the best part: you can start building your own digital movie library today using free software and your PC's optical drive, and this guide will show you how.
This guide assumes the following:
- You have access to either a physical DVD drive or a physical Blu-ray drive. (If your computer came without an optical drive, that's no problem. External DVD and Blu-ray drives are still available for purchase at most major electronics stores and on Amazon. Blu-ray drives are more expensive, but buying a Blu-ray drive for your computer will still be cheaper than purchasing a Blu-ray player for your TV. If you need advice on what's right for your computer, please let me know in the comments.)
- You have a Windows PC (This guide will be for PC users, mostly because the easiest free tool to backup both DVDs and Blu-rays is currently available for PC only. There are some alternative programs that I'll mention, but I won't be providing a complete guide.)
- Your computer has at least an Intel i3 processor. A faster processor is preferred for video file conversion.
You may also want to consider purchasing an external hard drive or large capacity flash drive to keep the movie files on. Each DVD movie will take up around 1 GB of space, while each Blu-ray movie will take up 2-4 GB. Keep this in mind as you proceed.
If you're ready to give it a try, keep scrolling, and here we go!
Software You Will Need
You'll need two programs for this process, both of which are free to download and use.
1. MakeMKV
This program allows you to rip DVDs and Blu-rays while skirting the copy protection so that you can watch them without proprietary software.
You can download the latest version of the software by visiting its website:
The program is technically still in beta, and its full functionality is free to use while it is in beta. You will be able to use the program for 30 days without a registration key, but you'll want to head over to the MakeMKV forums to grab a beta key that is updated every month or so. You can continue to use this free beta key as long as the software developers update the forum post. The program will prompt you when it's time for a new key.
Mac and Linux users, you'll have to find another program to rip DVDs and Blu-rays. I don't have much experience doing this on a Mac, so if anyone has any suggestions, please post them in the comments. One program I can point you to with a DVD ripping function is DVDFab. You can download their "HD Decrypter," which seems to be the only free component of their suite. It is available for both Mac and Linux.
2. Handbrake
Handbrake is the crown jewel of this post. It's an open source video conversion program that can handle almost any video format. I almost included this program in my last free software post, but I decided to introduce it here since it has a direct application to DVD and Blu-ray conversion.
In everyone's interest, Handbrake is available for Windows, Mac, and Linux, so you should be able to find a version that will work with your operating system:
No need for a registration key for Handbrake. It's completely free to use.
Once you've downloaded these two programs, you're ready to get started so grab a DVD or Blu-ray and let's do it!
Ripping Your DVD/Blu-ray
"Ripping" is the term for copying the raw video files from a disc to your hard drive. You'll always need to do this first so that you can convert the movie down to one file.
This step will take up large amounts of space on your hard drive. For a DVD, it requires 5-7 GB of free space, and for a Blu-ray, you'll need around 40 GB of free space. Don't worry, you'll be able to delete these files at a later step, so your free hard drive space is still safe.
Begin by checking your disc drive. If it's built-in, no problem. If you have an external drive, you'll want to plug it in and make sure your computer identifies it and installs the necessary drivers.
Open MakeMKV. Refer to the previous instructions for information about registering the program if you're prompted to. You should see a window similar to this one:
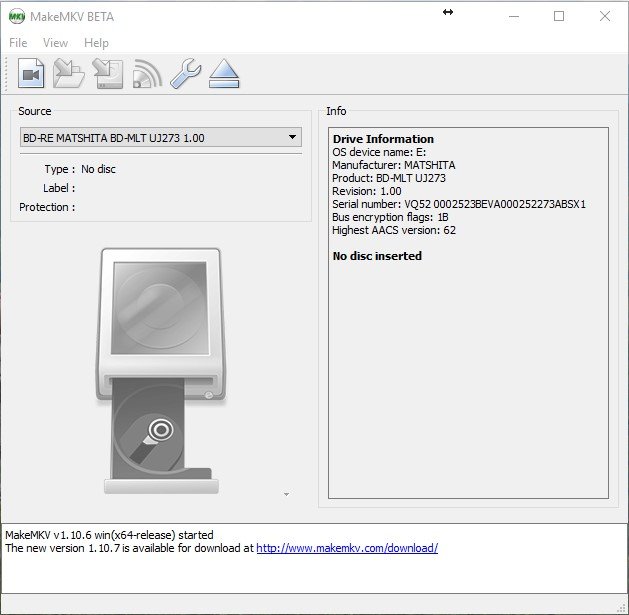
Next, insert your disc into the appropriate drive. MakeMKV will display an animation to let you know that it is reading your disc.
If your computer has an AutoPlay setting for when discs are inserted, you may need to close the AutoPlay window or any other program that attempt to access the disk
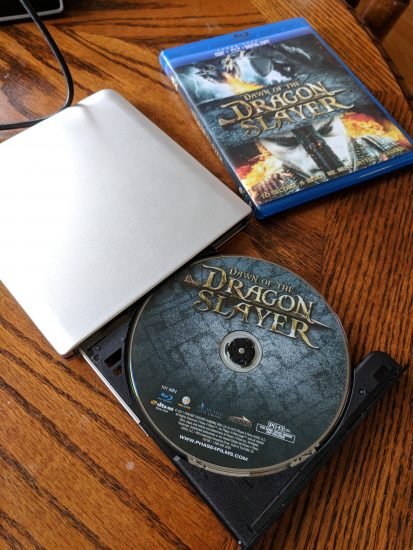
For the purpose of this tutorial, I'll be using the discs from a Blu-ray/DVD combo of the low-budget movie Dawn of the Dragon Slayer, which I purchased for $1 at Dollar Tree. Yes, it's as bad as it sounds, so you can definitely check it out if you want, but I'm not sure it was actually worth the $1 I spent on it.
When the disc has loaded, you'll see one of two things depending on if you have inserted a Blu-ray or a DVD. We'll start with the instructions for Blu-ray, so if you've inserted a DVD, skip ahead to the DVD section header.
Blu-ray specific instructions
If you've inserted a Blu-ray, you'll see something like this:

You're ready to rip the Blu-ray now, so you can click on the picture of the disk drive, or on the folder with the green arrow in the top left corner. Upon doing so, you'll see a small window appear:

Be sure the box beside "Decrypt video files" is checked. You may specify the path you'd like the files to be saved to. Be sure you remember where this directory is since you'll need it later. When you press OK, the rip will start, and you'll see a window that looks like this:

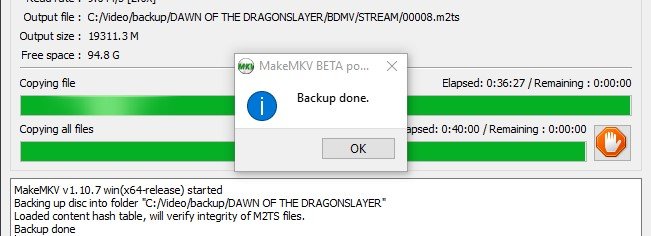
This will copy the entire Blu-ray to your hard drive, so again, be sure you have at least 40 GB of space free. That's about the most space I've ever seen a single Blu-ray disc occupy. This process may take some time, depending on the read speed of your drive. My disc took about 45 minutes, but larger movies may take an hour or more. So leave the process running and go type up a blog on Steemit, read a book, watch some YouTube, or play your favorite computer game while you wait.
When the process finishes, you'll see a dialog box that says it's complete:
You're ready for the conversion step, so you can now skip to the "Converting Your Rip" section.
DVD specific instructions
For DVDs, MakeMKV has a few extra options you won't see for Blu-rays, so I will walk you through the process now.
First, insert your disc, and you'll see a window that looks like this:

Click on the picture of the DVD in the drive, which is highlighted in red in the above image. This will begin the process. MakeMKV will analyze the structure of the DVD, which may take a couple of minutes, and when it finishes, you'll see a window that looks similar to this:

Take note of the section highlighted in orange. These are the titles that are available to be ripped from your DVD. You'll always want to select the one that is the largest. This will contain the main movie file. Other titles may be special features on the disc, etc., so you may include those if you wish. for the purpose of this tutorial, I left all of my titles selected.
Highlighted in blue, you'll see the directory for the output. Be sure to select a location that you can recall easily, as you'll need to remember it for the next step. Again, you'll have a size estimate for the output file beside each title in the section highlighted in orange. The maximum amount of space a DVD rip can take up is 7.4 GB if it's a dual-layer disc, so keep this in mind.
When you're ready to rip, press the button highlighted in red that says "Make MKV." This will begin the ripping process. You'll see some status bars and an estimated time to completion, similar to the screenshot in the Blu-ray specific instructions. This could take a while depending on the read speed of your drive (30-45 minutes, usually), so leave the process running and go type up a blog on Steemit, read a book, watch some YouTube, or play your favorite computer game while you wait.
When the process finishes, click OK, and close MakeMKV. You're ready for the next step: conversion.
Converting Your Rip
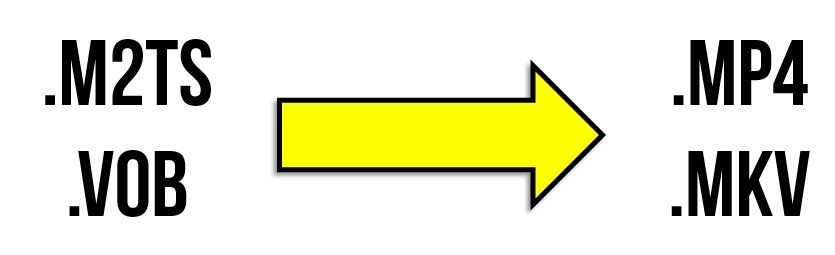
So now that you've ripped your DVD or Blu-ray, you've got a very large movie file sitting on your hard drive. In fact, you can browse to the folder where you ripped your disc, find the largest video file, and play it with VLC Media Player. However, keeping a video file that is 5-30 GB in size on your hard drive can take up quite a bit of space. Multiply that by the number of movies in your collection, and you've filled up your hard drive already. That's where conversion comes in.
In terms of quality, Blu-rays are far superior to DVDs. Remember that a dual-layer DVD can have a maximum of 7.4 GB of files on it. A dual-layer Blu-ray disc can have up to 50 GB. This means that the video quality and audio quality on Blu-rays is far better than DVDs. The quality of your movie will always be directly related to the size of the file. Therefore, the goal of conversion is to obtain the smallest file possible without noticeably losing video quality.
Handbrake is a fantastic program for achieving this goal. On average, I can take a 5-7 GB DVD source file and convert it to less than 1 GB without a noticeable loss of quality, and a 30-40 GB Blu-ray source file down to between 2 and 4 GB. Storing these files then becomes much less space intensive, allowing a large movie library to be stored in smaller spaces such as external hard drives or portable flash drives.
These numbers will always depend on the conversion settings, so I'm going to walk you through the best settings I have found for obtaining a good size-to-quality ratio.
Note: These instructions will be the same regardless of whether you ripped a DVD or Blu-ray.
First, open Handbrake. You'll see an interface that looks like this:

Under Source Selection, choose "Folder" and select the folder where you chose to save the rip from earlier. Handbrake will then scan the titles of the disc.

For longer films or discs with many special features, this number could be very high, so the scanning for titles process may take a while. For my disc, there were only six titles on the Blu-ray and two for the DVD, so it took less than a minute. Just be prepared to wait a while.
Next, you'll see something similar to this:

Setting a Default Save Directory
There's a lot here, but we'll start simple. If you're running Handbrake for the first time, you'll need to specify a path to save your completed video files. On the menu bar, select "Tools" then "Preferences." On the left side menu, select "Output Files" and specify a location to save them in the box higlighted in red here:

Click back, and you'll see the main interface again. Let's get to know it:
The Handbrake Interface

First, in blue, we have the main control bar. You'll see options to "Open Source," which we've already done. If you click it, you'll see the initial open dialog again, which asks for a folder or file location. You'll also see buttons to Start the Encode, Add to Queue, and Show Queue. We'll get back to these in a moment.
In green, we have the Source title menu. This is the first thing you'll need to adjust. Handbrake usually loads in the longest title it finds on the disc source files by default, so generally this will not need to be changed. If you click on the drop down box beside "Title," you'll see a list of available titles on the disc. The longest one is probably the movie, so you'll want to select it.
As an aside, if you're ripping Blu-rays or DVDs of TV shows, the individual episodes will show up here, however they will not be labeled. They'll generally be in order, so you can deduce which episode is which by looking at the order included with the packaging. Special features will also appear here as titles, but it may be harder to determine which clip is which.
Once you've ensured the proper title is selected, you have the option to change the file destination if you want it to be different than your default one you set in "Preferences." This may be changed in the "Destination" box highlighted in red.
You won't need to worry about the section in orange just yet, but Handbrake has many conversion presets built in, and that's where they live.
The yellow section is what we'll tweak next. You'll notice in the "Picture" tab that the size of the source file will be shown. For a Blu-ray, this is almost always full HD 1080p, or 1920x1080. For a DVD, the max resolution is 480p, or 720x480. You do not need to change anything in the Picture tab.
Video Settings
Next is the Video tab. This is where we'll make the most changes to get the conversion settings to fit your movie perfectly. When selecting it for the first time, you'll see the default settings that Handbrake loads in:

There's a lot here, and explaining each one of these settings would take a while, so feel free to consult Handbrake's documentation or just do a Google search. I'm going to recommend settings that I've worked out after converting many movies, but these are really suggestions. Each movie will be different, and these settings will work for most movies, but you are more than welcome to try out your own settings and post them in the comments if you have success! Here's what I recommend:
For Blu-ray movies:
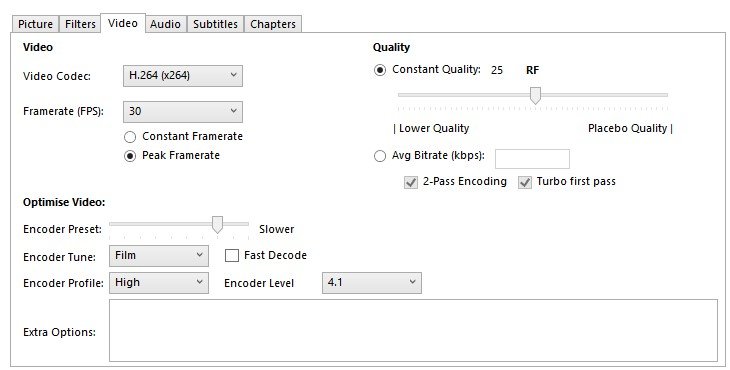
For DVD movies:

The only difference between the two is the Quality slider setting. You can place your cursor on the slider to get a description of what it does, but I've found that 25 is best for Blu-ray, and 20 is great for DVDs. You are welcome to try other settings.
A description of what each setting does may be found in this guide if you're interested in learning more.
Audio Settings
Next is the Audio tab. These settings are very important because you don't want to end up with dialogue that's quiet and loud, booming explosions causing you to have to adjust the volume every 5 minutes. Here's the audio setting that I recommend:

"Auto Passthru" is a great setting because Handbrake will analyze the audio stream throughout and normalize the volume. The one consequence of using this option is that the overall file size will be larger since the higher-quality audio takes up more space. Therefore, you can adjust the audio settings however you want. Mp3 or AAC passthru are other good options that provide a lower file size with some volume normalization.
Subtitles
One last setting that may interest you is the Subtitles tab. I enjoy enabling subtitles during movies since it allows me to read along and prevents me from missing small details in the movie dialogue. Many DVDs and Blu-rays include subtitle files, so Handbrake can take advantage of them. Alternatively, you can download a subtitle .srt file from a site like YIFY subtitles and import it to be used with your movie. For more information on Handbrake's subtitles, you can read their documentation here.
Encoding Your Movie

Now that you have the settings updated, you're ready to start encoding. Click the green button at the top of Handbrake that says "Start Encode." You'll see a progress bar appear at the very bottom of Handbrake:

Here you'll have a progress meter, information about the current frames per second (FPS) that Handbrake is processing, as well as an approximate amount of time it will take to complete. Depending on your settings and processor speed, this is the most time consuming part of this entire tutorial. Unfortunately, in order to obtain a low file size while maintaining high quality, Handbrake will need some time. You may need to leave your computer to perform this task overnight because it will consume most of your computer's processing power while running, making it difficult to use your computer for other tasks.
If you have multiple movies ripped and would like Handbrake to work on them consecutively, you may add more tasks to the queue by importing a new source, tweaking the settings, and clicking "Add to Queue" in the top menu. You may view your Queue and its progress at any time by clicking the "Show Queue" button.
If you'd like a preview of how your settings are going to look, selecting the "Preview" button at the top of Handbrake will encode a short segment of the movie for you to preview before committing to the hours-long full movie conversion.
You may also save conversion setting presets via the right side panel as mentioned earlier. This will allow you to click on one preset each time instead of having to individually tweak each setting in the tabs.
Enjoying Your Movie Files

When Handbrake finishes encoding your files, you're ready to view your movie file! Simply navigate to the save destination you chose and use a media player program to play your new .mp4 file. I suggest VLC Media Player, which I reviewed in Part 2 of the Free Software Series.
You can check the file size by right clicking and selecting "Properties." If you're unhappy with how large the file is, or the quality isn't up to your standards, you may have to tweak your Handbrake settings and try again (this is where the preview function is helpful).
If you're satisfied with the audio and video quality, as well as the file size, you can go back and delete the source files from where you originally ripped the disc. Your movie file may be transferred to an external hard drive or flash drive and may be viewed on most modern TVs that have USB ports and .mp4 support (this is the majority of modern televisions).
Repeat the process with as many DVDs or Blu-rays as you like, and soon you'll have a digital movie library that can be taken with you wherever you go. Enjoy!
Final Thoughts

This guide is meant to be an introduction to ripping and converting DVDs and Blu-rays. Feel free to change the Handbrake settings to suit your personal needs or use another ripping program if you already have one. MakeMKV will likely remain free for the foreseeable future, and Handbrake will definitely be free, so you can enjoy repeating this process for many years to come.
I have definitely enjoyed my digital movie library, and I hope you enjoy yours. If you have any questions on any part of this tutorial, please comment and let me know, or find me on Discord or Steemit.chat (ethandsmith). I'll be happy to help!
If you have suggestions for free software tools you think should be included in future posts, please comment and let me know!
As always, thank you for stopping by!
All images are my own creation, photos taken by me, or screenshots of software. Featured image was constructed from public domain resources obtained via Wikimedia Commons and Pixabay.


@ethandsmith, keep em coming! I have a couple very specific DVDs I have in mind that would be great to save.
I hope you're able to follow the guide and save them! Let me know if you have any questions, and thanks for stopping by!
Great post my friend. Love your software free tips. I am sure many people will find the use of these free software's. I actually have some VHS tapes of the games I had as a kid I wanted to turn into DVD's. So this will be helpful for sure.
You are really taking the time and effort to write your posts and I hope you it gets the attention it deserves on Steemit.
Have a great day brother. :)
Thanks for your comment!
Converting VHS tapes to a digital format is definitely a challenge. I think you can still get USB recorders that work with VCRs through the RCA jack audio video ports, but the problem becomes the resolution and quality. If you're able to get them to DVDs, though, you can definitely use these programs to digitize your memories!
Good luck, and as always, I appreciate your comments.
I've bookmarked this. Gonna come in handy soon!
I hope so! Let me know if you have any questions!
Ahhh thanks for this guide! Sooner or later, there wont be any CD/DVDs anymore
I think that will be a sad day. Physical media is great because you can rip it to your computer. I prefer to rip my CDs so I can have 320kbps mp3s. I also like to pick up a DVD or Blu-ray occasionally so I can save the movie with this method.
I know some day I won't be able to, but if I ever have kids and I can show them a bunch of movies without having to purchase them through a streaming service, I think I'll be glad I decided to do this.
Thanks for stopping by!
Haha, from where I come from. We pirate almost everything.... But I would still go to the cinema because as an animator, I know how much effort and time the team put behind the scenes.
Yeah I was thinking that movie you had didn't sound like the best... ;) Lol! Great post about how to do something I previously had no idea how to do. Now, I could follow your rather detailed tutorial and get those DVDs on my computer. Nice! Another plus about having them on there is you do it when they are new and then you don't have to worry about it if your kids scratch the disc and it doesn't play anymore or it skips. I mean, not that that would ever happen in our house. Seriously, I think the kids use the DVDs for Frisbees or put them on the bottom of their shoes and scrape them along the floor. ;)
Yes. There will never be a need to return a disc to its case. You can even eliminate opening a case only to find that the wrong disc is inside! There are so many advantages. Thanks for sharing, and please let me know if you have any questions.
Lol! Exactly. Nice! ;)
Hi Ethan, great post and thank you for such a detailed tutorial. It's enough to make me try doing it! I know this is probably easy stuff, but right now I am wondering how to convert the plastic bag of cassette tapes of music I love to some other form. I've been carrying them around for years to play (very loudly) when I'm driving. Now finally, I have a car, only eighteen years old but a classic 😎, that doesn't have a tape deck and I'm thwarted! I guess I'll have to invest in them again in some digital format. I hear that MP3s are much closer to the live sound than CDs, so perhaps I will skip that late 20th century technology altogether.
Hi @shanibeer! Thanks so much for taking the time to read my post.
Cassette tapes and VHS tapes are very difficult to convert to digital format because you must play them all the way through in order to record the tape. There are methods to do this, but it's probably a better use of your time to just try to purchase CDs.
I know you said that you've heard mp3s have better sound, but I would argue that CDs are the superior format to buy music on. The reason is that most CDs have the same remastered versions of songs that you can purchase via iTunes, Amazon, Google Play, etc. CDs can also be ripped into your computer using music media managers (I mention my favorite one in this post) in very high quality, often higher than when you download them as mp3s. I have a large CD library, but I also download music from Amazon as mp3s. I like to look for Amazon's AutoRip feature that gives you a free mp3 version of an album when you purchase the CD. Let me know if you have any questions!
I'm driving a 17 year old vehicle, and it does still have a tape deck. In fact, the tape deck still works, but the CD player doesn't! So I have the Beatles compilation album 1962-1966 on cassette tape, and I still listen to it in the car!
This is going to be extremely helpful! I will be traveling around the world for a while... I can have all my favorite movies on a flash drive for when I'm sick of watching foreign language films ;)
Thanks!
Very thorough presentation. I started doing this with my extensive dvd and blu-ray collection. I only did one movie due to the time it took to do it. One thing I was not aware of was that the blu-rays compressed that much. I’ll have to give it another try.
SDG
Thanks for stopping by!
It is very time consuming, especially if you're just getting started. I've caught up with my collection now, so I just have to do one or two when I purchase them now.
The compression algorithms have gotten much better since I started doing this several years ago. Definitely give it another go, and let me know if you have any questions!
This is very thorough and well done!! I appreciate the information you've put together. I may have to look at converting some old DVDs this way.
Personally, I have moved away from hard copies of movies all together. The secondary market for movie codes is booking. I can buy a new release code for VUDU a week before it comes out in the stores for half the price or less than the physical disk is going to cost.
If I am willing to wait a couple of weeks, I can usually snag a movie for $4. Less popular titles for even less.
But there are some movies on my shelf that don't have a digital version, or I am unwilling to pay for one, so maybe I will have to rip them to my new old computer while it is mining. hahaha
I've noticed this trend, too. I've been able to snag several movies for cheap compared to how much it would cost to purchase the Blu-ray. Also, since I live in a college town, people sell DVDs and Blu-rays cheap all the time, so I've been able to increase my library that way.
It's very nice to be able to watch the movies without an Internet connection, though. I think that's the main reason I still like to rip and convert the movies myself. Good luck if you ever get around to digitizing your library! Let me know if you need any help!
Please reply to this comment if you accept or decline.
Muxxybot is a Curation account that features chosen posts, selected and voted on by the Curation team. If featured, your post will be shared on Muxxybot's post, which will be resteemed by @gmuxx. The author will then get added to Muxxybot's voting list for automatic votes on all future posts.
I accept!