The pros and cons of building raised garden beds from concrete blocks
Building raised garden beds has many benefits. Depending on how big you build them and your choices of materials, you can recoup the costs in just 1 to 4 years. They need less watering than planting directly into the ground and it is much easier to keep weeds and many pests out of a raised bed. For those (like me) with a bad back, raised garden beds are also much easier on your back and depending on how you build it, can be used as a temporary seat while working in the bed.
But cost to complete can vary greatly and there are many other factors to consider. In this article we will be looking at the pros and cons of using concrete blocks to build your bed. I will be writing additional articles on other materials in the near future. To keep cost comparisons as easy as possible I will try to keep all measures for cost purposes to 4-foot x 16 foot (outside dimensions)
Advantages of concrete block construction
- Barring a natural or manmade disaster, they will last pretty much forever. This is a biggie in budget considerations.
- Higher side walls have greater stability that many other materials.
- You can add flat rocks or make your own fake rocks with molds available online, that are very aesthetically pleasing. This will add to your costs of course.
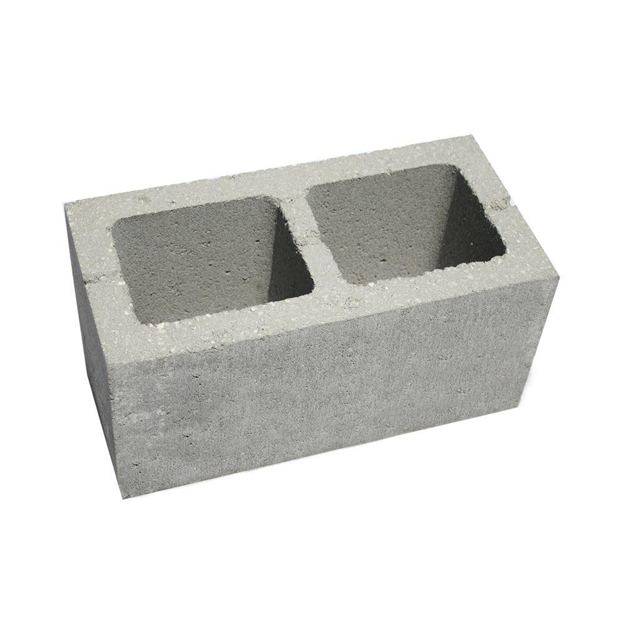
- Unless you choose to add a topper block to your bed, you can use the holes within each block to grow herbs around your garden. Choosing herbs that provide some benefit to what you are planting can help keep pests from the garden while being a source of herbs to use in cooking.
Disadvantages of concrete block construction
- Without adding a decorative over layer, some people consider them to not be aesthetically pleasing.
- In some areas there are laws against having cement blocks showing in any construct on the property. Check with your local officials before starting.
- Unless you have worked with concrete blocks in the past, there is a little bit of a learning curve, but most anyone can do it if they do a little reading before they start. It may however take a little more time to complete than some other materials.
Labor costs can vary greatly depending on your area and how many friends and family members you can get to help out. For that reason, we will not be including labor costs in our numbers. The project can be completed by the home owner to save some money.
A standard concrete block in the USA measures 16-inch-long, 8 inches high and 8 inches wide. We are building our bed 16 feet long x 4 feet wide. Each layer high we choose to build will be 8 inches. For most people 16 inches will be perfectly fine. If you have a bad back you might want to double that which of course would double your material costs. It is a decision you will need to make for your personal situation.
Let’s do the math to determine how many blocks we need per layer. Since our sides are 16 feet long and our blocks at 16 inches long, it is easy to know we need 10 blocks per side for a total of 20 blocks per layer.
For the ends we need we need 4 blocks per end. Keep in mind, the blocks are much wider than wood, so the inside dimensions will be only 3 feet. If you want that extra 12 inches in width, simply add 1 additional block per end and you will have the entire 4-foot width inside. So, we need a total of 10 blocks per layer for the ends.
Each layer of our bed will need 30 blocks. I would build a minimum of 2 layers high but if you choose you can build an 8-inch-high bed with only one layer.
My local Home Depot sells the blocks for $1.22 each. That means a 2-layer high bed would cost 60 x $1.22 = $73.20 plus tax for the blocks. You will also need Mason Mix to glue the block together. Home Depot sells it for $6.45 per bag. The number of bags needed will vary depending on how much you use between the blocks, but 4 bags should be plenty for the project making the cost just $25.80. The total so far is $99 plus tax.
Decision Time
Depending on where you live, this could be the only material costs. That would of course mean your bed would retain the look of concrete block. If you want something a little fancier, you will need to cover the outside of your bed. There are many ways to do this.
- Paint – Many community gardens choose to use blocks because they rarely need to be replaced and are very cheap. Volunteers then paint bright colorful scenes on all sides creating a happy environment. You could also choose to simply paint the blocks in a solid color. This would add only the cost of the paint which can vary from $25 a gallon to $50 a gallon or more.
- Stucco is a surface treatment that can add a more pleasing style to your blocks. It comes in many colors and costs range between about $16 to $35 per bag. Make sure you compute the square footage of the outside area of your bed so you can determine how much you will need to buy. The one drawback with Stucco is you may need to hire someone to put it on so be sure to figure their pay into your costs if you need to hire an installer.
- Rock – This can be a beautiful choice and depending on your choice of rock can provide an upscale or a rustic look. Cost can be a major drawback as rock is fairly expensive and usually requires hiring a contractor to install it. To save some money, there are molds you can buy online that allow you to use concrete mixed with a colorant to make very realistic looks rock.
- Adding a topper – To achieve a more finished look, you may choose to add a topper to your bed. There is a wide variety of choices but it can be a major addition to costs. Check with your local supplier to determine the best choice for the look you are seeking to obtain. There are concrete versions that are relative inexpensive with materials such as marble at the higher end.
That is the basics of what you can do with concrete blocks. In my mind, the biggest advantage is the fact your garden bed will probably last longer than your lifetime (and perhaps your children’s lifetimes too). Wood will need to be replaced at least every 8 to 10 years and perhaps sooner in areas with poor drainage or higher rainfall totals.
I hope you find this useful in your decision-making process. If so, would you please consider giving me an upvote and/or resteem.
Remember: Freshly grown food is cheaper, of higher quality and can keep your family fed if supply chains break down for any reason.
In theory and the presentation of the writing is very good. Your lucky buddy, this post got many awards, especially from curie.
I also made this brick-making process, look at my proprietary writing that has no appreciation value like you @fernowl13
This my url post
https://steemit.com/homesteading/@owner99/the-process-of-making-batako-in-my-uncle-s-house-by-owner99-20171028t201642729z
A couple of months ago I did a post about growing potatoes in cinder blocks. https://steemit.com/gardening/@simms50/cinder-block-potatoes
I have done this a couple of years now and what I have found is that I needed more water for these potatoes than the ones that were grown in the ground. I will be growing more potatoes next year, but I will be sure to give them more water than what I did this year. Thanks for posting and sharing!
I guess part of that has to do with how much rainfall you get at which part of the growing season. Since our drought broke a few years ago, I had to enlarge the drain holes on the one that sits on the side patio. It was staying far too wet. The others did just fine. My biggest reason for like these is I can sit on them while I work. My back loves it, lol. Thanks for sharing your thoughts!
simms50: Unless you till the soil in your ground, it will be compacted and will not have much drainage. Tillage should be done once a year. Raised beds depending on the soil used will always require more water than in-ground beds; this is why you should use some sort of mulch to keep the raised bed from drying out. Source: http://extension.uga.edu/publications/detail.html?number=C1027-3
I can't get enough of the how-to's. It's so much easier to learn from others experience. I have several raised beds constructed out of many different materials. The ones that look the nicest are the metal ones. But they are also the ones that heat up quickly and dry out faster. I learned that I can start my tomatoes and pepper seeds in those earlier than normal and then transplant them to my wood beds to finish growing.
that is a good idea about starting them in the metal containers and I agree, the extra heat does cause them to dry out faster. Thanks for your reply. We can all learn something from others!
Just curious...
How is this? I have never heard of it before.
Not 100% sure how to explain it. If you pour water directly on the ground, it soaks in fairly quickly. If you pour it into a 5 gallon bucket filled with dirt (and the bottom cut out) it won't start soaking into the ground below until there the dirt cannot hold any more water. So a light rain or a short rain, may not every soak into the ground below and is only being used by the plants and via evaporation. A good mulch to prevent evaporation and the only water the plants do not get is when there is excess water. When planting in the ground, the moment the water enters the ground it begin to soak into the surrounding area also, so it takes much more water to get the same depth of water as the raised bed.
Agree with using blocks 100% . Though they can be a bit laborious to start it is well worth the end product. Lasts forever! 🐓🐓
Thank you for your response. Wood just did not work for me. You have to use pressure treated or replace them every 3 years. I don't like having my food growing in the chemicals they use in pressure treating. Plus like you said, they last forever! I am still using the first one I made 10 years ago when we bought this place.
I'm curious how 16 feet = 10 blocks that are 16 inches in length?
10 blocks x 16 inches = 160 inches
16 feet = 192 inches
Just wondering....
It is entirely possible I made a mistake. Not only am I human I also have to work through a magnifying glass because of a vision impairment. Sadly, I don't think there is any way to fix a mistake once it is posted. That is one of the limits of blockchain.
Sorry to hear about the vision issue. I'm still trying to figure out if I should be making it 10 blocks long or twelve blocks long?
Thanks in advance.
By the way, you CAN edit your post!
If you could tell me how, I would appreciate it. I have not been able to find a way to do it yet. I sort of figured there was a way, but it is easy for me to overlook a link, especially if they are lighter colors and a white background
As long as you want! As short as you want, the end result is an expensive raised bed; cheaper to just to use 4x4s and 1x1s treated wood if you ask me. Though, I must say, when I was building my terrace garden beds, the first thing that popped to mind, was the concrete blocks for stability.
At any rate, you have the dimensions of a standard concrete block: 16-inch-long, 8 inches high and 8 inches wide. You want to build a bed that is 16 feet long and 4 feet wide.
The length of the bed is 16 feet. There are 12 inches to a foot, so you will need to multiply 12 and 16 which equates to 192 inches. How many blocks are required for 192 inches? You will need to divide 192 inches by 16 inches which equates to 12, 12 blocks per side for the length(Long), for a total of 24 blocks.
The width of the bed is 4 feet. There are 12 inches to a foot, so you will need to multiply 12 and 4 which equates to 48 inches. How many blocks are required for 48 inches? You will need to divide 48 inches by 16 inches which equates to 3, 3 blocks per side for the width, for a total of 6 blocks.
For both the width and length, that brings the total amount of blocks to 30 per layer assuming total width and length of the entire bed with the blocks. Remember, your inside measurements for the width will be short by 8 inches on each side for the width (one full block), as you have to account for right angles on the outside of the bed; so as she stated, just add 1 additional block per side for the width to get a working area of 16 feet by 4 feet (Inside); then the total of blocks will be 32. Hope this helps.
Thanks for article @fernowl13. I agree and find concrete blocks the best for me for raised beds. Another advantage for me is the holes help support the pipes and faucets for my watering. I would differ in they use less water as I find the water percolates deeper in the looser soil. I guess it all depends on where you live and your soil type. I see in one of your responses about the negatives of wood chemicals. That might be a good follow on article - discussing the pros and cons of alternatives.
I am working on a wood article now. Yesterday was eye treatment day and they sort of make life painful and harder to see for a few days, so I am a little behind schedule right now, but it will be available in a few days. Thanks for your thoughts, I really do appreciate them.
Overall, great article. Mistakes will happen, I make them all the time, we, as humans are not perfect. The article is well written and organized, very easy to read.
I used wood in the past for raised beds and now switching to concrete blocks.I found mine on clist for free and did not find glue was necessary.Keeping the beds 4x10 allowed me to use pvc for hoops and row covers for season extension. Herbs and companion plants planted in the holes work great after veggie crops get established.
I agree, concrete blocks works so much better. It is more work to set up up, but if you are lousy with a hammer (like I am) the setup is not that much harder but they last forever. You are correct about the pvc hoops, they can extend you growing time dramatically and depending on where you live, can allow some things to grow year round.