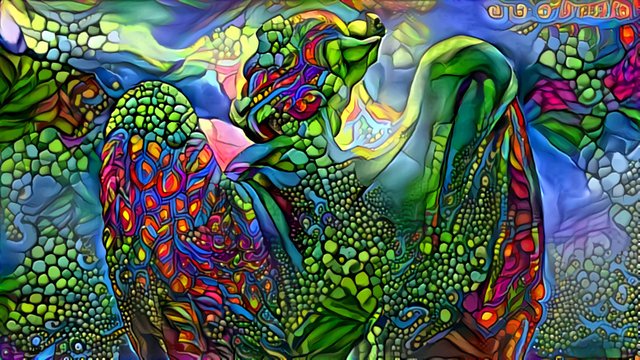
Deep Style - Deep Dream Generator Tutorial (and OUTING MY WIFE ON STEEMIT post)
Are you interested in making strange and surreal art? Mind blowing special effects for your photography? Welcome to the Weird.

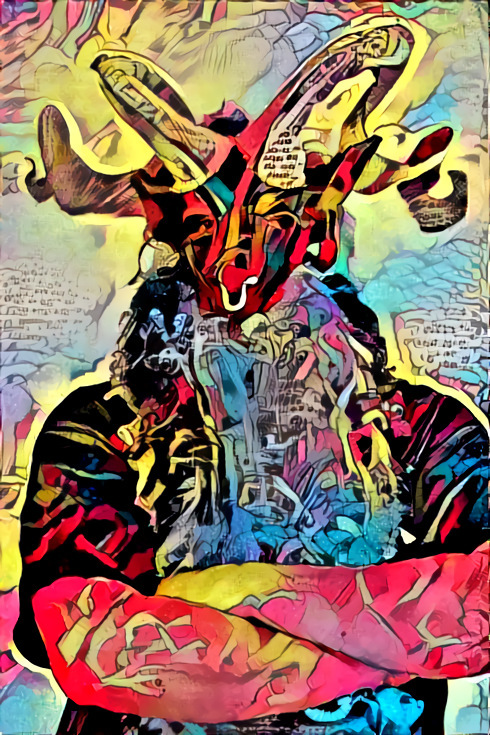
Welcome to the Weird - Carl Nash
For the past week I have been having a blast using the Deep Dream Generator as part of my artistic process. After mentioning this a few times in my recent posts, the rare and radiant maiden the angels call @juliakponsford gave me the great suggestion to make a tutorial post on using the Deep Dream Generator. I do not claim to be an expert but I will share what I have learned in playing around with the tool.
Post Roadmap
This is a long post and it takes a few turns and meanders, goes over a few dips and hopefully up a few rises :) In case you want to head straight to the crunchy bits, here are the major headings:
- Intro/Roadmap (you are here)
- Shameless Self Promotion and Art Explosion Contest Shoutout
- What is the Deep Dream Generator?
- More Shameless Self Promotion Disguised as an Example
- BASIC tutorial - the quick start guide
- A note on Account User Level, Permissions and High Resolution Images
- ADVANCED tutorial - an in depth look at all the Deep Style settings
- General Hints, Advice and More Examples (AKA HERE IS WHERE I OUT MY WIFE ON STEEMIT)
- Outro - ALL THE LOVE

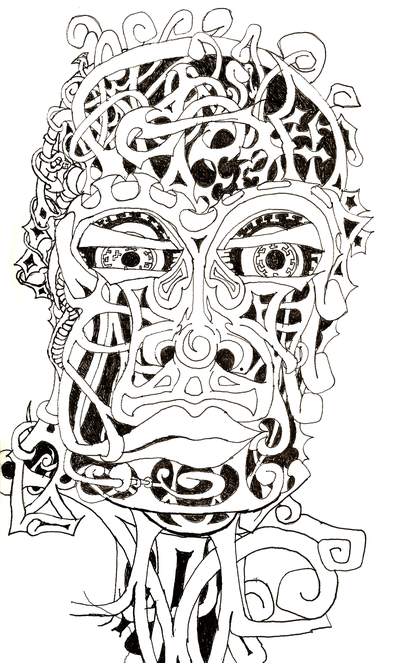
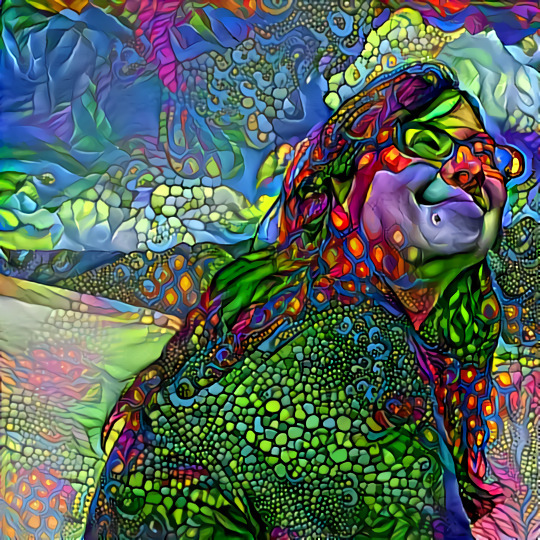
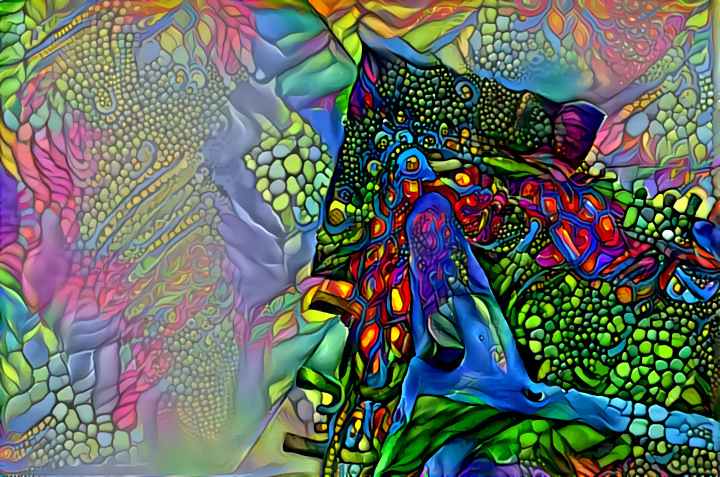
Dreaming of the Dreamer - Carl Nash
Shameless Self Promotion
My highest paying post to date is the piece of art above and associated post on the process of feeding it through the Deep Dream Generator multiple times before finally (digitally) painting on top of it. Check the post out - I am proud of it. This piece of art was actually made for @juliakponsford's awesome Art Explosion Contest. All you artist types should check out the Art Explosion Contest - the week 6 contest submission period is over but make sure to follow @juliakponsford for the next installment!
</shameless self promotion>
What is the Deep Dream Generator?
It is a free website which lets you use a neural network to generate images. This basic concept exploded into the collective internet consciousness some years back thanks to Google Deep Dream. If you somehow have arrived at Steemit without ever encountering Google Deep Dream style images, please alert me to the time travel device you used in the comments below. I am also interested in time travel, would love to chat.
Here is Van Gogh in classic Google Deep Dream style (harvested from Google of course - this is not my work here):

What the Deep Dream Generator brings to the table that classic Google Deep Dream style generators do not is the ability to train the neural network in a style image of your choosing. You can upload any image as the style image. And of course you can upload any image as the base image that the AI will apply the style to and create a new image from.
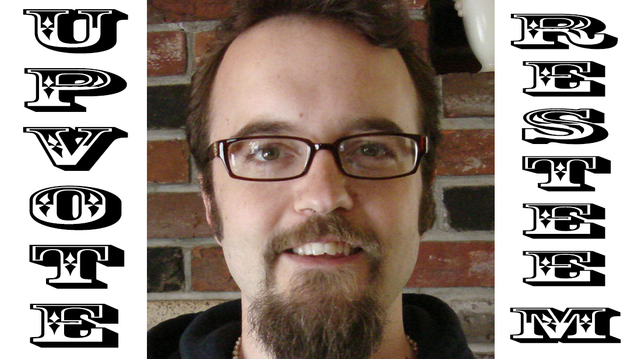
The possibilities are limitless. Before I get into tutorials, here is another bit of shameless self promotion by way of an example - I created the post cover image for my FREE upvote & resteem service using the Deep Dream Generator.

This image was created using the piece of original art below left as the style image and the text "UPVOTE RESTEEM" and my face as the base image.
 |
 |
BASIC tutorial - the quick start guide
Step One: Create an account / Log in
Navigate to http://deepdreamgenerator.com

You can either "sign up" (your standard account creation process with selection of username and password) or "log in" with your existing Facebook, Google or Twitter account/login.

I used my Google account - I have two-factor authentication enabled on my Google account so I don't mind using it to log in to 3rd party sites.
UNRELATED PSA - I highly recommend you enable two-factor authentication for your email account and any other sensitive online accounts if that option is available to you. May the Goddess bless Steemit with two-factor authentication soon!
STEP TWO - Navigate to the image generation home page
Once you have logged in, click on the "Generate" button at the top right:

You will arrive at https://deepdreamgenerator.com/generator - you can bookmark this page to jump straight to the good stuff in the future.

STEP THREE - select a mode
By default the "Deep Style" mode will be selected, but you can select from "Deep Style"; "Thin Style"; and "Deep Dream". The remainder of this tutorial focuses only on the "Deep Style" mode but I plan a future tutorial post for the "Thin Style" and "Deep Dream" modes. Stay tuned there. For now - you are done with this step! Yay that was easy!

STEP FOUR - upload or select a base image

Click on the "Upload Image" link to select the image you want to use as the base image. This is NOT the style image. The base image is what the neural network is going to apply the style to, making a new version of the base image you upload here in the style that you will select in the next step. Once you have generated an image at least once, you will have the option of selecting your previously uploaded base image(s) as well - either by just clicking on the thumbnail that appears next to the "Upload Image" link, or by clicking "More" if you are looking for a recently uploaded image that is not in your four most recent uploads.
STEP FIVE - Select or upload a style image
This is really where the magic happens. You have several options here:
Default Styles
You can just use one of the default styles - by default (unsurprisingly), "Default Styles" will already be selected, and the "Starry Night" default style will be selected. The green check mark identifies the currently selected style. The little thumbnail for each style shows the result of applying that style to a generic image. The name of the style will not appear until/unless you click on it. You can choose from such descriptively named default styles as "Laser Fusion", "Simpsons", and "Mosaic".
Upload Your Own Style
This is what I have been playing around with mostly, uploading my own artwork or my own original photography as the style image.Somewhat counter-intuitively, you will only have the option to upload your own style if you are in "Default Styles"
Click on the icon of a gray up-arrow in a gray circle to upload your own style image.
Once you have clicked on this icon, a new "Choose file" option will appear above it - click on this to open the file selector wizard:

My Styles - Select a Previously Used Style
Once you have generated an image at least once you will have the option to select from style images that you have previously used. To do this, select the "My Styles" option and then click on one of your previously used styles. Again, the green check mark indicates which style is currently selected - as you can see I have been playing around with using polyhedral dice as a style (see the results in this Polyhedral Cathedral post):
Select a Popular Style
Your final option for selecting a style is to choose from style images that are popular with other users of the Deep Dream Generator. Click on the "Popular Styles" option and then select from the style choices. These will not have names so you just have to look at the thumbnails. Again, the green check mark indicates the currently selected style: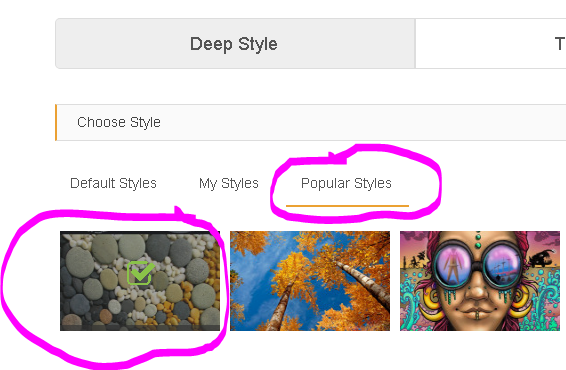
STEP SIX - Generate Image
Now that you have selected a base image and a style image it is time to let the Deep Dream Generator go to work! There are other options that you can play with that will allow you to fine tune the result (see below for Advanced Tutorial), but this section of the tutorial is just about the basics. If you just want to get up and running creating kewl images with the generator, at this step you just hit "Generate" and wait for the neural network to do its magic.
Terrible Web Design Warning
Do NOT hit the "generate" button at the top of the web page! Yes, you would think that this would generate your image... but you would be wrong, because Terrible Web Design. This button at the top of the page should actually be labeled "Generator" because it takes you to the generator homepage... so hitting the "Generate" link at the top of the page will return you back to Step Two of this tutorial. It will reset all of your selections and you will have to repeat steps 3 - 6 all over again. Gah! This frustrated me the first time I ran into it so just trying to save you some pain :)
Terrible Web Design Part Two
"You know, what would really make sense, is to make our users scroll down to the very bottom of the page to find the real "Generate" link. That way we can make sure they are really paying attention and not just clicking on the easy to see "Generate" link that is at the top of the page and visible without scrolling. " - hypothetical words spoken by theoretical Deep Dream Generator web developer :)
Hey I followed steps 1 - 7 and received an error message when I clicked "Generate"!
Yeah this happens sometimes. For no apparent reason you may see something along the lines of "You must select a style to continue" / "Image is a required field". This will occur even if you had in fact selected a style and a base image. When this error pops up you will have to repeat steps 4-6. I have even had this error pop up a few times in a row - I just repeated steps 4-6 until it went through.
STEP SEVEN - Hurry Up and Wait
Once you have hit "Generate" it will take some time for the neural network to make your image. It will pop up a message saying it will take ~10 minutes. This is a generic estimate and has no bearing on how long it will actually take. More important is the number of other submissions in the queue - this is displayed next to the progress bar. If there are only a few submissions in the queue it might only take a couple of minutes, but if it is 30+ it may take a while for yours to get processed. Patience.

STEP EIGHT - download your finished image
Once the generator has finished crunching your image, it will pop up in a screen like this. To download, click on the gear icon to expand the options, then select "Download":


Every image you create is also stored in your account - I would assume there is a practical limit to this but I haven't found anywhere that spells this out. Just select the "profile" option at the top right of the screen to see your profile and browse through your previously created images.
A note on Account User Level, Permissions and High Resolution Images
Before I get into the more advanced options below, a few words on the way your Deep Dream Generator account works. The Deep Dream Generator uses a tiered user level structure which is tied to the number of images you can generate per hour and the quality of the images you can generate. New accounts will only be able to generate lower resolution images, and less often, than higher level accounts.
I should note that even the highest level of account status can only generate images of limited resolution. The highest resolution images are only .95 MP. As awesome as this tool is, it is not particularly useful for applications that demand high res. Sorry Steemit cover image designers or anyone looking to make high res images for print applications - this tool is not for you.
There are a lot of ins and outs to the level based permissions that I am going to glaze over so please visit this link for the full scoop - everything is laid out very clearly here. You can check your current account level by clicking on the "Profile" link:

Newbie Level - your account will be in "Newbie" status for the first day after creation, AND until you have generated 10 images (dreams). While you are a Newbie you can generate a maximum of 10 Deep Style images per hour of the lowest resolution. Once 24 hours have passed since account creation AND you have generated 10+ images, you will graduate to...
Member Level Now you can generate two medium resolution Deep Style images per hour in addition to the 10 low resolution images.
There are two levels beyond Member: Dreamer and Deep Dreamer. You will not have privileges to generate "high" resolution images until you reach Deep Dreamer level, which takes a minimum of 21 days.
Read all the requirements for leveling up your account here.
ADVANCED tutorial - an in depth look at all the Deep Style settings
Follow steps 1-5 per the BASIC tutorial, but pause before hitting the "Generate" button. There are several options you can change to control the new image that will be output from your base image and style image.
Expand the Settings Menu
Toward the bottom of the screen, under the style selection options, is a settings bar which is collapsed by default. Click on the down arrow to expand the settings menu:

The expanded settings menu:

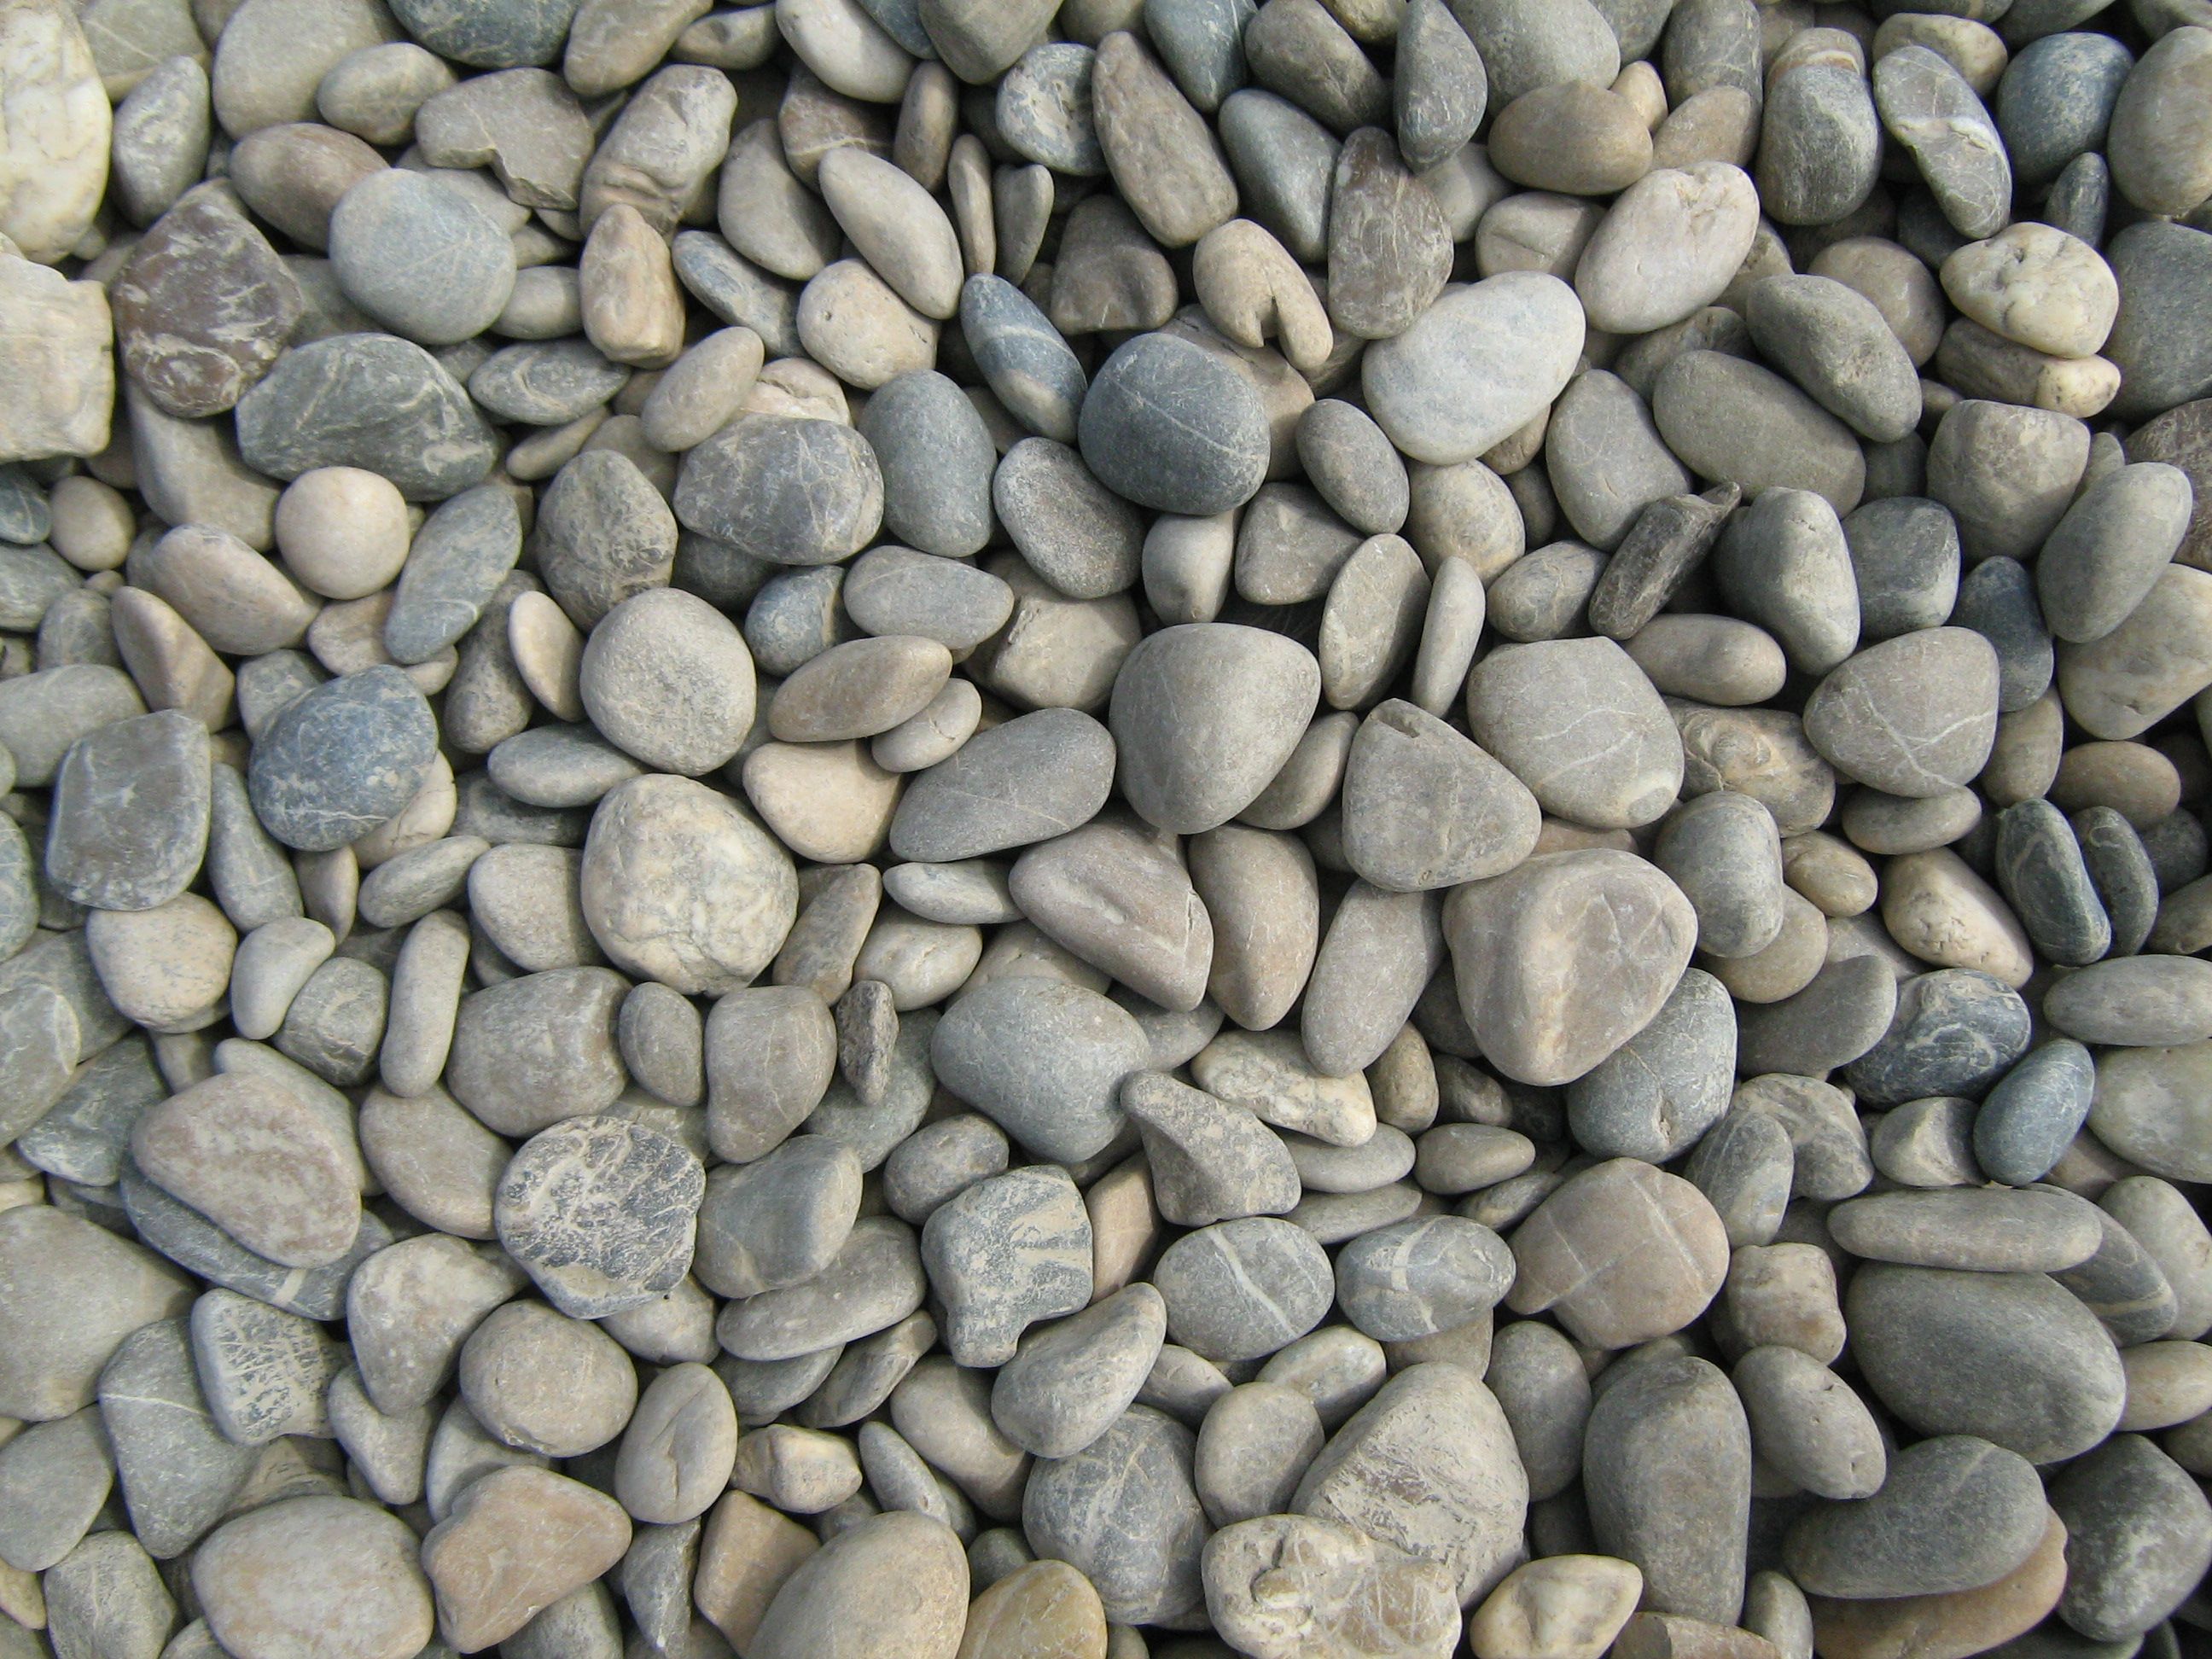
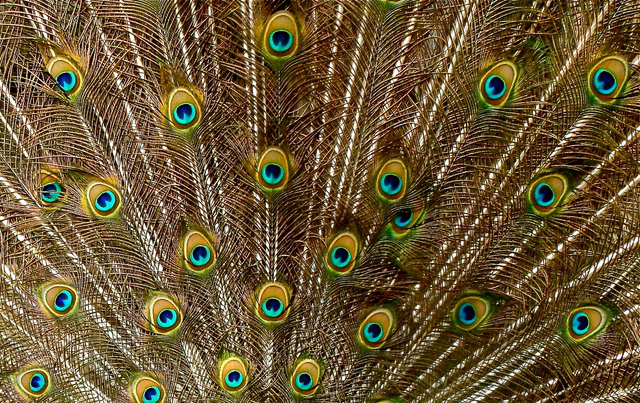
For a few of the settings below I am going to show you examples. I will be leaving all other settings at default in my examples except for the settings being illustrated. The starting images for my examples are as follows. Base image on left: pebbles from wiki commons - style image on right: cropped portion of peacock picture from wiki commons
 |
 |
Enhance Setting
Default setting is 3 out of 5. Raising the Enhance setting increases the quality of the new material that the AI generates using the style image as inspiration while diminishing some of the original texture and structure of the base image. Decreasing the Enhance setting will preserve more of the original texture and structure of the base image but decrease the quality of any new material that the AI creates. This one is best understood by seeing it in action. FEnhance setting all the way lowered to preserve more of the texture of the pebbles:

Enhance setting all the way up to add more of the feather texture from the style image:

In this case lowering the Enhance setting to preserve more of the pebble texture made the output image more three dimensional, with a rougher texture, while raising the Enhance setting really smoothed out the image and almost gives it an underwater look as the feathers had a lot less variation in texture.
Resolution Setting
This controls the resolution of the output image. Default is "Normal" (which I would call low res at .36MP max res), with options for "Medium" (.6MP max res) and "HD" (.95MP max res). As mentioned above, when you first start out your account you will only be able to create low res ("Normal") images.Depth Setting
Default setting is 2 out of 3 ("Normal"). 1 out of 3 is "Shallow" and 3 out of 3 is "Deep". Unless you are in a hurry, ALWAYS set your Depth to "Deep" The more depth you set the better quality you will get but it will take more time to generate the image.Style Weight Setting
Default setting is 5 out of 9 (scale ranges from 10% to 90% in 10% intervals). The lower the setting, the closer the output image is to the base image, and the higher the setting, the closer the output image is to the style image. This is one of the first settings you should get used to fiddling around with, in combination with the scale setting below. There is no one size fits all advice I can give you here - it is going to depend entirely on the images you are using and what you are trying to accomplish.Style Scale Setting
Default setting is 4 out of 7 (default is 100%, scale ranges from 40% to 160% in increments of 20%) This is probably the setting you will adjust the most often. This controls the relative size of the patterns the AI is generating from the style image. This is another one best illustrated through example:Style Scale all the way up at 160%:

You can see at this scale the AI was able to apply the central eye design of the peacock feathers across entire pebbles. It is a decent fit, scale of style to base image.
Style Scale all the way down at 40%:

Here with the style scale set way down the AI is having a much harder time. Not a good fit style scale to base image.
Preserve Colors
This is a simple on/off switch. By default it is off, which does NOT preserve the colors from the base image, rather introducing new colors from the style image. Switching this ON will preserve the colors from the base image while generating a new image using the style of the style image. This is pretty straightforward but it can make a huge difference. Pebbles and peacock feathers are a terrific example here. Obviously in almost all cases if you were using peacock feathers as your style image you would want to leave this turned off - what is the point of peacock feathers as a style image if it is not for the awesome color?Here we see the pebbles as base image and peacock feather as style - but I switched ON preserve colors to keep the boring pebble colors from the base image:

The last setting you can change is the Access permission

This doesn't impact the output image in any way, but changing this to "Public" will allow other Deep Dream Generator users to see your output image and possibly "like" it. If you want to advance your account level up past the "Member" level you will have to set some of your output images to public and collect a certain number of "likes" across your images. See above for more on user account level.
HERE IS WHERE I OUT MY WIFE ON STEEMIT
In the next section I am going to be giving you more examples, and to be honest, my wife has had better results than I have as far as using the Deep Dream Generator on photography - so I am going to be using some of her examples there as well as my own. This is probably as good a time as any to connect some dots. My lovely and talented wife is here on Steemit, although she is not particularly active. Can we show her some love in the comments, or even visit her page and maybe coax her into a more active presence here?

Lovely Wife, Thing One and Thing Two
My wife is @dillemma here on Steemit, and has a second account as well which is very narrowly focused on her coloring book page art - check out @coloringbook as well!
General Hints, Advice and More Examples
Spend some time browsing through the public images that other users have created using the Deep Dream Generator
When you are logged in to your account, the home page deepdreamgenerator.com will display popular recent images from other users. The display is really helpful for learning and gaining inspiration, because it shows the base image and style image as thumbnails next to the output image, so you can see what is working for other people:

You can even easily use a style image that another user used - just click on the + icon in the box to create an image using the same style and settings. When you do this it will pop up a selector wizard asking you to select a base image. As soon as you select a base image it starts generation - you cannot change any of the style settings.
PRO TIP - once you have created an image in this manner using the style image of another user, that style image shows up in the "My styles" selection option (See BASIC TUTORIAL - Step 5). Now if you make another image using that style you can adjust the settings as described above in the ADVANCED TUTORIAL.
Spend some time playing around with the generator
That is your great advice? Spend some time playing around with it?
Well yeah, actually. First, grok the word "play". Start by just messing around with the tool for fun. Just grab any old base image you have and any style image that sparks your fancy and generate an image. Play with it. I have been frustrated several times by having a specific end result in mind when I selected background and style images - best success has come by letting the AI decide what was going to happen to a certain extent. Feed it interesting things and see what it does. I also mean play with it - as in interact with and play a game with the neural network. Treat it as a collaborator that is spitballing ideas with you. Don't assume you are the art director of this art project - you and the AI are both artists working on the same project and providing direction. Maybe don't start out with your first run at the generator being this big idea you have had - save that for a bit while you get to know the AI a little better. Not to say you can't do that - but it might save you some frustration to gain a baseline competency and then start tackling specific objectives. Have fun!
Record your settings
I highly recommend either writing down the settings you change from default (see ADVANCED TUTORIAL). I wasn't doing this at the beginning and @dillemma was - it helped her figure out the settings much faster than I did.
I also encourage you to record the style image - you might think you will be able to tell what it is, but after you have been playing around with this for a while I can tell you from experience it is hard to remember what you used to create a given image when you go back and look at it.
A simple and efficient way to record all this info is to just include it in your naming convention when you save the output image e.g. BASEIMAGENAMExSTYLEIMAGENAME_80wght_160scale for an image that you adjusted Weight to 80% and Scale to 160%.
Consider cropping your images to focus on certain areas
Particularly in the case of style images, you may find yourself wishing the AI had included more of a specific element when it created a new image. As long as your original image is high enough resolution, you may just be able to crop out a portion of the image that focuses on the feature you want the AI to use. You will likely have to reduce the Style Scale setting if you are cropping a relatively small portion out to use as a style pattern.
Do you need an Image Editor?
This is venturing outside of the scope of this tutorial, but if you don't have a good image editor for cropping and other simple adjustments e.g. contrast, saturation, color balance, etc., I recommend IrfanView. I am not affiliated with this program/company in any way. It is completely freeware and it is a tiny little program - minuscule footprint while running and it starts like lightning even on old (ancient) computers. I have PhotoShop and I still use irfanview all the time. It is my default program to open image files. Just visit http://www.irfanview.com/ and click the 32 bit or 64 bit download link on the main page (or visit the download page if you need other options).
Two quick irfanview tips: If you start dragging your selection box and then hold down the Ctrl key while you finish dragging your selection, it will force a square aspect ratio. If you hold down Ctrl before you start dragging your selection box, it will force a widescreen rectangular layout which just so happens to be the perfect aspect ratio for Steemit post thumbnails...
Select interesting style images
This sounds like a no brainer, but I mean "interesting" from the perspective of your robot partner in crime. What does the AI think is interesting. I want to give you an example here.
I took a bunch of really pretty photos at the Oregon coast earlier this spring, of a sunset intodistant clouds across a beach that was still wet with the receding tide - a glistening mirror for the glorious sky.

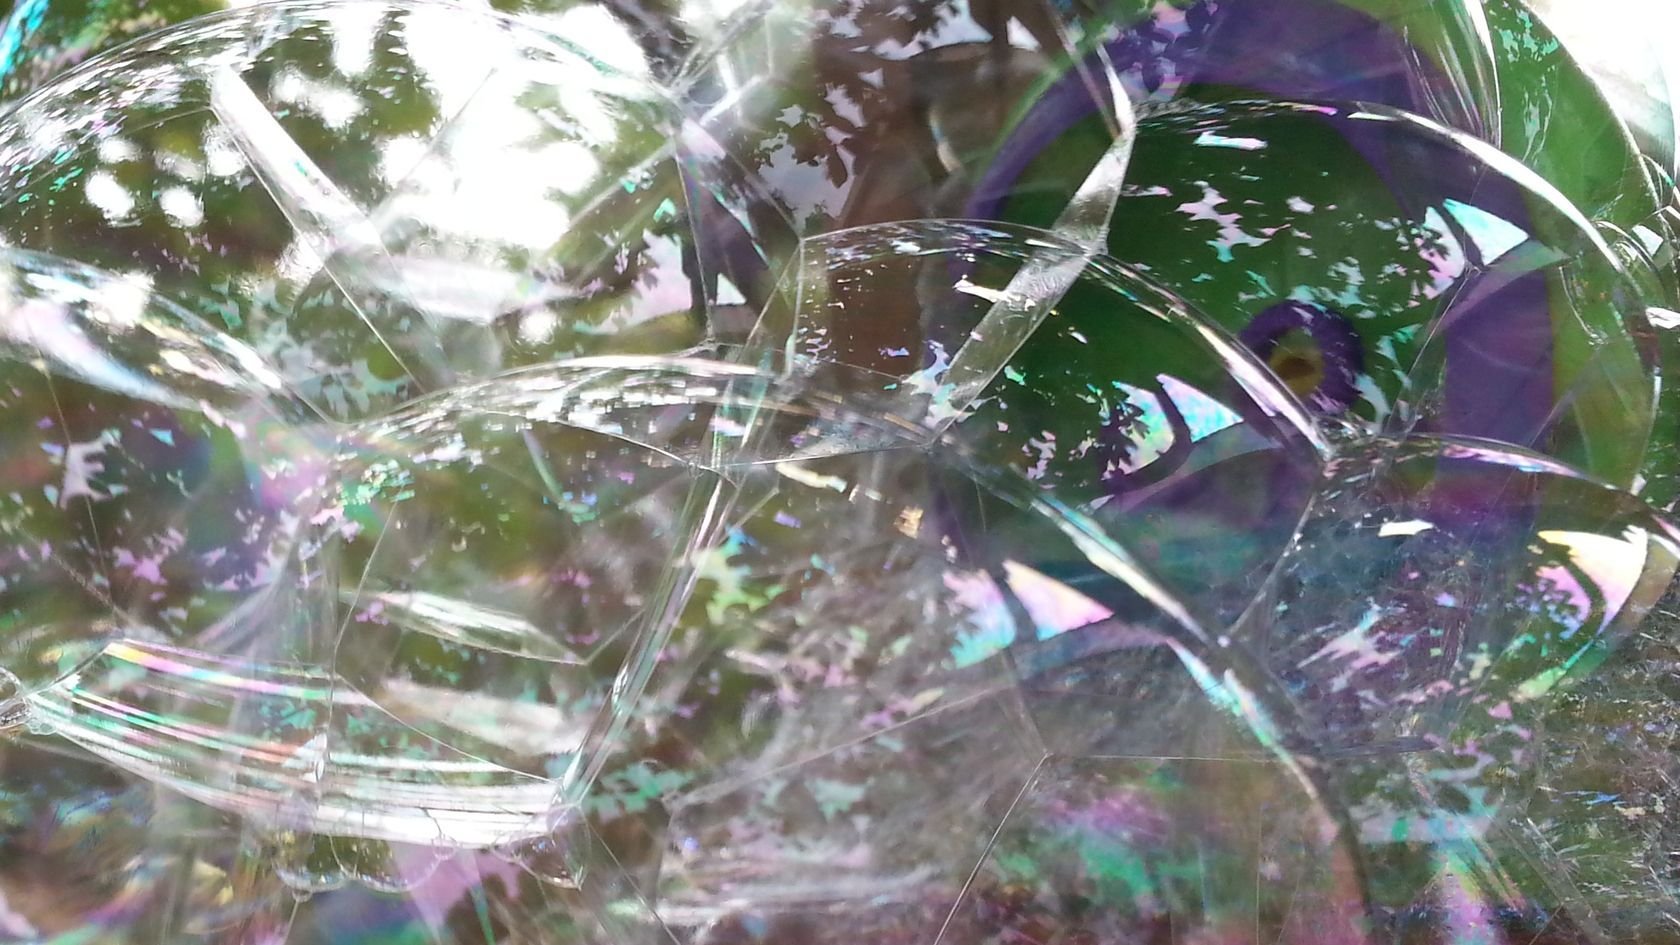
I thought one of these photos might make a good style image. I used the below cropped section of a macro photograph of bubbles as the base image. I used this same image as the base image for the Dreaming with the Dreamer piece of art at the top of this post - I had already had success applying several different styles to it.
Bubble Base Image:
It is possible that the beach sunset style image might work with the right base image - but what I found was that the range of contrast was so limited, with the sky mirrored in the sand, and similar colors and textures everywhere - that this photo, which was beautiful to the human eye, was supremely boring to the AI.
The AI chewed it up and burped and spit out BORING all over my base image.

Bubbles - Beach Sunset Style
My point is that style images that have a good range of contrast work better. You want some areas of high contrast, some interesting textures and surfaces for the AI to sink its teeth into.
Look for two images that have some similarities
The AI will have an easier time mapping the style image onto the base image if there are some similarities between the two images in terms of areas of light and dark, areas of high and low contrast, or shapes.
Don't fall into the "Base Image" "Style Image" trap
This is another thing I learned from @dillemma. I started off conceptualizing this whole process in the way it is outlined in the tutorials above - one image as the base image and the other as a style image. This is limiting. Try thinking about both images as style images. This also gets back to collaborating with the AI instead of directing it. Start by just collecting some interesting images that you plan on using as style images - and then try combining them in different combinations by using one as abase image and one as a style image. Do the same thing for base images - collect some base images that you plan on using, and then combine them together. If your brain works anything like mine, you will collect different kinds of images when you are thinking about them as a base image vs. a style image - but that is a preconception and the AI has no problem totally blurring those lines. For instance I was thinking about physical place images as base images for the most part instead of style images, in part because of the failure of my attempt at the sunset beach style - but they can work wonderfully as style images if they are interesting to the AI.
Here are some of the images @dillemma made that showed me how limited my thinking had been:
Japanese Garden x Cityscape - @dillemma

Foliage x Cityscape - @dillemma

Morel Mushrooms X Cityscape at different Style Scales - @dillemma


Amanita Mushrooms x Cityscape at various Style Scale settings

100% Style Scale

Can't decipher my wife's code on what her style settings were here :)

140% Style Scale

160% Style Scale
Inception!
The most fun that I have had is when I start feeding my output images back into the generator - either as a base image or a style image. I have gotten pretty crazy, alternating back and forth between different style images fed into the resulting images in a recursive process layer after layer deep. This is how I generated the post header graphic. I started with a plain text image that read "Welcome to the Weird". Then I ran this through my wirebot style. Then I ran that output through my shoggoth style. I ran that through my wirebot style again. Then my shoggoth style again. Repeating back and forth, changing the scale and other settings of the style, until we arrived at the craziness. And of course then I played around with the output in PhotoShop as well :)
Recursion Examples
This is how I generated the post header graphic. I started with a plain text image that read "Welcome to the Weird".

I used my Shoggoth in the Fungus Forest art as the style:

1st iteration:

Then I ran the 1st iteration through my Wirebot style:

I kept alternating between those same two style images through seven iterations total:


Finally I combined the last two iterations on different layers in PhotoShop, using layer masks to integrate them together in a relatively seamless fashion, and painted over the top to accentuate things that I saw in the image - faces, creatures, etc. I also did a little background painting and pushed some colors around in the two deep style layers.
ALL THE LOVE
I have all the love to give. So much love. Steemit I am glad to be here with you but to be honest I am glad to be anywhere. Be glad, be thankful, be happy, be love - please pass it around and give it freely up not to get it back but because it feels good. It feels awesome to love.
I love my wife - @dillemma I love you.
I love Thing One and Thing Two.

I love @juliakponsford for inspiring me to start dabbling with the Deep Dream Generator - her contest is what prompted me to even start digging down this rabbit hole. And now look where I ended up. In wonderland.
I love MSP / PAL (discord chat associated with MSP) - Minnow Support Project is an incredible resource for little fishies. There are too many awesome people that I have been blessed with the opportunity to hang out with on PAL - too many to name here. I would only forget some and I don't want to do that - to all my PAL Peeps reading this - I love you.
And most importantly - I love you.
Yeah you. Reading this. I love you.
Cheers - Carl
This is wicked awesome amazing and I'm going to have to try this out later! Thank you!
Thanks @leta-blake! If you end up posting any deep dream creations please drop me a link to them here in the comments! I would love to see what you end up with :)
Great feed. Amazing. Like as reading a newspaper
It's been THREE months now since I started playing with the DDG Carl and it's been such an inspirational period for me.
Often it felt that the DDG was just a sidetrack ~ A distraction that was taking my time and energy away from my 'real work.' But then I realized I was learning, not just about colour and tonal relationships: Their clashes and harmonies, but more importantly I feeling a growing excitement about the potential of my own imagery ~ And as a result my (projected) drawing and painting ~ And where they may go now. Beyond.
There are as many different approaches as there are people using the DDG ~ And my approach now is to play with all the Settings until one image really sings. Love that WOW moment or sometimes it's an AHH moment. Like when after doing about 20 versions of this image of Frida Kahlo, this one image came close to reflecting both her grace and composure as well as all her strength and solidity.
I wish to thank you SO very much for introducing the DDG to me Carl. I'll be back at Steemit very soon now to share more about my 'Dreams.'
Link to the Dream Page
This makes me so happy to hear this! I am so glad you have been inspired by the deep dream generator - it has been something of a revelation for me as well :) Looking forward to your posting :) Much love - Carl
EDIT and I love your dream page! You have been doing some great stuff there. With your amazing base images to start with you are really creating some magic!
I have been doing some really trippy abstract stuff using deep dream and running the results back through the generator again, manipulating in photoshop, running through the generator again... here are a couple of the cooler results:
https://steemit.com/art/@carlgnash/into-the-realm-of-the-drowned-queen-willamette-abstraction-series
https://steemit.com/art/@carlgnash/city-of-brass-and-the-hive-queen-original-art-willamette-abstraction-series
OMG this is so cool! Your wife's art is incredible :)
what i find the brilliant part, which is why i resteemed your DreaM the dreamer picture, is how you combined a real life photo (bubbles) with some computer imagery and some of your own hand drawn art. 3 different realms coexisting, and interacting. layers of dimensionality. its interesting. they look like abstract paintings. they create new shapes and stuff VIA the subconscious mind of the AI.... like those detailed screen shots you posted... i think you should keep making this work, balancing the image when it becomes too abstract OR TOO figurative. its art when its a combination of both :)
Thanks @web-gnar! Yeah I totally agree. The fun part for me exactly what you describe - the combining of the different mediums - the part I describe as a collaboration with the AI / neural network. It really does feel like a collaboration when I am finding stuff to enhance in the material the AI makes, and it is great inspiration for my digital drawing/painting. So much fun! I definitely plan on continuing to do this - just started last week with that other post - that was my first effort!
I think it has amazing potential in the hands of artists - it can go way beyond just combining a couple of pictures to make something kewl. Cheers - Carl
I can't wait to play! Thank you for the great tutorial
Have fun! Hey if you post anything you make, drop a link to your post in the comments here! Would love to see it, and might be fun to get a collection of deep dream generator posts here in the comments
Look how fun this turned out!
OMG I LOVE THIS!!! Wow reptile mosaic skin goddess and the sky is so cool... really amazing result!
Ok so here's a poetry post using a similar image. I'm a little obsessed with that style!
https://steemit.com/poetry/@sunravelme/dirty-angel
And I will have to write something to go along with the tower
these are so cool. The colors and textures are phenomenal. Thank you so much for posting these back here, I really hope others reading the comments here do the same! Going to check out your poem now :)
This tutorial was excellent in fact I think I am going to have to keep it open the next time I play around because there is so much to take in! Also to your wifes images are dope she should definitely post more on steemit and also visit us in chat! ❤️
Wow, awesome huge post! Hope people have fun with deep art. Here is a couple of other Steemit users I follow who have done some cool ones
@kidsysco
https://steemit.com/art/@kidsysco/adventures-in-cloud-computing-deepart-io
@xyanthon
https://steemit.com/art/@xyanthon/deep-dreams
I did a couple of posts and shared some not too long ago as well
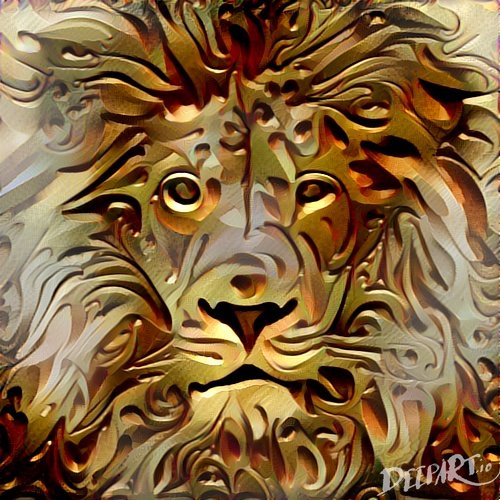
https://steemit.com/cats/@cryplectibles/crypto-collectibles-presents-bebop-and-boo-boo-in-google-s-deep-dream-generator
https://steemit.com/art/@cryplectibles/crypto-collectibles-presents-iron-man-deadpool-and-superman-with-bonus-boner-batman-in-deep-dream-generator
aw man thanks so much for sharing these! What a great portrait of your cat. I am blown away by the engraved brass lion. Geez. It is really incredible to think about the iceberg of AI... we are standing on the tiniest tip poking out of the ocean and think we have stumbled upon a mountain...
Resteemed and 100% upvoted. Thank you for using my service!
Read here how the new bot from Berlin works.
@resteem.bot
This post has received a 1.01 % upvote from @booster thanks to: @carlgnash.