Tutorial Part 1 | How I Clean My Doodle In GIMP (Free Software Alternative to Photoshop)

I am working on a series of doodles as you can see on this post here. I completed one of them last night and I proceeded to scan and enhance it digitally. I intend to use this doodle on some products that I sell on my Redbubble store. I have neglected my online stores for so long and since the crypto market is doing quite poorly these days, I figured it's good to maintain multiple sources of income.
I have been creating my own designs for several years now. I tried dropshipping but although the income was quite good I found no satisfaction in promoting someone else's products. And since I am good at art I thought why not promote my own designs? My disadvantage was I knew nothing about making digital art. I couldn't (still can't) afford the pricey gadgets required to design them but it never deters me from learning at least the basics of it. I created my art using the old fashion method - pencil, pen, and paper - and enhanced my artwork digitally. It took me months to figure out how to do stuff in Adobe Photoshop and Illustrator. I downloaded the one-month free Adobe subscription and devoted that one month to learn as much as I could. I continued to pay for the subscription for a couple of months until I couldn't afford it anymore. And that was when I looked for alternative open source software that could meet my needs. And I found GIMP. It's free so I wasted no time and downloaded it. I have been using it for the past 3 years.
The tutorial
I created this tutorial for the benefit of doodlers - newbies or experienced - who are thinking of using their designs on products and sell them for extra income. Everyone can do this IF they are willing to work really hard to learn the rope. The learning curve could be steep like it was for me but it's doable if you persevere. A LOT of people thinks this is a "fun and easy" way to make money. I tell you it's not. You have to work and be ready to face lots and lots of discouragement.
This tutorial is not exhaustive and it's pretty basic. I suggest you use this tutorial on top of other learning sources that is available freely out there (Youtube) or if you want thorough lessons you can consider signing up at Skillshare. They offer two months of free access to premium lessons before they start charging you.
This is going to be a long post but let's begin!
Step 1
Scan your doodle at high resolution. I typically used 300dpi for my scans. You can use higher resolution if you like. Open your scanned doodle in GIMP.
Step 2
Go to Colors menu and click on Posterize. I want to posterize this image to reduce it to the fewest amount of colors possible.

Step 3
Move the Posterize slider bar to the lowest possible, which is 2. You will notice the image is a lot cleaner and it even erases some unwanted pencil marks.

Step 4
Go to Colors menu and click on Desaturate. I want to convert this image to grayscale.

Step 5
On the Desaturate option menu, I used "lightness". You can play around with the other two options and choose what you think produces the best result. Click OK.

Step 6
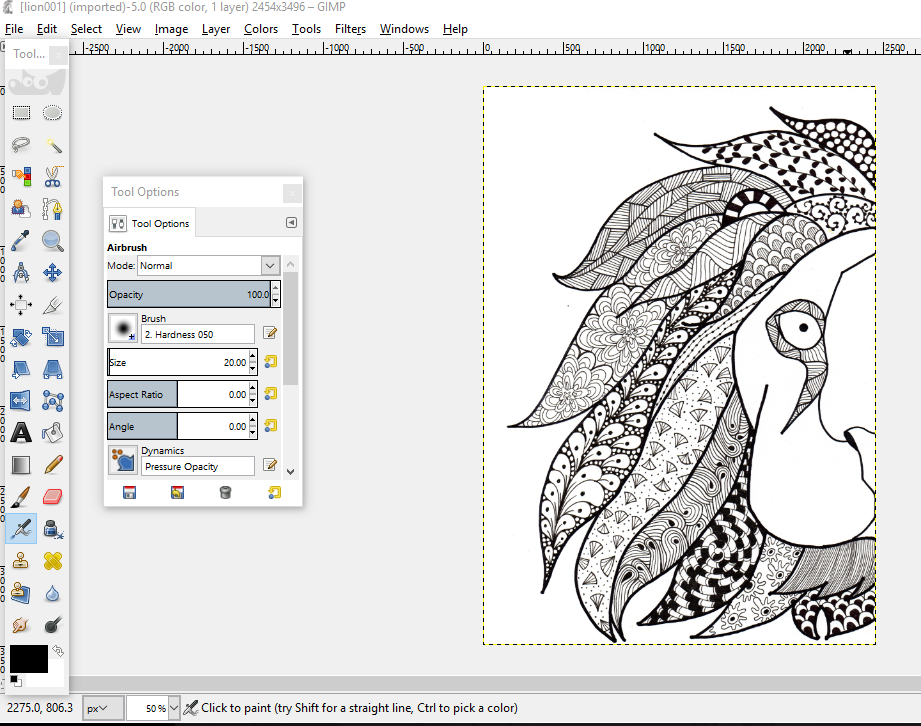
Now I zoomed my image (View > Zoom) to look for more areas to clean. I want my image to be as clean as possible without visible pencil marks or unwanted dots. Next, I click on the Eraser Tool (see the red circle). On the tool option box, I select the hardness of the eraser and also the size. Play around with the features and choose what is best for you.

Step 7
If the image is clean enough and I am satisfied with it, I anti-alias the image to further smooth out jagged edges. To do this I go to Filters menu, click Enhance and next Antialias.

Step 8
Next, I want to mirror the image to make a complete image of the lion's head. But before I can mirror it, I need to resize the canvas I am working on and make it bigger to accommodate the mirrored image. Go to Image menu, and click on Canvas Size.

Step 9
Now we want to double up the width of the canvas, so in order to do this, on the Width field I typed (width)*2. Maintain whatever figure of the width and multiply it by 2. See the red box. Click Resize.

Step 10
And my canvas size has doubled up!

Step 11
To create the other half of the image, I need to duplicate the current image and make a new copy. Go to Layer menu and click on Duplicate Layer.

Step 12
On the Layers pane, we can see that we have a new copy of the image!

Step 13
Click on the newly copied image (duplicated layer) and drag it to the canvas. Make sure you align both images properly side by side.

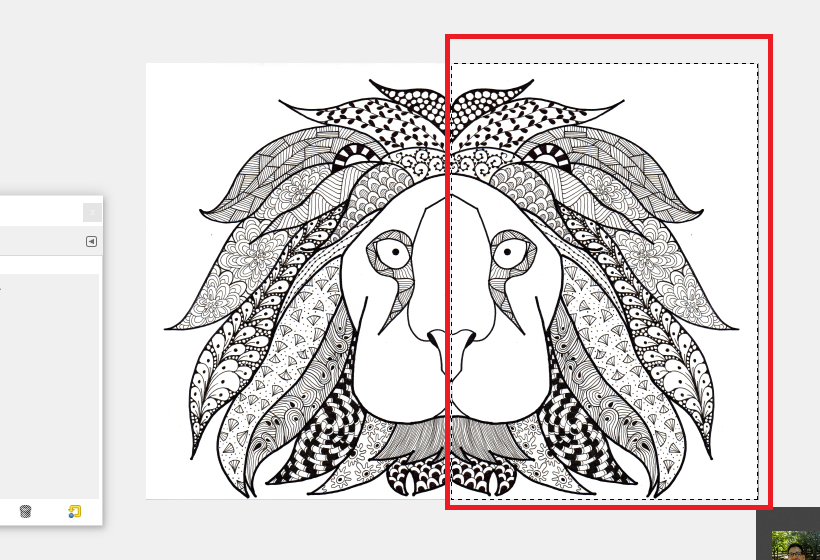
Step 14
Next, we need to flip the new image to create a mirror. Click on the copied image on the right. Go to the Flip Tool in the toolbox pane. The Flip tool option will appear. Make sure the flip type is set to horizontal. Refer the red boxes.

Step 15
Click on the copied image on the right. It will flip the image and voila! the mirror is successfully created! Make sure both images are properly aligned. (My Discord notification appeared as I screenshot this and the poor guy's head were captured as well LOL).
Step 16
If I am satisfied with the image, I need to flatten it and merge all the layers. Right click on any one of the layers in the layers pane. Click on Flatten Image.

Step 17
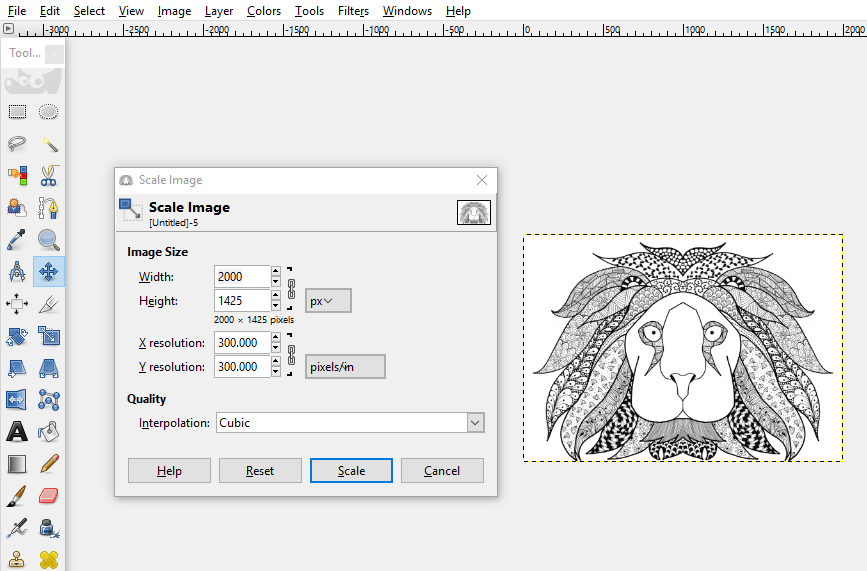
This step is optional. You can immediately export this image as JPEG or PNG without resizing it. However, I want to resize this image because I don't want the file size to be too huge. I have an old laptop and it takes longer to process larger files. To resize this image go to Image menu and click on Scale Image. Scale it accordingly.
Step 18
And finally, I export it as a PNG file because I don't want it to lose its quality if I make further adjustments.

Step 19
So that is how I clean my doodle digitally. However, the cleaned image is just a raster image. If I want it to be clear and sharp on products I need to convert it to vector image. However, I will not touch on that topic in this post because it can be very confusing for newbies LOL. The image below has been vectorized and notice how clear and sharp it is? I will cover the steps to vectorized an image (using free software!) in part 2 of this tutorial next week. Stay tuned!

Thank you for checking out my post! What do you think of this tutorial?
My previous posts:
Team Malaysia Babes & Steem Sugars | A Doodle Inspired By Steemit Women Communities
Winner Announcement | Weekly Doodle Contest Week #1 WINNER
Portrait of Simon Reeve | In Love With BBC Earth
My Sketchbook | Can't Stop Doodling
A Page From My Sketchbook And My Kids Drawings
I am selling some of my paintings over on Artfinder. Shipping is FREE worldwide. You can check them out here: ARTFINDER.
My gifts & merchandise available at REDBUBBLE (international), Printcious & CreativeUnited (Malaysia).
Thank you!

My avatar was illustrated by @pinstory

Wow.. amazing how this software can do.. digitalised doodle! Would love to try! Thanks @coloringiship :D Resteemed.
Thank you for posting this. It's very interesting, I learn something new today.
When I saw your earlier post but yet to read it could be digitally done, I was thinking that your hand must be really steady because everything looked so precise and uniformed! My hand is shaky. 😆
My hand is quite steady after practicing for years LOL. The doodles are quite precise even before they are digitally enhanced. I always try to draw free hand to minimize pencil marks and cleaner raw images are generally easier to clean 😊
Ah haaa!!! Thank you!!! I were looking for software that helping me to draw while feeding my baby... thanks!
Glad you find it's useful @pizzapai. Are you using a tablet to draw? If yes, try using Autodesk Sketchbook instead of GIMP. They have the free version I think.
Lol i use iphone.... and one finger...lolll 😂
High five fellow GIMP user! But gosh I can never get over your detailed patterns
Hurrahhh to FREE software 😂😂😂😂
Thank you for the tutorial, I will read the while thing more in depth tonight when I can download GIMP which is also something new I am learning from you, thanks for that as well.
The lion looks really good!
Thank you for sharing the process ^^ simple and very clear!
Like to see your tutorial. Always detail. Great job there sis
@coloringiship, learnt something and after all doesn't looks too complicated.Thanks for the sharing.
I just downloaded Gimp the other day and have been using it with some drawings I did for a project idea. I didn't want to color by hand and I didn't want to do the same drawing over and over to use different colors, so I knew I needed some help. I did use a couple of videos that use a different process, but since I do want to clean them up as much as possible for possible products in the future, I will really be looking forward to your next tutorial! Thank you for doing this and I can't wait to try your method! It seems to make more sense than the two others I found. Cheers!