Series "Practical advice" #14 - Shooting modes A and S
Как быстро летит время... решил сегодня найти свою старую серию постов "Практические советы" для начинающих фотографов, зашёл в ленту своего блога и долго погружался "в глубь веков". Погрузиться пришлось на целых 2 года. А казалось, что это было недавно.
На всякий случай я приведу ссылки на те посты, может быть кому-то они окажутся полезными. Если коротко, в этих постах я пытался поделиться опытом того, с чего начать, если вы решите заниматься фотографией осознанно, применяя для этого камеру. Вот этот список постов. Возможно он не совсем полный, но это то, что мне удалось обнаружить.
How quickly time flies... I decided today to find my old series of posts "Practical Tips" for novice photographers, went to my blog feed and plunged "into the depths of centuries" for a long time. I had to dive for 2 whole years. And it seemed that it was recently.
Just in case, I will provide links to those posts, maybe they will be useful to someone. In short, in these posts I tried to share my experience of where to start if you decide to take pictures consciously, using a camera for this. Here is this list of posts. It may not be completely complete, but this is what I managed to find.
12.Basic photo editing for beginners -HDR
13.Basic photo editing for beginners - Panorama
Today I would like to say a few words on camera settings in addition to the post at the link #4.
In that message, it was about manual settings in general, the dependence of the parameters among themselves. I would like to say a few words about the shooting modes of most cameras. Of course, it is more correct to open the manual for using your camera (there is probably such a manual on the Internet) and slowly study it, but not just read, but read / study in small steps and immediately apply it in practice. Nevertheless, I would like to share my thoughts.
It can be difficult to apply manual shutter speed, aperture, and ISO settings right away. There is no experience, there is no intuition and a large number of mistakes are possible. And some shots can't be repeated.
But there are two modes that can help you get used to the choice of parameters.
"Shutter priority"
"Aperture priority"
That is, you set one of the selected parameters, and the camera itself sets the corresponding other parameter. As a rule, these modes are marked on the "wheels/discs" of the shooting mode selection.
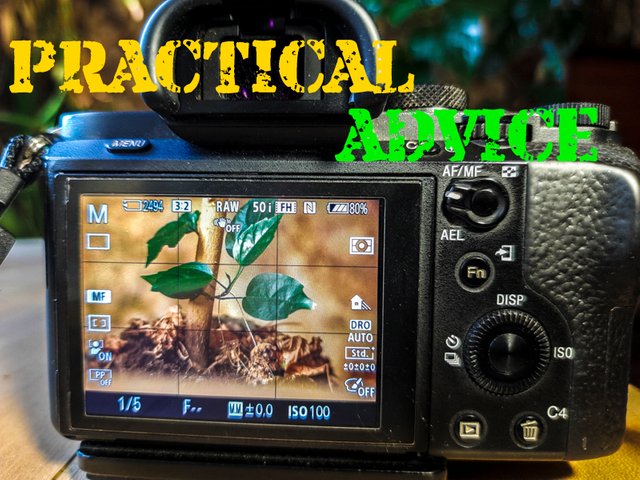
M Mode (Manual) This mode allows you to manually adjust the aperture and shutter speed
Mode A (Aperture Priority) The aperture value is set by the user, and the camera automatically changes the shutter speed to obtain the correct shutter speed
Mode S (Shutter Priority) It can also be called the AE shutter priority mode. The shutter speed value is set by the user, the camera automatically changes the aperture value to get the best exposure.
Exposure
The amount of light used to produce the image. The exposure depends on the time during which the shutter remains open (shutter speed) and the amount of light passing through the lens (aperture value).
At the same time, the ISO value is not changed by these modes. It is either set manually, or you can choose the automatic ISO setting mode.
And here lies the first nuance when working in S and A modes. It may turn out that the shutter speed/aperture value you selected at this ISO value does not provide a normal frame (normally exposed, that is, the frame may be too dark or, conversely, overexposed).
For example, while in S mode, you want to shoot moving objects and you need a shorter (faster) shutter speed (your priority). For example, you set 1/500-1/800 (the average speed of the object). At the same time, it is important for you to get the most detailed picture without digital noise and you have set ISO100. But if your weather is cloudy or it is already evening, then under such conditions you may not get a normally exposed photo (without overexposure and excess blackness).
In this case, as a rule, the camera gives you a signal about it. One of the parameters on the display will flash. And you will have to find a compromise.
It is possible to slightly lengthen the shutter speed (we are talking about the S mode - make a test frame and see if the object is clear or blurred). An easier option is to increase the ISO value. Modern cameras allow you to take photos with a fairly significant ISO with minimal noise, which is almost invisible. Here the choice is yours, what is more important to you. I try not to set the ISO value above 3500, but this is for my camera. With your camera, just take test shots in advance.
If you still have to set a large ISO value (otherwise the frame turns out to be too dark), then there is an option with the subsequent translation of the color image into black and white. Firstly, there will be practically no color noise on a black-and-white image, and on the other hand, graininess is not always a "marriage". This can be used as an artistic technique for processing your photo.
These are just some tips for taking conscious pictures with the camera and choosing settings. Using these two modes, you will soon intuitively begin to understand the dependence of the choice of these basic parameters on each other.
In order to get the most useful out of this post, it is necessary not just to read it quickly, but reading it )gradually) to hold your camera in your hands and make trial settings and pictures. So step by step you will easily understand these issues. They seem complicated only at first glance. It's like mastering car driving skills. But there is also fear there. There's absolutely nothing to be afraid of with a camera. Unsuccessful pictures can simply be sent to the trash and move on.
I wish you all creative success.
Сегодня я хотел бы сказать несколько слов по настройкам камеры в дополнение к посту по ссылке #4.
В том сообщении речь шла о ручных настройках вообще, зависимости параметров между собой. Хочется сказать несколько слов о режимах съёмки большинства камер. Конечно, более правильно открыть руководство по использованию вашей камеры (наверняка есть такое руководство в интернете) и неспеша изучить его, но не просто читать, а читать/изучать малыми шагами и тут же применять на практике. Тем не менее рисну поделиться своими соображениями.
Сразу применять ручные настройки выдержки, диафрагмы, ISO может оказаться сложным. Нет опыта, нет интуиции и возможно большое количество ошибок. А некоторые кадры уже не повторить.
Но есть два режима, которые могут вам помочь привыкнуть к выбору параметров.
"Приоритет выдержки"
"Приоритет диафрагмы"
То есть, вы выставляете один из выбранных параметров, в камера сама выставляет соответствующий другой параметр. Как правило эти режимы маркируются на "колёсиках/дисках" выбора режимов съёмки.
Режим M (Ручной) Этот режим позволяет вручную настраивать диафрагму и выдержку
Режим A (Приоритет диафрагмы) Значение диафрагмы устанавливается пользователем, а фотоаппарат автоматически изменяет скорость срабатывания затвора для получения правильной выдержки
Режим S (Приоритет выдержки) Так же может называться режимом приоритета выдержки AE. Значение выдержки устанавливается пользователем, фотоаппарат автоматически изменяет значение диафрагмы для получения наилучшей экспозиции.
Экспозиция
Количество света, используемое для получения изображения. Экспозиция зависит от времени, в течении которого затвор остается открытым (выдержка), и количества света, проходящего через объектив (значение диафрагмы).
При этом значение ISO этими режимами не изменяется. Оно либо выставляется вручную, либо вы можете выбрать автоматический режим выставления ISO.
И здесь скрывается первый нюанс при работе в режимах S и А. Может оказаться так, что выбранное вами значение выдержки/диафрагмы при данном значении ISO не обеспечивает получение нормального кадра (нормально экспонированного, то есть кадр может быть слишком тёмным или наоборот пересвеченным).
Например, находясь в режиме S вы хотите снимать движущиеся объекты и вам нужна более короткая (быстрая) выдержка (ваш приоритет). Вы выставляете к примеру 1/500-1/800 (средние скорости движения объекта). При этом вам важно получить максимально детализованный снимок без цифрового шума и вы выставили ISO100. Но если у вас погода пасмурная или уже вечереет, то при таких условиях вы можете не получить нормально экспонированного фото (без пересветов и лишней черноты).
В этом случае, как правило, камера даёт вам об этом сигнал. Один из параметров на дисплее будет мигать. И вам придётся искать компромисс.
Возможно немного удлинить выдержку (мы говорим про режим S - сделать пробный кадр и посмотреть, будет ли объект чётким или смазанным). Более простой вариант - повысить значение ISO. Современные камеры позволяют при довольно значительном ISO получать фотографии с минимальным шумом, который практически не заметен. Тут выбор за вами, что для вас важнее. Я стараюсь не выставлять значение ISO выше 3500, но это для моей камеры. Со своей камерой просто сделайте заранее тестовые снимки.
Если всё же придётся выставлять большое значение ISO (иначе кадр получается слишком тёмный), то есть вариант с последующим переводом цветного изображения ч чёрно-белое. Во первых на чёрно-белом изображении практически не будет цветового шума, а с другой стороны, зернистость не всегда является "браком". Это может быть использовано как художественный приём обработки вашего фото.
Это лишь некоторые советы по осознанной съёмке с помощью камеры и выбора настроек. Пользуясь этими двумя режимами вы вскоре интуитивно начнёте понимать зависимость выбора этих основных параметров друг от друга.
Для того, чтобы получить от этого поста максимум полезного, надо не просто быстро его прочитать, а читая )постепенно) держать в руках свою камеру и делать пробные настройки и снимки. Так шаг за шагом вы легко разберётесь в этих вопросах. Они кажутся сложными лишь на первый взгляд. Это похоже на освоение навыков вождения автомобиля. Но там присутствует ещё и страх. С камерой бояться совершенно нечего. Неудачные снимки можно просто отправить в корзину и двигаться дальше.
Желаю всем творческих успехов.


Благодарю! Постепенно со всем познакомлюсь.
Если вопросы какие появятся, готов попробовать ответить)
!thumbup
👌 🤗👍
Hello @bambuka! You are Glorious!
command: !thumbup is powered by witness @justyy and his contributions are: https://steemyy.com
More commands are coming!
Muy buenos consejos, los voy a poner en práctica, gracias por compartirlos
Me alegro de haber sido útil. Si hay preguntas, pregunte y trataré de responderlas.
Gracias, lo tendré en cuenta
🖐 😊 👌
Thanks for stopping by and support @stef1