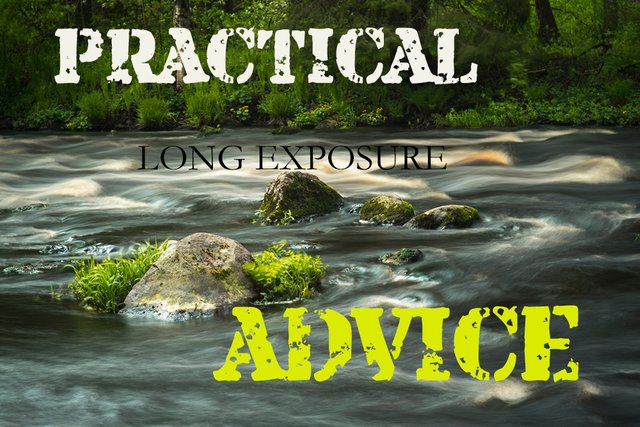
Series "Practical advice" #8 - Long exposure
Suppose that we have made Camera selection и Lens selection 1 and Lens selection 2
We have studied Manual camera settings
Setting the shutter speed
Aperture setting
At the same time we are able to obrazat photos as you wish.
Cropping a photo
It's time to get acquainted with some features of a photoshoot in manual mode.
Самое время познакомиться с некоторыми особенностями фото съёмки в ручном режиме.
The last time we examined the features of the depth of field. It was the work with the diaphragm. Not all, of course, but the highlights.
Depth of field
Последний раз мы разобрали особенности глубины резкости. Это была работа с диафрагмой. Не вся, конечно, но основные моменты.
Now we will look at one of the techniques for working with moving objects and adjusting the shutter speed to get one interesting effect.
Сейчас мы рассмотрим один из приёмов работы с движущимися объектами и настройкой выдержки для получения одного интересного эффекта.
Why is it needed / Зачем это надо
You will, of course, remember what we said when we looked at the use of shutter speed and some of the features of its manual adjustment. We mentioned that the faster the shutter speed, the clearer the subject will be in the photo. Most likely you will not be able to capture the ant at a shutter speed of 1/60 sec. You simply will not see him, unless, of course, he stares motionlessly into the lens of your camera (I strongly doubt it). You will have to set the shutter speed to about 1 / 1000-1 / 2000 sec. Then you "freeze" him in motion, stop his movement.
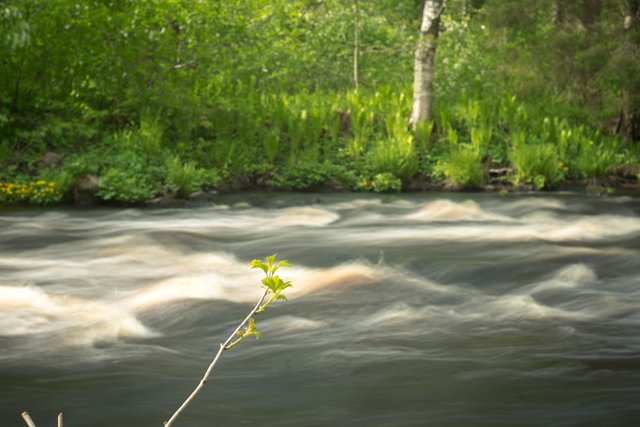
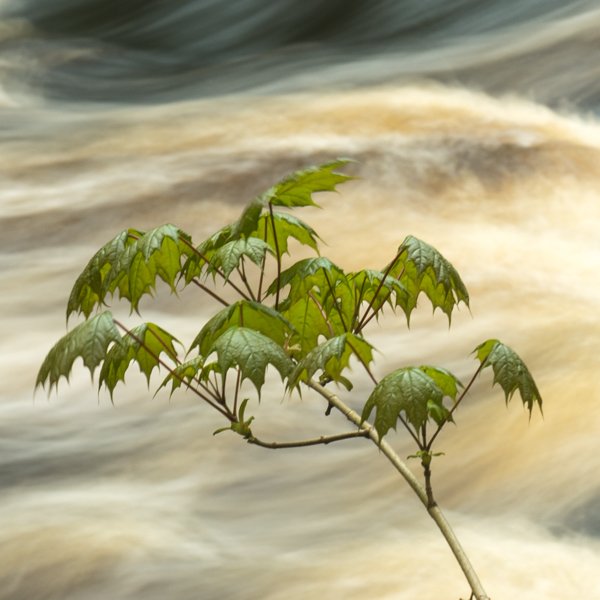
But suppose you are walking in the woods and unexpectedly (or on purpose) come to the river bank. The river has a fast flow and has rocks and rapids. Or, for example, you went out to a waterfall. By changing the shutter speed, you can get completely different results. If you set the shutter speed long enough, you can get the effect in the first photo.
Вы, конечно, помните, что мы говорили, когда рассматривали применение выдержки и некоторые особенности её ручной настройки. Мы упоминали, что чем короче выдержка, тем чётче объект будет зафиксирован на фото. Скорее всего у вас не получится заснять муравья на выдержке 1/60 сек. Вы его просто не увидите, если, конечно, он не будет неподвижно смотреть в объектив вашей камеры (я в этом сильно сомневаюсь). Вам придётся поставить выдержку около 1/1000-1/2000 сек. Тогда вы "заморозите" его в движении, остановите его движение.
Но предположим вы гуляете в лесу и неожиданно (или специально) выходите на берег реки. У реки быстрое течение и есть камни и пороги. Или, к примеру, вы вышли к водопаду. Меняя значение выдержки вы можете получить совершенно разные результаты. Если вы установите достаточно длинную выдержку, то сможете получить эффект, как на первом фото.
Long exposure setting features/ Особенности настройки длинной выдержки
There are some features that I want to draw your attention to and which should be taken into account when manually adjusting the camera
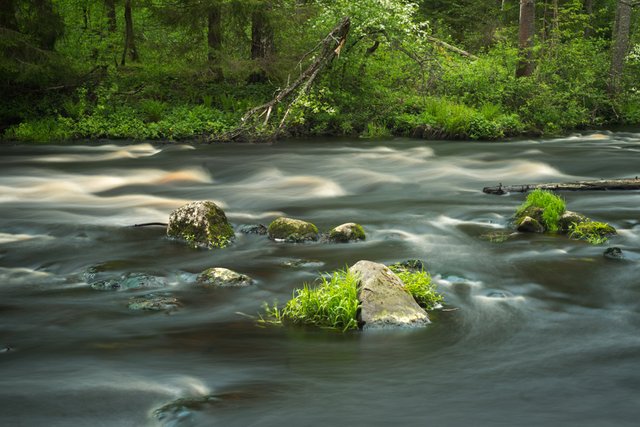
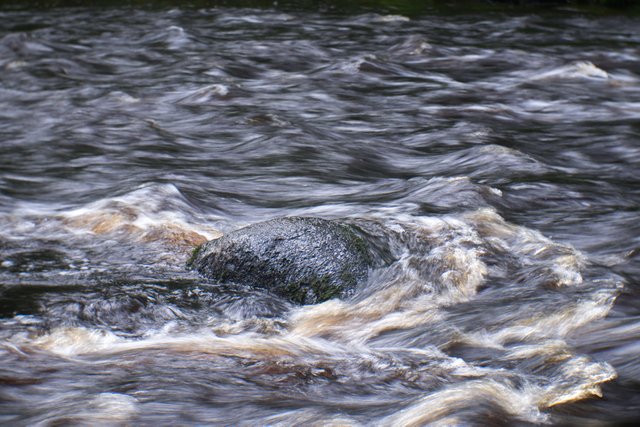
Taking into account the speed of water flow (movement of an object). You will have to take test shots to get the effect you want. The longer the shutter speed is set, the smoother the water surface will appear. If you need to remove ripples on the water, you can safely set a few seconds of exposure. You may even be able to get some reflection in the water that is not visible in the ripples.
In the photo below, the waves and ripples could be removed by making an exposure for example 5 seconds. But I only slightly blurred them, because this pattern of waves seemed interesting and more lively to me.
Есть некоторые особенности, на которые я хочу обратить ваше внимание и которые следует учитывать при ручных настройках камеры
Учёт скорости течения воды (движения объекта). Вам придётся делать пробные кадры, чтобы добиться нужного эффекта. Чем длиннее будет установлена выдержка, тем более гладким будет выглядеть поверхность воды. Если вам нужно убрать рябь на воде, можете смело ставить несколько секунд выдержки. Вы даже сможете получить некоторое отражение в воде, которого не видно при ряби.
На фото ниже волны и рябь можно было бы убрать сделав выдержку к примеру 5 сек. Но я лишь слегка размыл их, потому что этот рисунок волн показался мне интересным и более живым.

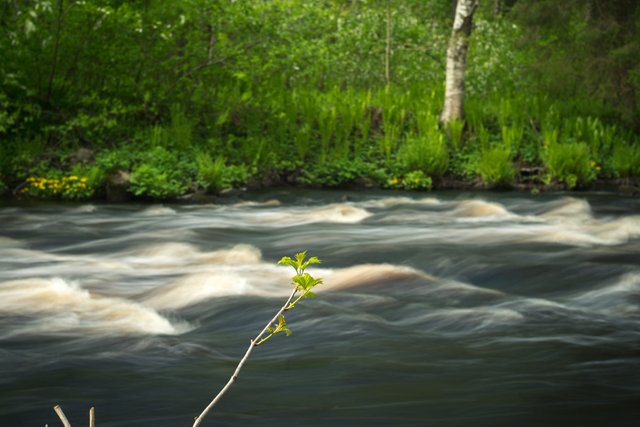
1/13 sec
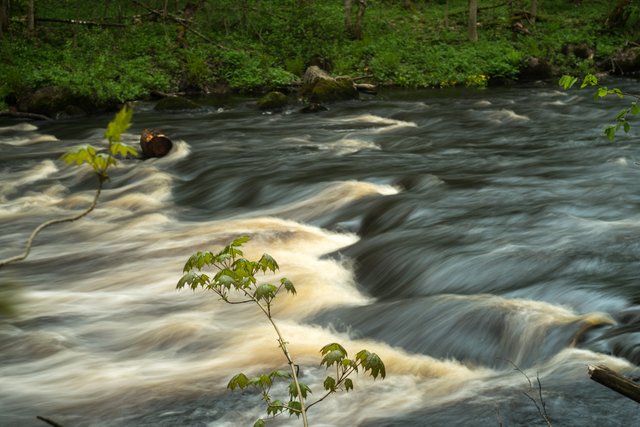
Let's go back to the river. I deliberately took several shots with different shutter speeds to show the peculiarities of the resulting effects.
Вернёмся к реке. Я специально сделал несколько снимков с разной длиной выдержки, чтобы показать особенности получаемых эффектов.
8 sec
Both shots were taken with a shutter speed of 8 sec. If I wanted to take a shot for myself, I would decrease the shutter speed, make it shorter. With this value (8), the water has lost all relief and drawing. Only large lines remained. For some purposes, this may be justified, but let's see what happens with decreasing the shutter speed.
Оба кадра сделаны с выдержкой 8 сек. Если бы я хотел сделать кадр для себя, то уменьшил бы выдержку, сделал её более короткой. При таком значении (8)вода потеряла всякий рельеф и рисунок. Остались только крупные линии. Для каких-то целей это может быть оправдано, но давайте посмотрим, что будет с уменьшением значения выдержки.
2 sec
1 sec
0,6 sec
1/3 sec
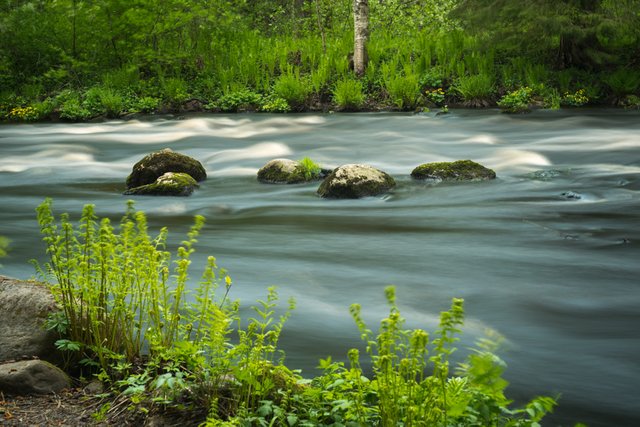
You can see how more and more small details gradually appear. This is how you can achieve what you want by testing and comparing the results.
For this speed of the river flow, I liked the shutter speed around 1/3 sec. On the one hand, the relief and lines of water jets are visible, but on the other hand, the drawing is smoothed and there is a feeling of movement.
Вы можете заметить, как постепенно проявляются всё более мелкие детали. Вот так методом проб и сравнения результатов вы можете добиться желаемого.
Для этой скорости течения реки мне больше понравилась выдержка в районе 1/3 сек. С одной стороны виден рельеф и линии струй воды, но с другой стороны рисунок сглажен и есть ощущение движения.
0,5 sec
0,5 sec
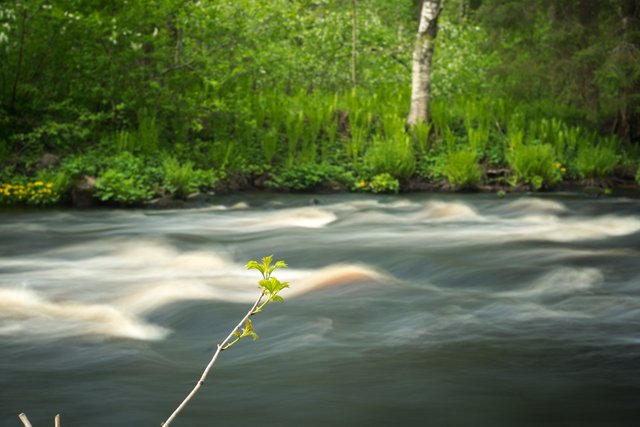
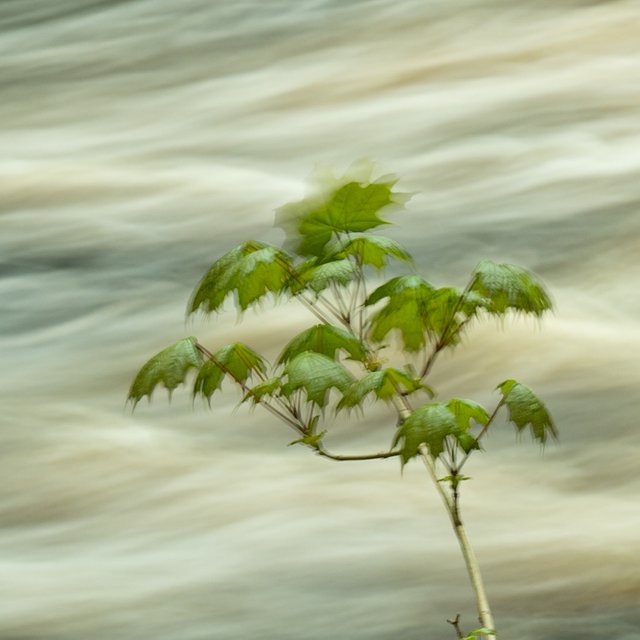
You will have noticed, of course, that trees, branches and grass do not always look sharp. This is not because they were out of focus. There is one more peculiarity of long exposure photography in natural conditions of nature. There is wind in nature, wind creates movement ... Yes, not only water moves, but everything in the frame, and this should also be taken into account. When I was shooting, the wind was not constant, but gusts. I had to wait for it to calm down a little. But if the wind does not blow in your face, this does not mean that it is not on the opposite bank. For this reason, all frames taken from one location differ from each other.
Вы, конечно, заметили, что деревья, ветки и трава не всегда выглядят чётко. Это не потому, что они не попали в фокус. Есть ещё одна особенность съёмки с длинной выдержкой в естественных условиях природы. В природе существует ветер, ветер создаёт движение... Да, движется не только вода, но и всё в кадре и это тоже следует учитывать. Когда я снимал, то ветер был не постоянным, но порывами. Мне приходилось выжидать, когда он чуть стихнет. Но если ветер не дует тебе в лицо, это не значит, что его нет на противоположном берегу. По этой причине все кадры, снятые с одной локации отличаются друг от друга.
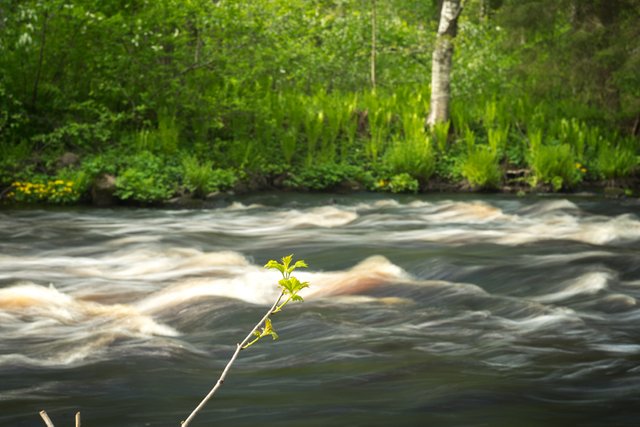
1/15 sec
To enhance the relief of the water, you can make the shutter speed even shorter; additional dynamics can appear here.
Для усиления рельефа воды вы можете сделать выдержку ещё более короткой, здесь может появиться дополнительная динамика.
1/3 sec

1/15 sec
And the last point worth paying attention to. If you want to take a long exposure shot during the day and especially in sunny weather, you cannot do without a ND filter.
И последний момент, на который стоит обратить внимание. Если вы хотите сделать снимок с длинной выдержкой днём и особенно в солнечную погоду, вы не сможете обойтись без нейтрального серого фильтра
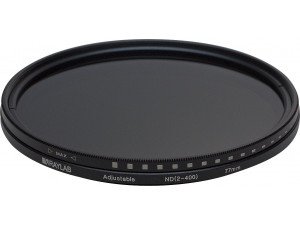
To get started, it makes sense to buy an inexpensive variable ND filter. For example, RayLab ND2-400 for the diameter of your lens. This is not an advertisement for a company, just an example. Don't buy too cheap filters. The quality of the glass and the shading can nullify all your efforts. It's also not worth buying an expensive one right away, maybe this is not your way of shooting at all, why overpay.
The best quality is given by constant density filters of a well-known brand, but this is just a remark.
The role of such a filter is to simply limit the luminous flux to the matrix in the case of long exposure. If choosing the lowest ISO and a fully clamped aperture is not enough for you, and the frame still turns out to be overexposed, only a filter will help.
Для начала имеет смысл купить недорогой нейтральный фильтр переменной плотности. Например, RayLab ND2-400 под диаметр вашего объектива. Это не реклама фирмы, просто пример. Не стоит покупать слишком дешёвые фильтры. Качество стекла и затемнения могут свести на ноль все ваши усилия. Покупать сразу дорогой тоже не стоит, возможно это вообще не ваш способ съёмки, зачем переплачивать.
Лучшее качество дают фильтры постоянной плотности известного бренда, но это просто как замечание.
Роль такого фильтра состоит в простом ограничении светового потока на матрицу в случае длительной выдержки. Если вам недостаточно выбора самого низкого ISO и полностью зажатой диафрагмы, а кадр всё равно получается пересвеченным, поможет только фильтр.
Conclusions and recommendations / Выводы и рекомендации
Want to get a nice blur of the surface of a fast river or waterfall? Then try the following
1.Set the minimum ISO value (e.g. 50)
- Close the maximum aperture possible (from the depth of field conditions)
- Increase the shutter speed as much as possible, but at the same time not to get an overexposed frame.
- If you want to increase the shutter speed even further, apply a ND filter.
- Use a tripod
By the way, the neutral gray filter can be used to obtain other effects, but we can talk about this separately.
Хотите получить приятное размытие поверхности быстрой реки или воды водопада? Тогда попробуйте сделать следующее
1.Установите минимальное значение ISO (например 50)
- Закройте максимально-возможно (из условий глубины резкости) диафрагму
- Увеличивайте длину выдержки максимально возможно, но при этом чтобы не получить пересвеченный кадр.
- Если вы хотите увеличить длину выдержки ещё больше, примените нейтральный серый фильтр.
- Используйте штатив
Кстати, нейтральный серый фильтр можно применять и для получения других эффектов, но об этом возможно поговорим отдельно.
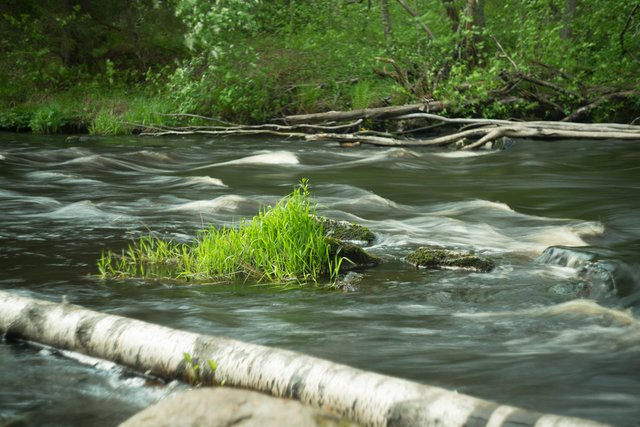
Snapshot without processing. ISO100; 1/4 sec; 85mm (aperture approx. F3-3.5 + ND)
Снимок без обработки. ISO100; 1/4 сек; 85 мм (диафрагма примерно f3-3,5 + ND)

| ▽ | ▽ |
|---|---|
| Camera | Sony A7М2 |
| Lens | Helios-40-2 |
| Location | Russia |
| Post-production | in LR |
Manual processing in Lightroom
From Russia with Love

Regards, @bambuka
Woo! what spectacular images!
I love the effect on the water!
Thanks so much :)