Building custom websites with play 2.6.x(Scala) part 2
Repository
https://github.com/playframework/playframework
What Will I Learn?
In this tutorial you will learn the following
- You will learn how to import static assets
- How to import Bootstrap into your play project
- How to import Jquery in your project
- Linking views in play framework
- How to reference images in CSS
- Creating Actions to render custom pages
- Creating routes for custom pages
Requirements
The following are required in order to properly follow along this tutorial.
- Intellij IDEA
- sbt
- playframework with slick installed
- Web browser
- Basic knowledge of Scala programming language
- Basic knowledge of HTML and CSS
- Basic knowledge of Bootstrap and Jquery
Resources
- Bootstrap website:-https://getbootstrap.com
- Bootstrap repository:-https://github.com/twbs/bootstrap
- Bootstrap License:- MIT License
- Jquery website:-https://jquery.com
- Jquery Repository:- https://github.com/jquery/jquery
- Jquery License:- MIT License
Difficulty
- Intermediate
Tutorial Contents
Welcome to today's tutorial on how to build custom websites using Play(Scala) 2.6.x, in this tutorial we shall go a step further in building our template inside play and also use Javascript pluggins like Bootstrap and Jquery.
Importing static assets into playframework
Static assets include our images, CSS, Javascascript, and Pluggins that are imported into a web application to extend the functionality of that application.
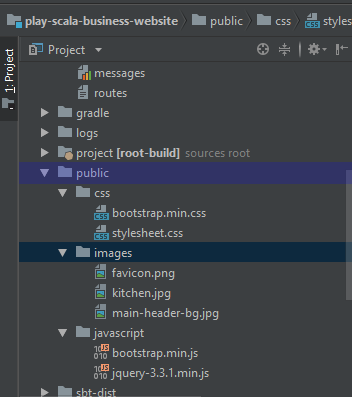
Static assets in the play framework are located inside the public directory. Inside this directory are sub directories, like css, which manages stylesheets, images, which holds pictures, and javascript, which contains javascript files. It is inside the javascript that boostrap.js is located.
Please note that the sub folders like images, css and javascriptcan be named as you prefer them as you prefer them, but it's advisable not to rename the public directory.
To import javascript into your code the syntax for the path is this: @routes.Assets.versioned("sub-folder/filename")
This code retrieves files that are stored in the public directory, whereas the sub-folder can be any folder in the public directory and the filename is our file.
Importing Bootstrap into play framework
Including Bootstrap into a play project is almost the same as doing it inside HTML, the major difference is in the way the pluggin is referenced. In HTML you would simply do this in your header: <script src="sub-folder/bootstrapfile.js" type="text/javascript"></script>. This simply references the file from it's sub-directory. In play however this is slightly different, the syntax is this : <script src="@routes.Assets.versioned("javascript/bootstrap.min.js")" type="text/javascript"></script>.
The @routes.Assets.versioned() simply references the sub folders inside the public directory.
Now let's download Jquery and Bootstrap and import it into our project. To do this we will update views/main.scala.html with the following code:
 <link rel="stylesheet" media="screen" href="@routes.Assets.versioned("css/stylesheet.css")"/>
        <link rel="stylesheet" media="screen" href="@routes.Assets.versioned("css/bootstrap.min.css")"/>

        <script src="@routes.Assets.versioned("javascript/bootstrap.min.js")" type="text/javascript"></script>
        <script src="@routes.Assets.versioned("javascript/jquery-3.3.1.min.js")" type="text/javascript"></script>
To import Bootstrap into your project you must download both the css and js files but jquery doesn't require you to download any css.
Code explanation
We import our bootstrap css file, by using the
@routes.Assets.versioned()which references folders directories inside thepublicfolder.The folder containing the CSS file is called
cssand our bootstrap css file is calledbootstrap.min.css. So we reference both ascss/bootstrap.min.css.We import our bootstrap javascript file, and to do that we call
@routes.Assets.versioned()function and pass in the file path as the parameter (javascript/bootstrap.min.js)Lastly, to import our Jquery file path we pass
javascript/jquery-3.3.1.min.jsas parameters to the@routes.Assets.versioned()function.
Linking views in play framework
Linking pages can be done using the <a> same as in HTML, but pages in play framework are referenced differently, and this is done using the following syntax: [email protected]. For instance we referenced our index page in this manner: <a href="@routes.PersonController.index">HOME</a>, meaning that we are calling the index method, defined in the PersonController.
When someone clicks the HOME link, the index method is called, and the HTML and whatever is inside this method is displayed to the user.
Now let's display the code for the menu navigation, which contains our links like HOME, ABOUT, SERVICES and CONTACT.
<div class="header">
        <div class="main-nav">
            <ul>
                <li><a href="#">CONTACT</a></li>
                <li><a href="@routes.PersonController.servies">SERVICES</a></li>
                <li><a href="@routes.Personcontroller.about">ABOUT</a></li>
                <li><a href="@routes.PersonController.index">HOME</a></li>
            </ul>
        </div>
    </div>
Code explanation
play framework views allows you to mix both pure html for presentation and scala syntax for referencing file paths and routes
The index page is fetched by the index function in the PersonController. To link to the index page you have to pass
@routes.PersonController.indexas the value of thehrefattribute instead of using the direct file path, as you would normally do in HTML, you would use routes instead in play framework.We can link to the about, contacts, and service pages by defining routes to these pages. For instance the defined routes to the about pages by passing
@routes.PersonController.aboutas a value to thehrefattribute. We do the same for the other pages
Referencing Images in CSS
To give our template more appeal, We will use a background image, this image is referenced from our public folder. Unlike the rest of our static assets that we imported using @routes.Assets.versioned(), we cannot use this method inside CSS because it will only lead to errors when referencing the file. So the best way to go about it is to set to type the following CSS property: background-image: url("../sub-directory/imageName");. The sub directory I am using is called images and the imageName is called kitchen.jpg.
Now let's make update to our stylesheets, we will attempt to insert a background image for our header and, and this would be done inside the our css package, in a file which we have named stylesheet.css. We will be importing the image from our image directory,
.banner-section {
    position:relative;
    width:100%;
    height:400px;
    background-image: url("../images/kitchen.jpg");
    box-shadow: inset 0 0 0 1000px rgba(0,0,0,.3);
}
Code explanation
To set background color in our css file, we simply set a color value to the
background-colorattribute. For instance we can type something like{background-color: white}.banner-sectionis the class name for our banner section, it's position is relative to the child elements it contains.We set the width to 100% so that it covers the entire browser window and the height to 400px, we set this attribute by typing
width:100%;andheight:400px;This is where things get a little interesting, we set our background image by typing
background-image: url("../images/kitchen.jpg");. referencing an image starts with..followed by the file path. Now,imagesfolder is found in thepublicdirectory and it contains the filekitchen.jpg. If you noticed we didn't reference the image using the@routes.Assets.versioned()function, we just referenced the image file path directly using the url() function. Please note this difference because using@routes.Assets.versioned()to set background image will lead to errors.We added a little box shadow, to reduce the opacity of our background image by adding a transparent foreground so that texts can be more readable. We inserted a box shadow by typing
box-shadow: inset 0 0 0 1000px rgba(0,0,0,.3);. The opacity can be increased by increasing the alpha value of the rgba property. Values can range from .1 to 1, With .1 being the least opaque and 1 being the most opaque.
Creating Actions to render custom pages
For you to render custom pages, then a controller action must be defined with functions to display the custom page. The about page will be rendered each time the user clicks the about link. So to create controller actions lets type the following code.
def about = Action { implicit request =>
    Ok(views.html.about())
  }
Code explanation
We define a method known as about which does not accept any parameters
We define an action with an Ok, to display our page. The Ok function displays whatever is contained inside it.
The
view.html.about()represents the about view. This view will be rendered each time the user clicks the about link
Finally we define the routes for our custom pages. This can be done by typing the following in our routes file
GET / controllers.PersonController.about
Code explanation
When we type localhost:9000 to run our application, our index page is called automatically. We can call the about page by clicking the about link which displays
localhost:9000/aboutin the address barThe PersonController is the name of the controller we have created for the sake of this application, and about is the about method defined inside the PersonController controller
Finally to run our application, we do the
- Open command prompt
- Type cd and navigate to the project path
- type sbt
- Type run to run the application
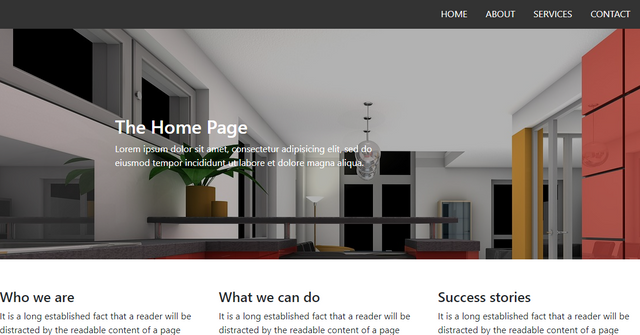
Now let's view the results and see what it looks like, just open your browser and type localhost:9000 and view the results
Curriculum
- Building custom websites with play 2.6.x(Scala) part 1
- Creating a file upload system with play 2.6.x(Scala) part 1: Multipart/form-data
- Creating a user registration system in play 2.6.x (scala) using mysql
- Creating a user registration system in play 2.6.x (Scala) using mysql
- Retrieving a particular user and initiating GET requests in play 2.6.x(Scala)
- Updating a particular user in play 2.6.x using slick
- Deleting a User and sorting elements in play(Scala) 2.6.x
- Carrying out aggregations in Play(Scala) 2.6.x
- Retrieving Data From 2 Tables in play 2.6.x(Scala) Using Slick: Part 1
Proof of Work Done
Proof of work done can be found here
https://github.com/leczy642/play-scala-slick-web-template
.png)
.png)
.png)
Thank you for your contribution. As per your Contribution the difficulty is Intermediate, but all are basic stuffs. When I know how to import the static assets, its very clear that the Bootstrap or JQuery or images can be referenced in a similar way.
In your "Creating Actions to render custom pages", you said "We define a method known as about which does not accept any parameters", its better to explain the location where the function needs to be defined (the file), even though you might have explained it earlier, because its very hard to follow.
Your contribution has been evaluated according to Utopian policies and guidelines, as well as a predefined set of questions pertaining to the category.
To view those questions and the relevant answers related to your post, click here.
Need help? Write a ticket on https://support.utopian.io/.
Chat with us on Discord.
[utopian-moderator]
Hey @leczy
Thanks for contributing on Utopian.
We’re already looking forward to your next contribution!
Want to chat? Join us on Discord https://discord.gg/h52nFrV.
Vote for Utopian Witness!
Congratulations @leczy! You have received a personal award!
Click on the badge to view your Board of Honor.
Do not miss the last post from @steemitboard!
Participate in the SteemitBoard World Cup Contest!
Collect World Cup badges and win free SBD
Support the Gold Sponsors of the contest: @good-karma and @lukestokes