Creating a user registration system in play 2.6.x (scala) using mysql
Welcome to my tutorial where I will be teaching you how to develop a user registration web application using play 2.6.x. This tutorial promises to be exciting as you will be learning how to access a MySQL database and store data by combining slick and Scala play. Hopefully by following my series you will be able to develop web applications using play
Repository
https://github.com/playframework/playframework
What Will I Learn?
In this tutorial you will learn how to create a user registration system using the play framework for scala and MySQL database. You will also learn the following
- Importing a project into IntelliJ IDEA
- Setting up a play project to access a MySQL database
- Navigating a play application by using routes
- Setting up controllers
- Passing data to views
Requirements
The following are required in order to properly follow along this tutorial the following are required
- An IDE (Preferably IntelliJ IDEA)
- SBT
- Play framework
Difficulty Level
Intermediate
Tutorial
The first thing you need to do is to download the play slick framework package from here. After dowloading the package, unzip it and put it in a directory on your hard drive.
Rename the folder to suit your purpose, in our case we will call the project scala-user-register.
Open command prompt (on windows) and type cd followed by the project path and hit enter.
Then type sbt to start our download dependencies.
Next, Open IntelliJ IDEA click on import project and click on next
uncheck library sources and click finish. Next, select the file to import and click okay
select sbt.
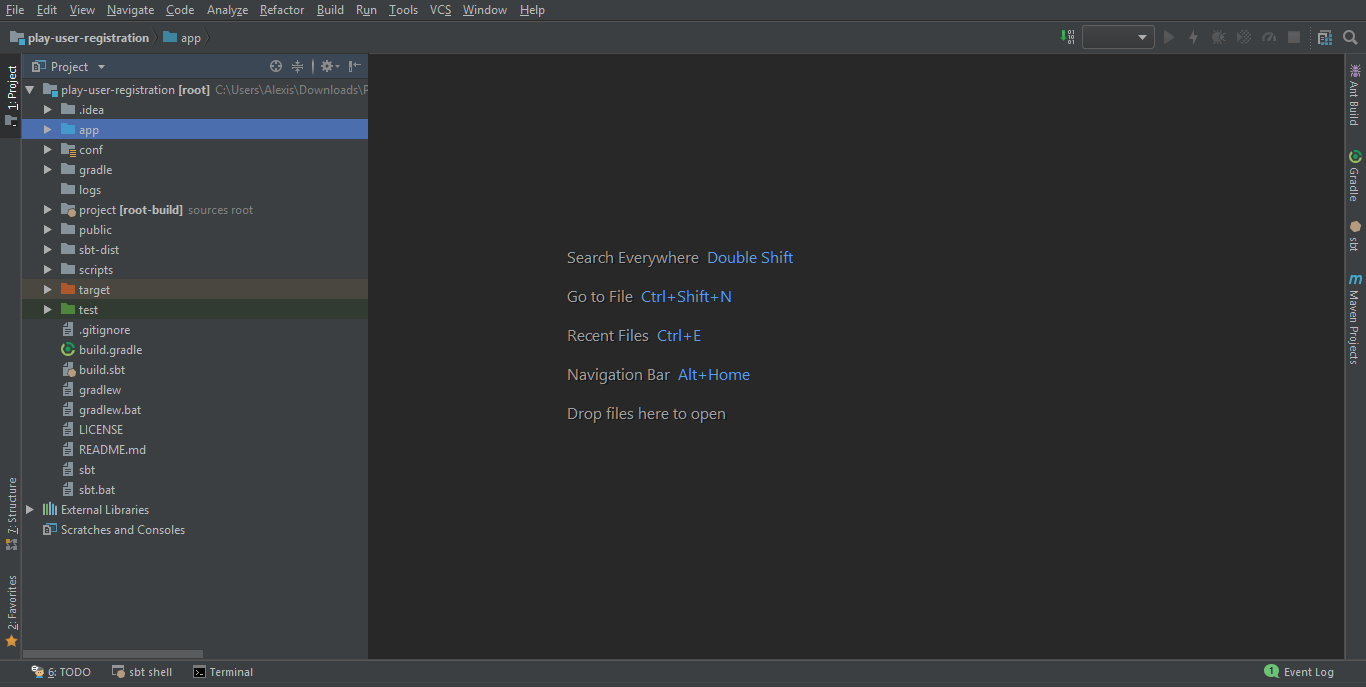
Your workspace should look something like this
Adding some dependencies
We need to add some dependencies for play slick and play evolutions, so we go to this locationtest/build.sbt and type in the following dependencies
libraryDependencies += "com.typesafe.play" %% "play-slick" % "3.0.3"
libraryDependencies += "com.typesafe.play" %% "play-slick-evolutions" % "3.0.3"
We need to add the MySQL dependency so that we can access a MySQL database. By default play accesses the h2 database, so you will have to add the dependencies for the database you want to access.
So to add the MySQL depency add the following code to the build.sbt file
libraryDependencies += "mysql" % "mysql-connector-java" % "5.1.34"
The next thing we need to do is apply some configurations to the conf/application.conf file. The some of the configurations we will be adding includes the database name, username and password. So open the conf/application.conf file and the following code
slick.dbs.default.driver = "slick.driver.MySQLDriver$"
slick.dbs.default.db.driver = "com.mysql.jdbc.Driver"
slick.dbs.default.db.url = "jdbc:mysql://localhost/yourDBName"
slick.dbs.default.db.user = "root"
slick.dbs.default.db.password = ""
yourDB name is the name of the database, and you can set yours as desired. The username is root and the password is blank. This setting is usually for localhost, but you might have to change these values when deploying on a live server.
Now that our database has been setup we update our changes, so go back to your command prompt and type update
Creating the models
Now that we have setup MySQL for our application, its time to start building our scala play application. So first we need to create our model, to do that create a folder inside the app package and call it models.
After creating our models package we create a case class (file> New > Scala class), in this case we will be calling this class User. To initialize the class type the following code
case class User (id: Int, fullname: String, phone: Int, email: String, age: Int)
We want to send the values as JSON to the client so we use the JSON library to serialize a User class, but first we must import the play json library package, we can do this by typing the following code:
import play.api.libs.json._
To serialize our data into JSON we type the following
object User {
  implicit val userJsonFormat = Json.format[User]
}
We need to create another model class that will enable us convert our model into slick objects, so inside the app/models
package we would create class, for this example i will name mine UserData.
After doing that, let's initialize our class
class UserData (dbConfProvider: DatabaseConfigProvider)(implicit ec: ExecutionContext) {
inside our class let's get the JDBC provider and make some important imports
private val dbConfig = dbConfigProvider.get[JdbcProfile]
import dbConfiguration._
import profile._
So now let's define our table, and give it properties. We can do that by creating a private class inside our UserData class our private class will be called 'UsersTable', but our actual table will be called 'users'.
private class UserTable(tag: Tag) extends Table[User](tag, "users") {
Now let's define our columns, we will be creating 5 columns and the id column will be set as primary key and will auto increment
def id = column[Long]("id", O.PrimaryKey, O.AutoInc)
    def name = column[String]("fullname")
    def phone = column[Int]("phone")
    def email = column[String]("email")
    def age = column[Int]("age")
The O.primaryKey, and O.AutoInc statements mean that the id column has been set as primary key and will auto increment. Whereas we have set the name, phone, email and age to String, Int, String and Int respectively.
Still inside the UserTable private class we need to define the table's default projection, as this would enable us to pass the id, name, phone, email and age data to the User case class apply and unapply methods.
def * = (id, name, phone, email, age) <> ((User.apply _).tupled, User.unapply)
So the complete code for the above will look something like this:
private class UserTable(tag: Tag) extends Table[User](tag, "users") {
    def id = column[Long]("id", O.PrimaryKey, O.AutoInc)
    def name = column[String]("fullname")
    def phone = column[Int]("phone")
    def email = column[String]("email")
    def age = column[Int]("age")
    def * = (id, name, phone, email, age) <> ((User.apply _).tupled, User.unapply)
Now that our tables have been defined, it's time to start querying our database, but first we need
to create a table query object which will map to. To do that we type the following code
private val allUsers = TableQuery[UserTable]
Now let's type a query to insert a user into the database, for that we will create a method called createUser. This method will take 4 parameters, name, phone, email and age. We will not be adding the id paramter because it will just auto increment each time a user is added to the database.
def createUser(name: String, phone: Int, email: String, age: Int): Future[User] = db.run
We need to create a projection for the other columns (name, phone, email, age) except the id column which will be inserted automatically
(allUsers.map(p => (p.name, p.phone, p.email, p.age))
We return the id, so as to know which id was generated for each user, also we define a transformation for the returned value which combines our parameters with the returned id
returning allUsers.map (_.id)
into ((namePhone, id) => User(id, namePhone._1, namePhone._2, namePhone._3, namePhone._4))
We now insert a user into the database
) += (name, phone, email, age)
Creating the controllers
Let's create a method that would display all the users stored in the database, we would call this method listUsers, it would not take in any parameters since we are displaying a particular user.
Now that we have completed our model we now move on to the controller, inside the app/controllers package we will create a new scala class (right click controllers package> new > scala class) and call it UserController. We define the UserController class by typing the following code
class UserController @Inject () (repo: UserData, cc: MessagesControllerComponents)(implicit ec: ExecutionContext)
                              extends MessagesAbstractController(cc)
We will now create mapping for our form
val userForm: Form[CreateUserForm] = Form
Let's apply the form parameters (name, phone, email and age) and apply the apply and unapply methods
 mapping(
      "name" -> text,
      "phone" ->number,
      "email" -> text,
      "age" -> number
    )(CreateUserForm.apply)(CreateUserForm.unapply)
we will now create the index method which is called by default, when the homepage loads. This method will display our form
def index = Action { implicit request =>
    Ok(views.html.index(userForm))
  }
still inside our UserController class we will create a method called addUser, this method we receive request from our
form, bind the form data insert data inside the database if no errors
def addUser = Action.async { implicit request =>
    userForm.bindFromRequest.fold(
      errorForm => {
        Future.successful(Ok(views.html.index(errorForm)))
      },
      person => {
        repo.createUser(person.name, person.phone, person.email, person.age).map { _ =>
          Redirect(routes.UserController.index).flashing("success" -> "user successfully created")
        }
      }
    )
  }
lastly in our controller, we will create a class for a form and it contains our form properties
(name,phone,email,age) as paramters
Updating the routes
Play uses the methods in the routes file to navigate your website. When a GET request is made to return a particular web page, play uses routes determine which controller and method to return
To locate our 'routes' file, navigate to conf/routes and type in the following code
GET     /                         controllers.UserController.index
POST    /user                     controllers.UserController.addUser
Play evolution
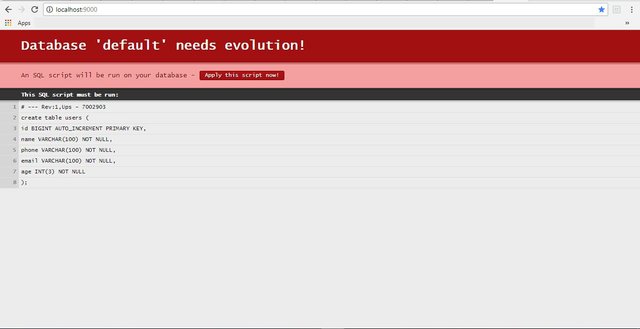
Play uses evolution to keep track of changes made in the database. The evolution script is found in 1.sql in the conf/evolutions.default package. My 1.sql script looks something like this
# --- !Ups
create table users (
      id BIGINT AUTO_INCREMENT PRIMARY KEY,
      name VARCHAR(100) NOT NULL,
      phone VARCHAR(100) NOT NULL,
      email VARCHAR(100) NOT NULL,
      age INT(3) NOT NULL
);
# --- !Downs
drop table "users" if exists;
You will be asked to run this script, before running your application
Passing data to our views
The views package is where the templates for our application can be found. There are 2 view templates index.scala.html and main.scala.html, we will be creating our form inside index.scala.html, found in app/views
let's define our userform and make an implicit request
@(userFormDef: Form[CreateUserForm])(implicit request: MessagesRequestHeader)
we will create flash messages to display a success message or errors if any
@import helper._
@request.flash.get("success").map { key =>
@request.messages(key)
}
Our form uses a post method to send data to the controller. The form action is set to the addUser method in the UserController controller class.
@main("Welcome to Play") {
@form(routes.UserController.addUser())
Our form input type is text, and the name of the various types are name, phone, email and age
@inputText(userFormDef("name"))
        @inputText(userFormDef("phone"))
        @inputText(userFormDef("email"))
        @inputText(userFormDef("age"))
        @CSRF.formField
Now let's add a submit button to our form
<div class="buttons">
<input type="submit" value="Add User"/>
</div>
Running our application
Now its time to run our application, in IntelliJ Idea click on terminal, then type sbt after that type run. You should get something similar to the screen shot below
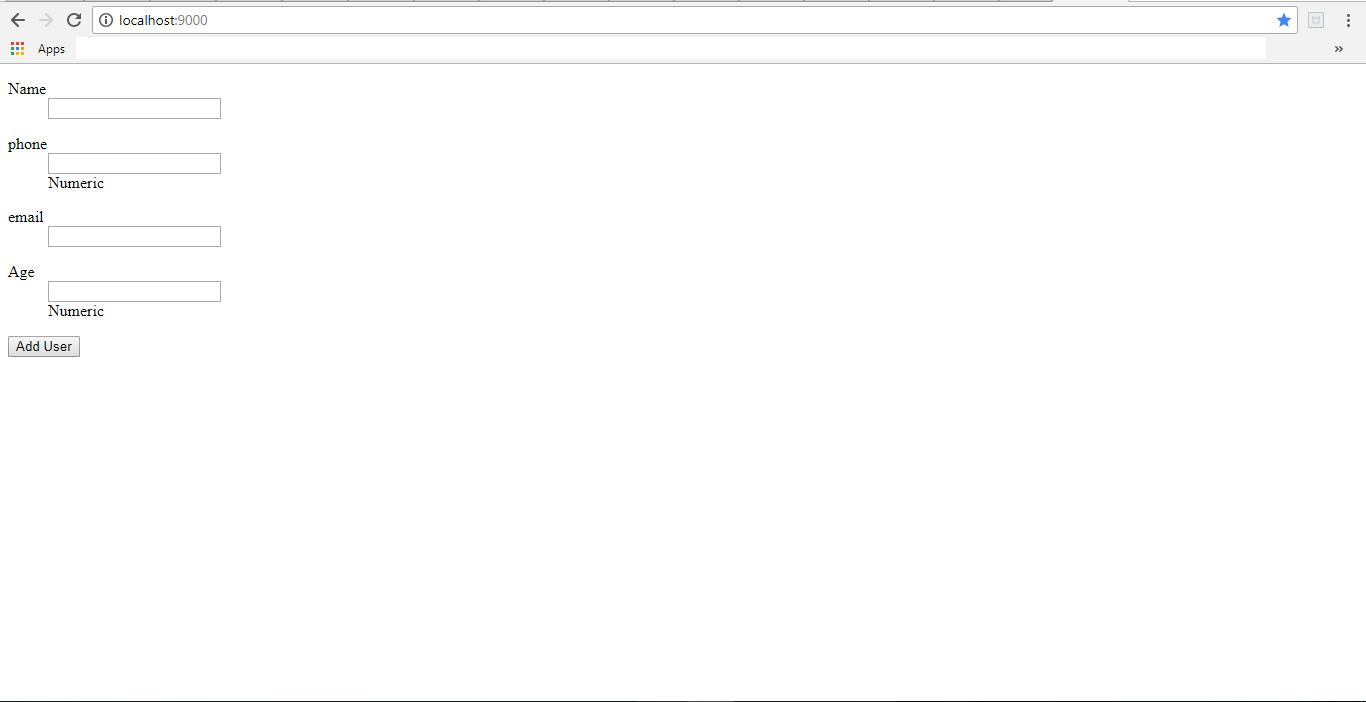
The next thing you need to do is to open up your browser and type localhost:9000 click on "apply this script now!" and it will run the script to create the table. After clicking on the button the form appears for you to fill.
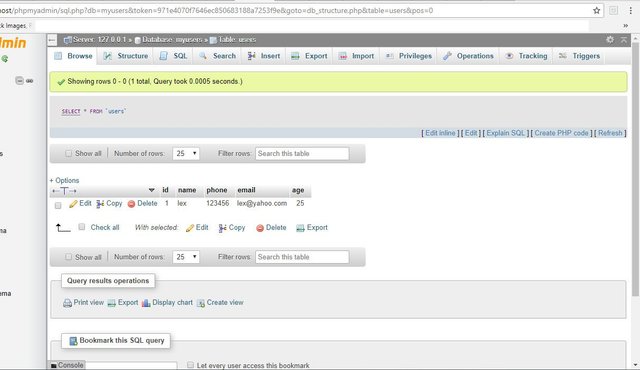
fill the form and click on add user, and the user will be added to the database
Code
The code used in this tutorial can be found here
.png)
..jpg)
.jpg)
.jpg)
Thank you for your contribution.
Need help? Write a ticket on https://support.utopian.io/.
Chat with us on Discord.
[utopian-moderator]
Thanks for pointing that out