Daz Studio and Unity: Getting Morphs from Daz Studio into Unity in a fashion that is useable [Basic]
Hi, Steemians. I've been in big time game developer mode recently and it has impacted how much and how often I've been posting on Steemit. I'm not going anywhere, just have only so many zots in a day and currently development is where I need to focus most of my free time. During this time I'll likely share some reposts, and I will post on steemit as things come into my mind and nag me to post them. I do want to share some of the things I am learning for those of you out there that are also amateur or professional game developers. I have a lengthy series on Daz Studio accumulating here on Steemit, and also quite a number of Unity related posts.

This tutorial is my first take at showing you how to get morphs from Daz Studio into Unity so they can be used. There are a lot of additional details that can be explored. I have been working heavily on a character system and I will post some more detailed posts later once I am completely satisfied.
Getting Morphs from Daz Studio to Unity
In Daz and in many other tools they are known as morphs. In Unity and many other areas they are called Blendshapes.
We are going to use a nude male figure to demonstrate this without any anatomical elements. So while the character is nude there are no reasons that I can see for this particular post to be flagged as NSFW.
If this tutorial is confusing there will be links to older and related posts at the end of this tutorial that may help fill in any confusing parts.
I am going to use the GENESIS 3 MALE which comes with Genesis 3 Starter Essentials. I will also be using basic morphs which may require a morph pack. Here are some things to consider:
Genesis 3 Male Body Morphs

Genesis 3 Male Head Morphs

Genesis 3 Female Body Morphs

Genesis 3 Female Head Morphs

Genesis 3 Male Expressions

Genesis 3 Female Expressions

Step 1 in product view for figures double click on Genesis 3 Starter Essentials.

Step 2 in Figures double click on Genesis 3 Male.

It should now look like this or similar to this:

In Daz when you have a character selected the Morphs you own show something like this...
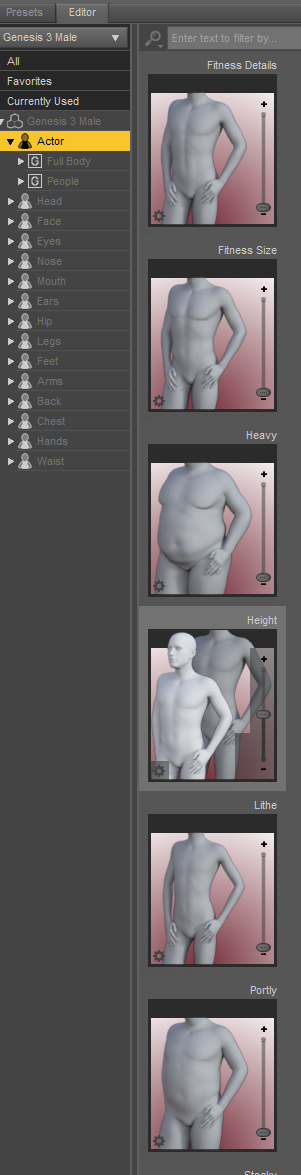
So what happens if we slide the heavy morph to max?


Wouldn't it be nice if you could do that in Unity at runtime, or make different prefabs with different morphs set so you really only need one male model to express a near infinite variation of people? You'd be able to make a detailed character creation system, or randomized civilians, or anything like that.
You can. That is the purpose of this tutorial. Before we proceed set that heavy morph back to 0% for the purpose of our next steps. We don't want to set any morphs yet.
It's all in the Exporting
Go the file menu and choose EXPORT.

Pick where you want to save it and give it a name and save it as an Autodesk FBX file.

Here are the default settings I use in this case. Notice I changed it to FBX 2014 - Binary. FBX 2012 - Binary will still work and is what it defaults too, but I tend to always change it to 2014. Also some things you export may tell you they require degraded skinning to export. When you are forced to use degraded skinning check the box Allow Degraded Skinning, but leave that unchecked when possible.
If we were going to export this character now this would be all that is required, but it'd be missing the morphs which is the purpose of this tutorial.
Toggle the triangle for the Genesis 3 Male line so it expands the list.

Should change to this.

Notice under EXPORT how it says BAKE for some things and NOT USED for many others. None of those NOT USED will be included. The ones that say BAKE it will bake the current shape into the export and they will not be adjustable as a blendshape. If we had left HEAVY at 100% it would have been defaulted to BAKE in this menu.
Though by default we can't really read the morphs... so we need to widen the Name column by mousing over the column border and dragging it wider so we can read the names. We need to be able to read what we are doing.
I own a lot of things in DAZ so my list is very large. It also lists some things I don't actually own. I've noticed if I pick up a new figure like Michael 7 it may include a bunch of expression morphs for him that I don't own. So if you ever mess with this and it is not working that is likely why.
For the purposes of this my plan is to export that HEAVY Morph and one known as BODYBUILDER that makes them muscular.
If you scroll down in that list you will see it listed Genesis3Male.FBMHeavy and Genesis3Male.CTRLBodybuilder.

Notice Heavy says Not selected? We need to change that to Export. I'll show you how.
Click on the Edit Morph Export Rules button.

Here is my default, and I want to explain how this works.

The match column you can double click on and change. It will search for any occurrence of that string in the list and will apply the action you want. I leave .Bone as a bake rule on all of my exports.
Let's click ADD and add another.

Then let's double click where it says name1 and change that to Genesis3Male.FBMHeavy

Then click on the Bake Action and change it to Export.

Click ACCEPT and if you didn't have a typo the FBMHeavy morph should now look like this instead of saying Not Selected.

Let's now repeat the process for Genesis3Male.CTRLBodybuilder. I'll explain the differences I have learned between FBM, FHM, CTRL, eCTRL, pCTRL, etc later in this tutorial.


Now let's go ahead and click the final ACCEPT button at the bottom of the FBX Options window and export this...

Everything from this point is done on the Unity side of things, so before we jump into Unity I want to share some things I've determined on my own by doing a lot of exporting in the past week. I am assuming what these things stand for based upon what I have seen them do.
FBM I believe stands for Full Body Morph and it doesn't usually do anything to the head.
FHM I believe stands for Full Head Morph and it appears to only impact the head.
eCTRL is an expression control. It is a morph for a facial expression.
pCTRL is a posing morph and can do things like move a hand, a finger, or other things as described in it's name.
CTRL seems to be linking multiple other morphs together. The bodybuilder for example there are actually two FBM morphs related to Bodybuilder. The CTRL links those together so you only need one morph that applies both of those.
If you have a figure such as Michael 7 if you look you'll find a FBM for Michael 7 which is the body, and an FHM which is the head. You'll also find a CTRL which is the head and the body at the same time.
I've noticed the more of these you add the more laggy it gets in the editor inside of Unity, so while you could add everything I've found it is a good idea to plan what I actually need and plan to use.
There are many morphs to build pretty much your own expressions, as well as tons of detail on facial morphs if you wanted to make a complex character generator.
Yet I urge you to think it through and exercise some self control for performance purposes. Or you could do what I did and just mess around with it and draw your own conclusions.
In Wormhole Ventures I am replacing the character design system with this and I made an initial UI yesterday.


That is my UI that I still am attaching to code and it shows buttons and details there that will not always be visible. For example the male isn't going to need the FBMBreastsNatural and FBMBreastsImplant sliders to change breasts.
I just built the UI yesterday and need to attach code to it. You could build it however, you wanted to and with whatever detail levels.
Bottom 4 sliders are parts of the eye followed by hair.
So there is are some demo scenes of how I am using this. I actually have 18 different male and female figure types not counting the breast, thin/heavy, and body builder morphs that I implementing with only a single male exported figure and a single female exported figure.
In Unity
I'm going to create a blank project called CharacterDemo just for this tutorial.


I am going to right click on ASSETS and create a NEW FOLDER called DAZCharacter.
I will then select that folder by single clicking on it.

In the Assets Menu I am going to click on Import New Asset.

I'll then browse to where I exported the character from DAZ and select that FBX file.


I usually change the Animation Type under Rig from Generic to Humanoid and then click Apply so it is fully ready for Mecanim animations.

Drag the MaleDemoForSteemit or whatever you named yours into the Hierarchy.


I typically rotate them 180 degrees on the Y axis.

Then move the camera closer...
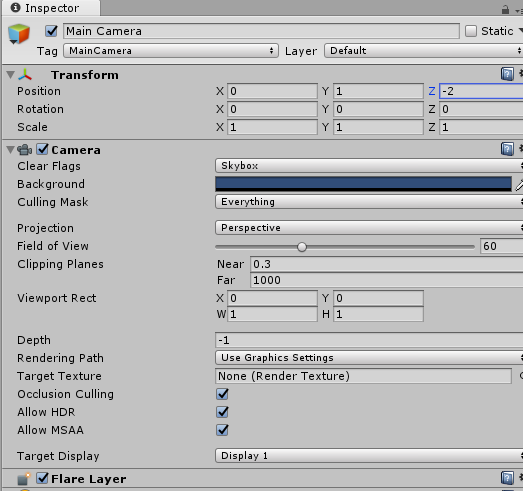

The figure may look weird, but that is because we haven't optimized it for PBR which I cover in several posts [1, 2, 3]
At this point expand the hierarchy of your figure until you can see the Genesis3Male.shape

Click on that and look at it in the inspector

Note that at the top of the Skinned Mesh Renderer section there is a toggle able section called BlendShapes.

Toggle that and you'll see the two morphs we exported.

Try changing the Genesis3Male__FBMHeavy from 0 to 100.

Change it back to 0 and then changed Genesis3Male_CTRLBodybuilder from 0 to 100.

Now set them both to 100.

That's the basics of how you do it. There are other things to consider, but I'll cover those in future tutorials.
Here is from my own WHV character setup an example of an eCTRL expression or two... :)


Closing
That is the basics to converting Morphs into Blendshapes useable inside of Unity.
Here are my Unity and Daz related Tutorials
If you are missing some things and you need to know more here are some previous tutorials I have written about getting Daz characters into Unity.
- DAZ 3D/Studio - Today the Licensing Program for Game Development changed - Pros and Cons - New format for Interactive Licenses - Important happened this week.
- DAZ3D - Introductory Post - Use it for still images, videos, and even game development...
- Importing Daz Studio Characters into Unity - Use them in your game... Unoptimized version
- DAZ 3d Studio - Genesis 3 to Unity PBR Setup (Blender for AO Maps) [Graz'zt]- How to get a character into Unity and set it up with full Physically Based Shading
- UPDATE: Improvement to DAZ 3D/DAZ Studio Genesis 3 to Unity PBR Setup
- DAZ3D Genesis 3 to Unity - The problem with eyes - making the imported Daz Eyes look nice.
- Daz Studio - Different types of Export data Michael 5/Genesis, Michael 6/Genesis 2, Michael 7/Genesis 3, and Michael 8
- DAZ Studio / Unity / Simple LOD - Experimentations in optimizing the crazy DAZ Studio hair polygon count so it is not as bad for game engines
- DAZ Studio - Morphs Library - Genesis , Genesis 2, Genesis 3, and Genesis 8
You can make evrybody pretty! Wish there was a programma which could change settings from the mind...
You always come with Creative ideas. Thanks for your extraordinary efforts @dwinblood!
Thanks for this interesting post
Hello @dwinblood i love your post always this time i hate your post because only of your pictures