Polishing Your Posts: Tips for Creating High-Quality, Readable, and Engaging Articles for Your Blog
During my time as a mentor for the Unmentionables, I’ve often encountered many of the same questions about post formatting. It’s important to make your posts attractive to other readers, so I’ve decided to compile several tips on how to engage your readers better and make your posts look extremely polished and professional. This post was also inspired by a comment I wrote recently in response to a post by @karencarrens.
The Merriam-Webster Dictionary defines the verb polish as:
1: to make smooth and glossy usually by friction
2: to smooth, soften, or refine in manners or condition
3: to bring to a highly developed, finished, or refined state
While the first of these definitions applies to the image above, the third and arguably the second can apply to how posts should appear when submitted to Steemit. We all want to put our best work forward, as it prompts more engagement from users across the platform. There is definitely a learning curve to posting on Steemit, especially if you want to create quality content that isn’t just copied from somewhere else. If you’ve joined Steemit for the long haul, and you’re interested in making your posts excel, I hope you’ll take into consideration the following four guidelines for bringing your posts to their refined, highly developed, and finished state.
1. Learn How to Use Markdown

I can’t emphasize this one enough. Take time to read the Markdown Styling Guide that Steemit provides a link to above every post and comment input field. It is essential for formatting posts. All of the other tips I give in this post will rely on understanding how to use markdown. For example, I’ve already used Markdown many times in this post to include links and make “Master Markdown” appear as a heading. Take the time to read the guide linked above, and you’ll be using formatting to your advantage very soon.
A few of the most commonly used formatting tools in markdown are as follows (an example is given, and then the corresponding markdown code follows):
Heading 1
# Heading 1 text here
Heading 2
## Heading 2 text here
Bold text
**bold text here**
Italic text
*italic text here*
[Link text here](Link URL here)
This is a blockquote. Use it to directly quote someone in a post or comment.
>Quoted text goes here
I would advise committing these to memory, as they are the ones you'll use most often. If you want some practice, check out this website.
2. Grammar and Readability
I know this may be a tough issue for many Steemians because there are a lot of non-native English speakers. It may also be an issue for native English speakers since this may be the most writing you do on a regular basis. For me, it can be an issue because I'm used to reading and writing scientific literature, which has a different feel and syntax than writing a blog post.
So what can you do to improve your skills as a writer? The best tip I can give is to keep writing. The more you write, the better you get. You'll develop unique styles and your command of the English language will improve. In case you want to move along a little quicker, there are some other tools that can help you. One that many Steemians already use is Grammarly. It's a browser extension that will check your grammar, help with sentence structure, and make suggestions to help you write. There is a basic free version that anyone can use and a premium version that gives even more help to your writing. Check it out here.
If you prefer to compose your posts in an outside editor like Microsoft Word, Grammarly has a Word add-on that performs the same functions. The built in grammar and spelling checker in Microsoft Word can also be of help, but it is not as good at picking up on general ideas, which causes its suggestions to be erroneous sometimes.
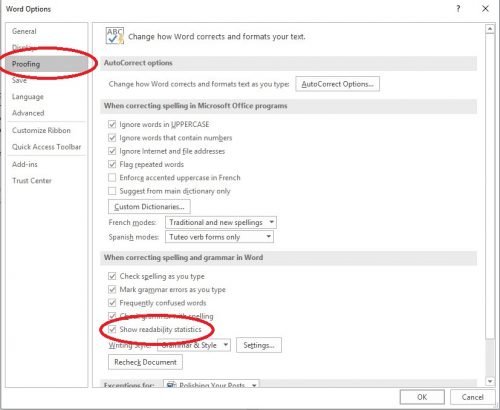
Another test that may help you create posts for a more general audience is the Flesch-Kincaid Readability test. The test will analyze your writing and let you know the approximate grade level of your writing. Many times broad publications like magazines or online news sources will aim for this to be between six and nine, since this is generally considered a good range for the general reader. If you type up your Steemit posts in Microsoft Word, you can access this test very easily. Simply click File (or the Office button if you’re not using the latest version of Word), then Options. Click on Proofing on the left side menu, then you should see a check box beside Show readability statistics.
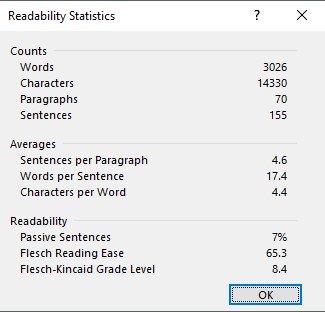
Simply check that box, and then upon pressing the F7 key or clicking the Spelling and Grammar button in the Review tab, you’ll get a readability summary that includes the Flesch-Kincaid score once all Spelling and Grammar issues have been handled. Here's what the report for this article looks like (minus the markdown):
Don’t have Microsoft Word? No worries. There are plenty of online tools like this one, which allow you to check your Flesch-Kincaid score. Aim for the six to nine range. This allows your article to be read and understood by the majority of readers.
Scientific literature often scores above twelve on the Flesch-Kincaid test. When I was an undergraduate student, I was in a lab group where we attempted to see how high we could get this number on a lab report that we turned in. High scores can be good for science, but probably not so good for an average Steemit post.
Finally, if you aren’t confident in your writing skills, ask for help. I’ve read many articles for a variety of people over the years. I have also let others read my posts or papers because another set of eyes may help catch mistakes that you might have overlooked. Over at The Unmentionables, I’m always happy to proofread articles for anyone and offer suggestions for how to improve grammar and readability. Find someone with a little spare time and ask them to read your post before sharing it publicly. It could help tremendously!
3. Text Emphasis
One of the easiest things to do to improve your readers' experiences as they scroll down your post is to emphasize text. Consider breaking your post up into sections and giving each section a title. When you get to each section, use Markdown to make the section title a header, similar to how I've done in this post. That way, if someone wants to quickly scan your article, these large header texts will catch their eyes. The markdown header tags feature six different levels of header text, so use them to your advantage.
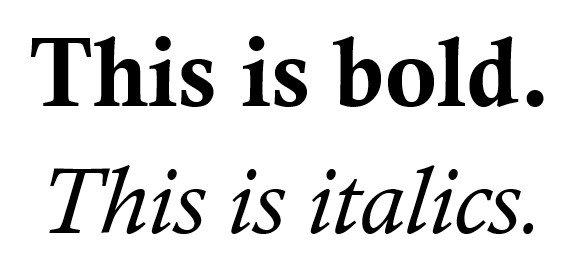
Next, consider using bold and italic texts to emphasize specific phrases or titles. I personally use italics in place of quotation marks most of the time for titles of books, movies, etc. (e.g. The Adventures of Tom Sawyer). It gives the post a more elegant feel, and the slight emphasis of the italics blends in better with the sentence than quotation marks will. Bolding a phrase or sentence can help it stand out in case you need to drive home a specific point or make sure readers pick up on an important idea. All of these formatting tools together can add some extra appeal to your posts as readers scroll down the page. There is always the risk of overdoing it, but be sure to take advantage of the preview that Steemit gives you of your post before sharing it. Look over the post yourself to see if the formatting is spread out properly and not too noisy.
4. Images

Images are a huge part of your post on Steemit, which means there are many things to consider when choosing images for your posts.
Featured Images
First is the featured image. The first image you include in your post will show up beside the title of your article anytime it appears in a feed across Steemit. When people scroll down their home pages, they often will notice images before they notice the titles of the posts. Therefore it’s incredibly important to pick a high-quality image that summarizes the main idea of your post. If you’re posting about a photograph you’ve taken, be sure to include the main image first so it shows up as your featured image. If you’re typing an informative article like this one which includes screenshots, don’t forget to add an eye-catching image at the beginning of your post so that a tiny unreadable screenshot is not the featured image.
Finding High Quality Images
Good featured images can be tough to find. Never fear, though. There are resources for you to use. Start by searching for images that fit your theme on Pixabay and Unsplash. Both of these websites offer free-to-use, public domain images which you may use without attribution in your posts. Many of these images are high quality, and there is a large selection, so you can usually find something that will represent your post nicely.

Be careful when choosing images. Be sure the images are your own, or they are licensed for commercial use since you could potentially make money from your posts. Many new Steemians make this mistake. Great bloggers will be sure they are properly citing sources or using material that is designed to be redistributed. Using an image from a quick Google image search and then citing the source is usually fine, but I like to air on the side of caution and use images with defined licenses. Another great place to search for images is the Wikimedia Commons. If the image has a license, it is listed below it with instructions for attribution. Finally, check the Commons page on Flickr for more images released for use across the web. There are many more sources for free images, but I think I’ll do a standalone post on these at a later date.
Image Formatting
Formatting your images can add an even more polished feel to your post. Using markdown and several other easy manipulations, you can master the use of images on Steemit in no time. I’m going to break this section up with headers so you can quickly reference these formatting tools. We’ll start with inserting your image.
Inserting Images
There are many ways to insert an image into a post on Steemit. The simplest is to drag and drop the image from its location on your computer into the compose field. The image will be uploaded and hosted by Steemit, and a Markdown code is generated for you. I recommend using this tool if you are using your own images and you don’t have another place to host your images. It’s definitely the quickest and easiest way to use images. For example, here’s an image I uploaded using this method:

Here is the Markdown code that was generated when using this method:
Notice there is a place to include the image description between the brackets that defaults to the image file name. You may change this to whatever you wish.
Centering Images
You may also have noticed that the image is centered. This is another simple trick that can make your posts look polished. Simply use the basic HTML tags <center> and </center> before and after the markdown code for your image. For example, the Markdown to center the image I Included above is:

Linking Images
And if you’re paying very close attention, you’ll also notice that by clicking on the image above, you’ll be taken to the page for The Unmentionables. Linking images can be another great tool for your posts, and the Markdown for it is very similar to linking text as explained earlier in this post. It involves adding an extra set of brackets around the Markdown for your image and then adding the desired link in parentheses after the brackets. The general formula is:
[](Link URL)
As an example, the markdown for the image above is:
Image Size and Load Times
I also want to mention the subject that inspired me to write this post in the first place: image loading time. If your image file is too large (several MB), it can cause your posts to load slowly, which may result in frustrations as readers try to scroll through your posts. One way to remedy this for .PNG files is covered in this article by @karencarrens, but I want to go over another method for image resizing, as well as how to still let users access full resolution images without sacrificing post load times.
Since the width of the post window on Steemit is anywhere from 675 to 875 pixels (approximately, depending on the viewing medium), having an image larger than that will only increase your page loading time. The solution is to decrease the size of your images before uploading or inserting the URL. Here’s how to do this:
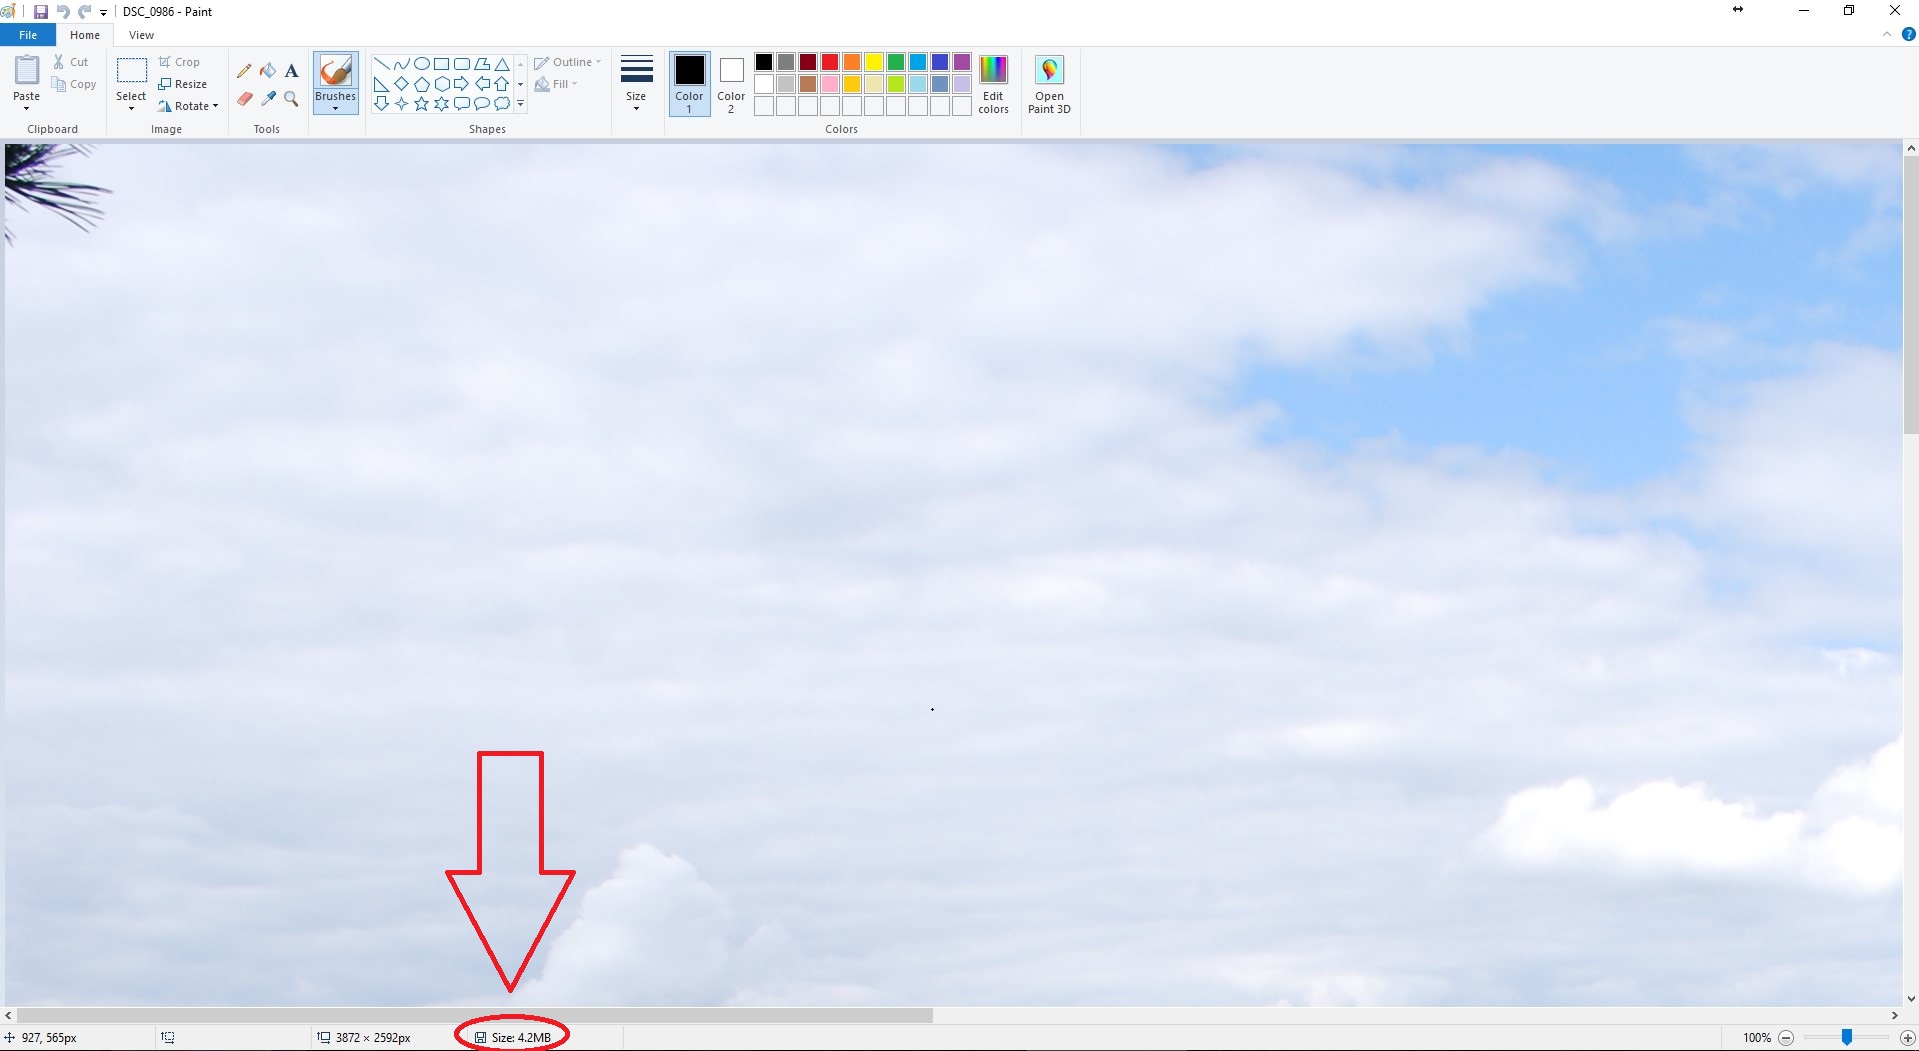
The quickest way I have found to resize an image is to open an image in Microsoft Paint. Notice here that the image is so large, you can't tell what it is when you first open it. Also, the file size is quite large (4.2 MB).
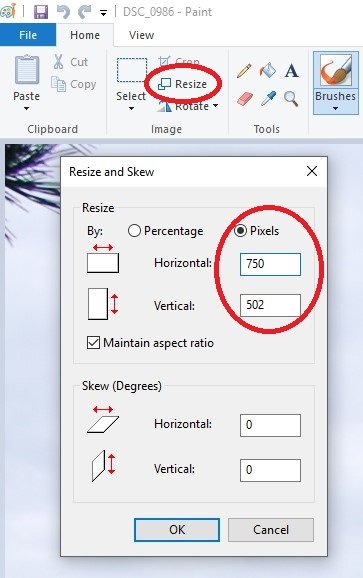
Next, click Resize on the menu bar, and you'll see a box appear. You can resize by percentage or by specifying an exact size. I find that scaling down to around 750 px in width works well.
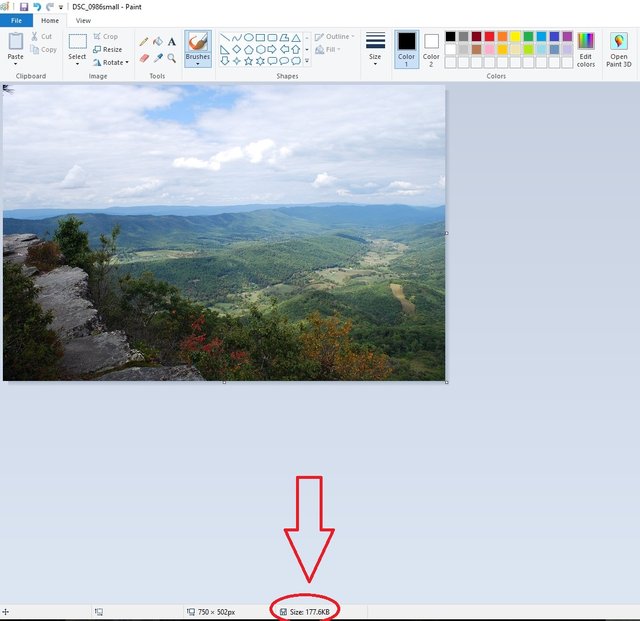
Click OK, and your image will be resized! What's more important is that after saving that image (be sure to Save As if you don't want to overwrite your original image), the file size will be decreased dramatically (mine went from 4.2 MB down to 177 KB!).

Now you have an image that will fill the post width on Steemit by default and give the same results you described in your post. I like this because it eliminates the need for 3rd party processing of your images.
Image Hosting and Thumbnails
But what if you want users to be able to view your image in its native resolution? One solution is to provide a link below the image to the high-resolution version. However, there is a more elegant solution that takes a bit more time to set up, but is worth it in my opinion: using thumbnails, which link to the high-resolution images. A thumbnail is simply a smaller version of your image that is used as a placeholder where the full resolution image is not required. We actually just made a thumbnail in Paint using the steps described previously, so now all you need is a place to host the two images. I use the space on my personal blog, but if you don’t have personal hosting space, a quick Google search for free image hosting services will return many options.
Before I show you how to use thumbnails, note that you may also insert images into Steemit posts via their URLs if you have them hosted elsewhere. Use the same Markdown code that appeared in the uploaded image example above, or just paste the link to the image into the post creation area:
 or
Image URL
The center tags still work for this method also. Use them as necessary.
Using a thumbnail to link to a full-resolution image is straightforward. It uses the same code as linking to any other URL as described above, except this time the link will be to the full size image. Here’s how:
First, resize your image in Paint as described above, and save it as a new image. Now you have two images. The original and the smaller thumbnail version. Upload them to your image host, have both URLs ready, and use the following markdown to link the smaller image to the larger one:
[](Full resolution image URL)
This loads the smaller image into the post, but allows you to click through the image to see the full resolution, making it ideal for photography contests where image resolution loss can be detrimental. It's also helpful if your readers are using a browser extension like HoverZoom. Check it out in action on this post.
As an example, here's the code I used for the above image of the screenshot of Paint:
](http://ethandsmith.com/wp-content/uploads/2017/09/Screenshot_4.jpg)
Image Spacing
As a final note, don’t forget to consider image spacing on your posts. If your post has a huge block of text, consider breaking it up with an image. However, don’t get too many images close together unless you want it to appear like a slideshow. Having great image spacing usually means that the reader can see the next image while reading paragraphs of text. If the blocks of text are shorter, people are more likely to read them. Long posts with nothing but text can be intimidating to some readers. Adding images makes their experience more enjoyable.
Final Thoughts
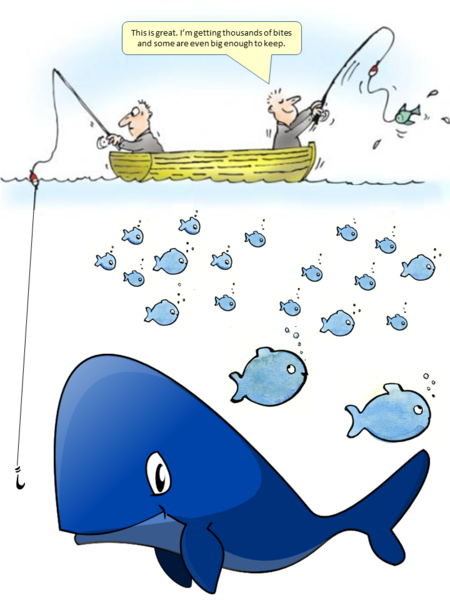
If you can successfully master these four tips, you’ll be well on your way to creating fantastic posts every single time. Whether it’s a long article about a subject you’re passionate about, or if you’re just sharing a picture in a photo challenge, using these tips will help your posts rise to the next level. Who knows? Maybe you’ll get spotted by a whale or two. With great formatting, anything is possible.
I wish you the absolute best with your future posts. Feel free to bookmark this post since it’s a lot of information. I don’t expect anyone to remember all of this overnight. It’s taken me many hours of writing and planning posts to get the hang of things. Keep at it, and you’ll have some great posts in no time. Just remember, good posts take time.
I’d be happy to help you with any of your future posts. I’m part of the mentoring team in the Discord group The Unmentionables, so if you have any immediate questions, head over to our discord room and message me! Otherwise, I’d love to hear from you in the comments section.
As always, best wishes and happy Steeming!
@ethandsmith -- I salute you. That pretty much says it all -- because I'm not sure I ever said that to anyone before. Certainly not for a very long time ... and for damn sure not often. Bravo!
from #theunmentionables
Hi @ehtandsmith, I just stopped back to let you know your post was one of my favourite reads and I included it in my Steemit Ramble. You can read what I wrote about your post here.
If you’d like to nominate someone’s post just visit the Steemit Ramble Discord
Thanks so much for including my post! I'm glad you enjoyed it. I'll be sure to nominate some more great posts in the future for the Ramble!
It's always good to see posts which help people improve the reader experience. Really, that is what our work is about after we get through pouring ourselves into it
Definitely. Keep up the good work. You always find some great posts for the Ramble!
Thank you .. that is always good to know other people agree the choices are worth the hunt
@ethandsmith
Wow!! This post was so very helpful. Where were you when i signed up. I wish I could start over. LOL. I had to learn as I went. I had no prior knowledge of HTML. However, I was happy to meet @inquiringtimes he took time to help me with learning how to do a proper verification. I am still learning more as I go. Another significant person that has always upvoted my post is @mahdiyari who is the owner of our Discord channel. Just wanted to introduce myself and wish you much continued success.
🎀 @theprettysoul 🎀
Thanks so much for taking the time to read my post!
Indeed, @inquiringtimes is a great user to know. He and I are working on some collaborations to improve how new Steemians are greeted so that this information is more readily available.
Which Discord group are you referring to? I'll have to check out @mahdiyari's blog, too.
Thank you for introducing yourself. I'll check out your blog, and I hope you find the same success that you wished me!
@ethandsmith
Yes, It is so nice to have a support team on here. I am sure you and @inquiringtimes will do great work together and make Steemit everyone's #1choice in Decentralized Social Media.
Yes, please stop by and check out my page. I just wrote a post on "How to get started with Bitcoin for Girls."
Let me know what you think.
https://steemit.com/cryptocurrency/@theprettysoul/how-to-bitcoin-cryptocurrency-made-simple-for-girls
🎀 @theprettysoul 🎀
@ethandsmith, I was just revisiting this article of yours because @bafi referenced it in a new article. Even though I have linked to this in an article of my own, this article is so good it deserves its own spot in the #resources channel of my Discord Server. It sure deserves more than the payout it received. Thanks for all you do to help new users on this platform.
Cheers!
Hey @mitneb, thanks for coming to check out this post. It's one of my most referenced blogs to this day. I'm glad you find it useful. there's a lot of info here, but I still use many of these tricks when formatting my own blogs. I hope many more people find it useful!
This has been a very helpful article for me, @ethandsmith! I've been trying to figure out how to do several of these techniques in Markdown, and it's taken a lot of trial and error. Your summary and detailed explanation for the different options is going to be a huge help to me for future posts. I'm adding this to my personal Steemit reference library. I'd upvote and resteem this if it wasn't too late! I found this article from a link posted in an article by @gogogadgetupvote.
I'm trying to join the Unmentionables on Discord right now, but it says the invite has expired. Can you generate a new invite please?
Thanks for writing such an informative and helpful article. Cheers!
Glad you've found this post to be so helpful!
The unmentionables group is taking applications currently, so check out one of the curation posts on the account @unmentionable for the application link.
I'm so glad this post has been helpful to you. Let me know if there's anything else I can help with!
Thanks, @ethandsmith! I've filled out the application now! Thanks for getting back to me! Cheers!
I only picked up Markdown when I started using steemit about three months ago and only the simple commands. So this post is great to reassure myself I'm doing it right... :) and to pick up additional tricks! Thank you!! :))
You're very welcome! I'm glad to provide some reassurance. I'll have to check out your posts to see it in action.
Also, I hope you've enjoyed your time on Steemit! If you've stuck with it for three months, that's great! Let me know if you have any other questions!
Hi, I saw your post featured in the Daily Qurator and came to check it out. This is a great tutorial on Markdown and using pictures in posts. Using pictures in my posts has always been a little troublesome for me and your info on resizing them to speed up loading was very helpful. Thanks for sharing this information.
Glad you hopped over here from @qurator! Glad to know I'm getting some traffic from their great service.
I'm also so glad my post helped you out! I'm sure having quick-loading images will help your posts in the future. Feel free to let me know if you have any other questions!
Great quality content, loved it!
Bookmarked for future references as well!
Thanks for checking it out! I really appreciate it! I hope you'll be able to make use of these tips as you begin your Steemit journey!
This is a brilliant post. I often stop mid post through when writing and search how to do some of this stuff. Now I have a handy guide bookmarked safe and sound.
Thanks so much! I worked hard to include the things that took me the longest to remember. I'm hoping it will help out our group as well as many others who need a quick place to reference these tips.