Building the "Fountain of Youth" - Electrical Modifications
"If there is magic on this planet, it is contained in water."
- Loren Eiseley
Summary: This is a series of articles describing in extensive detail how I've modified an off-the-shelf acrylic polishing machine for use as a hydrogen/oxygen gas inhaler. What I have done is largely—but not entirely—based on previous work done by Brown's Gas expert George Wiseman.
If you are adventurous, moderately skilled at working with your hands, and short on cash as I was when I took on this project, fasten your seatbelt! Consult all the articles in this series, and get busy building, but, be forewarned: this series is not a hand-holding "How To Do It" as much as it is a "How I Did It."
However, if you are more inclined to simply "cut to the chase," you can save yourself an incredible amount of time and trouble by ordering an HHO health machine "off-the-shelf" from Eagle-Research.
Series Index
- Part 1: "Fountain of Youth" - Embarking On A New Maker Adventure
- Part 2: "Fountain of Youth" - Figuring Out How To Build It
- Part 3: "Fountain of Youth" - Inside an Acrylic Polishing Machine
- Part 4: "Fountain of Youth" - ~Euphoria!~
- Part 5: "Fountain of Youth" - Standing On Giant Shoulders
- Part 6: Building the "Fountain of Youth" - Mechanical Modifications
- Part 7: Building the "Fountain of Youth" - Tower Cap
- Part 8: Building the "Fountain of Youth" - Electrical Modifications
Electrical Modifications...
The time has come to look at some of the electrical modifications made to get the machine up and running in a controllable fashion. First, have another look at the original wiring, "as-delivered" when I purchased the acrylic polishing machine.
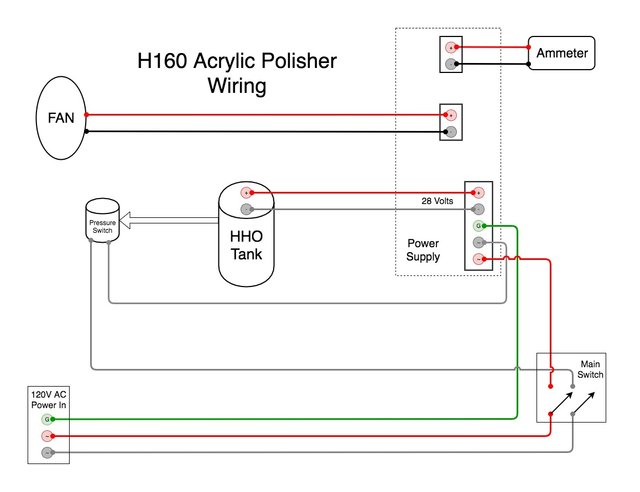
H160 System Wiring Schematic. ~ Image by the author.
The original wiring diagram is above, and the new, modified wiring diagram is below. If you want to understand how I modified the machine, I'd suggest placing the two diagrams side by side and noting the differences.
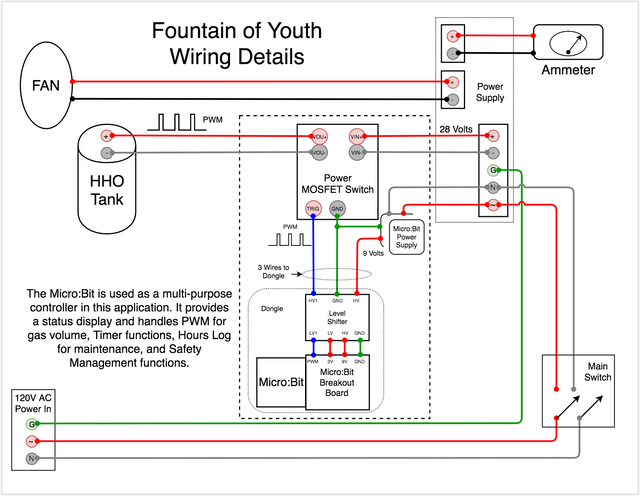
"Fountain of Youth" Modified Wiring Schematic ~ Original image by @creatr
As you compare the two diagrams, please notice the following:
- The ammeter and the fan are unchanged
- The power input is unchanged
- The over-pressure switch has been bypassed and completely removed
- A new subsystem has been inserted between the power supply and the HHO tank
Comparing the two should make it clear that the main "trick," in essence, is to break the circuit between the power supply and the HHO tank in order to pulse-width modulate the power delivered to the tank. This allows for adjusting the gas volume easily, as well as achieving most other design change goals.
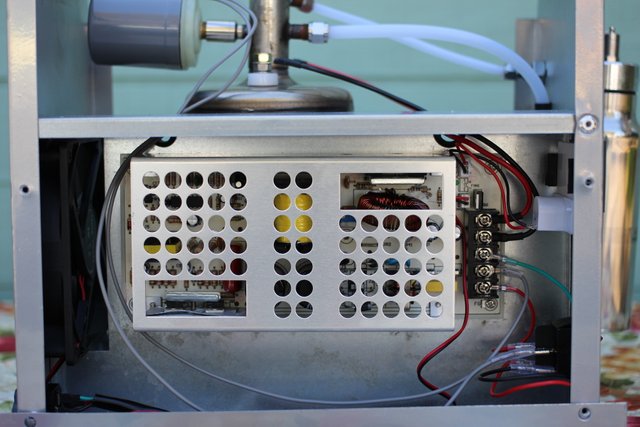
Photo of Wiring Before Mods ~ Original image by @creatr
In the "before" photo, you can see two grey wires coming from the over-pressure switch. That switch is "normally closed" and only opens if the tank pressure exceeds some upper limit. In our modified design, there is nothing but water restricting the free flow of HHO, and so there really is no need for an over-pressure switch.
You may wonder, "What happens if someone closes a door, pinching one of the delivery tubing lines?" There is a very low-pressure relief valve on the two bubblers that scrub lye mist out of the gas, and they will vent before the tank pressure can reach a dangerous level.
You can also see the RED and BLACK wires going from the power supply to the tank. That is the circuit that our modification breaks.
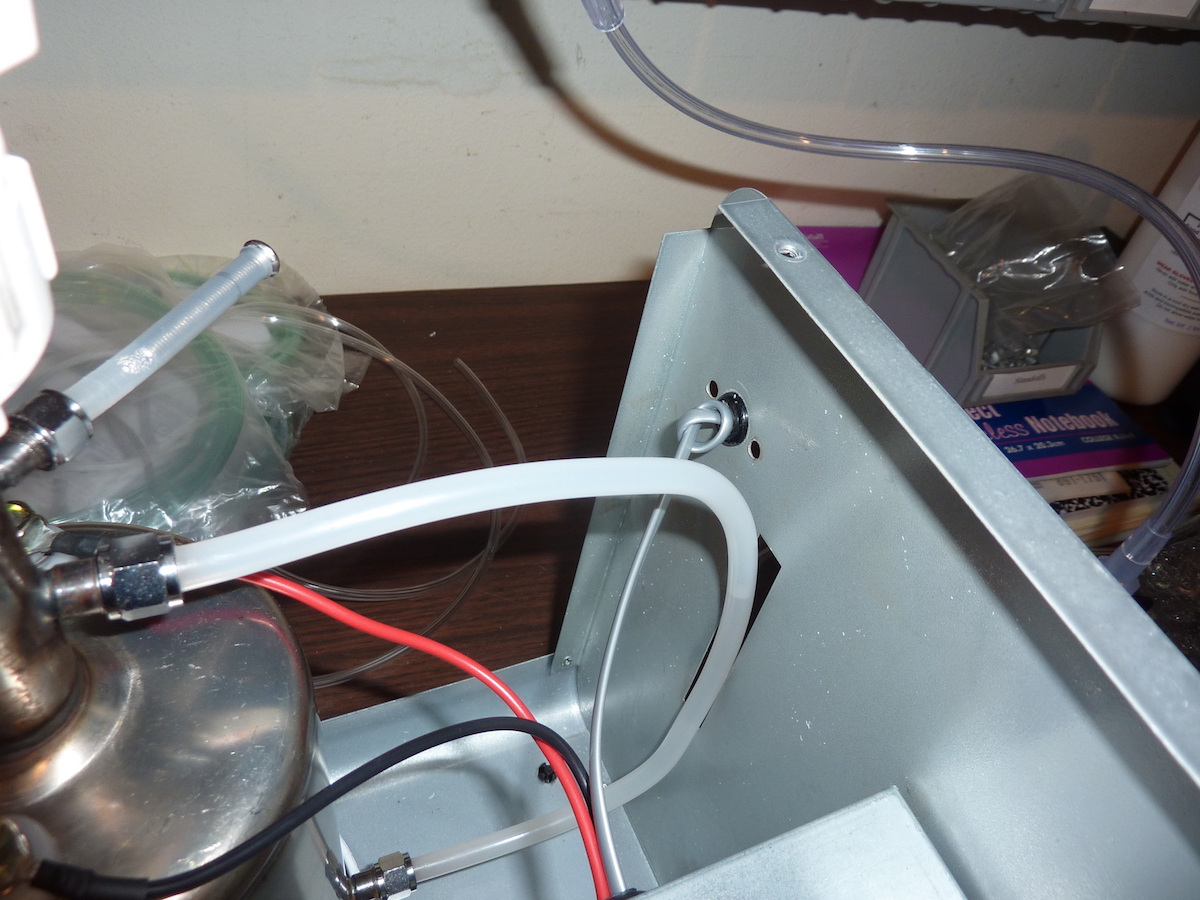
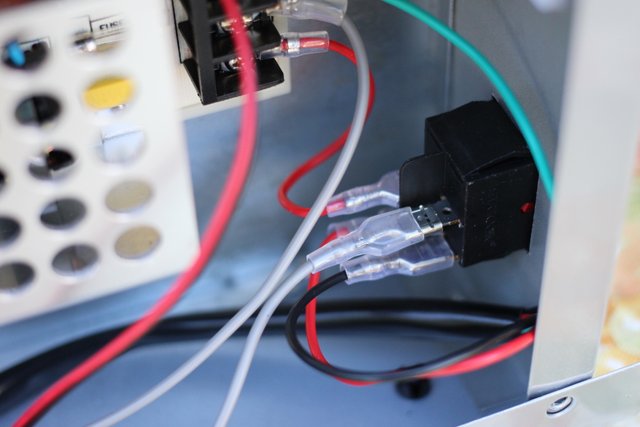
The next photo shows the wiring inside the machine after electrical modifications. There is a lot going on in this "after" photo, so you'll want to keep coming back here to follow the written descriptions later in this installment.
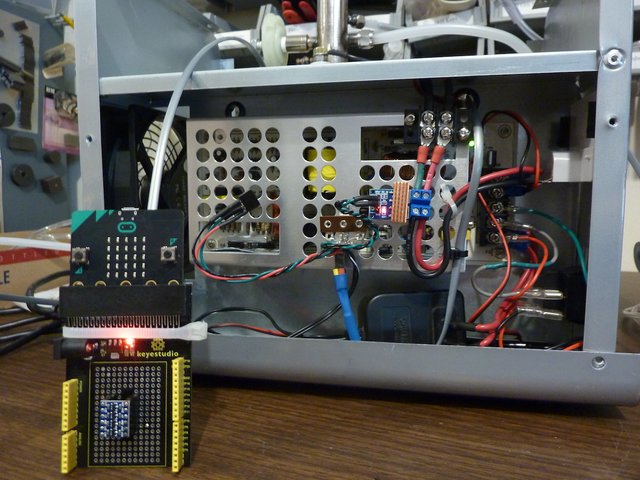
Photo of Wiring After Mods ~ Original image by @creatr
You can see (look on the right by the power switch) that the pressure switch wiring has been short-circuited directly between the main power switch and the power supply. I simply cut the grey wire and spliced it together, covering the splice with a piece of green heat-shrink tubing.
You can also see that the black and red power wires now connect to a MOSFET switch (close-up below).
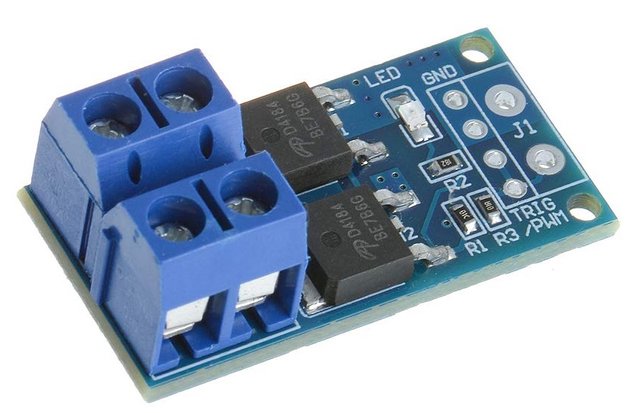
MOSFET Switch ~ Image source: Amazon)
I discovered that, when operating, the MOSFETs would get quite hot even though they are nominally operating well below their rated 15 (continuous)/30 (surge) amps. Rather than worry about that, I bought some nice little copper heat sinks. These are finned pieces of copper that came with thermally conductive adhesive strips. You can see the heatsink in place in the "after" photo (as well as a number of other things I'm about to mention).
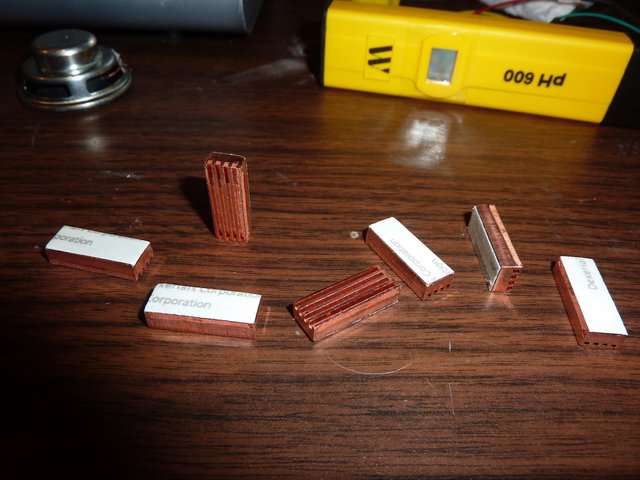
Copper heatsinks with thermal adhesive strips ~ Image by the author.
Above the switch, I installed a terminal strip. This makes it easy to disconnect the HHO tank for removal and cleaning (see Episode Six). Note that I simply disconnected the existing tank wires from the power supply, and added new wiring up to the MOSFET switch and the new terminal strip.
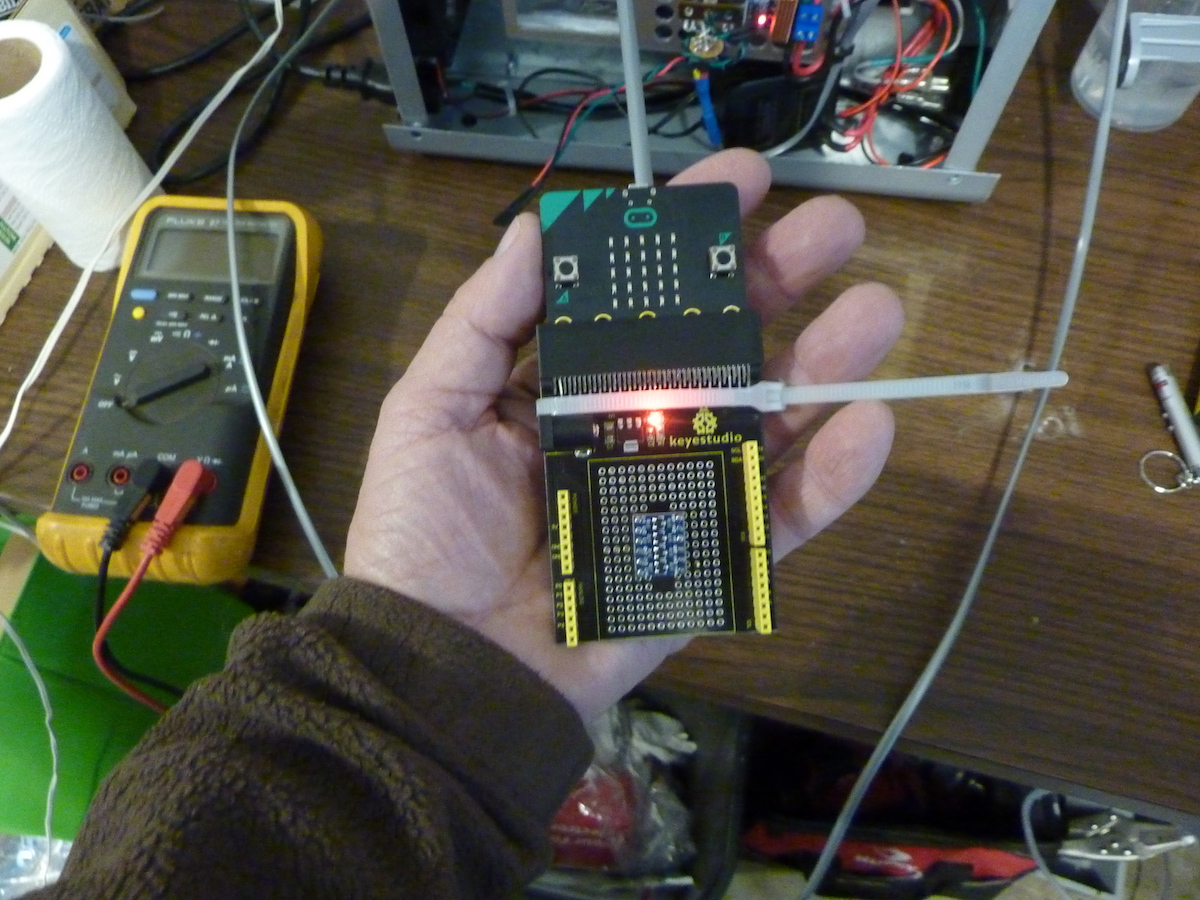
Another important discovery was that the Micro:Bit PWM output level is not quite adequate to directly drive the MOSFET switch.
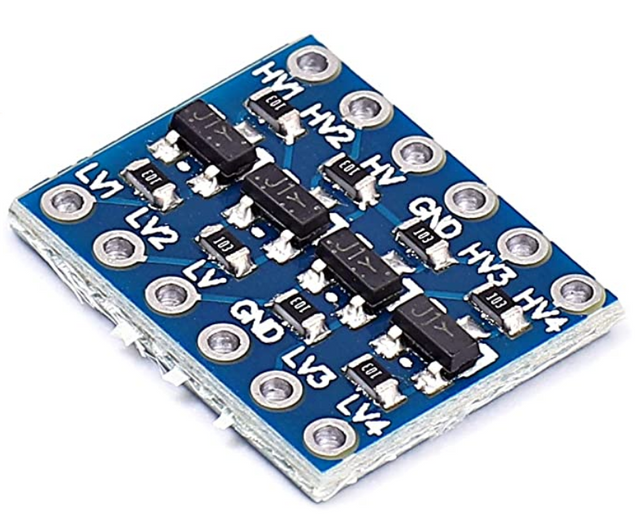
Voltage Level Shifter ~ Image source: Amazon)
To remedy this, I bought a Level Shifter circuit and mounted it on the breadboard area of the Micro:Bit breakout board. If you were to use a 5-volt Arduino instead of a Micro:Bit, you might be able to drive the MOSFETs directly; but you'd need a replacement for the Micro:Bit LED display array.

Micro:Bit Breakout Board ~ Image source: Amazon)
Rather than mount the Micro:Bit, the level shifter, and the Breakout Board on the machine cabinet, I chose to turn that sub-assembly into a remote dongle. The schematic presented earlier accurately shows the cable connecting the dongle to the chassis. Only three of four available wires are in use: a 9-volt power wire, a Ground wire, and the PWM wire.
In the "after" photo, the dongle cable is fed through the same grommeted hole in the firewall as the HHO tank power wires, and it ends in a BLUE heat-shrink covered connector that you can see coming up from below about in the middle of the image.
I had intended to use the fourth wire in the dongle cable for audio annunciation (i.e. to audibly signal startup, shutdown, etc.) but I ran into two separate problems. First, the wire picked up horrendous electrical noise, making its use for audio out of the question. Second, I pretty much ran out of program space when programming the Micro:Bit. While I'm sure these are engineering issues that can be overcome through any of several means, I didn't consider it worthwhile to divert my energy to that end at this point in the project.
If you're wondering what the RED/GREEN/BLACK wires floating unconnected in front of the left side of the power supply are, they are the unused proposed audio connection.
The slides below show how the dongle wire is fed through the hole that used to mount the original stainless steel bubbler. I inserted a rubber grommet to prevent the wire from chafing, and I knotted the wire so that the knot would act as a strain relief if the cable is pulled from outside the chassis. You can also see the completed dongle in my hand.


<<<-Drag to SCROLL Left and Right->>>, CLICK for full-sized image. All Images by @creatr
I also soldered connecting wires directly to the wall-wart 9-volt power supply so that I could tap incoming line power directly from the main power supply terminal strips.
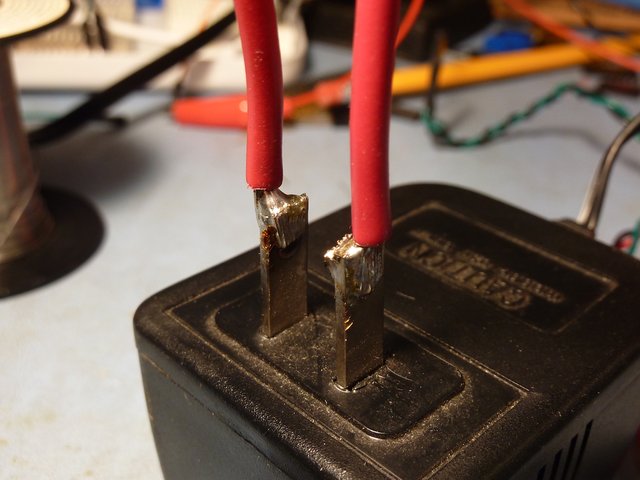
Power wires for 9-volt supply ~ Image by the author.
Note the use of heat-shrink tubing to insulate the 110-volt wall wart prongs, as the wart is left sitting on the bottom of the machine chassis.
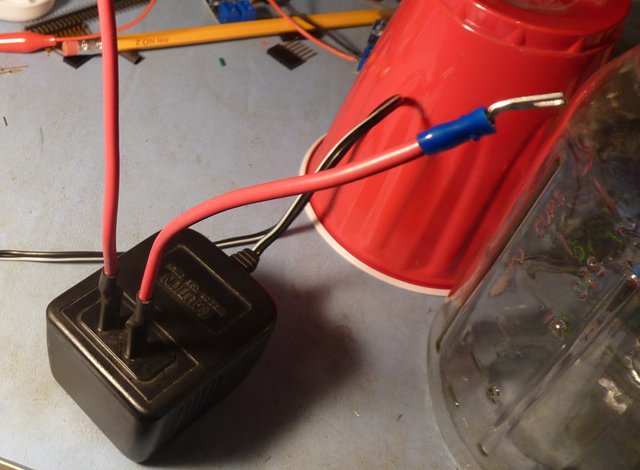
9 volt supply with connecting wires. ~ Image by the author.
Here's a close-up of the main power switch before modification. You can see the RED and BLACK (hot and neutral) mains wiring attached to the bottom pair of contacts. Note that the GREEN ground wire goes directly above to the power supply terminal strip.
The red (AC hot) wire on top of the switch remains connected as-is, and the grey wires are cut and spliced together, removing the pressure switch from the circuit.
DPST Power Switch. ~ Image by the author.
Feel free to ask questions.
Are you thinking of building your own HHO for health machine? We definitely want to hear from you.
Coming up next time:
Python software for the Micro:Bit that runs the show...
See you next time!
DISCLAIMER:
I am not a doctor, nor am I a medical professional of any kind. This series of articles describes my very individual, personal quest to investigate credible reports of the benefits of breathing hydrogen and oxygen gas, drinking hydrogen enriched water, and applying hydrogen and oxygen gas to weakened or diseased body parts. The devices I am building, the tools and materials I am using, and the gases I expect them to produce, are potentially dangerous and even life-threatening if used carelessly. Should you choose to use any of this information, do so only with the most serious care taken for safety. I am in no way responsible for any use you may make of this information, which you undertake entirely at your own risk.
AquaCure® is a trademark of Eagle Research.
~FIN~
you can still reward it: CLICK HERE.

P.S. If you have an "in" with anybody at Steemit, Inc. - Would you please ask them to get rid of these damn, extremely annoying "off-website" arrow/boxes? The have, overnight, made Steemit ugly. There are much better solutions.
For more stories, please visit our Library Stories Shelf - Just CLICK the shelf below.


Introducing: The SILVERengines proton - Image by @creatr
CONTACT US - Will Exchange for Steem
You are why I'm here on Steemit!
I have very eclectic interests and hope, over time, to write about them all.
⬇️To Check Out @creatr's World⬇️CLICK Each Image Below⬇️

|

|

|
Awesome! Duncan, you're back. I was worried - you hadn't posted anywhere for a couple of months. Then I saw you had left a comment earlier :)
Once again your post blows my mind about exactly what is possible and once again I become just slightly convinced that you are some kind of evil genius ready to take down the avengers!
I had to begin a brand new Discord ((due to some bizarre code-like messages I started to receive that I assumed was some kind of hacking attempt))and the only server I was accepted to ((wls)), it seemed you are not a member so I was unable to add you.
Mine is simply @stevenwood. I shun over-complication lol. I'm not certain there's a way to add eachother again until we have a clickable link in a mutual server though.
In answer to your question, Noooo I don't follow mainstream dogma and anti-natural remedy propaganda... Miraculously our ancestors had many treatments for a myriad of ailments before Big-Pharma stepped in and monopolised the market on toxic cures... In fact I received a long-overdue shipment of top grade water and pulled up the SE website to familiarise myself with the details again as sadly I lost access to your guidance from Discord.
I am newly returned to the blockchain, ((a week or so)) after another bout of dubious health. I am incredibly positive and optimistic but suffering with quite a severe skin irritation again.
Although I confess I am always wary of doing something wrong, my Daughter says she is going to help me make a batch when she is off work for the weekend. The first one where we have crossed paths in several weeks as we have both worked through the 'pandemic' she as a medical secretary, me in a food factory lol.
I am planning to document my results and write about my experience, directing people in your direction if they think they would enjoy the stated benefits. I have set a goal to be far better in all aspects at 50 than I was at 40.
ThankYOU so much for looking me up my friend, 'm incredibly happy to see you back around :)
Hey, Steven!
So glad to hear back from you. I've reached out to your new Discord account, but I really am not there much... :O
I don't know quite what it is that puts me off about Discord? Somehow I feel much more comfortable on Telegram.
So, recently hit the big 50? Congratulations! :)
BTW, I have fairly recently discovered that (at least here in the US) it's possible to purchase a reasonably priced reverse osmosis system with an added filtering stage that removes all conductive matter from water. I have not quite yet pulled the trigger to purchase, but prices here in the US for a very simple version of such a setup are well under $100 US total... I really should get a setup in order to better be able to advise users of my silver machines.
In any case, I'm glad that you're "back," and I wish you well, and look forward to hearing of your further adventures.
Oh no. I haven't reached it yet. In truth I am approaching the doorway of 48 but I have become quite focussed on 50 recently. Not in the way that people often view milestones of this nature but rather in an empowering, liberating light. I recently outlined most of the aspects of my life that bring me pain, self deprecating feelings or those I do not bring me value.
I then looked at what brings me joy, happiness, contentment and fulfillment and am trying to formulate a strategy that focuses on the benefits I want, while eradicating the habits, feelings and practices I do not.
I have condensed this approach in to a solitary aim, to work hard on myself, my qualities and my life to ensure that at 50 I am far better than I was at 40 in as many areas as I possibly can. I have a decent time-frame to achieve this which should remove the need for instant gratification activities and lead to a far more solid approach to self-improvement and aiding in the betterment of others in any way that I can.
I wish you well in all the areas that really matter Duncan and hope you and yours flourish as lock-down begins to ease and normal life and normal opportunities begin to re-surface again. 😎
downvote clear .!shop
1% upvote as gift
你好鸭,creatr!
@huaren.news给您叫了一份外卖!
夏日必备冰淇淋

吃饱了吗?跟我猜拳吧! 石头,剪刀,布~
如果您对我的服务满意,请不要吝啬您的点赞~