Painting a watercolor step by step (Final) - Pintando una acuarela paso a paso (Final)
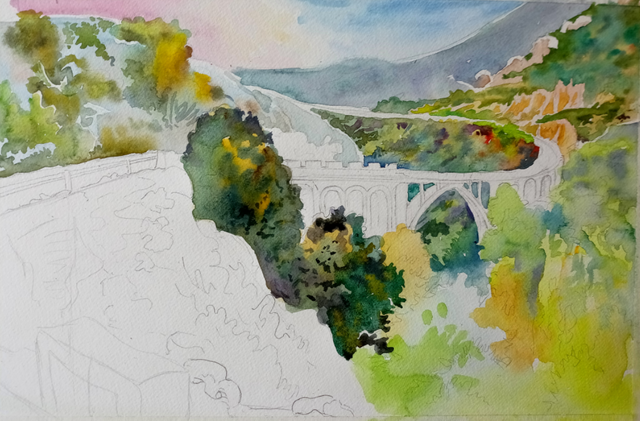
In my last post, I had finished with the background and the farthest planes of the painting. In this one, I will tell you how I painted closer areas and details.
First I dealt with the varied vegetation in the foreground, the one in front of the bridge. To paint this area, I applied a few washes with a medium load of pigment. An irregular variegated wash, all over the right area, with shades of ochre, orange, lemon yellow and may green, I added, wet on wet, a little violet to create greenish grays in the upper area, where the curve of the road is.
Once I had intoned that part of the landscape, I let it dry and went to the lush area of trees on the left, just behind the rocks in the foreground. To those trees I applied a pigment-laden wash of ochre colors, siennas, sap green, indigo and sepia, which melted into the paper and produced a variety of intense greens and greenish browns. I applied the indigo and sepia for the darker parts.
En el último post, había finalizado con el fondo y los planos más alejados del cuadro. En este, iré contando cómo pinté zonas más cercanas y los detalles.
Primero me ocupé de la vegetación variada que hay en primer término, antes de llegar al puente. Para pintar esta zona di unas aguadas con una carga media de pigmento. Una aguada irregular, por toda la zona derecha, con tonalidades ocre, naranja, amarillo limón y verde vegetal. Le añadí violeta en húmedo para crear grises verdosos en la zona superior, la de la curva de la carretera.
Una vez entonada esa parte del paisaje, la dejé secar y me dirigí a la zona frondosa de árboles de la izquierda, justo tras las rocas del primer término. A esos árboles les apliqué una aguada cargada de pigmento de colores ocres, sienas, verde vejiga, índigo, sepia, que se fundieron en el papel y produjeron una variedad de verdes y marrones verdosos bastante intensos. El índigo y sepia los apliqué en las zonas oscuras.
For the rocks in the foreground I used the same light grayish wash as for the rocks in the upper part, always reserving the white of the paper for the very illuminated areas. Next, wet into wet, I created the greens of the vegetation between the rocks with brushstrokes of sap green and touches of violet and sepia for the shadows. Once dry, I applied a salmon color ( you can get it with a very washed English red) to the shoulder area just above the rocks, and a stronger gray in the shaded area (Prussian blue+violet+van dyck brown). I painted the crash barrier block with a slightly greyed cerulean blue with a pinch of English red in the shaded part, reserving the white of the paper for the illuminated part. The front I did it with varied orange. For the ground surrounding the guardrail I used ochre with tan sienna and a pinch of bladder green where to make vegetation.
Para las rocas del primer plano le di la misma aguada grisácea clara que a las rocas de la parte de arriba, reservando, siempre, el blanco del papel a las zonas muy iluminadas. A continuación, y en húmedo, creé los verdes de la vegetación que hay entre las piedras con pinceladas de verde vejiga y toques de violeta y sepia para las sombras. Una vez seca, apliqué un color salmón (se consigue con un rojo inglés muy aguado) a la zona del arcén justo encima de las rocas, y un gris más fuerte en la zona sombreada (azul de Prusia+violeta+pardo van dyck). El quitamiedos lo pinté agrisando levemente el azul cerúleo con una pizca de rojo inglés en la parte de sombra, reservando el blanco del papel para la iluminada. El frente lo hice con anaranjados variados. Para la tierra que rodea al quitamiedos puse ocre con siena tostado y una pizca de verde vejiga donde para hacer vegetación.
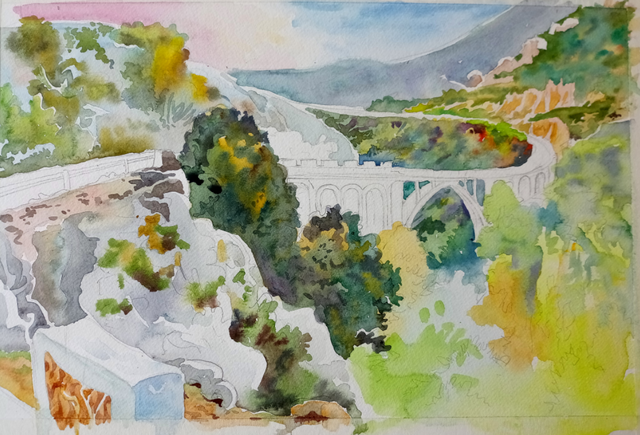
To paint the arch of the bridge, I only applied color to the shaded parts with a variety of light grays and left the white of the paper for the areas where the sun shines (this time I applied masking fluid). Then I did the bridge sides with van dyck brown and ochre, which I darkened in the shadow areas with a mixture of indigo blue and van dyck brown.
I painted the asphalt of the road with a blue-gray wash from cobalt blue and a pinch of vermilion red. When we grey a color by adding its complementary we obtain "broken hues". In the far part of the road I used the same shade but much more watery, to make it look lighter.
Once everything was dry, the only thing left to do was to define and give detail to finish the painting.I applied, wet on dry, different brushstrokes of more intense and darker tones than the colors of the base washes to give shape and volume to the trees. In the same way, I defined the rest of the vegetation and rocks. I also outlined those areas that required a more evident contrast. In this final stage of the painting, I used curved, fast and fluid brushstrokes, loaded with pigment.
Para pintar el arco del puente solo di color a las partes en sombra con una variedad de grises claros y dejé el blanco del papel para las zonas donde da el sol (esta vez apliqué líquido enmascarador). Los laterales los hice con marrón van dyck y ocre, que oscurecí en las zonas de sombra con una mezcla de azul índigo y marrón van dyck.
El asfalto de la carretera lo pinté con una aguada azul grisácea a partir de azul cobalto y una pizca de rojo bermellón. A esto se le llama «quebrar el color», agrisarlo con su color complementario. En la parte lejana de la carretera usé el mismo tono pero mucho más aguado, para que se viese más claro.
Una vez que se secó todo, solo quedaba definir y dar detalle para terminar el cuadro. Apliqué, húmero sobre seco, distintas pinceladas de tonos más intensos y oscuros que las aguadas de la base para dar forma y volumen a los árboles. De esa misma manera definí el resto de la vegetación y de las rocas. También perfilé aquellas zonas que requerían de un contraste más evidente. En esta etapa final de la pintura, usé pinceladas curvas, rápidas y fluidas, cargadas de pigmento.
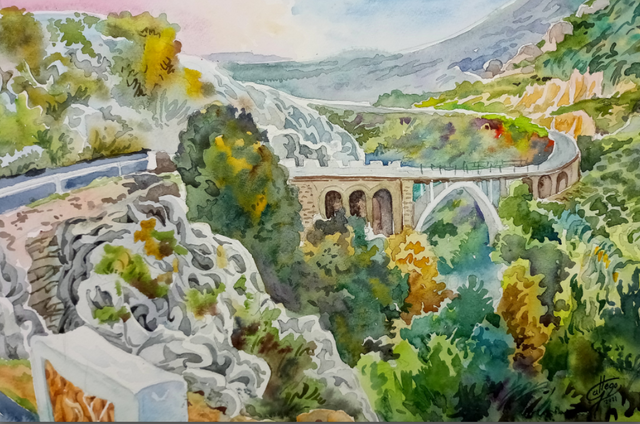
When the painting is finished and the paint is dry, it is gratifying to remove the strips of masking paper from the watercolor to reveal the white box around it, as if it had a natural passe-partout. It is also necessary to carefully remove the staples that held the paper in place. Now it only remains to frame it with a suitable passe-partout and a glass to protect it from humidity, flies and other external agents. And hang it somewhere away from intense sunlight.
And that's all. I hope that this small tutorial will help you to become fond of this painting technique. In watercolor, each work is an adventure. Because water, sometimes, acts with its own life and the force of gravity too, and produces unforeseen, surprising and incredible effects.
Finalizada la pintura, es gratificante quitarle a la acuarela las cintas de papel de carrocero para descubrir el recuadro blanco alrededor, como si tuviera un paspartú natural. También hay que quitar con mucho cuidado las grapas que mantenían fijo el papel. Ya solo quedaría enmarcarla con un paspartú adecuado y un cristal que la proteja de la humedad, las moscas y otros agentes externos. Y colgarla en algún sitio alejado de la luz solar intensa.
Y eso es todo. Espero que este pequeño tutorial os sirva para que os aficionéis e esta técnica de pintura. En la acuarela, cada obra es una aventura. Porque el agua, a veces, actúa con vida propia y la fuerza de la gravedad también, y produce efectos imprevistos, sorprendentes e increíbles.
Juan Gallego
Hi Juan, thank you very much for such amazing tutorial, it was great to know how such variety of colours are created using the combination of other colours. I believe in the past when I used some combination, the problem probably was that some of the colours neutralized each other and at the end it was either messy or dirty looking. I will try to do your way and see if that will come up such beautiful like your colour palette.
Really appreciate your tutorial :)
Dear @steemcurator01, Juan Gallego, the professional Watercolor Artists from Spain posted his 3d part of watercolor tutorial this is EXLUSIVELY on Steem blockchain.
Would you please support his work that also will give this post more visibility to be seen by other users. Appreciate for your help!
I'm glad I can be of help. My next goal is to record videos and learn how to edit and upload them to the blockchain. But I have to check how that works, because I don't know if the videos are embedded from YouTube or if the posts made from Dtube are shared directly with Steemit, or if there is some other video hosting service. I have to look into all this.
Красивая работа!
¡Gracias!
Awesome post. The watercolour painting turned out really well, the combinations created a perfect ambiance. Thanks for sharing a great work
You are welcome, thank you for appreciating my work.
¡Hola! Realmente tu trabajo es grandioso, eres un grande artista y una inspiración para mí. 💜💜
Gracias por tan excelente paso a paso, felicidades y éxitos.🙌🏼💖🇻🇪
Muchas gracias. Espero que ver todo el proceso anime a más gente a probar la acuarela.
Hola arcoiris. Mis respetos para Ud. Tremendo trabajo de acuarela. Muchas tonalidades que hacen del trabajo una gran obra bien detallada. Saludos.
#onepercent #venezuela #affable