Painting a watercolor step by step (2) - Pintando una acuarela paso a paso (2)
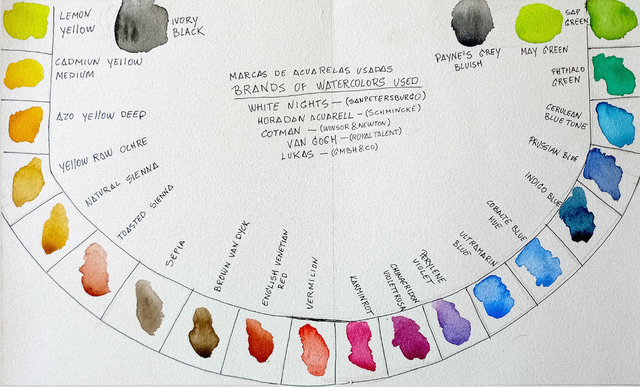
Hello again! We continue the work where we left off in the last post. But before we continue I'm going to share the layout of the colors in my palette, as I will refer to them continuously in the text. You can also see what brands of watercolors I use. The name are the ones that are most commonly used commercially.
¡Hola de nuevo! Continuamos el trabajo donde lo dejamos en el último post. Pero antes antes de continuar voy a compartir la disposición de los colores de mi paleta, ya que haré referencia a ellos continuamente en el texto. También podéis ver qué marcas de acuarelas utilizo. El nombre son los que suelen ser más usados comercialmente.
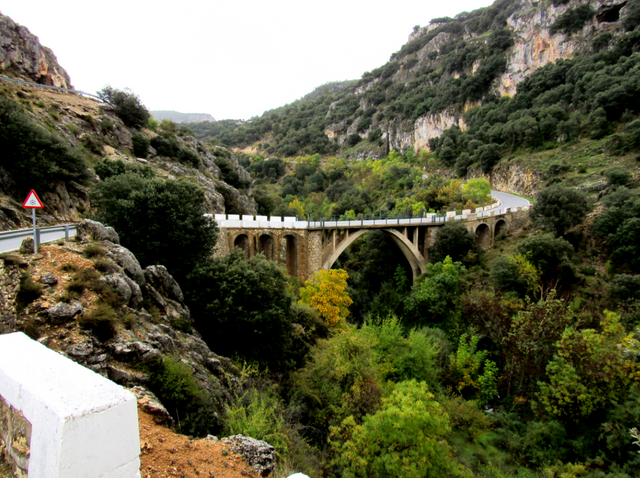
And this is the picture of the place that served me as a reference.
Y esta es la fotografía del lugar que me sirvió de referencia.
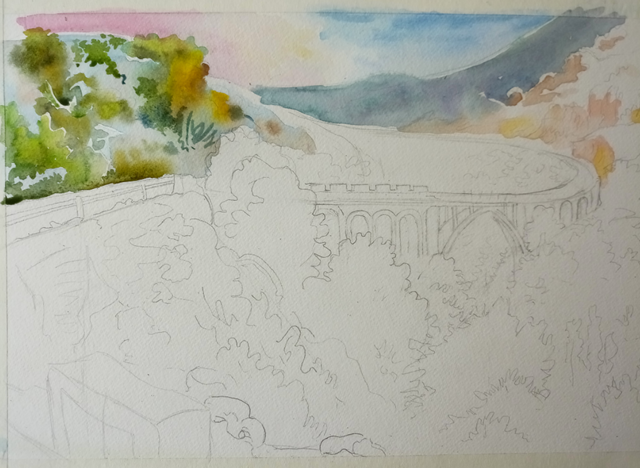
In nature landscapes, watercolors are usually started with the sky, since it requires more agility, boldness and dexterity in the brushstrokes than the rest. So, if we fail in the sky, we can tear up the paper and start over. This is something I have had to do quite a few times.
In this case, it was a small and simple sky. The first step was to dampen the paper of the whole area that would occupy the sky, and then I gave it a light variegated wash of violet-pink quinacridone color on the left side, and cobato blue on the right side. I let the color melt in the center and added a few light touches of medium yellow in that central area. With that, I considered the painting of sky finished.
En los paisajes de naturaleza, las acuarelas se suelen comenzar por el cielo, ya que requiere más agilidad, atrevimiento y destreza en las pinceladas que el resto. Así, si fracasamos en el cielo, podemos rajar el papel y comenzar de nuevo. Es algo que me ha tocado hacer muchas veces.
En este caso, se trataba de un cielo pequeño y sencillo. El primer paso fue humedecer el papel de toda esa zona del cielo, y luego le di una aguada leve de color quinacridona violeta-rosa en la parte de la izquierda, y otra de azul cobato en la zona de la derecha. Dejé que se fundiesen ambas aguadas en el centro y añadí unos toques leves de amarillo medio en esa zona central. Con eso, di por terminado el cielo.

Next, I painted the farthest plane of the mountains in the background. I waited until the sky was almost dry and applied a wash lightly loaded with blue-gray pigment (ultramarin blue+phthalo green+[a hint of] carmine) on the hillside to the right, the one going up, and another one of a blue-gray (Prussian blue+English Venetian red) on the lower area in the center.
I then moved on to the immediately nearest plane: the two hillsides rising on the left and right. For the rocky slope on the left, I reserved the white of the paper for the brightly lighted areas of the rocks, and gave the rest a gray wash with little pigment (phthalo green+[a hint] of carmine). While the gray was still wet, I applied stains with hints of ochre, sap green and toasted sienna to create a sense of vegetation among the rocks. On the right slope I only worked, for the moment, the rocky cliff, which I painted with orange and reddish washes.
Lo siguiente fue pintar el plano más lejano de las montañas del fondo. Esperé a que el cielo estuviese casi seco y apliqué una aguada ligeramente cargada de pigmento gris azulado (azul ultramar+verde esmeralda+una pizca de carmín) en la ladera de la derecha, la que sube, y otra de un gris azulado (azul de Prusia+rojo veneciano inglés) en la zona más baja que queda en el centro.
Pasé, entonces, al plano inmediatamente más cercano: las dos laderas de los montes que se elevan a izquierda y derecha. Para la ladera rocosa que hay a la izquierda, reservé el blanco del papel para las zonas de rocas muy iluminadas, y al resto le di una aguada gris con poco pigmento (esmeralda+pizca de carmín). Mientras el gris estaba húmedo, apliqué manchas con toques de ocre, verde vejiga y siena tostada para dar sensación de vegetación entre las rocas. En la ladera de la derecha tan solo trabajé, de momento, los cortantes rocosos, que pinté con unas aguadas anaranjadas y rojizas.
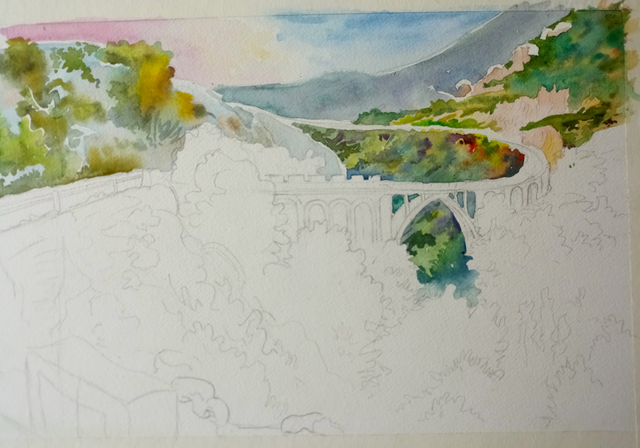
Next, I began to paint the vegetation that covers the watercourse at the bottom of the gorge. At first, the one beyond the bridge. In the area along the curve of the road and the arch of that bridge, I applied an irregular variegated wash of various types of yellows (lemon yellow, natural sienna, ochre and medium yellow); in the more distant areas, I painted a wash of luminous greenish gray. Without waiting for it to dry, I added, wet on wet, cerulean blue, Prussian blue, phthalo green and cobalt blue, with slanting, pigment-laden brushstrokes. When mixed with the previous washes, I got a variety of vivid greens where there was a previous base of yellows, and more bluish tones where the base was grayish green. This creates a sense of depth and remoteness. To finish, I applied a few small touches of sienna and vermilion just to the side of the curve, to give joy and contrast to those greens.
While this was drying, I painted the vegetation on the slope to the right. There, I had only colored the rocky cliffs. Now, after reserving the white of the paper for the most illuminated parts of the stones, I gave a few washes of lemon yellow and medium yellow. I added to them, in wet, phthalo green and Prussian blue, and obtained a series of distant and luminous greens. Finally, before moving on to the foreground, I worked on the rocky hillside shadows on the left side of the painting. For the vegetation I used greenish browns (Van Dyck brown+sap green), and, for the shading of the rocks, a bluish gray (phthalo green+carmine+Prussian blue).
A continuación, me puse a pintar la vegetación que hay en la vaguada que baja desde la carretera hasta el río (que queda oculto). En principio, la parte que está más allá del puente. En la zona más cercana, que bordea la curva de la carretera y el puente, apliqué una aguada previa de diversos amarillos (amarillo limón, siena natural, ocre y amarillo medio); en las zonas más alejadas, pinté una aguada de gris verdoso luminoso (verde vejiga). Sin esperar a que se secase, añadí, húmedo sobre húmedo, azul cerúleo, azul de Prusia, verde esmeralda y azul cobalto, con unas pinceladas inclinadas y cargadas de pigmento. Al mezclarse con las aguadas previas, obtuve una variedad de verdes vivos allí donde había una base previa de amarillos, y unos tonos más azulados donde la base era verde grisácea. Así se provoca una sensación de profundidad y lejanía. Para rematar, apliqué unos pequeños toques de siena y bermellón justo donde la curva, para dar alegría y contraste a esos verdes.
Mientras se secaba todo esto, pinté la vegetación de la ladera de la derecha. Allí tan solo había dado color a los cortantes rocosos. Ahora, después de reservar el blanco del papel para las partes más iluminadas de las piedras, di unas aguadas de amarillo limón y amarillo medio. Les añadí, en húmedo, verde esmeralda y azul de Prusia, y obtuve una serie de verdes lejanos y luminosos. Por último, antes de pasar al primer plano, trabajé las sombras de ladera rocosa de la parte izquierda del cuadro. Para la vegetación usé marrones verdosos (pardo Van Dyck+ verde vejiga), y, para el sombreado de las rocas, un gris azulado (verde esmeralda+carmín +azul de Prusia).
And that's all for today. In the next post I will explain how I painted the closer areas and then added detail to the whole. picture.
Thank you very much for reading. You can leave me comments with any questions you may have, and I will try to answer them, even if sometimes it takes me a while.
Y esto es todo por hoy. En el próximo post explicaré cómo pinté las zonas más cercanas y añadí luego detalle al conjunto.
Muchas gracias por leerme. Podéis dejarme comentarios con cualquier duda que tentáis, y trataré de responderla, aunque a veces me demore un poco.
That is great, I was glad to see your tutorial back. It is nice to see how you started. I can imagine that sky is very important. Sometimes I try not to do sky, but concentrate on main topic. That looks then very weird. But seeing how you started your painting, it is something for me to try in the future. Love the variety of colours, it seems they smoothly follow one another one. The landscape is lovely.
@steemcurator01, this user @arcoiris is a professional Artist and he is presenting his wateroclour tutorial only here on Steem. Would you please give him some support, would really appreciate it!
Thank you very much for all this support. I'm glad that some of what I've posted may be useful to you in the future. I will have the last part ready shortly. Sometimes it is difficult for me to find the precise words to translate into English certain terms in the context of watercolor painting.
Best regards
Hola @arcoiris
¡Te ha quedado espectacular! Una hermosísima obra de arte. 😍💜
Siempre he deseo aprender a dibujar con acuarelas. Me parece fascinante. 🎨 Tu lo haz hecho maravillosamente. Felicidades y éxitos.
Saludos desde Venezuela. 💕
Saludos amigo @arcoiris
Excelente trabajo estás realizando, aunque no ha sido terminado , se puede ver la hermosura de ese paisaje.
Buena publicación.
Muchas gracias. Espero subir pronto la última parte con la acuarela ya terminada. Tengo la publicación en castellano, pero me queda traducir al inglés, que a veces me da problemas por la terminología más técnica de la pintura jeje.
Hola arcoiris. Muy buena presentación, muy explicativa. La misma va tomando forma. La combinación de colores espectacular. Felicitaciones por tan buen trabajo. Veremos su terminación. Saludos.
#onepercent #venezuela #affable
Muchas gracias. Creo que en nada podré subir la última parte, en cuanto termine la traducción al inglés.