Lección 02: Introducción a la Aplicación de Dibujo Ibis Paint X – Lesson 2: Introduction to Ibis Paint X Drawing Application / @carlaisl
Saludos mis queridos amigos de Steem Kids. 💜🎨
Me complace presentarles mi segunda publicación en la comunidad como Tutora de Dibujo Digital. Mediante mis lecciones de dibujo, les estaré enseñando y guiando en el maravilloso mundo de colores, en base a todo lo que he aprendido autodidácticamente. ¡Espero que sea de su agrado mi trabajo y que aprendan mucho!

¿Eres nuevo en el dibujo o ya tienes experiencia? Mi querido niño, igual puedes participar en esta lección y aprender cada día mas, porque “No necesitas ser un experto para ser un gran artista” – Rui Torres.
Hoy les presento mi segunda lección, relacionada con la Aplicación de Dibujo Ibis Paint X, la que estaré utilizando para las lecciones y será la mayor protagonista de las mismas. Puedes descargarla mediante el siguiente link: IBIS PAINT X
En la LECCION 1, tuve la oportunidad de leer, apoyar, comentar y dar la respectiva retroalimentación, a 6 tareas para el hogar de los siguientes alumnos:
| Estudiante | Link de la Tarea del Hogar | @kishwarsumbal | Publicación |
| @madilyn02 | Publicación |
| @ikramullah430 | Publicación |
| @ghani12 | Publicación |
| @leyxi209 | Publicación |
| @ibtisamwaqas | Publicación |
¡Ahora sí! Comencemos con esta lección:
¿Que es Ibis Paint X?
Es una aplicación de dibujo muy popular entre los artistas digitales y aprendices, gracias a su facilidad de uso, gran cantidad de herramientas y opciones que permiten hacer obras creativas de manera sencilla. Sin embargo, no todo es haciendo clic en un botón como muchos creen, pues requiere estudio y práctica para lograr un buen dibujo. ¡Para ello yo los ayudaré! 💜
Además de permitir hacer lindos dibujos digitales, Ibis Paint X permite grabar el proceso de creación desde cero, para que puedas verlo y compartir con quienes desees. Por otro lado, la aplicación cuenta con un menú donde puedes ver dibujos de otros usuarios, e incluso compartir los tuyos, si así lo deseas.
Ingreso a la Aplicación Ibis Paint X
Una vez que hayas descargado la aplicación, búscala en tu menú del dispositivo e ingresa a ella. Al entrar, te aparecerá la siguiente pantalla de inicio, donde hay 3 opciones principales:
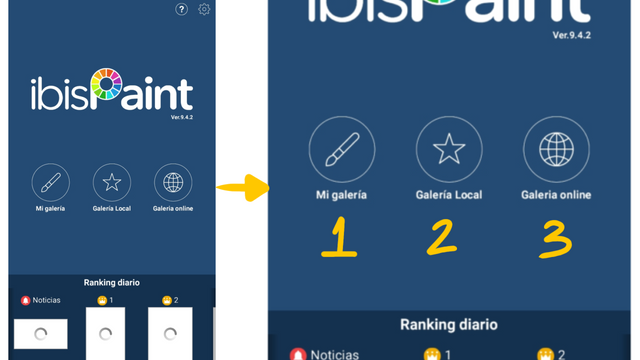
1. Mi Galería: Aquí podrás ver todos tus dibujos, guardarlos, editarlos y crear unos nuevos.
2. Galería Local: Aquí podrás ver los dibujos de otros usuarios de la aplicación que haz guardado, para ver solo el proceso de creación (video) y compartirlo en tus redes.
3. Galería Online: Aquí podrás encontrar miles de dibujos digitales de usuarios de la aplicación, de los que puedes inspirarte. Incluso también puedes publicar los tuyos e interactuar con los demás artistas.
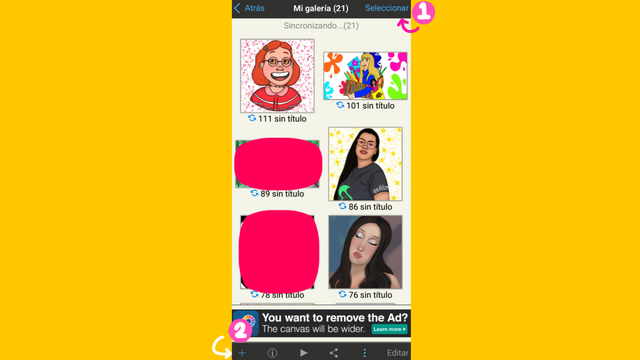
Enfoquemosnos en la opción 1: Mi Galería. En la siguiente captura de la aplicación, yo hice clic en ella, y pueden observar varios de mis dibujos (algunos los censuré porque pronto los publicaré en Steemit y quiero que sean sorpresas.👀😂)

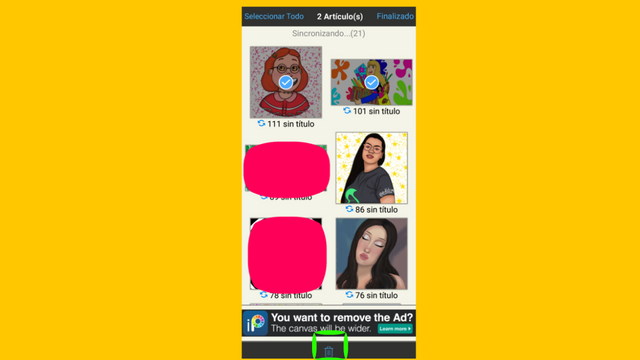
En el capture hay diversas opciones que debemos comprender:
1. Seleccionar: Esta opción nos permite elegir varios dibujos al hacer clic en ellos, y borrarlos haciendo clic en el botón señalado en el cuadro verde:
2. + = Nuevo Lienzo: Esta opción nos permite diseñar un lienzo, es decir, nuestra área para trabajar el dibujo. Para ello, nos ofrece diferentes opciones:
• Importar foto: Puedes tomar una foto de tu galería y usarla como lienzo.
• Selección de Dimensiones: Nos permite introducir los valores del tamaño que deseamos que tenga el lienzo. El primer valor es el ancho y el segundo el alto. Si usamos esta opción, para guardar el tamaño debemos hacer clic en "OK" ubicado a la derecha. También nos presenta lienzos con tamaños específicos, como por ejemplo: 1500x500 para el encabezado de Twitter.
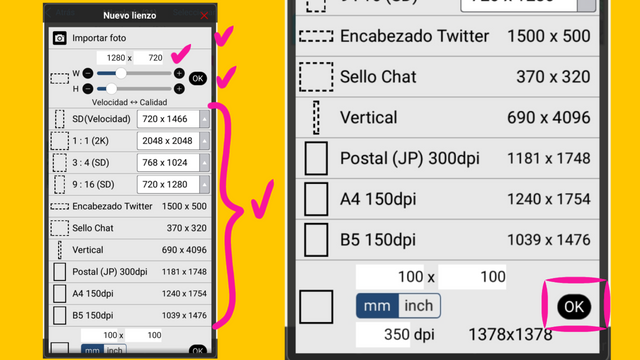
Personalmente, yo utilizo el tamaño 1:1 que es el formato cuadrado. Tu puedes utilizar el que desees según el tamaño que quieres que tenga tu dibujo.
Una vez que selecciones el tamaño que desees, debes hacer clic en el botón del final "OK" e inmediatamente la aplicación te creará el lienzo.
Las opciones 3, 4, 5 y 7 se activan cuando seleccionamos un dibujo, siendo sus funciones las siguientes:

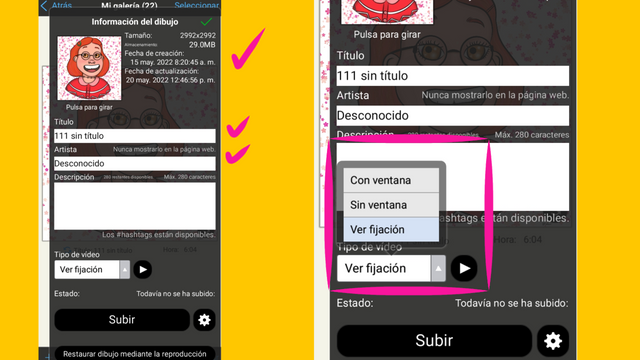
3. Información: Nos proporciona información sobre el dibujo, como la fecha de creación, tamaño, título, nombre del artista y descripción. Además, te permite ver el proceso de creación del dibujo (video) de 3 diferentes maneras, y subirlo a la galería online de la aplicación.
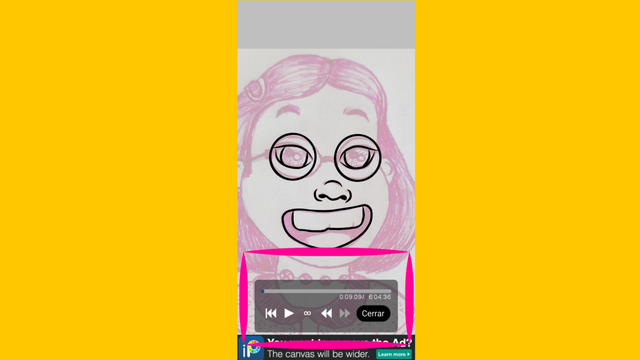
4. Video de creación del dibujo: Te permite ver directamente el proceso del dibujo. Podrás observar un pequeño menú con opciones, como pausar el vídeo.
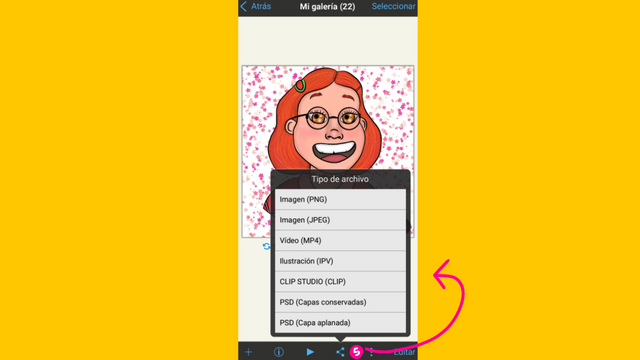
5. Tipo de Archivo: Esta opción ofrece diferentes formatos con los que podemos compartir nuestro dibujo, como imagen, video e ilustración. Esto lo repasaremos más adelante cuando hayamos creado nuestro primer dibujo, pero ya tienes una idea de ello.
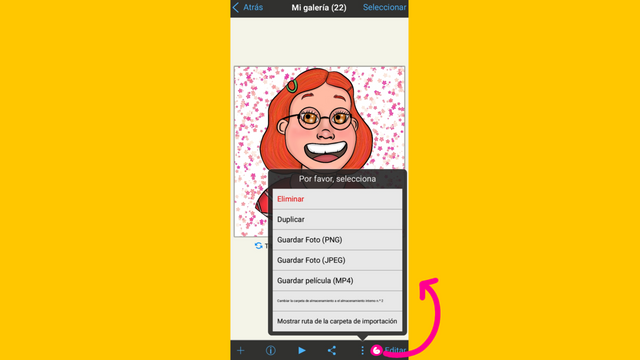
6. ፧ = Otros: Son varias opciones que nos ofrece la aplicación, como eliminar el dibujo, duplicarlo, guardarlo en nuestro dispositivo (como foto y video), cambiar su ruta de almacenamiento, entre otros.
7. Editar: Permite ingresar al dibujo, es decir, el lienzo, para modificarlo.
Opción Nuevo Lienzo (Punto 2 anterior de "Mi Galería")
Esta opción siempre la vamos a utilizar para crear un espacio de trabajo. En mi caso, siguiendo lo explicado anteriormente en la opción 2, seleccioné un lienzo 1:1.
Al seleccionar el tamaño nos aparecé la siguiente captura con nuestro espacio de trabajo, muchas opciones y herramientas que iremos comprendiendo mediante las lecciones. Por esta lección, solo hablaremos de las brochas, colores, formas de borrar trazos y guardar en PNG.
Brochas
Las brochas están ubicadas en la parte inferior, y la opción podemos identificarla porque tiene un ícono de pincel. Al hacer clic en ella, nos aparecerá otra ventana con otras opciones, y volvemos a elegir la opción brocha:
Luego tendremos muchísimas brochas para dibujar. En mi caso cuento con 385, pero no se crean, si uso 5 en un dibujo para mi es mucho, jajaja.
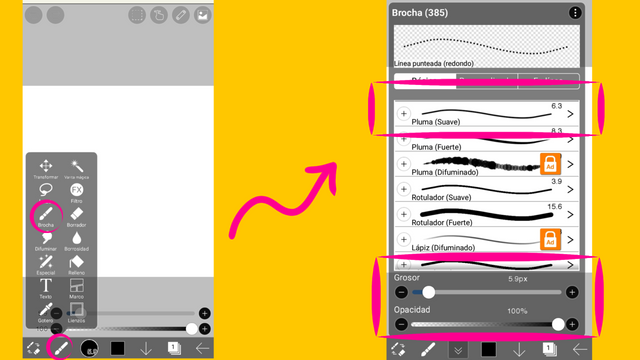
Nota importante: En la sección de brochas no todas están disponibles porque son para la versión paga. No te preocupes querido estudiante, solo debes hacer clic en el ícono del candado naranja "Ad" y verás una publicidad corta de 30 segundos. Después la brocha la tendrás disponible por 18 horas. Puedes repetir este proceso cuando quieras, para desbloquear las brochas.
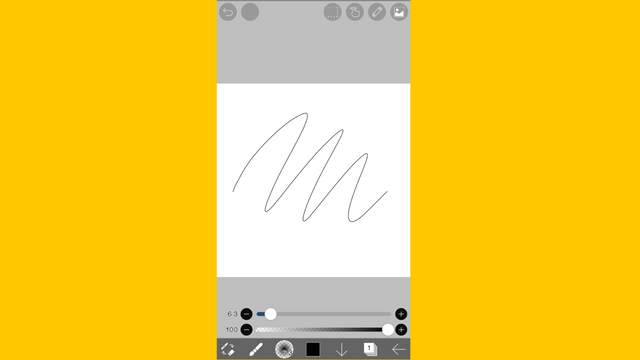
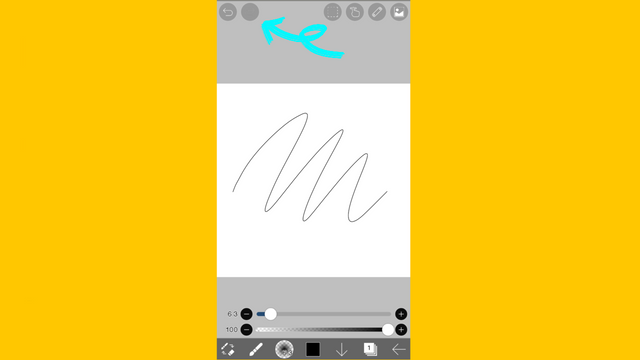
Al seleccionar una brocha cualquiera, en mi caso "Pluma suave", automáticamente la aplicación te la activa. Como pueden ver, yo hice una línea:
En la parte inferior, aparecen dos opciones para modificar la brocha:
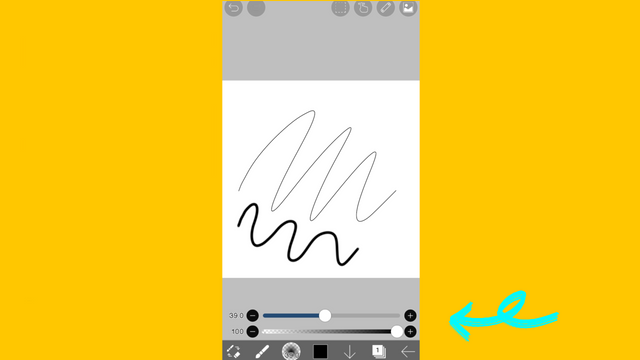
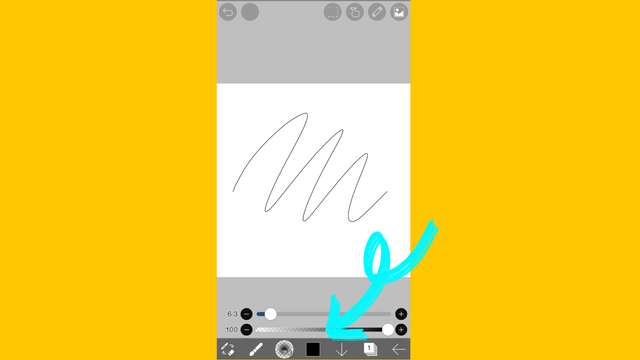
1. Tamaño: Si desplazas el circulo de la barra hacia la derecha, el tamaño de tu brocha aumentará. Por ejemplo, en el capture anterior el tamaño era de 6,3 pero lo modifiqué tal como acabo de explicar a 39,0 y el trazo fue más grueso:
2. Opacidad: Es la oscuridad o claridad del trazo de la brocha. La aplicación siempre la tiene al 100%, es decir, lo más oscura que puede estar. Pero si desplazas el circulo de la barra hacia la izquierda, se vuelve más claro el trazo.
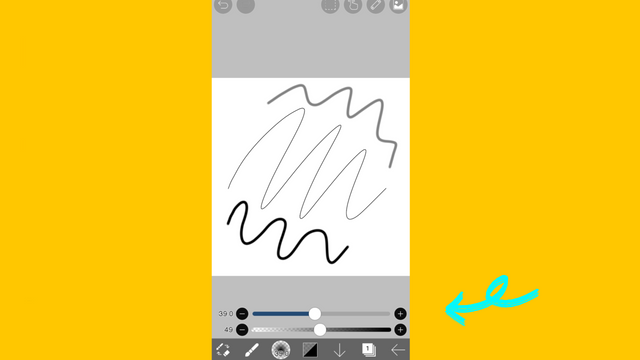
En el capture anterior, mi trazo estaba al 100%, pero lo cambié tal como explique a 49. Ahora el color del trazo fue más claro:
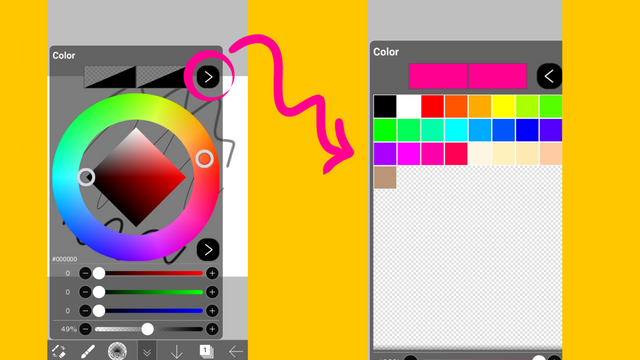
Colores de la Brocha
Para cambiar el color de la brocha, hacemos clic en el cuadro inferior señalado:
Aparecerán muchas opciones con colores, incluyendo la rueda de colores. Haz clic en el color de tu preferencia y automáticamente la aplicación lo activa para que puedas usarlo.
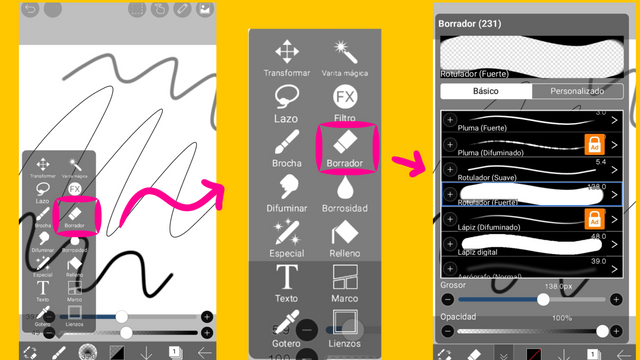
Borrador
Esta ubicado al lado de la opción brocha. Al hacer clic en el, ya estará activo y con tan solo pasar tu dedo o lápiz digital en el lienzo, podrás borrar lo que desees.
El borrador puedes utilizarlo con diferentes tipos de brochas, haciendo clic en la opción señalada y eligiendo la brocha que más te guste. En mi caso, activé el rotulador (fuerte) y borré las líneas que hice al inicio:
También puedes modificar su tamaño y opacidad de la misma manera como se explicó con la brocha.
Deshacer y Rehacer
Si quieres borrar el último trazo que hiciste de forma rápida, puedes hacer clic en la opción deshacer ubicada en la parte de arriba, la cual puedes identificar como un ícono de flecha que retorna hacia la izquierda.
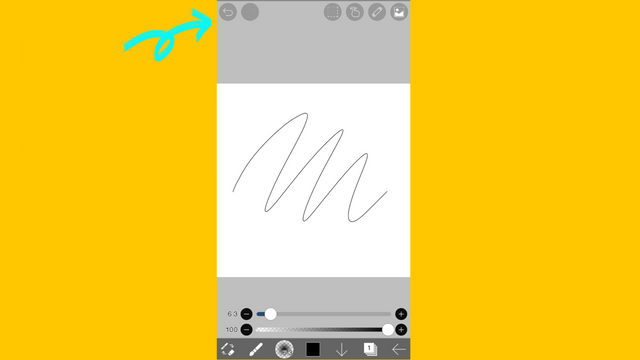
Para rehacer el trazo que borraste por última vez, debes hacer clic en la flecha que está al lado del ícono "deshacer".
Guardar tu Dibujo como Imagen PNG
Cuando hayas creado tu obra creativa, debes guardarla. Para ello, la aplicación ofrece diversas opciones que mencioné con anterioridad. Sin embargo, la más sencilla esta en el área de trabajo, la puedes identificar porque tiene un ícono de flecha orientada hacia la izquierda:
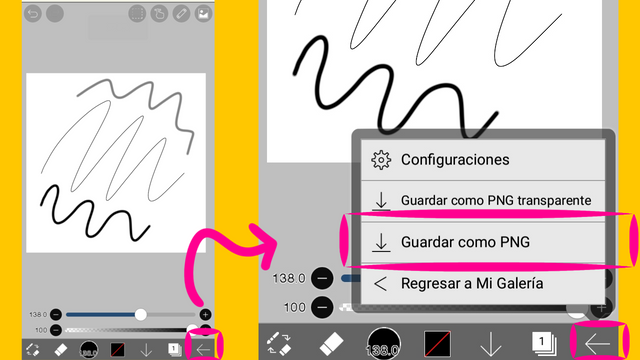
Al hacer clic en la flecha, aparecerán varias opciones, siendo una de ellas "Guardar imagen como PNG". Al seleccionar esta opción, tu dibujo se almacenará en tu galería del dispositivo, en una carpeta "Pictures".
Tarea para la Casa:
1. Ingresa a la Aplicación Ibis Paint, selecciona según tu preferencia: el lienzo, tipo de brocha, color, y haz un dibujo simple y libre de algún objeto con solamente líneas, es decir, no debes rellenarlo de color. No temas, es un dibujo sencillo, nada complicado o "de otro mundo".
Te doy algunas ideas: Puedes dibujar una flor, casa, árbol, logo de steemit, balón, zapato... ¡Lo que tu quieras! . Es solo para que te familiarices con la opción brocha, color, y formas de borrar.
Luego de que lo hayas realizado, guarda el lienzo tal como expliqué en el último punto, con el formato PNG. Y finalmente enséñanos a todos el resultado final.
Aquí te dejo un ejemplo de mi dibujo sencillo para la lección de hoy, un girasol:

Recordatorio Importante: Por favor almacena tu dibujo en la aplicación Ibis Paint X. ¡No lo vayas a borrar! Porque lo vamos a utilizar para la Lección 3.
2. Dime que tamaño de lienzo y tipo de brocha utilizaste para hacer el dibujo.
Por ejemplo: "Utilicé un lienzo 1:1 y la brocha suave..."
3. Cuéntame
porque elegiste hacer el dibujo que nos presentas, es decir, su significado.
Por ejemplo: "Mi girasol lo hice porque es mi flor preferida, me recuerda lo brillante del Sol y la belleza de la naturaleza..."
Reglas para hacer tu tarea:
1- Debes ser un niño verificado por la comunidad.
2- Debes realizar tu publicación en la comunidad Steem Kids y dejar el enlace de tu entrada en esta publicación, en la sección de comentarios.
3- Debes pertenecer al club5050, club75 o club100.
4. Tu publicación debe contar con mínimo 300 palabras y los tags adecuados; siendo esencial # steemexclusive.
5. Tu contenido debe ser de autoría propia. Si utilizas información de un tercero, indica las fuentes correctamente para evitar el plagio y sus consecuencias en la plataforma.
6. Utiliza los tags en tu publicación correctamente.
Recomendaciones para hacer tu Tarea:
1. Haz resteem a esta publicación para que más niños puedan unirse a la lección.
2. Si tienes alguna duda, déjamela en los comentarios de esta publicación. ¡Con gusto te responderé!
3. Diviértete y aprende ¡Haz tu publicación sin miedo alguno! Te voy a calificar y corregir con amor y respeto.
Se aceptan las tareas para la casa hasta el vencimiento de esta publicación.
10 % de las recompensas de esta publicación son para la cuenta comunitaria @steemkidss
CC: @patjewell, @ngoenyi
Greetings my dear friends of Steem Kids. 💜🎨
I am pleased to present my second publication in the community as a Digital Drawing Tutor. Through my drawing lessons, I will be teaching and guiding you in the wonderful world of colors, based on everything I have learned self-taught. I hope you like my work and that you learn a lot!
Are you new to drawing or already experienced? My dear child, you can still participate in this lesson and learn more every day, because “You don't need to be an expert to be a great artist” – Rui Torres.
Today I present to you my second lesson, related to the Ibis Paint X Drawing Application, which I will be using for the lessons and will be the main protagonist of them. You can download it through the following link: IBIS PAINT X
In the LESSON 1 I had the opportunity to read, support, comment and give the respective feedback, to 6 homework tasks of the following students:
| Student | Homework Link | @kishwarsumbal | Publication |
| @madilyn02 | Publication |
| @ikramullah430 | Publication |
| @ghani12 | Publication |
| @leyxi209 | Publication |
| @ibtisamwaqas | Publication |
Now yes! Let's start with this lesson:
What is Ibis Paint X?
It is a very popular drawing application among digital artists and learners, thanks to its ease of use, large number of tools and options that allow you to make creative works easily. However, not everything is by clicking a button as many believe, since it requires study and practice to achieve a good drawing. For this I will help you! 💜
In addition to allowing you to make beautiful digital drawings, Ibis Paint X allows you to record the creation process from scratch, so you can view it and share it with whomever you want. On the other hand, the application has a menu where you can see other users' drawings, and even share your own, if you wish.
Login to the Ibis Paint X Application
Once you've downloaded the app, find it in your device menu and launch it. Upon entering, the following home screen will appear, where there are 3 main options:
1. My Gallery: Here you can see all your drawings, save them, edit them and create new ones.
2. Local Gallery: Here you can see the drawings of other users of the application that you have saved, to see only the creation process (video) and share it on your networks.
3. Online Gallery: Here you can find thousands of digital drawings by users of the application, from which you can draw inspiration. You can even post your own and interact with other artists.
Let's focus on option 1: My Gallery. In the following screenshot of the application, I clicked on it, and you can see several of my drawings (I censored some of them because I will soon publish them on Steemit and I want them to be surprises.👀😂)
In the capture there are several options that we must understand:
1. Select: This option allows us to choose several drawings by clicking on them, and delete them by clicking the button indicated in the green box:
2. + = New Canvas: This option allows us to design a canvas, that is, our area to work on the drawing. To do this, it offers us different options:
• Import photo: You can take a photo from your gallery and use it as a canvas.
• Selection of Dimensions: It allows us to enter the values of the size that we want the canvas to have. The first value is the width and the second is the height. If we use this option, to save the size we must click on "OK" located on the right. It also presents us with canvases with specific sizes, for example: 1500x500 for the Twitter header.
Personally, I use the 1:1 size which is the square format. You can use the one you want depending on the size you want your drawing to have.
Once you select the size you want, you must click on the button at the end "OK" and immediately the application will create the canvas for you.
Options 3,4, 5 and 7 are activated when we select a drawing, their functions being the following:
3. Information: Provides us with information about the drawing, such as the creation date, size, title, artist name, and description. In addition, it allows you to see the drawing creation process (video) in 3 different ways, and upload it to the application's online gallery.
4. Drawing creation video: Allows you to directly see the drawing process. You will see a small menu with options, such as pausing the video.
5. File Type: This option offers different formats with which we can share our drawing, such as image, video and illustration. We'll go over this later when we've created our first drawing, but you already have an idea of it.
6. ፧ = Others: There are several options that the application offers us, such as deleting the drawing, duplicating it, saving it on our device (as a photo and video), changing its storage path, among others.
7. Edit: Allows you to enter the drawing, that is, the canvas, to modify it.
New Canvas Option (Item 2 above in "My Gallery")
This option will always be used to create a workspace. In my case, following what was explained above in option 2, I selected a 1:1 canvas.
When selecting the size, the following screenshot appears with our workspace, many options and tools that we will understand through the lessons. For this lesson, we'll only talk about brushes, colors, ways to erase strokes, and save to PNG.
Brushes
The brushes are located at the bottom, and we can identify the option because it has a brush icon. When clicking on it, another window will appear with other options, and we choose the brush option again:
Then we'll have tons of brushes to draw on. In my case I have 385, but they are not created, if I use 5 in a drawing for me it is a lot, hahaha.
Important note: In the brushes section not all of them are available because they are for the paid version. Don't worry dear student, you just have to click on the orange lock icon "Ad" and you will see a short 30 second advertisement. Then the brush will be available for 18 hours. You can repeat this process whenever you want, to unlock the brushes.
When you select any brush, in my case "Soft Pen", the application automatically activates it for you. As you can see, I made a line:
At the bottom, there are two options to modify the brush:
1. Size: If you move the circle of the bar to the right, the size of your brush will increase. For example, in the previous capture the size was 6.3 but I modified it as I just explained to 39.0 and the stroke was thicker:
2. Opacity: Is the darkness or lightness of the brush stroke. The application always has it at 100%, that is, the darkest it can be. But if you move the bar's circle to the left, the stroke becomes lighter.
In the screenshot above, my stroke was at 100%, but I changed it as explained to 49. Now the stroke color was lighter:
Brush Colors
To change the color of the brush, we click on the lower marked box:
Many color options will appear, including the color wheel. Click on the color of your choice and the application automatically activates it so you can use it.
Draft
It is located next to the brush option. When you click on it, it will already be active and just by passing your finger or digital pen on the canvas, you can erase what you want.
The eraser can be used with different types of brushes, by clicking on the indicated option and choosing the brush that you like the most. In my case, I activated the highlighter (strong) and erased the lines I made at the beginning:
You can also modify its size and opacity in the same way as explained with the brush.
Undo and Redo
If you want to quickly erase the last stroke you made, you can click the undo option locatedat the top, which you can identify as an arrow icon that returns to the left.
To redo the stroke you last deleted, you need to click the arrow next to the "undo" icon.
Save your Drawing as a PNG Image
When you have created your creative work, you must save it. To do this, the application offers various options that I mentioned earlier. However, the simplest one is in the work area, you can identify it because it has an arrow icon facing left:
Clicking on the arrow will bring up several options, one of them being "Save image as PNG". By selecting this option, your drawing will be stored in your device gallery, in a "Pictures" folder.
Homework:
1. Enter the Ibis Paint Application, select according to your preference: the canvas, type of brush, color, and make a simple and free drawing of some object with only lines, that is, you should not fill it with color. Fear not, it's a simple drawing, nothing complicated or "out of this world".
I'll give you some ideas: You can draw a flower, house, tree, steemit logo, ball, shoe... Whatever you want! . It's just to familiarize you with the brush option, color, and ways to erase.
After you've done that, save the canvas as I explained in the last point, in PNG format. And finally show us all the final result.
Here is an example of my simple drawing for today's lesson, a sunflower:
Important Reminder: Please store your drawing in the Ibis Paint X app. Don't delete it! Because we're going to use it for Lesson 3.
2. Tell me what size canvas and type of brush you used to make the drawing.
For example: "I used a 1:1 canvas and the soft brush..."
3. Tell me
because you chose to make the drawing that you present to us, that is, its meaning.
For example: "I made my sunflower because it is my favorite flower, it reminds me of the brightness of the Sun and the beauty of nature..."
Rules for doing your homework:
1- You must be a community verified child.
2- You must make your publication in the Steem Kids community and leave the link of your entry in this publication, in the comments section.
3- You must belong to club5050, club75 or club100.
4. Your publication must have a minimum of 300 words and the appropriate tags; being essential # steemexclusive.
5. Your content must be your own. If you use information from a third party, indicate the sources correctly to avoid plagiarism and its consequences on the platform.
6. Use the tags in your publication correctly.
Recommendations for doing your Homework:
1. Please resteem this post so more kids can join the lesson.
2. If you have any questions, leave them in the comments of this post. I will gladly answer you!
3. Have fun and learn Do your post without any fear! I will grade and correct you with love and respect.
Homework is accepted until the expiration of this publication.
10% of the rewards from this post go to the @steemkidss community account
CC: @patjewell, @ngoenyi
Congratulations, your post has been upvoted by @scilwa, which is a curating account for @R2cornell's Discord Community. We can also be found on our hive community & peakd as well as on my Discord Server
Felicitaciones, su publication ha sido votado por @scilwa. También puedo ser encontrado en nuestra comunidad de colmena y Peakd así como en mi servidor de discordia
Muchísimas gracias por el apoyo queridos amigos! 💜
Hi teacher, sorry for the late submission, here is my entry:
https://steemit.com/hive-139765/@madilyn02/homework-post-for-digital-drawing-lesson-2-introduction-to-ibis-paint-x-by-madilyn02
Good job my dear student, thank you very much for participating! I already support you, I wish you many successes, blessings. 😄💜🎨
Hola mi queridísima amiga, enhorabuena po tu tutorial, me encantan todos los tips que das para el uso correcto de la aplicación, entre ellos que se puede obtener gratuitamente los pinceles viendo publicidad.
Éxitos, estaré visitando los trabajos de los estudiantes.
Upvote y resteem.
Muchísimas gracias mi querida amiga por todo tu apoyo, me hace sentir feliz y motivada. Dios te bendiga siempre!
Gracias, gracias. Bendiciones y feliz día. 💜💜
Well done! Another great lesson. 👏🏻👏🏻
I will for sure pratice drawing that flower. Or maybe I should go back to kindergarten and draw a 🏠
Thank you my dear friend! What a joy to have your support, hahaha, how great it would be to draw a little house. Cheers! A big hug. 💜
Hello @carlaisi, Your post has been selected as one of the quality posts for the day by steemkids community. Congratulations! Please keep making quality and original contents with us here. We love you so much and will like to read more of your posts.
Please endeavour to resteem, vote and comment on the post of selection. Thank you!
Thank you my dear friends in the community for all the support, which is reciprocal! Greetings and success. 💜💜
Thank you for contributing to #LearnWithSteem theme. This post has been upvoted by @fabio2614 using @steemcurator09 account. We encourage you to keep publishing quality and original content in the Steemit ecosystem to earn support for your content.
Regards,
Team #Sevengers
Thank you so much my friend. Happy day.
Muy completa tu lección de hoy Carlita, que genial tu trabajo para enseñar a dibujar digitalmente a los niños. Te felicito mucho, que orgullo! 💙😀🎨
Ya quiero ver las próximas tareas de tus estudiantes, de seguro serán bellas. Saludos.
Gracias mi linda, eres una de mis inspiraciones para el arte, y enseñar a los niños! Que honor contar con tu apoyo, la mejor profesor de dibujo en Venezuela y el mundo. Te quieroooo. 💜
Carla me encantó esta lección, aprendo de tus orientaciones, gracias por todos estos detalles de la aplicación son de mucha utilidad, seguro a los chicos de la comunidad les encantará.
Gracias por compartir 🤗
Gracias mi querida amiga, que felicidad que estés aprendiendo gracias a mi post. Dios te bendiga siempre, saludos! 💜
Excelente clase!! Esta muy completa y bien explicada ❤ te felicito y te deseo muchos éxitos!!
Gracias mi querida Aless, te quiero muchísimo. 💜
Hi teacher, thank you for this lesson, I'm happy to see that you already published a second one. I'm getting myself ready to do the homework.
Thank you my beautiful student, I wish you much success, if you have any questions I am here to help you. Good luck! 💜💜🎨