Build your own covert cannibis grow fridge like a BOSS, complete DIY tutorial.
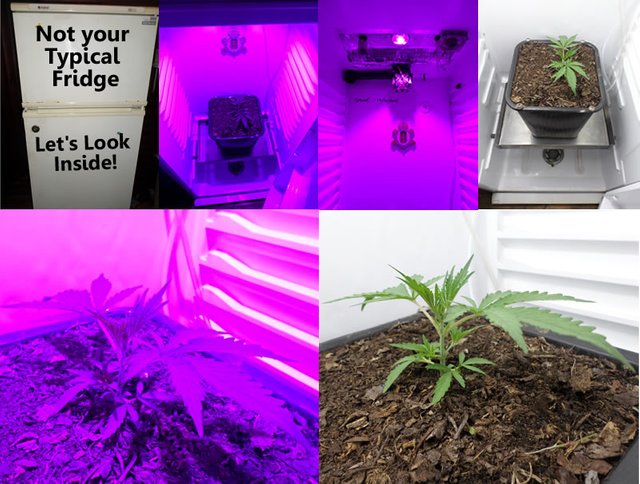
Hello everyone and welcome to my DIY covert cannabis grow fridge setup and complete DIY walk through tutorial.
In this steemit I will be showing off my covert build and share my secret covert grow for the very first time, on steemit. We will cover as much technical information as I can possibly provide. You should be able to take the knowledge you learn here and hopefully apply it to your own projects. It is important for me to express the fact that I use marijuana medically, However it is unfortunately illegal were I live. I take pride in the fact that my grow space is sterilized and cleaned daily and I only grow 100% organic medicine. Also I am not a writer, I simply aspire to write because steemit makes sharing my knowledge rewarding as well as worth my while. :-)
Everyone has a story and a personal reason for using cannabis, I don't condone any of the content here, So please remember the information provided is simply a reference to my own personal experiences and knowledge. Cannabis is illegal in many country's so please use this information responsibly or consult a legal adviser if you are uncertain about the marijuana laws in your country.
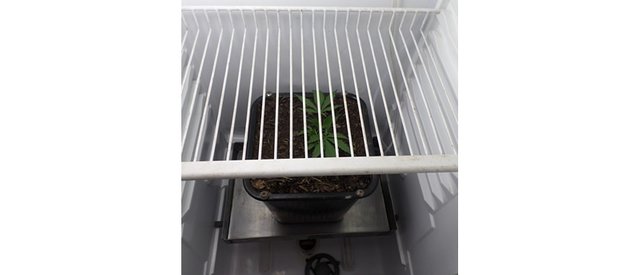
In this steemit I will focus mostly on the Do It Yourself fridge build itself, I will not be giving any medical or grow advice . In future I will post about growing medical marijuana if I feel there is a demand from this post. I am not a grow Guru however I am a experienced grower. My greatest achievement in growing is a personally developed " soil air injection technique" that allows me to grow in soil as fast as hydroponics with far better yields, quality and overall medicine. All this info was compiled over 2 years by myself through trial and error . As of this post the plant you see has already been trimmed for the first time and I have removed 2 sets of leaves. The plant has already grown several fully developed grow tips and many more sprouting . At 14 days old growing in 100% organic soil. You do the Math!
Let's get started!
Obviously the first thing you will need is a complete fridge, I simply scored one with a burned out compressor. I got it from a old lady who had bought a new fridge. She was looking for help having the old one removed, I thought it was a good trade. You need to use your own discretion here, there are many different types of fridges out there and who knows, maybe you not even going to use a fridge. No rules just a little engineering and loads of fun!
NOTE: The new evo friendly fridges on the market today can be made of a bio-degradable material. The fridge inner lining degrades with light intended for the sun I would imagine. In some cases if your light intensity is high enough it will degrade the inner lining of your grow fridge very quickly. Older fridges work great as they last and add to the covert effect. A new eco fridge will last around 2-3 years before the inside falls apart. However don't let this fact discourage your build, A fridge grow benefits from exceptionally good reflective properties and insanely good insulation that will make your build well worth it!
Once you have your fridge in hand, the next step is to have the compressor unit removed and all the plumbing, radiator unit ect.. basically everything gutted out. I would not recommend you do this yourself as the gas released when you open a fridge compressor can be very dangerous. Not to mention all the other dangers involved. However I managed make it out alive :-)
Next you need to find a nice work space that will allow you to work around your project with ease.
Tools I used:
- Electric drilling machine
- Hole-saw kit
- Tin snips
- A couple drill bits, 8mm and 10mm
Grow Equipment I used:
- Full spectrum COB LED
- Heavy duty ventilation fan
- Air pump
- Timer
- PVC Pipe or ducting
- Aluminum tape
- thermometer
- PC fan
Next you need to start cutting out and mounting your hardware, I have outlined and numbered the spots on images as a reference to the below post and DIY guide.
- When growing cannibis air flow is a major priority as well as temperature control. In my DIY design I have mounted the heavy duty ventilation fan in the top section , middle back #1. This is very important to get done correctly! Also take my advice, go heavy duty! If the fan fails your plants "cook out" in a couple hours and will possibly get leaf burn, dry out or die. We are going to heat sink the LED to the metal inner shell of the freezer space so a lot of heat will dissipate into the entire area, but more on that in the next section. The fan is mounted with the air flow direction flowing out of the fridge. When the top door is closed the fan creates a vacuum in the area.

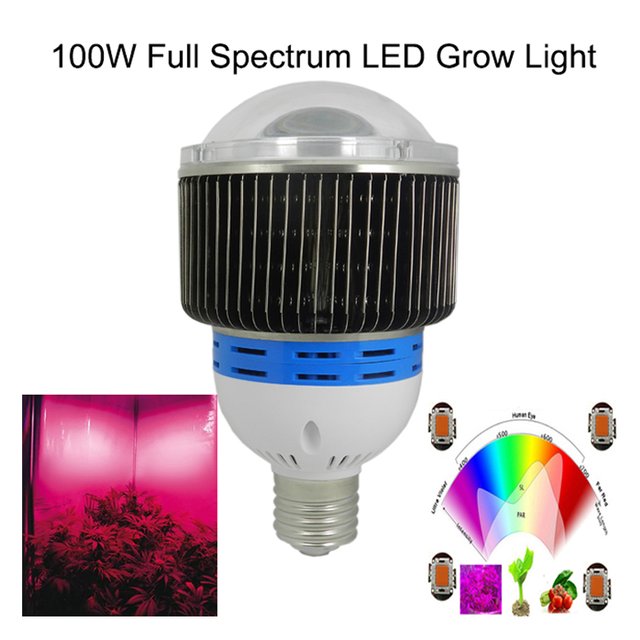
2 In my setup I use a specific LED design and type of light that I have kept secret up until as of this post. Why? Well it took me 2 years to perfect everything I am sharing here and normally I would have the edge keeping all my secrets. Not to mention 3 previous makes of brand LED's that just could not cut it! Steemit however has inspired me to compile this tutorial, I know my efforts are directly proportional to my posts long term success so I am happy. The LED I use here is very potent for what it is and I can say I have personally tried and tested it. The design I chose is typically known as a Chinese Factory LED Bay light, so you can imagine its tough! Unfortunately I do not have direct links but I will send you in the right direction. I found the light on a site called http://aliexpress.com
I am sure if you search a little you will find what I am using, Just remember it must be the CREE chip because its far superior to brigelux. I can vouch for it! I use the 100w and it kicks asssssss!!! very efficient with a build in cooling fan, heat sensor temperature switch that will turn the light off and on automatically if over heating occurs. This specific light also has a built in lens that intensifys and redirects the light in a very effective manner offering amazing output!
To fit the LED I simply removed the plastic dust cover and glass lens. I then took my hole-saw and cut through the dividing section in the center between the two areas. I then used heat sink paste " Typically used for PC CPU's " and applied it to the surface of the LED heat sink face. This allows the heat to transfer from the LED heat sink into the metal inner of the freezer section of the fridge. It works very well trust me! The bottom fridge section inner is all plastic mostly and easy to work with. Next you will need to drill the four pilot holes for the LED heat sink and screw the lens section back on clamping the light onto the thin metal dividing piece. Its important to clear a section of foam so you only have a thin section to compete with when mounting your light.
3 Now your job will be to take your hole-saw and bore through the center piece once again in a corner that divides the top and bottom section. If your refer to the piece of pvc pipe no2 in the above picture you will have an idea of what to do. I simply placed a pvc angle and attached an extender piece from a scooters air-box to redirect air flow over the LED heat sink, works great!
When the extractor fan runs in the top section and the door is closed it seals creating a vacuum sucking air through the pipe no3 past the LED heat sink and then exhausts out! . Twice the cooling in one go! The more air you can move over the LED heat sink the better. Always remember your equipment can handle surprisingly high heat but when humidity and heat combine you have a problem. And also worth mentioning, don't worry we will son address air flow in the grow area.
4 I am not going to go into much detail here but I will try and explain what I did there briefly as it is a very simple concept. In a nutshell I drilled 2 x 8mm holes and placed a rubber grommet in each one. I then threaded power cable through each one from the LED power supply and put CFL hanger's in for extra lighting. I included a little extra cable length so they can be moved up and down simply being held by the rubber grommets. I must be honest in such a tiny highly reflective space its overkill to have extra lights trust me. You have more heat to work with and the results will not vary much if you are not a professional grower. You will notice I have a second DIY LED at the top back as well. The only reason I personally have an overkill of lighting is because one of my preferred strains is a 100% pure land race sativa from South Africa. It astonishingly handles anything I throw at it but that is for another post possibly.
5 I personally use the air pump for the air injection technique I have developed for myself over the years. Air pumps are obviously mostly used for hydro so it is very important to realize a few things here. I grow in soil using air injection with the air pump sucking warm air from the top area is ok. While this may work for my soil grow it will not work for hydro. For hydro you want to place the air pump on the outside possibly in the compressor cavity so you can suck cold air, warm air will ruin a hydro system. Once again that's for another post :-)
6 Nothing to really say here just a general multipurpose timer, All I recommend is get help if you are unsure with any of the wiring that must be done, its not rocket science however rather safer than sorry.
7 CPU fan power supply, straight forward.
Next we will address the grow section from above
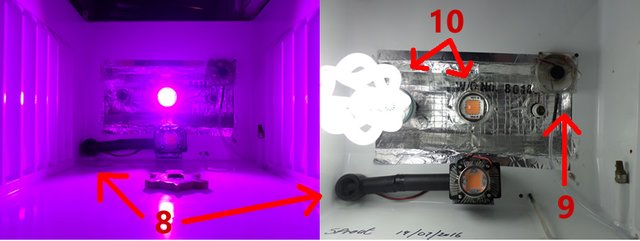
8 Here you can see the opposing side of the pvc pipe leading up into the top section from earlier, the vacuum above sucks fresh air into the grow area and exhausts the hot air via the extractor in your top area. In the last section 11 we will cover the air inlet port and all will be clarified.
9 A simple 12v PC fan to circulate air. Although I have a powerful extractor and suction moving a ton of air through my grow I always feel that a fan circulating and moving air in the enclosure is a good idea. The fan helps stabilize temperature throughout the grow area removing hot and cold spots. Also marijuana benefits greatly from moving air over leaves.
10 Here you can see the inner top section of the LED's and CFL's hanger to get an idea of how it works and looks from the plants perspective. You can pic up how potent the 100w LED is in comparison to the 120w CFL in to above image. As you will notice the LED's light intensity actually obscures the camera image a little bit.
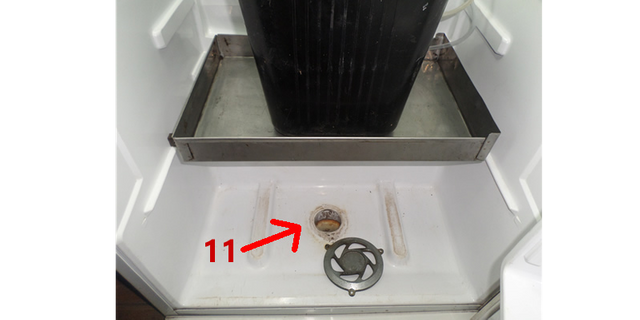
11 And finally the last bit of essential input. What I did here was simply cut a 80mm hole with a hole-saw. Really that's it :-) Your extractor fan will now be able to circulate 100's possibly 1000's of liters of cool fresh air in one continues cycle, sucking cool air in through the bottom and exhausting out the back. You will notice the silver cover, once again a donor part from something or other I had lying around. This is very important in my situation because I personally use the bottom inlet port to regulate temp and air flow. For example if you live in a moderate climate and you fridge is indoors, in the house with a more or less consistent average temperature you would probably just make the hole and that's it. If the temp drops below your desired low you can then simply restrict the airflow slightly like I do with my silver thing, and the temperature will rise a little. It's important to make small adjustments and then wait about 2 -3 hours for the climate to stabilize and check again.
Another important factor with rearguards to the climate in your grow fridge will be the extra CFL's if you added them. I find them beneficial in cold temperatures as they help warm the environment at a comfortable level as CFL's don't get very hot really. I run 1 - 2 extra 120watt 6400k if my plants require special requirements. CFL's will work great for growing marijuana if used correctly and don't let anyone ever tell you otherwise!
In my personal grow I don't have a carbon scrubber because personally in my situation it's not necessary. It's a topic I have researched and know about but have very little actual experience in. If you can share any info on active carbon air filtration comment or share your steemit. I would appreciate it!
Well I guess I must come to my conclusion... I'm bushed pun intended :-)
I would recommend growing SCROG "Screen Of Green" when growing in a small area, the wire shelves that are part of the fridge are perfect for this. soon I will do a illustrated steemit on SCROG growing and insane yilds :-)
I would like to thank every steemitite for your support and would appreciate any constructive cristism. As well as your comments, pics, up-votes and whatever you want to steemit! I have been at this for almost six hours so I apologize for any instantiates that might have taken place during this steemit. If i make it back here before the cut off time for editing I will give it another scan and update with a fresh pair of eyeballs. On request I suppose I can update with pics or whatever updates are needed as a comment below. Also I will use this post as a foundation for any new tutorials I create in future with regards to growing help, tips and my growing secrets.
My Related Posts
The art of Potsai, A illustrated guide to growing bonsai cannabis plant's. https://steemit.com/marijuana/@bitminter/the-art-of-potsai-a-giude-to-grwoing-miniture-marijuana-posts
Peace, catch ya on the flip side!
Steemit by @bitminter
So cool .
Decentralize canna grow .
Some ppl wanna industralize cannabis and make a lot of mony on it .
Not so good dhow .
@ossama-benjohn No not so good, it's my medicine and it is a plan't I believe it should be free for all!
@bitminter Skillz.
@domavila Thanks I am proud of it thanks for the recognition much appreciated.
Nicely done bitminter! me and u both had the same idea for a grow fridge. I usually don't post links in someones thread but since we both grow with stealth fridges i thought you might appreciate it. Also great informative post..like it a lot :)
https://steemit.com/marijuana/@mono/my-hydro-hps-stealth-fridge
@mono thanks for the comment, I have had a look at your post and nicely done. It goes to show how a little bit of effort, logic and creativity and we both have a very similar concept. Thanks much appreciated
You should update us with some pics later on, would love to see how the leds work...i have a spare fridge here..so you never know :)
Hey just noticed that you are also from South Africa : ) We Africans know how to make decent grow boxes.. Lekker man!!
Lol this is true! You might appreciate one of my other posts boet hahaha https://steemit.com/withdraw/@bitminter/complete-tutorial-how-to-withdraw-steem-directly-to-a-south-african-bank-account-fast
@mono, I just thought I would update quick on the growth development so far. You will notice a little nitrogen toxicity but it will pass soon. Keep in mind it has been 6 day's since the tutorial above. I am sure you will now be satisfied with the lights. Not bad growth for a soil grow hey.. Also just to mention I grow with the LED but switch over to CFL's for the pic's.
Hi, long time passed since the last message.
But I have few questions if you mind answering.
First you did not mention the use of timer ?
Second , which place is proper for the tube of air injection.
Finally, are the fans always on ? (you mentioned that only LED is operated with the temperature sensor)
Thanks...
Hello all just a quick update. I am pleased with the response of this post and will start compiling my next post. I will share the link on this page hopefully soon. Not sure what I will wright about possibly lighting. Thanks
Hello guy's I have done another tutorial on organic cannabis seed feminization.

Link: DIY, How to feminize cannabis seeds for your next grow. Please visit and leave your comments
Thanks looking forward to comments and feedback. Enjoy
Nice @bitminter
Shot you an Upvote :)
Upvoted
Very interesting tutorial I dont think I would be able to grow though, all my veggies always die!
i have made a guide to Buy Cannabis online if anyone want to check it out .
Thanks I am going to have a quick look.
Lol, plant's are easy to grow if you keep one simple fact in mind. When it comes to the any plants grow environment, If you are comfortable the plants will be comfortable. When growing aim for routine and you will be fine. If you need help with specific problems please post here and I will answer.
Shot guy's appreciate all the support! I am Loving steemit for allowing me to share. I am going to buy some awesome seeds and hardware for for baby's useing the money from this post. A big thanks to everyone for your support.
Thanks for the Step by Step guide. Those LED lights are very inexpensive.
Hi, yes they are very affordable, especially on alliexpress.com as you can buy directly from the manufacturer. If you found a possible link to a good light please share it here. The COB Tech today is truely potent and for some reason mostly goes overlooked. In my opinion people are stuck on the notion that the traditional multiple LED panel types are what is best and can only be used to grow. The only thing I would say these particular lights are a little bit noisy as the light is extremely compact wit one hell of a little fan in it for cooling, If you could imagine a small light weight hair drier . So I would imagine it can be a little bit noisy for certain situations. I built up the DIY one at the back myself, it simply cools from the suction created from the fridge, So if you a DIY guy buy a DIY kit and go to town if a little noise is a issue in your situation. As long as your chip is a CREE or Bridgelux you are golden! Bridgelux is good by I personally use a CREE 100w. I will possibly post on lighting soon :-)