The Art Of Potsai, An illistrated giude to growing miniture marijuana plants. " Exclusively on Steemit"

Author Comments
Hello steemit fans and welcome to my complete cannabis grow guide The art of Potsai. Before we begin I feel it is important to note that I am the original author of this post and all the content included has been compiled by myself @bitminter . This is the first time I have ever publicly shared any of this content therefore the contents of this post are now exclusive to and only to the steemit community. I have published this steemit article as a reference and expression of my own personal experiences only. Please feel free to give advice or comment on any section of this steemit if you feel compelled. We all have different experiences in life and I hope after sharing what knowledge I have we can work together to influence marijuana legalization and community's together in a positive way.
Please note: The use of cannabis is illegal in many country's. The information provided in this steemit is intended for medical and or educational purposes only! If you are uncertain about the laws with regards to cannabis in your country consult with a legal adviser before practicing any of the information provided in this steemit. Thank you!
Introduction

Potsai is the art of growing miniature Marijuana plants. In this steemit you will learn the required techniques to grow a miniature Marijuana plant from seedling to maturity with Medical grade results. I will cover everything from what strains to grow under certain conditions, pot size, nutrients, pruning of leaves and how to grow your Marijuana plants in plain sight without being easily identified if required by the grower.
What is the art of Potsai?
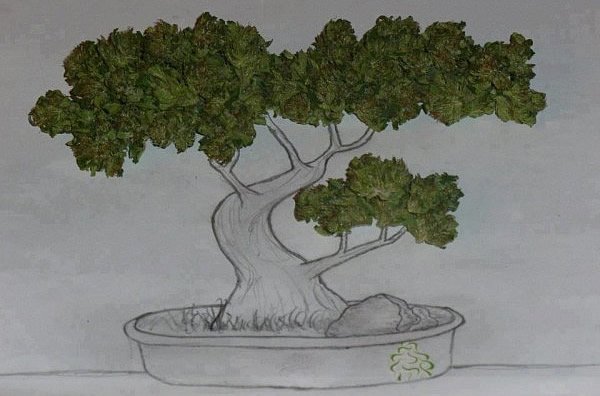
Bonsai are miniature trees grown in pots. Potsai are miniature Marijuana trees grown in pots. The aim of Bonsai/Potsai culture is to develop a tiny tree that has all the elements of a large tree growing in a natural setting. This look is achieved, principally, by branch and root pruning and shaping, but other factors are also important. The texture of the trunk, its look of age, the moss and the under plantings in the container — all contribute to the illusion of a miniature tree as it is seen in nature.
Traditionally Marijuana plants would not be used in Bonsai simply because of their growth characteristics, foliage and short life cycle.
Marijuana on average has a maximum one year life cycle from seedling to flowering. Once a female Marijuana plant has flowered in nature it will drop its seeds and die. However it is possible with constant artificial light cycles to keep a Marijuana plant in vegetative growth for many years. Because we will be growing in natural sunlight and in good old fashion soil you will be focusing more on completing the natural life cycle of your Potsai plants and producing a miniature high potency harvest. The goal of this steemit is to teach anyone how to grow miniature Marijuana plants from seedling to flowering/harvest and then start the cycle over again from seedling or a clone. Also with a little creative pruning to be able to display your Potsai plants in plain sight in the garden, on a coffee table or window sill without being easily unidentified.
Your intention should be to grow more than just another marijuana plant. We will step away from trying to grow your Potsai Marijuana plant as fast as possible and focus more on creating miniature Marijuana art with smaller more appreciated and potent yields. It’s a fact that Marijuana plants that live longer and mature as they should naturally will produce more potent, sticky and high quality buds. Basically the end result with Potsai is not quantity its artistic quality! However you could grow as many plants as you wish.
The import thing to remember with the art of Potsai is to keep things simple and use traditional outdoor growing techniques the way nature intended. No need for fancy hydroponics and lighting systems. We want to incorporate simplicity and affordability along with time and patience to create our desired results.
Another important aspect of growing your own Potsai plants will be curing your buds properly and adding flavors to your harvests.
Getting Started
Choosing your Marijuana strain
It is very important to keep in mind a Marijuana plants lighting requirements. Because we will be growing with natural sun light it is possible to grow certain strains with as little as 1-2 hours of direct sunlight a day if the ambient light in the room or outside is adequate. This is perfect for indoor growing on a coffee table, next to a window or under a skylight for example. On the other hand certain strains will do better outdoors and require more light.
Indica: If you planning on growing indoors on a coffee table, window sill or under a skylight for example I would recommend visiting your local seed bank and acquiring a typical Feminised Indica used more for growing indoor hydroponics. Indica strains usually will have larger broad leaves and require less light to grow sufficiently. If grown with a minimal of 1-2 hours of direct sunlight a day an Indica plant should thrive indoors with good healthy growth and yields if cared for properly. Indica tends to grow quickly with relatively high potency and larger yields.
Sativa: Sativa requires more light to grow sufficiently and typically if grown indoors should be grown in a spot with at least 4-5 hours of direct sunlight a day. Ideally you would want to grow a Sativa strain outdoors with as much direct light as possible. The advantage of growing a Sativa strain is high potency and the smaller narrow leaves complement the Potsai effect. Sativa’s tend to be hardier plants and grow slower than Indica with a more woody appearance. The important thing to keep in mind with a Sativa strain grown outdoors in a full day’s sun is it tends to require more frequent watering.
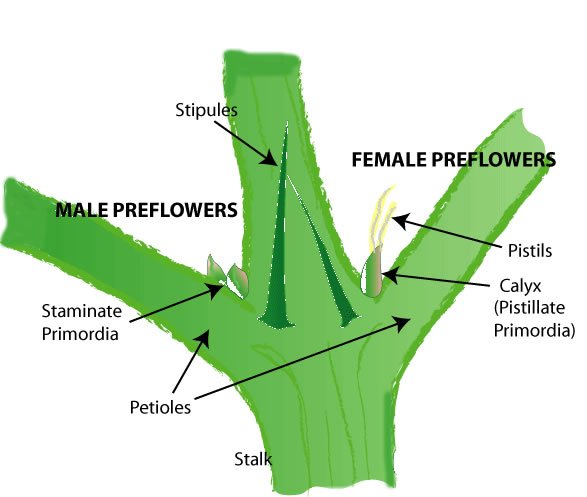
Tip: When you decide to purchase your seeds try and buy only feminized (Female) seeds to avoid growing male plants. This is very important simply because if you growing your plants from seedlings and trust me, it can be quite discouraging to realize that your plant is a male after a couple months of growing. Male Marijuana plants are generally an undesired trait with little to no potency.
Below is an illustration distinguishing the difference between a male and female Marijuana plant.
A simple solution to avoid male plants is to acquire a female clone from a friend and kick things off with a small plant. If you require a seed bank I would highly recommend The Original Sensible Seed Company. They are the most trusted, discrete and reliable with over 20 years of on-line experience.
Now that we have determined which strain will be using we can move to the next step.
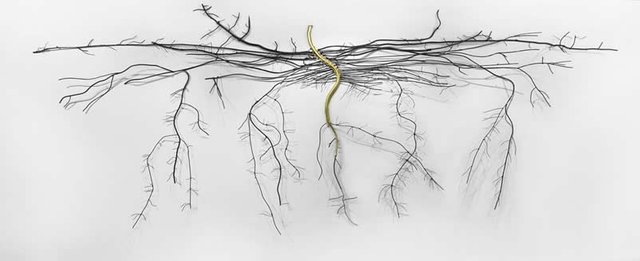
Pots: When it comes to selecting a pot/container for your Potsai garden you will find that Marijuana is not very fussy at all and will grow well if cared for properly in a small pot. Marijuana has an adventitious root system meaning that its roots tend to spread out in width rather than in depth with comparison to plants with a tap root.
This makes choosing a suitable pot quite forgiving. Basically I would recommend using a typical bonsai pot from your local nursery but any small to medium pot/container with a minimum 3- 4 inch depth will do. I personally found a log and hollowed it out to create a suitable natural looking pot that works great. Get creative and use your imagination, this is what the art of Potsai is all about.
Important: Always make sure your pot/container has sufficient drainage. This is very important for the prevention of root rot and prevents the possibility of your plants drowning especially with a small pot that can become overstated quite easy..
Soil: Your prime concern, after choosing high quality feminised seeds and your pot/container, is the soil. The trick is to use the best organic soil you can get your hands on. Scrimping on the soil doesn't pay off in the long run. If you use non sterilized soil you will almost certainly find parasites in it, probably after it is too late, and to transplant your marijuana can cause your plants to go into shock and die. You can find excellent soil for sale at your local plant store or nursery. The soil you use should have the below properties for the best possible results:
1. It should drain well. That is, it should have some sand in it and also some sponge rock or pearlite. 2. The ph should be between 6.5 and 7.5 since marijuana does not do well in acidic soil. High acidity in soil encourages the plant to be predominantly male, an undesirable trait.
3. The soil should also contain some humus good for retaining enough moisture and nutrients required for healthy growth.
If you want to make your own soil mixture, you can use this recipe:
Mix two parts moss with one part sand and one part pearlite or sponge rock to each four parts of soil. Test your soil for ph with litmus paper or with a soil testing kit available at most plant stores. To raise the ph of the soil, add 1/2 lb. lime to 1 cubic foot of soil to raise the ph one point. If you absolutely insist on using dirt you dug up from your back garden, you should sterilize it by baking it in your oven for about an hour at 250 degrees.
Be sure to moisten it thoroughly first and also prepare yourself for a rapid evacuation of your kitchen because that hot soil is going to smell terrible. Now add to the mixture about one tablespoon of nutrients/fertilizer (like Rapid-Gro) per gallon of soil and blend it in thoroughly. Better yet, just skip the whole process and spend a couple bucks on some organic potting soil.
Pot and soil preparation
Now that you have your pot, soil and seeds in hand you can start preparing the Potsai garden in order to plant your seeds or clone.
Try and visualize your miniature Potsai garden in your mind or better yet grab a pencil and make a sketch of how you want your miniature landscape to look. For example you might want to grow your plants over a piece of slate or plat three plants together as they grow. Possibly you would like to decorate with moss and precious stones or grow your Marijuana plant alongside another type of plant. The possibilities are endless so use your imagination and get creative!
Your first step will be to sterilize your pot/container. You will want to steer clear of using any harmful or poisonous chemicals. I would recommend placing your pot/container in the kitchen sink with a couple drops of everyday dish washing liquid and boiling water. Let this soak for a couple minutes rinse and dry.
Next take your pot and layer the bottom with a thin layer of small pebbles. This will help drainage and prevent soil from escaping from the bottom of your pot when you water. Now gently start adding your soil until the pot is full to the brim. Push down the soil and gently compact with your fingers until you drop about half an inch under the rim of the pot. Next water down the pot until water starts to run out the bottom drainage holes; this will help the soil to settle.
If you happy with the depth of the soil in the pot at this point you are done, if you require a desired look and prefer the soil to be level with the top of the pot for example simply add a little more soil and repeat the process. This method might seem a bit tedious but will prevent the soil from becoming compacted too much.
Once your pot and soil are ready you will want to add your miniature garden features. Place your stones and features to get a basic feel of how your garden will look. This is important simply because once you have planted your seed or seeds you want to avoid having to do any transplants. Once again take time and pride in your landscaping, use your imagination and get creative!
Now that you are all prepared and ready it’s time to breathe life into your garden and plant those seeds. This is very simple so forget all the hype about using special germination techniques, heating pads and stuff. We are going to do things the way nature intended and simply stick them in the ground. As simple as this is there are one or two factors to take into consideration. It will help to plant your seed/seeds at the correct depth. To deep and the seed could possibly rot and die before the seedling can break through the surface of the soil. To shallow and your seed/seeds might dry out to quickly and not germinate. The best advice I can give is to push your little finger into the soil only as deep as the first knuckle, approximately half an inch. Drop your seed in and fill the hole lightly with a little soil.
Choosing a suitable location for placement
Marijuana plants regulate their life cycle from the natural light cycle of the year round seasons. The best time to plant or start growing would be in early spring. As you move into summer the days get longer and once winter approaches the light cycles will start to get shorter and the nights get longer.
Basically during summer when the light cycles are longer your plant will be in its vegetative state growing new foliage and increasing in size. When autumn arrives and the light cycles start to get shorter your plant will automatically start to flower growing buds. If you want your plant to have a long natural life cycle it’s important to keep it in one designated spot getting as much direct sun as possible. If you want to force your plant to flower and grow buds early it’s possible to move the plant to another area with reduced amounts of light that will cause the plant to start flowering. To force flowering you would for example move your plant from a location receiving 6 hours of direct sun light a day to another location that is currently only getting 3-4 hours of direct sunlight.
Watering and nutrients
Watering Because you will be growing in a smaller than usual pot it is very important to check your plants soil regularly to prevent it from drying out to much. The smaller your pot the more frequently you will have to water, also to mention if your plants are in full sunlight they require more watering even possibly as frequently as twice every day. It’s important to realise that in order to keep your plants healthy it’s not good practice to drench your plants every time you water. On average you want to be giving a Potsai plant around 25-50 ml (one-two shot glasses) a day. Seedlings will obviously require less watering in the beginning. If you decide to go away for 3-4 days, only then should you soak your plants. If you find yourself in the situation where you need to go away for a week or two I would have to recommend you ask a good friend to just drop by and water your plant every other day. If this is not possible you can shoot down to your local pet store and purchase a large hamster water bottle.
Example of a hamster bottle
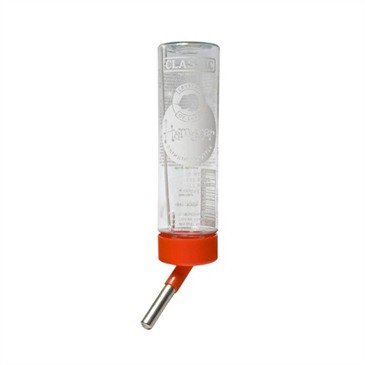
When using the hamster water bottle first give your plant one good soak before you plan on leaving home and simply take the filled hamster bottle and stick the metal tube into the soil. Your plant and soil will slowly drain the bottle as required. When using your hamster water bottle use only clean water. If you add nutrients you might run the risk burning roots and come home to a sick plant. Also if you have a very thirsty plant you might want to consider using more than one bottle.
It is obviously better to use purified water or rain water for watering your plants, but generally if you leave some tap water standing over night it will be just fine to use for watering the next day. Please note that this advice is based on a plant no bigger than just under a foot high, your watering requirements might vary, so please use the above as a basic guideline. Tip: Try watering your plant/plants using water from a fresh water aquarium. Fish discrete all kinds of organic nutrients into the water and even better yet an aquarium will contain organic micro nutrients easily absorbed by your plants. The other advantage of aquarium water is that you can use it every day for normal frequent watering.
Nutrients: When it comes to the art of Potsai and adding nutrients always remember less is more! This is simply because when you grow in smaller pots/containers it is very easy to over fertilize and burn your plants roots possibly killing them. The best practice would be to use only organic nutrients once a week at the products recommended dilution. If you using high quality organic soil this will be more than adequate for healthy plant growth. Tip: If your plants start to show any signs of wilting or yellowing of leaves after adding nutrients flush your plant with fresh water. Repeat in a day or two if necessary. Foliage and Pruning
Trimming Grow tips: There is a lot of controversy when it comes to Marijuana pruning. It’s best to remember that we not pruning for maximum growth but rather to achieve a specific style or desired look. For every new grow tip you prune you will find that your plant will fork out in a V growing two new grow tips in its place. This will encourage your plant to be smaller, bushier with more density. By pruning specific grow tips you can alter either the height or width of your plants and encourage certain directional growth. Marijuana plants are quite tough so don’t stress too much about pruning. You will be required to do allot of pruning of grow tips in the first couple months in order to achieve your desired trunk style.
Trimming and shaping leaves Trimming and changing the style of leaves will give your plant a unique and specific look. It’s possible to alter the look of your plant to the point where you can keep it in plain sight without anyone ever knowing what it is. This is very simple to achieve but will require constant pruning almost every second day depending on your plants growth. If you look at your typical Marijuana leaf it has anywhere from five to nine blades. Once your plant sprouts new leaves you need to carefully prune away the side blades leaving only the center blade to grow out as the whole leaf itself. You will find that the plant takes on the characteristics of any average plant with a single bladed leaf and the pruned away blades should not grow back if cut clean with the stem. On occasion when the leaves grow out you will find small bits of the old blades growing that you can just clean up. Your Marijuana plant will tend to compensate and adjust, the single blade will grow larger than normal meeting the plants lighting requirements. In nature a Marijuana plant creates THC as a defense to protect itself from being eaten, when you prune the plant will assume it is being attacked and therefore produce more THC increasing its potency.
Due to a Marijuana plants stigma in today’s world and the average assumption of how the leaves typically look people will not know what it is if you choose to use this simple technique. It’s basically a typical example of a wolf in sheep’s clothing.
In the below example on the left you would achieve a single leaf blade style by carefully pruning and trimming away the leaf blades in red. On the right you will see an example of a Indica growing on a window sill receiving approximately 2-3 hours of direct morning sunlight a day boasting a single leaf blade style.
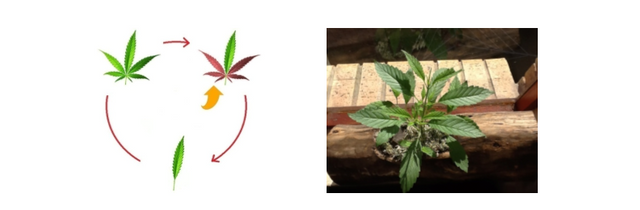
Keep in mind there are no set rules here, a person could trim away any of the blades creating unique styles. A V shaped leaf with 2 or 4 blades could also be achieved. Once again it is simply a matter of using your imagination and getting creative.
Creating a bark like effect: Marijuana plants generally don’t grow bark like a tree would. But it is possible to create this effect using a simple and effective technique. Only once your plant has reached a minimum age of 4 weeks you will be able to begin this process. Take a sharp blade or knife and gently scrape all around the bottom of the stem. Doing this once a week you can move a little further up the stem gently giving the entire stem a once over. This will create scaring of the stem and the illusion of bark.
Root trimming: With traditional bonsai you would have to remove your tree from a pot once a year to trim the roots and prevent root overcrowding, this will also stunt the trees growth. Because a typical marijuana plants life cycle is rarely longer than a year this won’t be necessary for us to worry about. Root trimming would also require transplanting and in my experience a marijuana plant will almost always die if you attempt to trim its roots. Curing Marijuana
Once you have grown your Potsai plant to maturity the next step is to cure it. You don't want to discover after all your effort that your plants smoke harsh and bad tasting. After all you have taken your time growing your beautiful miniature creation you will want a high quality cure, Excuse the pun. Here are some basic tips and a few advanced ones you can experiment with.
Preparing The Harvest
Curing your harvest is an important step when it comes to the art of Potsai. If you have spent almost a year carefully growing your plant/plants you will realise this is a very important part of the process. Taste, aroma and maximum potency is also a very big part of this art so you want to cure your pot and not just dry it. In this section I will be teaching you a few basic things to achieve the best possible smoke.
Your First Steps
Preparations must be made well before curing begins. You will know it’s time to harvest when 50% to 80% of the pistils have turned from white to their colour .Try and avoid giving your plant any nutrients a week before harvest, only clean fresh water is a good idea. This will give the soil time to clear out any additional nutrients. Adding nutrients before you harvest will give your plants a nasty taste and smell possibly making it harsh to smoke. Now that you have fragrant, spicy highly potent buds you want to preserve them as best as possible. The most important thing is that they must be cured. Mould is your biggest enemy once you harvest. The trick is to cure your yield slowly so that certain biochemical processes can take place but not so slowly that mould will set in or the crop sours. The key is to control humidity. A good cure can last up to 8 weeks or more and will leave you with a stash that's tasty and fragrant and which has lost none of its potency. A poor cure will leave you with nasty tasting bud that's harsh on the throat. A poor cure can even cost you your harvest.
Curing The Crop: Immediately after the harvest comes the cure. The reasons for curing and not to just quick dry your pot. You want it mild not harsh and you want a good aroma and flavour. After all you’re tender love and caring for your plant’s you don't want to ruin it with a too quick cure. A good cure lasts from 2 to 8 weeks but good results can be had in two weeks or so with small yields.
The idea is to evaporate the water out of your pot slowly enough to let fundamental biological processes take place that convert the sugars and starches in the bud into harmless and flavorful compounds. Sugar or starch will give a harsh smoke that hurts the throat and lungs.
Plants need sugars to live and they produce them from nutrients and sunlight. This curing process also breaks down some of the chlorophyll which gives Marijuana its green color. Too much chlorophyll gives an unwanted leafy taste that can be quite nasty. Your main enemy when you are curing your pot is the dreaded mould.
After pot is cured it's not very susceptible to mould but you have to maintain a certain level of humidity to let the curing process do its work. The way you control humidity is by controlling how much ventilation you allow. You want some ventilation but not too much. Too much and it dries out without curing properly, too little ventilation and you may get mould. If you see or smell the slightest sign of mould you must immediately stop the cure and let it dry out. If mould is unchecked it can destroy your harvest. Mould can be detected by sight and smell.
It looks white usually and will be fuzzy. If you see it in one part you can be sure the spores are all over so you may as well let it dry. Mould also has an odour which is always nasty. Never ever smoke herb that has mould on it, it can have serious health consequences!
You want to avoid contact with light and heat at all times with your pot after it has been during the curing process. Light will degrade your crop and temperatures over 80 F (27 C) are bad because this once again encourages mould and the possibility of your pot souring. The best place to store it is in the freezer or fridge sealed in a zip lock back. If that's not practical a cool dry dark place will do sealed in a jar.
You will need an enclosure to put your crop in for the cure process. Depending on the size of you crop you can use a cardboard box or a closet. With the cardboard box you want to hang the plants from a string. Don't just dump everything into the box because the plants on the bottom won't get enough air and may turn mouldy. I used to put string across the open top of the box and tape the ends to the outside.
I would crisscross strings and attach the plant with twist ties. Make sure the box is tall enough for your plants. If it's not tall enough you can cut the plant in half or even cut off each branch and hang it in the box. The plants or branches should be loose and have some space between it and the next. It doesn't take a lot of space just as long as air can circulate. With a closet you do the same thing. You might want to put nails or thumbtacks in the walls for the strings or a clothes hanger bar will work great.
If you use a box leave the top off, with the closet leave the door open. After one or two days you will have lost a good bit of moisture and you can begin to restrict air flow. Use a single sheet of newspaper over the top of the cardboard box with a gap at one end. As the cure progresses you would cover the top a little more every day. As soon as the leaves began to get stiff I'd cover the top completely. They will still get little air because the newspaper should not be airtight.
With a closet you will want to close the door after a day or two all except for a couple inches. As the cure progresses and the plants get drier, close the door altogether. Almost all closets have cracks around the door that air can come through. Watch the plants very closely to see how fast they are drying. As soon as you notice a little bit of stiffness to the stems they would have lost probably 50% of their moisture. When the leaves start to get a little bit crisp you have lost most of the excess moisture and you must restrict ventilation some more. The leaves should start to get a little crisp after a week or two. If it happens sooner you may be using too much ventilation and should cut back. At this point you should start to notice that all too familiar A-grade smell. This is the curing process doing its job and will have a piney, fruity or skunky aroma.
If you notice the least bit of a sour or rotten smell it is probably mould and you need to check very closely. After the leaves start to get a little stiff and you have restricted the air flow it takes anywhere from a week to 6 week more to finish it. When to stop is up to you.
You might want to decide by the colour of the herb. It gets less green as it goes along. Buds will retain the green colour longer than the leaves. Buds may still be green at the end of the cure but not quite as bright a shade of green. You will be the proud possessor of a stash of sweet smoking, good tasting buds without the harshness of fresh cured smoke.
Adding Flavours People pay a lot of money to get seeds they think will grow pot that smells like blueberries or chocolate or something else. Often these strains are hard to grow or may not be as potent or high yielding as other less expensive varieties. People want to know if orange bud smells and tastes like an orange. With the proper techniques you can make your favorite variety smell and often at times taste like anything you want. You want to do this without ruining the cure. It's no point having blueberry pot that burns your throat or doesn't get you high. Do not pour any syrup or similar flavorings on your pot. The sugar will make it very harsh and you are inviting the dreaded mould. Trust me there are better ways. The best flavor enhancing starts while the plant is still growing. You can do a certain amount while it's curing and you can even affect the smell/flavor somewhat after it's been cured.
There are two main approaches, inside out and outside in. You can apply flavors inside the plant while it's still growing and you can try to add flavors after it's been harvested but this is from applying the flavor on the outside. Anything you put in your plants water will affect the taste of the finished product particularly if you harvest it right afterwards. I have personally learned this hard way. I fertilized using fish emulsion right before I harvested the plant. Bad move! The resulting cure smelled like fish and had a foul taste. What you want to do is select a flavoring that is organic and very concentrated. Let’s take orange for an example.
You could use orange juice but if you could find concentrated organic orange extract you would have less pulp etc to deal with. You will find some concentrated flavor extracts in the grocery store. Want your pot to smell like vanilla? Vanilla extract is cheap and readily available, so is lemon extract (cooking variety). Other extracts can be found in stores that specialize in baking supplies. Let’s say you can't find any of that and you want to use what you have on hand. I took the example of orange flavoring. If all you have is orange juice you could use that. I would suggest filtering it first to get out as much of the pulp as possible. A coffee filter works well but it'll take a while to filter it all. You may have to change filters a few times. That's why I suggested the concentrated extracts if you can find them. It's important to do this shortly before harvest. For one thing, most extracts including the ones you make up yourself have a lot of sugar in them. This sugar will ferment and decay rapidly. Plants draw up solution fairly quickly so one hour should be enough for some of the flavoring to reach the top and three hours more than adequate. You might think it would take longer for the flavor to work its way through the plant but this is not the case. All you have to do is let the plant dry out a little before your apply the solution. In other words, schedule a watering just before harvest. Naturally you were giving your plants plain water for several days before harvest. Skip watering the day before harvest and give the plant the water with the flavor when it's a little bit thirsty and it will draw it right up. 1 hour – 3 hours should be more than enough time for this to happen. After harvest it's important to give it a good cure. Resist the temptation to fast dry some of the weed to try it out. You will find it's even harsher than it would be normally because you have added some sugar to the plant by way of the flavoring. The curing process will take care of the extra sugar and give you nice mild smoke. It will also have the flavor and aroma you are looking for.
Keep in mind there is no exact formula for the flavoring. I can’t tell you how many drops per gallon?" First of all, I don't know what you want.
You may want something that smells exactly like an orange or a blueberry and doesn't smell at all like pot. As far as I know that's not possible. You would probably ruin the pot if you succeeded. What some people think is a nice hint of strawberry may be way too strong to the next person. What one grower thinks is very blueberry may not smell or taste like blueberry to his friend. I suggest that you don't treat your whole crop this way while you are experimenting. Always remember that when it comes to the art of Potsai less is more! Other things you could try are guava, pineapple, grapefruit, passion fruit, cherry, mint or even pina-colada. Stronger and more concentrated flavorings will have a more pronounced effect than more dilute products. You may need gallons of orange juice to get what you want but a half ounce of concentrated strawberry essence might do the job nicely. In short, experiment and see what works for you.
The other approach is to use something in the curing process. People have had good results with orange peel, lemon peel or other citrus peels. This will only give a bit of odour; it's not as strong a technique as the previous one I mentioned. For those who just want a hint of something this may work fine.
Once again it's important to watch very closely for the dreaded mould when curing with peels. The moisture from the peels may promote mould if you're not careful. Let the herb dry for a day or two before you add the peels This might work a little bit with pot that's already cured and dried but it's less effective at that point.
Recommendations
The only recommendation I have is Growing Elite Marijuana. You can use Coupon code "STICK420" for a 10% discount because Its a little bit expensive. but in all honesty truly an amazing ebook collection with tons of content from real experienced growers.
Thank you for reading I hope you found this article useful if not at least interesting! Please share your grow experiences and knowledge and steemit article below!
Peace :-)
Your Friend @bitminter
sounds kinda like screen of green. That one 3rd image up there looked beautiful.
some good ideas, will have to try it once the wicked empire of babylon allows it in my jurisdiction
Thats the way to go.I like ur post .

gives good info.
thanks.
Thank you much appreciated! I actually wrote it a couple years ago.
Interesting I would never had thought you can do this, I want to maybe give it a try. I don't really smoke because it costs money but I can grow it!
Shoot me any questions and we can get you started, thanks
I up voted this now please check out mine!
https://steemit.com/steemit/@acassity/my-plan-to-bring-in-usd500-000-to-millions-in-revenue-for-steemit
Thanks great post I up-voted
This is an awesome article and it's a shame it hasn't been upvoted more. I can see you spent a lot of time researching, experimenting and writing it. Thank-you!
Question: When would you say is too late to start Potsaing a plant? I have some plants in pots that are bout 2 months old now. Alot more of my seeds turned male than expected, I think because of the Ph of my soil. I am going to look into that next round.
@hyacinthesin
I have experimented a bit with my plants, some strains definitely work better than others. I have been designing a tiny house and I hope to have a scaled down cannabis plant or two. Thank you.
@polarbard Thanks for the comment, Please share pics if you could I would appreciate it!
Looks like the bots are having a field day with my post? Is this good or bad?
Visiting this post has been like visiting a old friend, man 2 years already!