[Little Things #1] Daily stationaries 每日文具

早安喔!今天這一篇算是個新主題,事源在前兩篇文章的留言裡,跟 @mrspointm各 @tvb聊到繪畫練習和教學。忽發奇想,想寫更詳細的過程文章,而且用上更方便的彩色鉛筆。
畫風偏向小清新的插圖,而且也都用上生活物品。如果說閒時畫畫的話,這裡應該不太合用,因為大家閒時應該都在敲鍵盤寫帖了吧^^
Good morning! Today I would like to start a new topic/series. Because in the previous post, Steemian mrspointm and tvb leave me reply and we had a little conversation about learn/practice drawing. I inspired me to start a more detail drawing post, and with more userfriendly color pencils.
The illustration will tend to be fresh and simple. Topic will be mostly from daily life. If I say let’s draw in leisure time, may be do not apply here. Because we are writing post in leisure time, lol.

左邊就是我用上的工具了。筆都是一些舊筆,就是一直接也用不完的感覺的筆。唯一要介紹的是最左一支,是蜻蜓牌特幼橡皮擦筆,擦小範圍真的很有用(心)而本子是MUJI的小正方形空白繪本冊。它已經硬皮訂裝好了,只要畫上圖畫,就是一本迷你書咯~
If you would like to draw together, using my picture as reference is welcomed. Or you can use your own objects. The above are the tools I used. Those are old color pencil and only the most left one is extra small pen eraser by Tombo. The note book is bought from MUJI. Blank pages with hard cover binding. When you finished all pages, it will be a little personal illustration book.

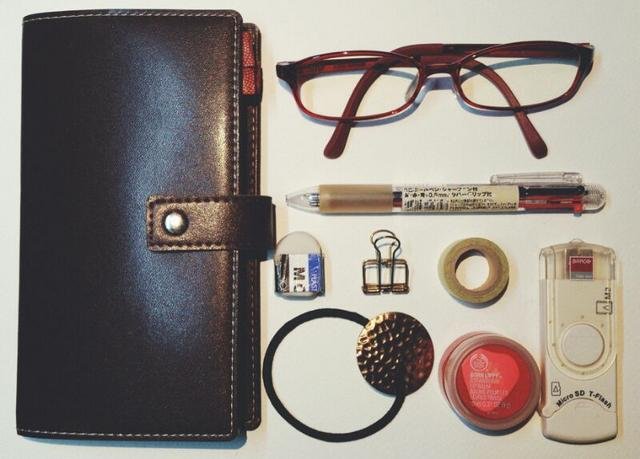
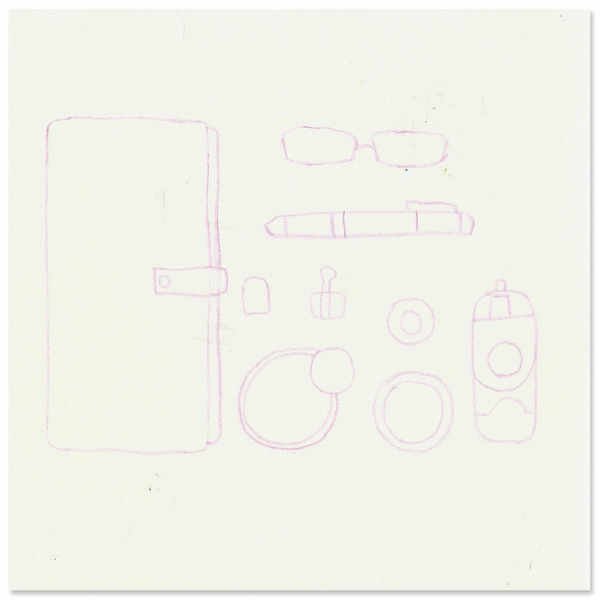
這就是實物圖,都是一些常用的筆記文具和個人用物。 手帳、擋藍光眼鏡、四色筆、橡皮擦、長尾夾、紙膠帶、SD卡讀卡器、髮圈和潤唇膏。用上包包裏的東西也可以,或許下一次畫吧~
This is the original photo. Some daily stuff. Notebook, glasses, pen, eraser, binder clips, masking tape, SD card converter, hair band and lip balm. Any things, may be some things in your bag.
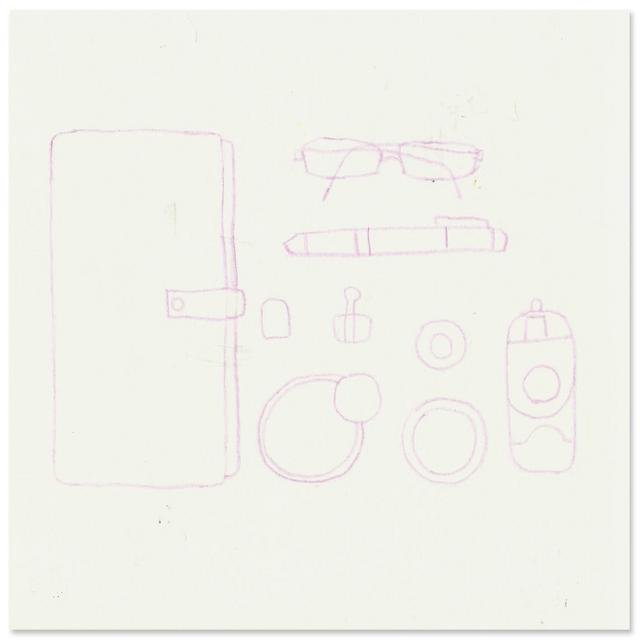
主要描出物品的大小,比例大概就好了。像讀卡器長度是手帳的一半這樣。其實大小不同也沒有關係,東西放歪歪的也可以。
I used light pink like for outline. Because black pencil line looks dull. The pink like can be covered by later filling. If not confidence by using non-erasable color pencil, you can draw by pencil lightly. Only draw with heavy pressure when you think it is the final outline. Erase it and here will be a invisible outline. (You can fill a light color line now or skip it). The outline is mainly for the scale of objects. Like the SD card converter length is half of notebook. In fact, no need to be too accurate, or with crazy scale is also ok.
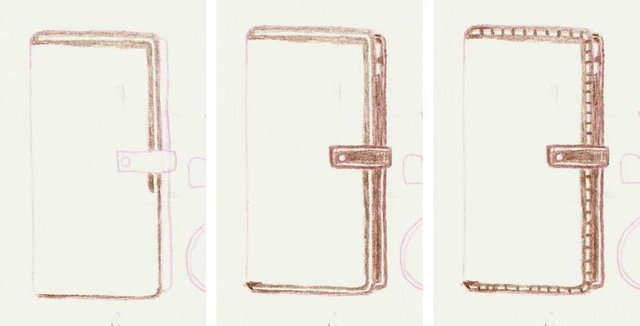
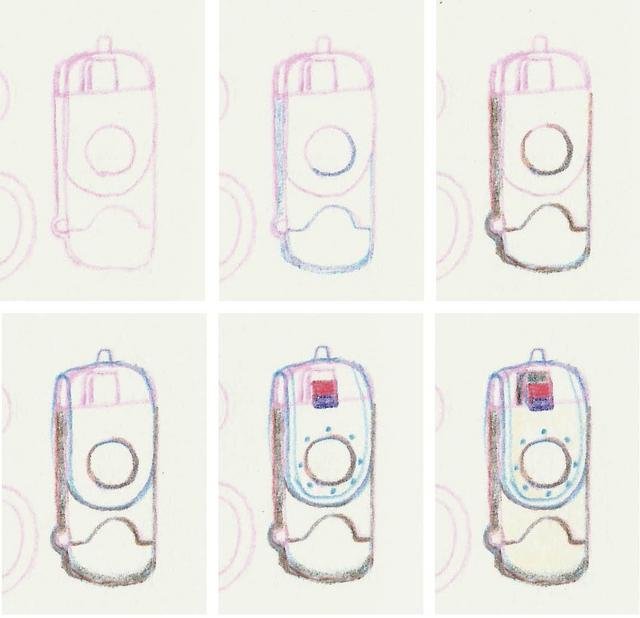
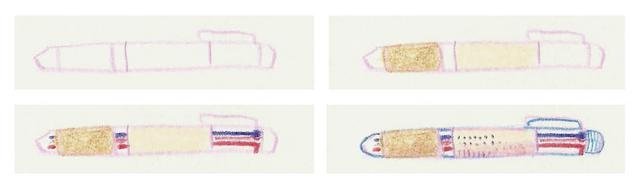
先畫手帳。最大範圍的東西先完成比較有成就感~手帳基本上都是一片啡色。不過邊緣的白線不畫就完全畫不出感覺了,所以其他細節可以拿掉,但白線萬萬不能。
把邊邊先蓋上啡色,建議筆頭要尖。隔開一點空間,再蓋上另一條內邊緣。
然後畫條長梯子,白線的感覺出來了。
Start from the notebook. This style does not require draw in detail but the white thread cannot be ignore.
I drew a brown edge of the edges, then draw another inner edge with a gap of white color.
Draw continuous perpendicular to finish the dash.
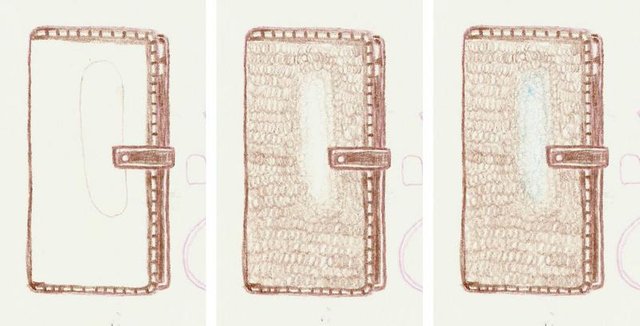
手帳有幾處高光,拿掉比較次要的,只畫最大的一處。先輕輕畫一個圈留待後面用。
以打圈的方式先薄薄填滿封面。高光部份有點藍色的,所以用上蔚藍色。兩色過渡的部份用力更小,可以先找一張白紙測試力度。
Draw only the main highlight on the cover. Draw a circle to mark the area first.
Fill in the area by drawing “old telephone cable”. The highlight has a slightly blue coating. I used cerulean blue. Light pen pressure is recommended. You may test the pressure first on other paper.
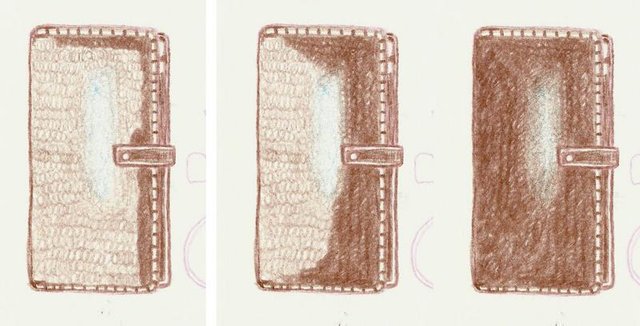
漸變OK了的話,可以用力填上顏色。
如果還是不確定,一點一點加大力度和塗兩三層來完成比較安全。已經完成80%了。
When the gradient is finished, draw it with higher pen pressure to make it solid. If you are not confident, draw by adding think layers is also ok.
陰影的地方我用了紫色。左邊封面邊緣的部份輕掃,一層層到覺得滿意唯止。然後我也在比較光的地方也都上了一層很輕的紫色,用意是增加色彩的層次感。
手帳內面的部份,側可以大力上陰影,這裡算是整張圖最深色的部份了。最後別忘了隱約看到的內頁紅色小標籤。
The shadow area I used purple. Apply a thin layer of purple on the left edge of notebook. Repeat it until you think it is dark enough. Other area of the cover I did a light crosshatching to make the brown not to dull.
The inner cover is the most darkest part of the picture. Use heavy pressure to draw it! And, don’t forget the little red bookmark.
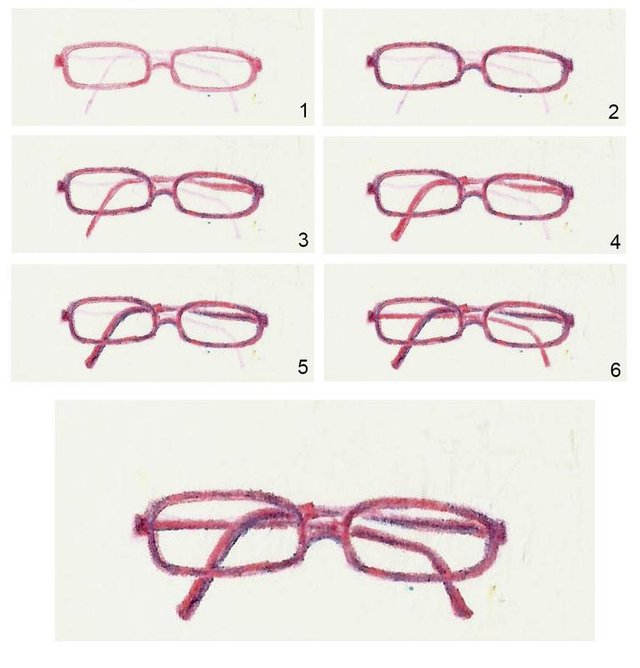
經過手帳的練習,眼鏡的上色應該比較簡單。不過眼鏡構造比手帳複習。先從最前面的框框開始,在先前的粉紅色勾線上畫上粗線,在轉角的地方再加厚。後面腳的地方也一樣。因為除掉了很多反光的細節,所以腳的後半段加粗部份要明顯,不然真的很沒看頭了(笑)
After the exercise of drawing notebook, the glasses will be easier. The color method is the same as notebook. But be careful of the structure of the glasses. The pink outline as the “bone”, and cover it by thick red line = the frame of glasses. As I skipped the complicated highlight and reflection of the glasses, we should pay more attention to the thickness of the handles. Otherwise, there is almost nothing worth paying attention, lol.
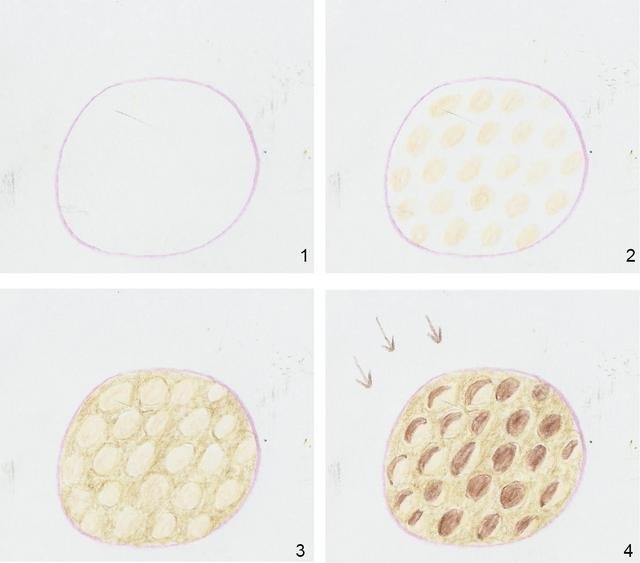
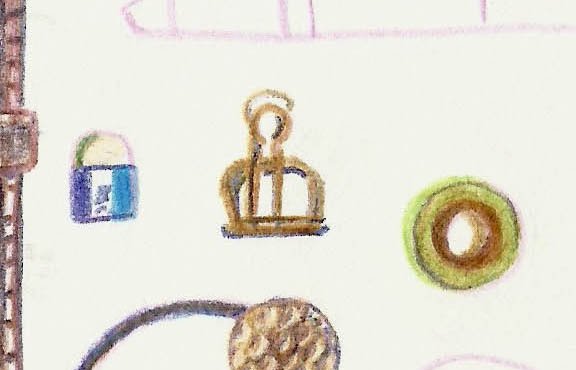
髮圈的金色裝飾比較需要多一點耐心去畫,我用另一張紙作了一個示範。
1️⃣ 起稿
(Outline)
2️⃣ 我用了肉色先畫上凹的部份,這是為了方便後面做高光的參考
(I used skin color to draw the concave dots.)
3️⃣ 把外圍的地方填上淺啡。
(Fill the remaining parts with light brown.)
4️⃣ 圖片的光源是左上角來的。就是在剛才的肉色園點中,用啡色填上背光部份
(The light sources is from left upper corner. Use brown to draw the back light parts in skin color dots.)
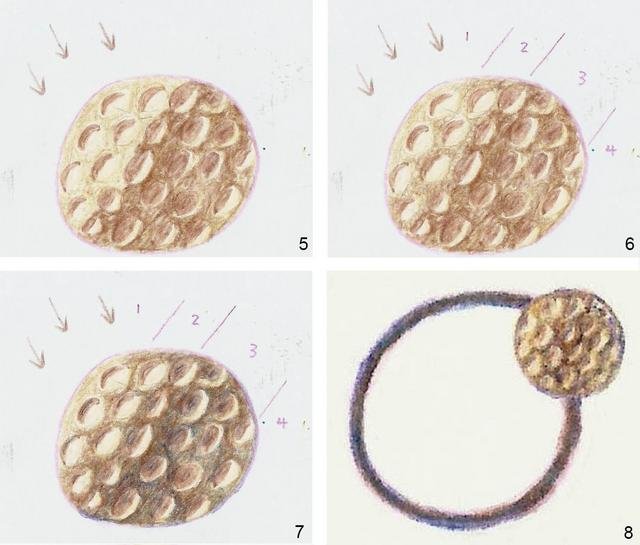
5️⃣ 加深陰影部份,也是用啡色,可以大加一點
(Use brown to make the shadow area darker.)
6️⃣ 淺啡和啡色的交界也是用輕握來做出漸變。手寫1的部份就是最光的;2是漸變;3是最深的部份;4要淺色一點,因為它貼近桌面,受到桌子的反光,反而亮了一些。
(Draw the gradient. Hand drawing with the number 1: This is the lightest part. 2: The gradient of light brown and brown. 3: The darkest. 4: The part near the table, some light is reflected back to the gold piece, so this part will a bit lighter then 3.)
7️⃣ 用紫色再加深暗3這個區域。跟手帳一樣,在2和4區也掃一點點來增加顏色的層次感
(Use purple to do final layer for the shadow. In area 2 and 4, I also did a little crosshatching like the notebook.)
8️⃣ 橡皮筋的部份是 啡 藍 紫 層層疊出來,因為我們這次不用黑色嘛。
(The hair band is the mix of brown + cerulean blue + purple . Because we do not use black color this time.)
SD卡讀卡器是白灰的比較難,所所這裡的處理比較大膽些。
先用蔚藍輕上一層陰影部份,再加一層啡色。透明膠蓋用蔚藍勾線就好了。然後畫上貼紙標籤。透明膠的內框和凸出的點。
最後也是用蔚藍加啡色來把灰色的插口表現出來。
完全白色的身體好像又太單調了,所以用肉色來跟背景色分別出來。
The white ares of SD card converter is a bit difficult. Anyway, give it a try!
Shadow area by cerulean and brown. The transparent cover outline, I used cerulean blue to outline it only. Add sticker and the connection part.
The total white body is dull, I used skin color to separate it from the background.
這三個小東西也是用色塊大概表顯出來就好。唯一長尾夾比較難,建議跟眼鏡的做法一樣,先用淺啡跟著粉紅色勾線畫出大概的形狀。交疊了的部份,用尖頭的紫色勾一條線以分別出來。然後高光位是淺啡,啡色來補一下整體,顯得實在一點。
These 3 little kids is simple, Drew by color blocks. Draw the binding clip with the method of glasses. Light brown for the think lines. Separate the overlaps by purple. Use brown to fill the body and left the light brown as highlight.
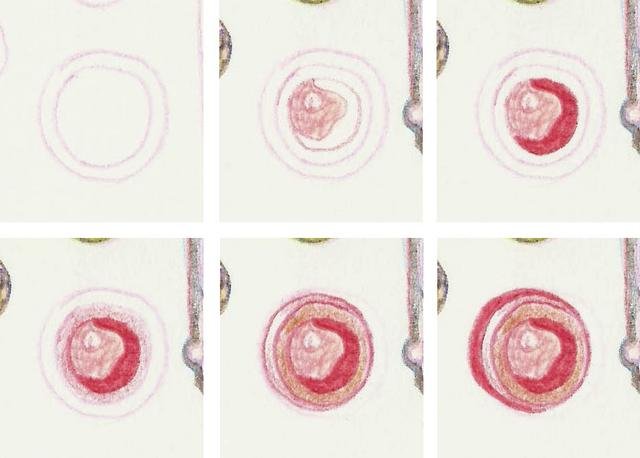
潤唇膏全是用一支紅色來完成的,不加其他顏色做陰影,做出火紅的感覺。
到第二行中間的圖,你會發現打稿時的外圈被擦掉了。因為本來沒想要畫透視,但後來又覺得不畫一點透視只有一坨紅色好奇怪。
Lip balm: Draw it with only red, with different pen pressure. I didn’t use purple to draw the dark area, keep it pure red. You may find the draft and final drawing is different. At first, I didn’t plan to draw the perspective. But it looks weird.
快要完成了~
四色筆已經有一點舊了,所以本來白磨沙的手墊部份都發黃。
透明部份也跟SD卡讀卡器一樣用蔚藍勾出來。筆芯都是手抖線隨意畫出來的(笑)
筆桿的貼紙我用了粉紅來打陰影,不用跟其他物件,可以多一點變化。而且左邊手帳已經是深色的代表,這邊用色比較活潑也未嘗不何~
Almost finished. The four colors pen holding part is old, so I use brown to draw it. Transparent parts is same as SD card converter. The refill is not accurate straight lines, lol. Then, pink color to draw the shadow of sticker on pen. No need to follow other object’s :P

包括了掃瞄和另畫解釋圖的持間,大概得花上兩個小時(不包寫帖)。這本子有12枚紙,留了第一枚作目錄,在第二枚的後頁開始畫。後面還有二十張圖~然後就成了一本小小的作品集了~
有空也請看看以往的作品~謝謝(謝幕)
Including scanning and extra demo, almost 2 hours to finish the drawing. This illustration notebook has 24 pages. I left the first and second pages for index, started from page 4. About 20 drawings to go, then a mini illustration book is finished!
If you are interested in my drawings, please visit my back number too! Thank you very much^^


好透徹的教學喔!
謝謝~有空一起玩玩畫畫^^
画的好像!
謝謝Helene~ 這次初試彩鉛的帖子😆
很勵害!
哈哈沒有喇,小清新比較簡單~
好可愛~~
謝謝Kris❤️️
wow~~ 好美喔!!! :D
謝謝 -3- 拖拉花比較美(別打頭
哈哈哈哈~~ 我真的太拖拉了!!! 謝謝你啊~ XD
This is so cool! I love such a things drawn!
Thank you<3 And I am trying to make this little things into a series xP