C-Sharp Programming Beginner Tutorial: Rock! Paper! Scissors!
Hi everyone, welcome back for the next Lesson! I’m going to go a bit more in-depth into the IDE (Interface Development Environment) that I use along with today’s programming lesson. I use Visual Studio 2015 currently, so I’m going to assume that is what you are using (as I want to be consistent); and I’m not going to teach you how to download it either. I’ll be showing the full process of how I will be making today’s game. There’s nothing fundamentally private regarding how I create it, and there is nothing fundamentally private about the game itself, so there should be no restrictions as to programming this first real game.
Rock, Paper, Scissors
Yep, the old classic Rock, Paper, Scissors game. You know the rules already, but I’ll just refresh you in case you get confused:
Rock smashes Scissors
Scissors cut Paper
Paper covers Rock
Winner holds the higher-powered item. Tie goes to nobody.
Game-Play: The player will be going up against a Computer, randomized between the 3 items. This will be text-based using Windows Form programming since that is what I am most comfortable with doing.
Scoring: This is just going to be a basic Win-Loss stat line.
Starting Up
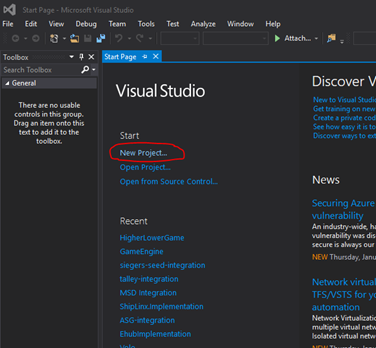
After starting Visual Studio, I get the Start Page where I select New Project from the Start list (as below, circled in red).
The next screen pops up, so I choose Visual C# for the Programming Language and Windows Form Application as the type of program that I will be creating. In the Name field towards the bottom, I entered RockPaperScissors (I don’t like trying to be clever because it makes programming difficult, especially when you need to debug a program for errors). Then I clicked the OK button to create the program.

After a short wait prompt, Visual Studio generates the behind-the-scenes components and the initial Form that we will be using. You can think of a Form as a canvas for the programmer’s visual style. Visual Studio allows you to use the Tools available and drag-and-drop them onto your Form. This is a very simple way to quickly generate the “game arena” so-to-speak. I won’t go over the process to drag-and-drop or even where the Tools are that will contain the Buttons and Labels that we will be using… sometimes they are in different places.

I know, it’s not that impressive now, but I’m going to create our visual interface (the “game board” if that makes more sense). So, now after I’ve performed my Magic Trick, you can see below what I came up with.
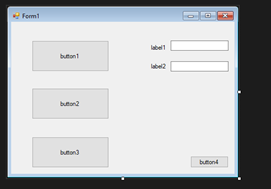
Nothing special to look at, but it will be functional once done. As you can see, I have not renamed “Form1” yet, nor have I added any text or names to the other components. I will show you how to rename “Form1” and this will be similar in nature to the other components, but first let me tell you what each component is:
A Button (same as those labeled “button2”, “button3” & “button4”. The names will not stay the same… they’re just used to protect the innocent. These are used to click and do things.

You guessed it, it’s a label. It’s use is simple, to label something.

Above is a Textbox. It’s used to show text… pretty self-expanatory.
Renaming and Cleaning up the Front
So, the process to rename a component (in almost all cases) is to, first, click the component (“Form1” in our below example) to select it.
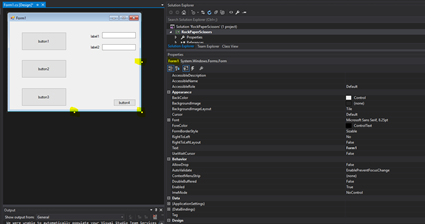
You can tell that it’s selected because the Properties section will show the name “Form1”; and you should see the white handle dots around the component that is selected. The Properties section is the most important part in setting the text and name for the components, since it makes it so much easier.
In the below image, you will see that I have scrolled down in the Properties list and have found the Name field. I have adjusted the Name to “RockPaperScissors”. The field is circled in red.
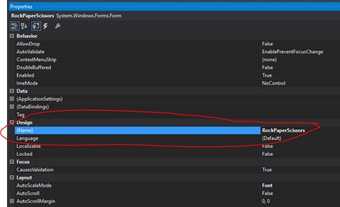
I then find the Text field and change what will display on the Form instead of “Form1”. I circled these in red so that they are very visible. Now it says “Rock, Paper, Scissors” so that someone playing knows what they are playing.
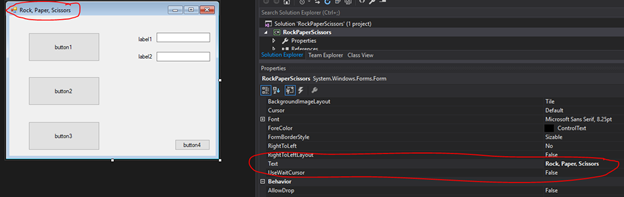
I am going to do the same thing to all of the other components, with more appropriate names and text (as is applicable… the Textboxes will remain blank).
Now you see these adjustments (at least the Text changes, that is) below.
Excellent!! That looks much nicer!
It doesn’t really do anything yet though, so now if I double-click the overall Form, it will autogenerate the behind-the-scenes code for the Form’s Load event. This will happen every time the application has to generate the “game area” the first time. This is what the “skeleton” code looks like just after you double-click the form.
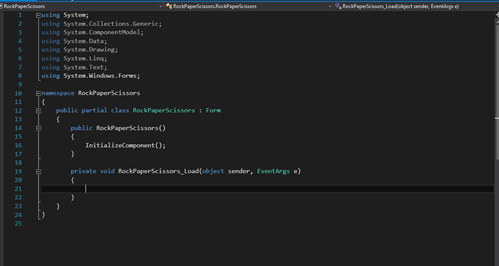
It’s pretty empty, I know, because we have not yet done anything to it. As you can see, there is a Function that was created called RockPaperScissors_Load (notice that the “RockPaperScissors” was the Name that we gave the form). This is common… it can be changed, but it’s a bit of a headache sometimes, so try to give your components a good name when you drop them onto the “game area”… that way when you double-click to activate their initial “Click” event (or Text-Changed event or whatnot) it will be easy to understand.
I like to start with the Load event for the overall Form as it makes it a bit easier to read. In this instance, you will see the private and void keywords for this function. As I’ve mentioned in previous posts, private essentially tells the program that this function can only be called from within the namespace.
A namespace is basically the container for the program (or a number of classes)… if you go deep into programming, you will probably wish to create separate class files that allow you to store libraries (groups) of classes (remember, a class is a container for common functionality). For now, though, just think of them as separate containers, some larger than others.
In addition, the Load event has 2 parameters in the “(object sender, EventArgs e)” that you won’t really need to understand. Honestly, with the object and EventArgs types of parameters you won’t have any need in your early work to use them… I rarely do. Parameters in general, though, are very important in your own custom Functions. I will explore those later in this Post.
Ok, so now I’m going to just dive head-first into this and finish the game. I’ll then come back and show you the finished product to explain what happens with all of it. Before I go further, though, I wanted to show you a great little feature of the Visual Studio platform.
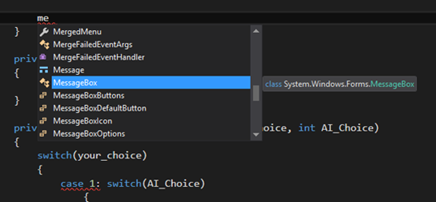
The above image shows an example of the Intellisense feature of Visual Studio. It allows the dotNet framework to predict your typing and suggest options… here I typed “me” and it already suggested the MessageBox option.
The Game in Session
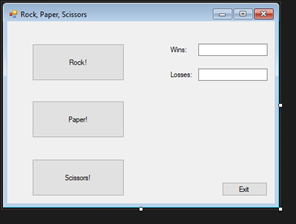
Before we see the Code I wanted to show you what the game looks like. I got a screen capture of the game after I had played several times (yeah, I have horrible luck); however, it shows that I chose “Rock!” and the Computer did as well… so it’s a tie.
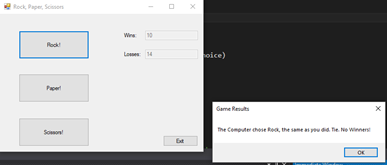
The game is as simple as clicking one of the options to see the result, then clicking the “OK” button in the “Game Results” pop-up message box. It’s quick and a fun little way to show how quick a game can be made if it doesn’t have a whole lot of bells-and-whistles or complex logic. It’s a great start for us! Now let’s see the Code itself…
The Code Review


Ok, let’s go through each section slowly…
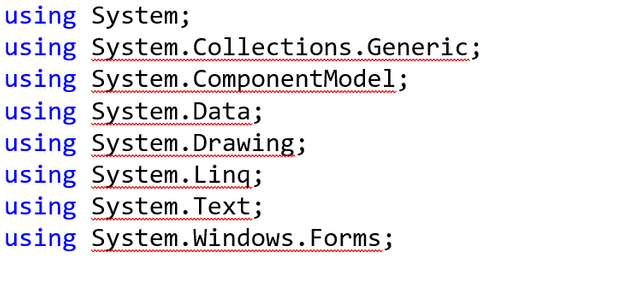
Above is the header section that shows what references will be used during the program. All of these, in this instance, were auto-generated.
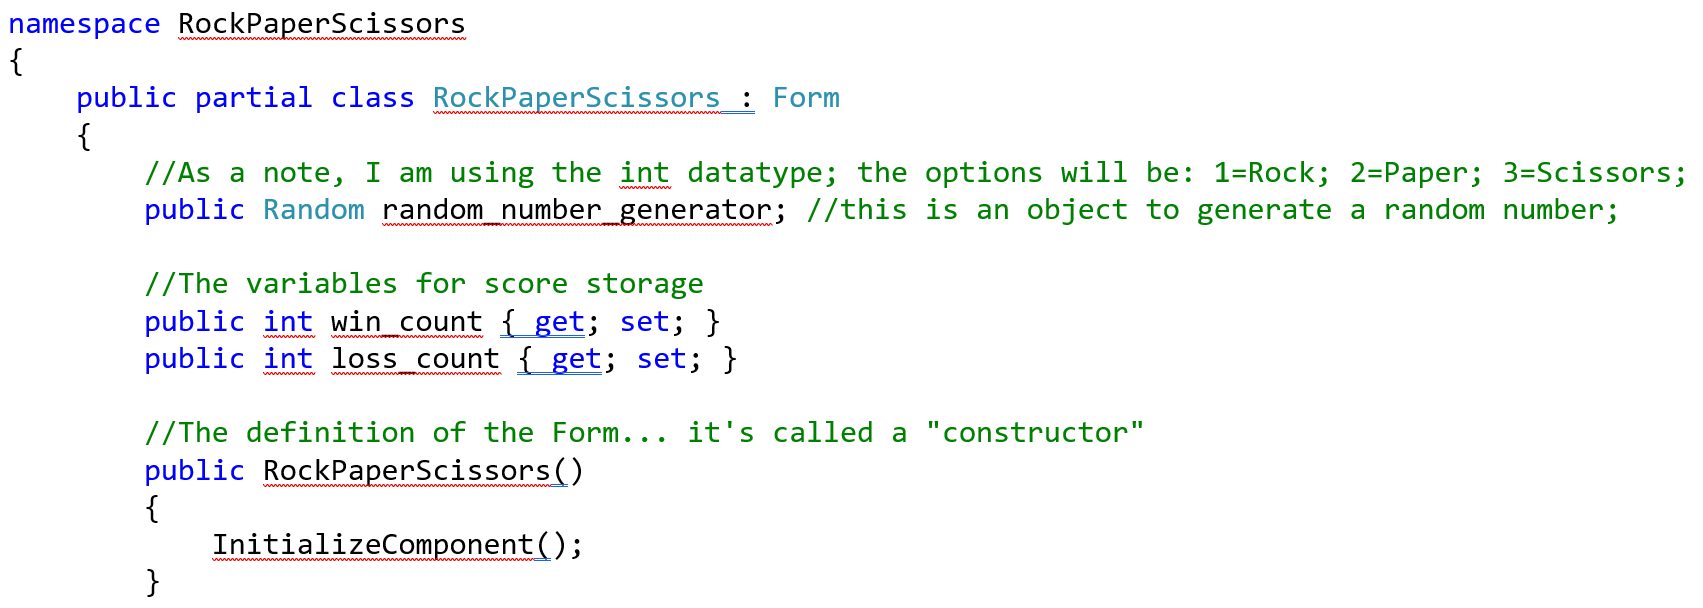
This section is basically where the code sets itself up. The namespace is the “master container” that says that everything else is based within its hierarchy. This is where we have the basic variable set-ups. “{ get; set; }” is something that is called an accessor and basically just says “you can pull the information from this variable or set the variable with new information”. It’s a bit out of the scope of this lesson, so I won’t be discussing it here.
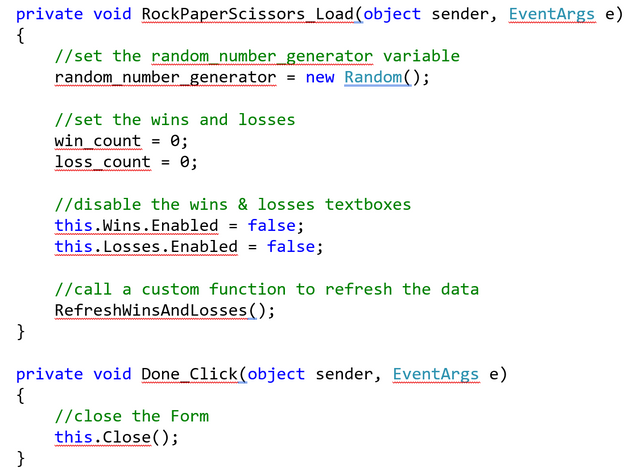
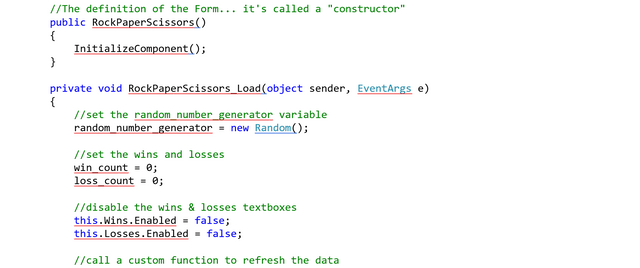
So, the above segment of code starts with the Load event of the game. In the Load event, we initialize the random_number_generator variable by calling setting it to “new Random();)” which is like saying “this variable needs to be set to a new Random object”. This means that, afterwards, we can use random_number_generator as its own object with its own functions and such.
After that, we set the win_count and loss_count variables to zero. Then we find the 2 textboxes that correspond to the number of wins & losses (“Wins” & “Losses”) and use the functions of the textbox. The .Enabled segment that you can see is a property of the Textbox object… I then set it to “false” so that it disables both of those textboxes.
Lastly, I call a custom function called “RefreshWinsAndLosses()”. The empty parentheses indicate that there are no parameters that need to be passed on to the function. You will see this function later on down in this Tutorial.
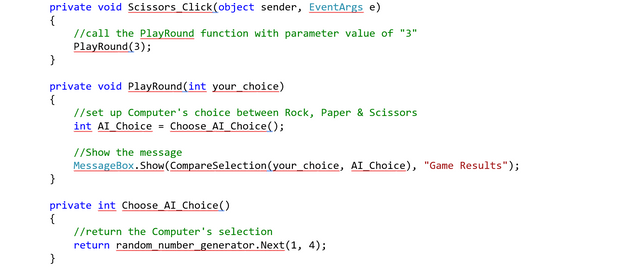
The “Done_Click” function is an event that happens when you click the “Done” button (the one with “Exit” as the text). The function just closes the current (this) form; and since there is only the single form, it closes the entire application.
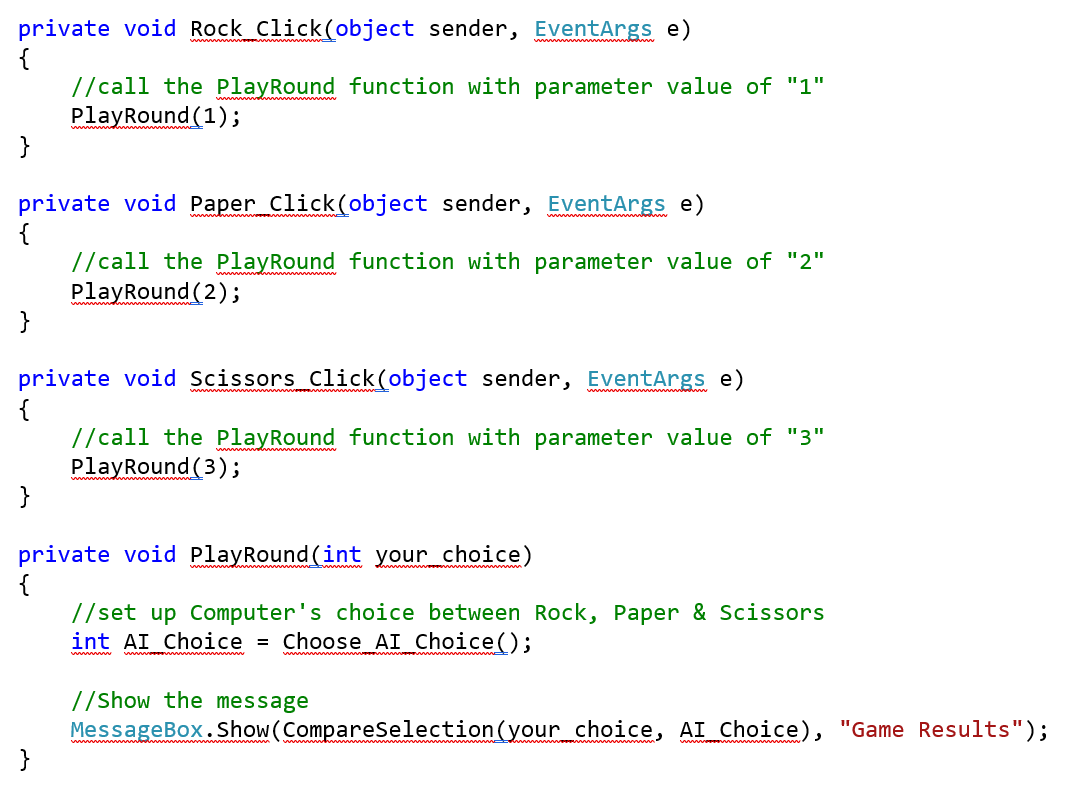
The next segment, shown just above, is repetitious. It should be pretty easy to pick up. The “Rock_Click”, “Paper_Click” & “Scissors_Click” functions does one thing when the corresponding Button (“Rock”, “Paper” & “Scissors”). All it does is call the “PlayRound” custom function, passing in a parameter to indicate which integer-based choice (1=Rock, 2=Paper & 3=Scissors) the Player selects.
Finally, the “PlayRound(int your_choice)” function does just a few things. First, it sets a variable called “AI_Choice” to the returned result of the “Choose_AI_Choice”. After that, the program shows a MessageBox (basically a pop-up box) with parameters, the first is the text inside the pop-up box and the second is the caption of the pop-up box. Here, the caption will read “Game Results” while the text inside is returned from the “CompareSelection(your_choice, AI_Choice)” custom function. The passed-in parameters are the “your_choice” variable, which is the integer value passed in from the original function call, and the “AI_Choice” variable, which is the integer value returned from the “Choose_AI_Choice()” function call.
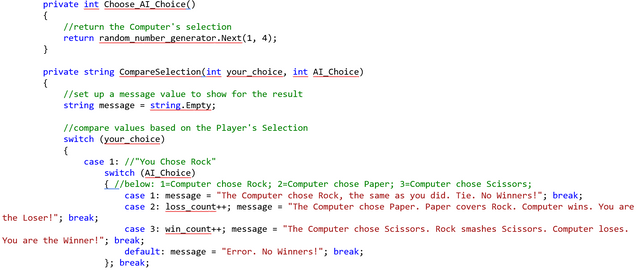

Ok, so now it’s the 3 remaining custom functions. I will describe each of the basic functions here.

The “Choose_AI_Choice()” custom function is pretty simple at its core, so just watch and learn. It takes no parameters which is shown by the empty parentheses. The function called by the .Next(1, 4) segment is a baked-in function of the Random object (“random_number_generator” is an object of datatype Random). Essentially it says “create a random integer between 1 and 4, not including 4”. Seems like it should be “(1, 3)” but the baked-in function relies on the second parameter of the (minimum, maximum) format to be 1 more than the maximum to generate.
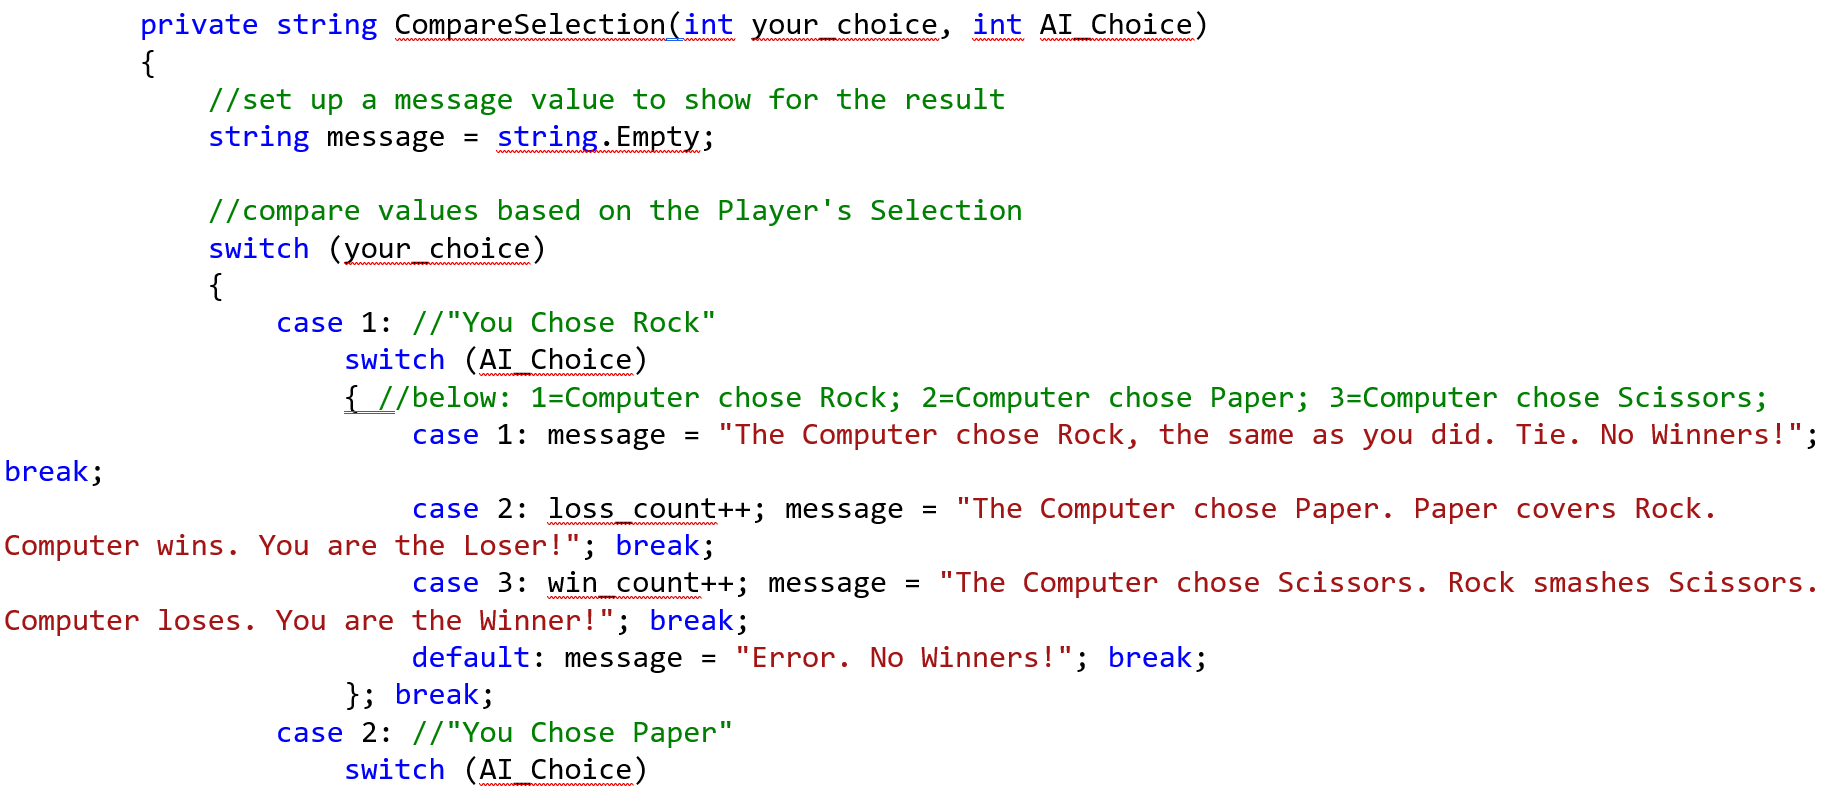
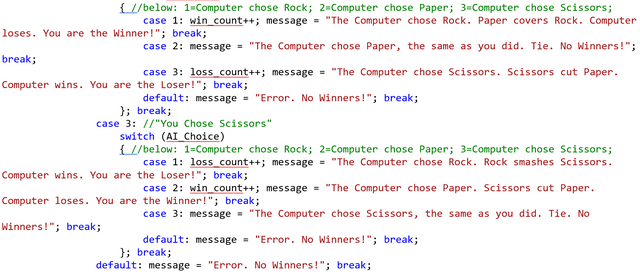
Then there is the “CompareSelection(int your_choice, int AI_Choice)” custom function that basically does all the comparison logic. If you read it I would hope that you can understand it, otherwise this post could become extremely bloated and extra-long.
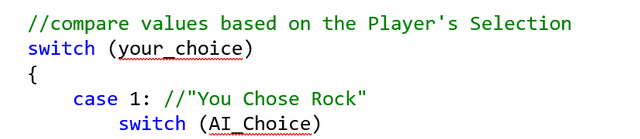
Just above is the basic format of the switch command. The format is “switch (variable)” and tells us “let’s find the values of the (variable) and check each one to see which logic to use. Inside the switch command you use the case statement to define each option. In the above example, it says “let’s take 1 as the option to check” then the colon defines what to do if the value matches what the “your_choice” value offers. Each case statement ends when you see the break; command. If the value doesn’t match, it falls through to the next case... if you exclude the break; it does every option that matches (if multiple options correspond).
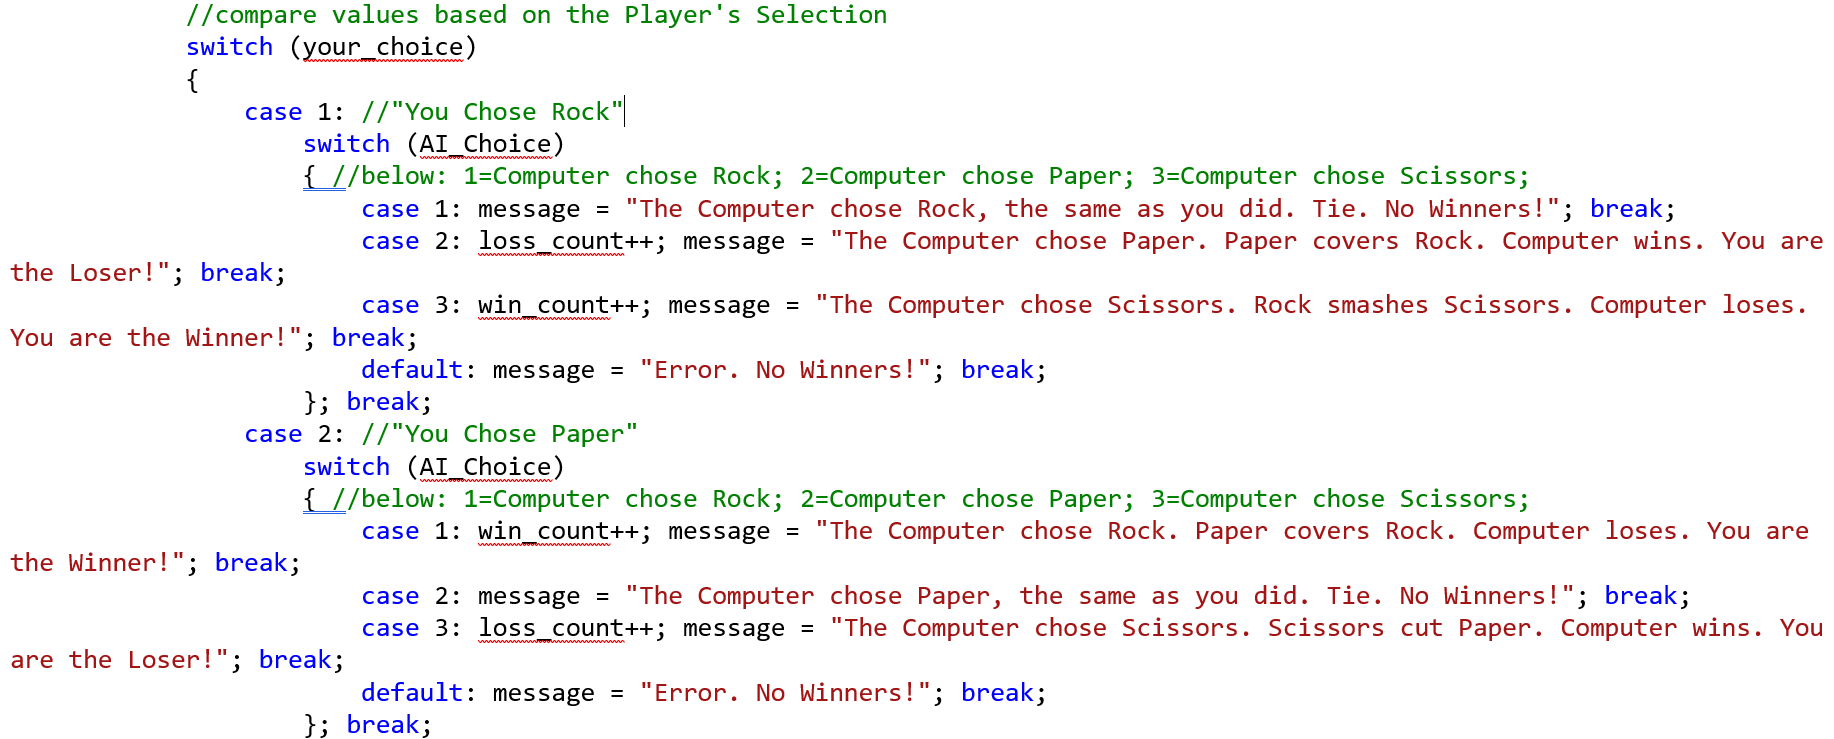
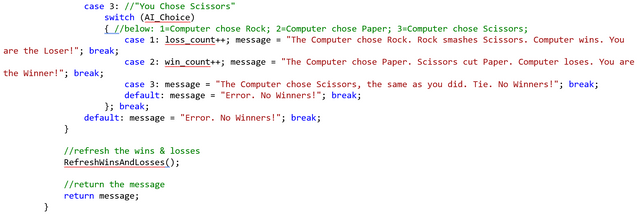
So, the logic says “if the player chooses Rock! (1) and the Computer chooses Rock! (1) then set the “message” variable to “The Computer chose Rock, the same as you did. Tie. No Winners!” then it breaks out of the switch statement. The other comparisons are below that and then the default statement occurs IF by some chance none of the options apply, which they shouldn’t.
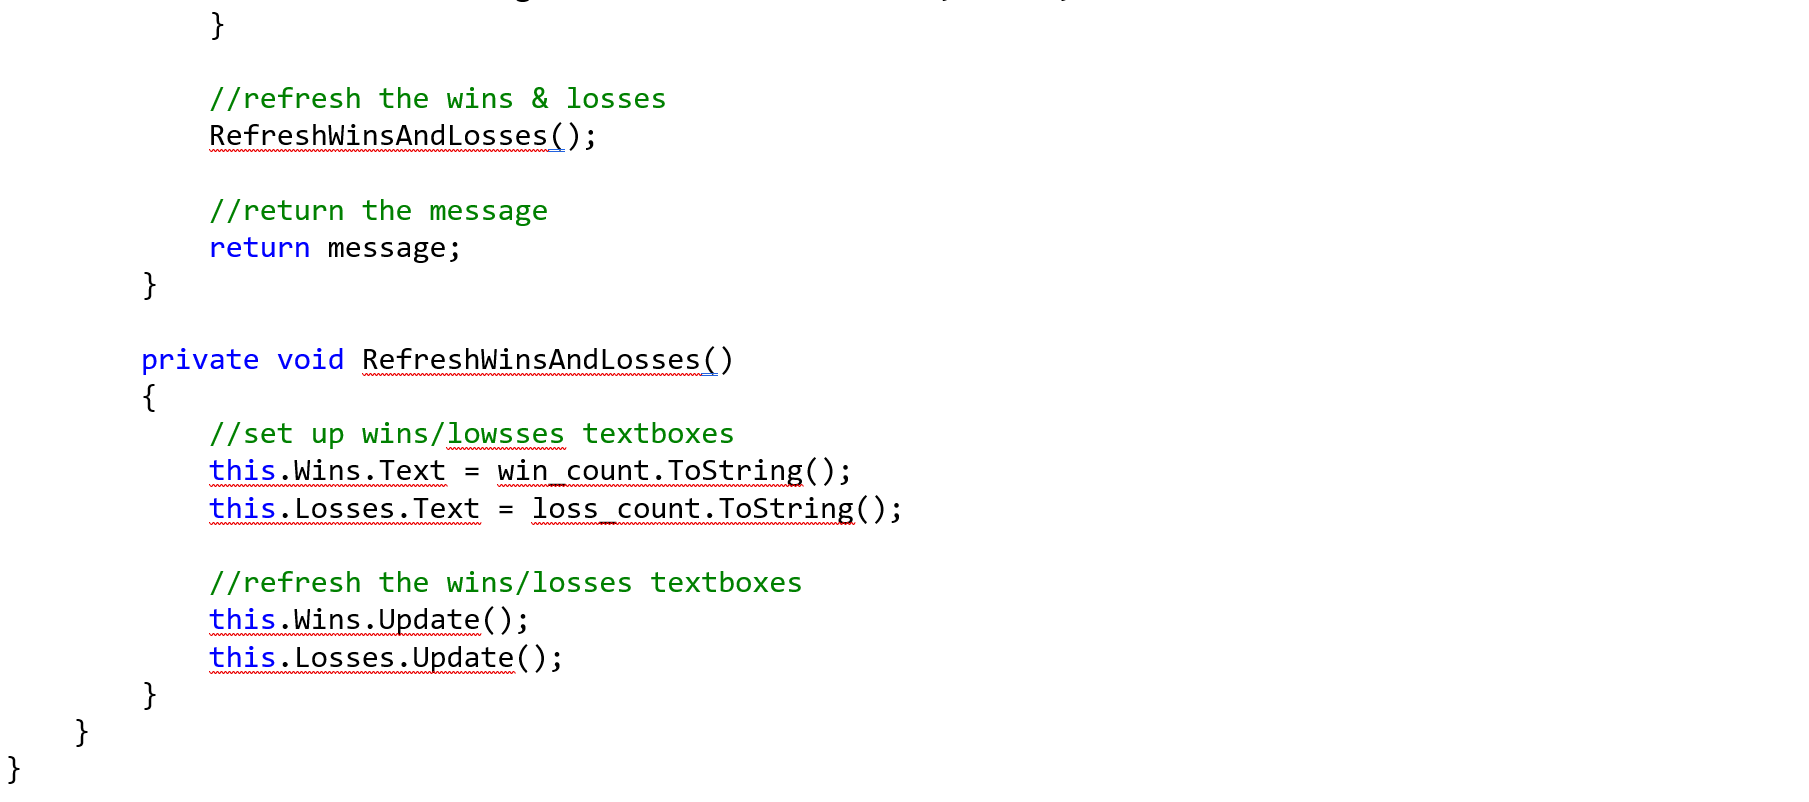
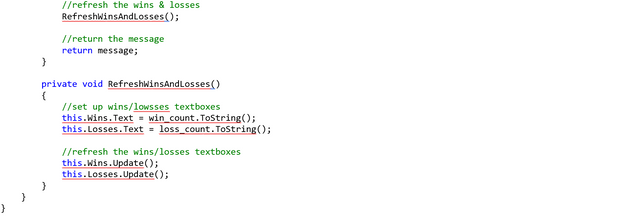
After the comparisons are made, then the function calls the “RefreshWinsAndLosses();” custom function and then returns the “message” variable to the code that called this function.
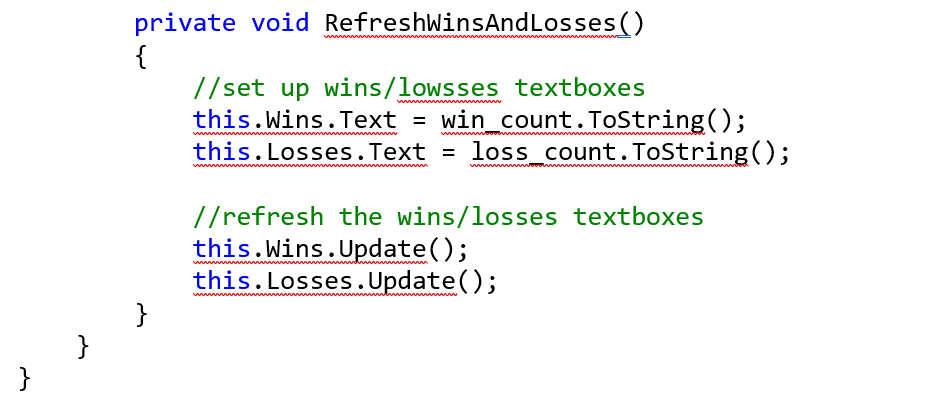
To finish out all of the code for the program you see the “RefreshWinsAndLosses()” custom function that passes in no parameters. The logic does 4 things: it sets the “Wins” and “Losses” Textbox values to the “win_count” variable’s value; and it calls the Update() segment extension. The .Text segment is the property for the Textbox that holds the actual text. The .ToString() segment extension function to the “win_count” and “loss_count” integer variables says to convert the numeric value to a text version. This makes it compatible with what can be shown in the Textbox. The .Update() segment extension function tells the form to refresh the data and update the visuals of the Textbox components.
Whew… and there we have it! That is the end of the logic and the code! I hope you could follow it and had a little fun learning!
I know it’s not the most fun, but it’s a pretty nifty little Game that you can make yourself with an IDE.
Thanks for Following, Upvoting, Resteeming, and all the other great things you do!!!
Here are the Previous Posts in this Tutorial Series:
C# Programming Beginner Tutorial: Basic Concepts and Ideas
C# Programming Beginner Tutorial: A First look at actual code using D&D as the Project
C# Programming Beginner Tutorial: Variables & Data Types to Fuel the Gaming Engine!
C# Programming Beginner Tutorial: Designing the Game with Programming Logic in Mind (Part 1)
C# Programming Beginner Tutorial: Designing the Game with Programming Logic in Mind (Part 2)
C-Sharp Programming Beginner Tutorial: Designing the Game with Programming Logic in Mind (Part 4)
I'm also developing a project in the C#.Net and I just want to ask you about a good platform where I can store big data and information.
I ask many programmers and many have recommend me to use MONGODB as the database
Do you happen to have knowledge about using the mongodb and c#.net
Response with this will much be appreciated/. Thank you
I’ve looked at MongoDB some have had it recommended to me as well for a free DB option, but I haven’t really used it much. I think I had trouble installing it so I became frustrated with it. I use MS SQL Server for work and am used to it.
As for integrating it into your project, once you choose one the biggest challenge is just finding the correct connection string and figuring out the query/datatype requirements (eg. some require quotes around table names in queries while others use square brackets).
I hope that helps to some degree.
really ?? as of now I'm into using the MongoDB and now I successfully established the connection to my C# application and MongoDB. Also I can save string data to the database. I am now working on saving files such as images, videos and installers ;) get back on you when I succeed :)
That's great! I use SQL Server because I'm used to most; however, the integration components that I write for my clients often involve connecting to different DBs, so it's not really too different.
I'm glad you figured out the connection... once you do that then you're on your way.
I also have a Beginner's SQL Tutorial series that you can look for (look for tag "sql-forbeginners" and find the the URLs for the earliest ones).
It sounds as though you've done quite a bit already with both C# and querying possibly.
yes and I was really happy with my progress.
I'll take note of your tag it also will help me a lot for querying :) thanks
cheers :)
You're quite welcome!
Hi Sir :) this is the link of my discussion :)
Would you please give a minute in reading my discussion ??
Thank you :)
Advance C# Programming with MongoDB
owwww another thing also, I find that MOngoDB dont rely on datatypes :) and I find it very good in keeping the performance of my system. large files was divided into several chunks/packets to ensure the performance :)
I wonder if it works quicker than SQL Server. I'll need to look back into MongoDB to see if that's the case.
hmmm I think when it comes to retrieving large data it was somehow the same but if finding that data is the topic I think mongodb will be more faster. I think its because in sql server I tend to save/stored files in a single table unlike in mongodb that I chop the file for better filtering :)
but I think I can also make it like that way in sql server. Ill give it a try after I finish my current project
Sounds like an interesting project. Maybe you should detail your findings in a Post.
Hi Sir :) this is the link of my discussion :)
Would you please give a minute in reading my discussion ??
Thank you :)
Advance C# Programming with MongoDB
Looks terrific. I'll read it more thoroughly later on when I'm not at work, lol.
yes Sir @dbzfan4while I'll make a post about combining MongoDB and C#.Net once I fully understand it to help others :)
Thanks for upvoting my comments, it really means a lot for me :)
You've had some very thought-provoking comments, and I like to reward good stuff.
DISCLAIMER: dropahead Curation Team does not necessarily share opinions expressed in this article, but find author's effort and/or contribution deserves better reward and visibility.
to maximize your curation rewards!
with SteemConnect
Do the above and we'll have more STEEM POWER to give YOU bigger rewards next time!
News from dropahead: How to give back to the dropahead Project in 15 seconds or less
Quality review from the dropahead Curation Team According to our quality standards(1), your publication has reached an score of 73%.
There are many details that can be improved. Baby steps!
(1) dropahead Witness' quality standards: - Graphic relation to the text (Choice of images according to the text)
- Order and coherence
- Style and uniqueness (Personal sence, logic, complexity, understanding, what makes it interesting for the reader)
amazing ,i program in c# and i love develop software . i liked this post.thanks for upvote.
You're quite welcome and I hope this is a sensible solution to training people in C#.
We already know that you are a very useful and good teacher.Thank you very much.thanks for upvote and resteem
Thank you for being such good people!
Thanks for you sir.
You're quite welcome.
If you continue writing these, I'll have no excuse whatsoever not to start learning programming.
me too, i need to commit them to memory!
Do you find that you can follow the lessons? I'm trying to make sure these are accessible and understandable to a wide audience of readers.
So cool nice one
My plan is, hopefully, to continue this for the next year if I am able to do so. I'd be more than happy to see you following my posts!! Thanks so much!
Good post, i love c#, work in it
Awesome! If you have any suggestions or would like to share your thoughts on my post, that would be great!
I like how to explain
amazing ,i program in c# and i love develop software . i liked this post
Great to hear! Did you think it was overly complex for a newer programmer? Mind that I also have other prior Tutorial Posts for it.
At the beginning it was complicated, but the effort manages to understand,
like this post I am motivated to publish some programming review my post
first_program_in_java
And I just re-read it and against what I had seen before I posted it, the markdown didn’t work as I had seen it work. I am going to try and fix that if I am able to do so.
but that's why it's an excellent post, I'll read you more often
That makes me feel good. Thanks.
Thanks for giving the chance to enjoy this beautiful news!!
You are quite welcome!
Thank you for this. I am only at the very beginning of my programming education, but i will try to follow along as best I can. Very eager to learn Computer Programming. This is the year.
I also have other Posts prior to this one that you should read. That just made me realize another thing I must add: the links to those previous posts! Come back after while and look at this post again to see it differently and to see the previous posts for you to start with.
Thank you for your reply. I will check this post and your others regularly.
That is a nice thing to say. Thanks.
We already know that you are a very useful and good teacher.Thank you very much
I appreciate the the praise! Thanks!