Steps 13 to 19 to Prepare an Ubuntu Linux Server to be a Witness for Steem!

How do we prepare to launch our Steem witness on Ubuntu Linux inside a secure server? I hope this tutorial when combined with the others I have written will show the exact steps needed to block most hackers from gaining access to any Ubuntu Linux server and make starting a Steem witness easier. Here is a list of the pervious tutorials in this series in the order of recommended reading. This tutorial is should ideally be read after reading the first, second, and third posts in this series.
- Steem Witness Basic Training at https://steemit.com/witness-category/@jerrybanfield/steem-witness-basic-training explains the basic of what a witness is and an overview of all the steps needed to participate.
- Launch a Steem Witness Today at https://steemit.com/witness-category/@jerrybanfield/launch-a-steem-witness-today shows where I started getting my witness online and provides further reading from others.
- 12 Steps to Secure a New Ubuntu Linux Server at https://steemit.com/witness-category/@jerrybanfield/12-steps-to-secure-a-new-ubuntu-linux-server shows a deep look inside the steps to follow to secure a new Ubuntu Linux server. The post you are reading now is part 2 of this post.
- Get a Steem Witness + Seed Online Today with These Ubuntu Linux Commands at https://steemit.com/witness/@jerrybanfield/get-a-steem-witness-seed-online-today-with-these-ubuntu-linux-commands shows the complete list of commands to get a witness running from zero. This guide is much easier to follow after reading the more in depth security tutorials first.
- Our Top 20 Witnesses Earn 250 Steem Power A Day at https://steemit.com/witness/@jerrybanfield/our-top-20-witnesses-earn-250-steem-power-a-day describes the earnings possible for reaching a top 20 witness position.
- How to Start Getting Steem Witness Votes at https://steemit.com/witness-category/@jerrybanfield/how-to-start-getting-steem-witness-votes provides tips on getting the first few votes
- Steem Secret #7: Appropriate Methods to Ask for Votes gives more tips on getting witness votes at https://steemit.com/steemsecrets/@jerrybanfield/steem-secret-7-appropriate-methods-to-ask-for-votes
Secure an Ubuntu Linux Server Against Hackers - Part 2
This security tutorial was not completed in my previous post and here you will find seven more steps that you must implement as well. I will also share with you how a little mistake I made locked me out of my server, which was very humbling, and I will provide solutions to protect yourself from being locked out of your own server.
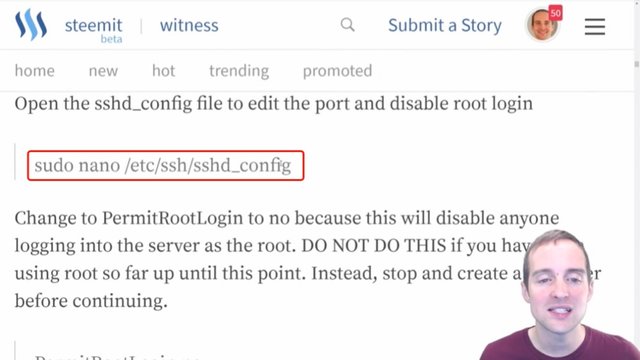
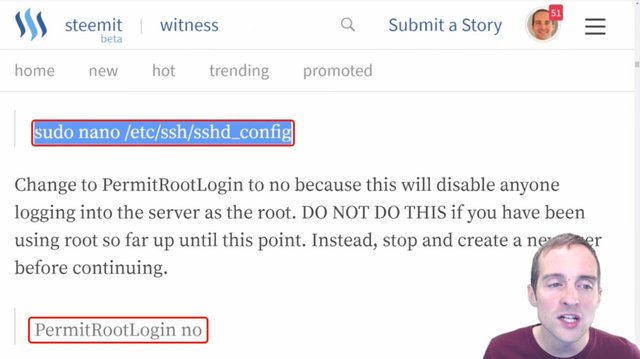
Step thirteen: Updating sshd_config with Nano to PermitRootLogin no.
The next thing we want to do with our server is make it much more difficult for anyone to get into it, that happens to locate the IP or happens to locate the server some other way.
There are two basic steps we want to take to do that.
We want to disable root login so that you can't just put in essentially root@myipaddress and try to brute-force the password to get in. The other thing we want to do is obscure the port by changing to a different number.
Now, some comments I've seen on my previous posts have said, "Well, security by obscurity is not really any security at all," and I will respond with a simple example.
If I've hidden a pot of gold somewhere and you know the exact house to look, that's going to make it much easier for you to find the pot of gold. If I hide a pot of gold and you only know the city it's in, you're going to have to do a whole lot more work to narrow down and find exactly which house it's at.
That leads to two basic security steps right here.
One, I will disable root login following these commands by editing the "sshd_config" file.
Then the other thing I'm going to do is change the port to sign in.
Now, one critical thing here is to make sure I keep that port in mind because when I change the new port number to something else, I will not be able to sign in on that old port. It will make it a little bit more difficult to find exactly which port to log in.
Right now on my server, you could just go to the default port, hit the root button and start trying to brute force the password. With the long and secure password I have, that probably wouldn't work very well, but you could theoretically sit there and use programs and just try to brute force the password.
With this setup, it will make it much more difficult for any hacker to even know where to start and often just not even making it obvious where to start makes it a lot less likely to have any further problems from there, which is why I suggest doing this right away.
What I'm doing, I'm reading these commands straight off my guide on Steemit from the tutorial I've already done.
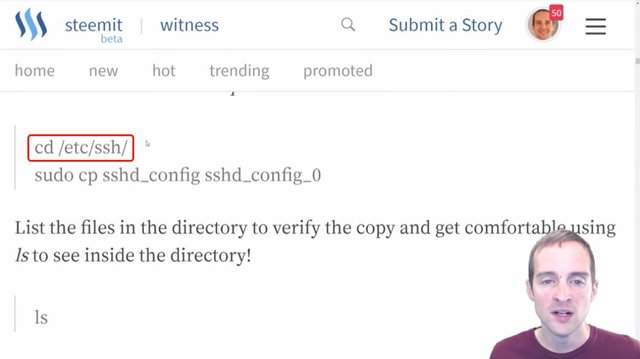
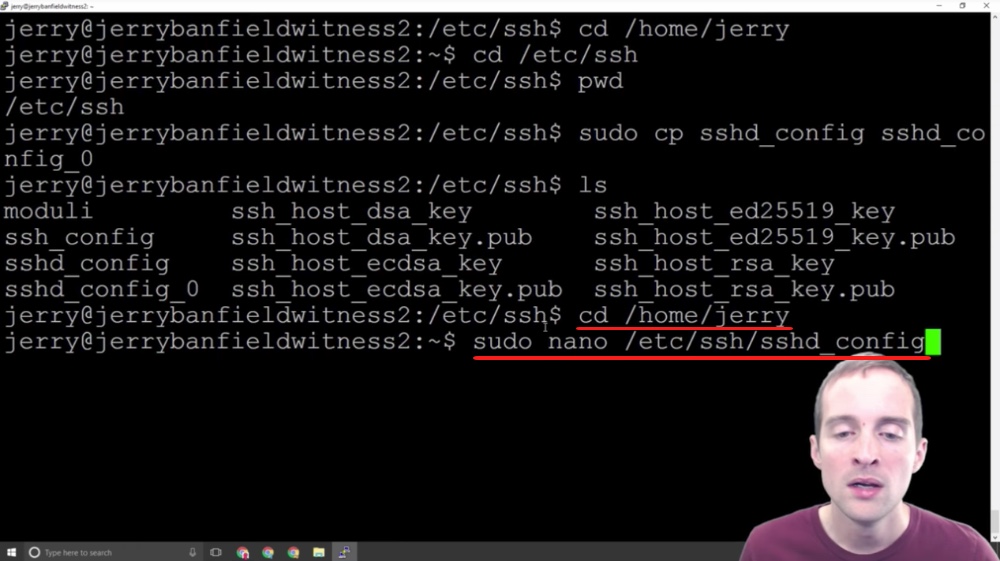
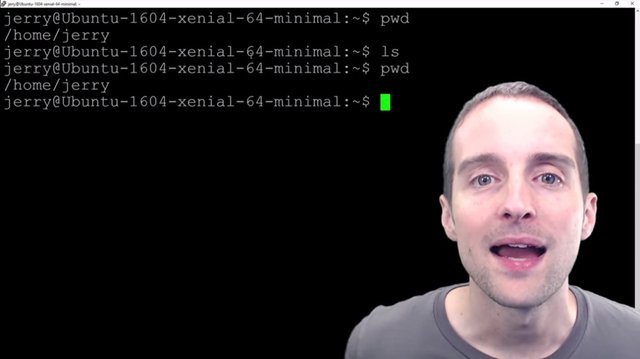
After we've got Nano, the first thing to do this is to change directory to etc/ssh/.
I need to be on the root directory for that. I "cd" back to the main and "ls" so you can see now that there's a blue list over here that says "etc" and then I can just "cd etc" one at a time into that.
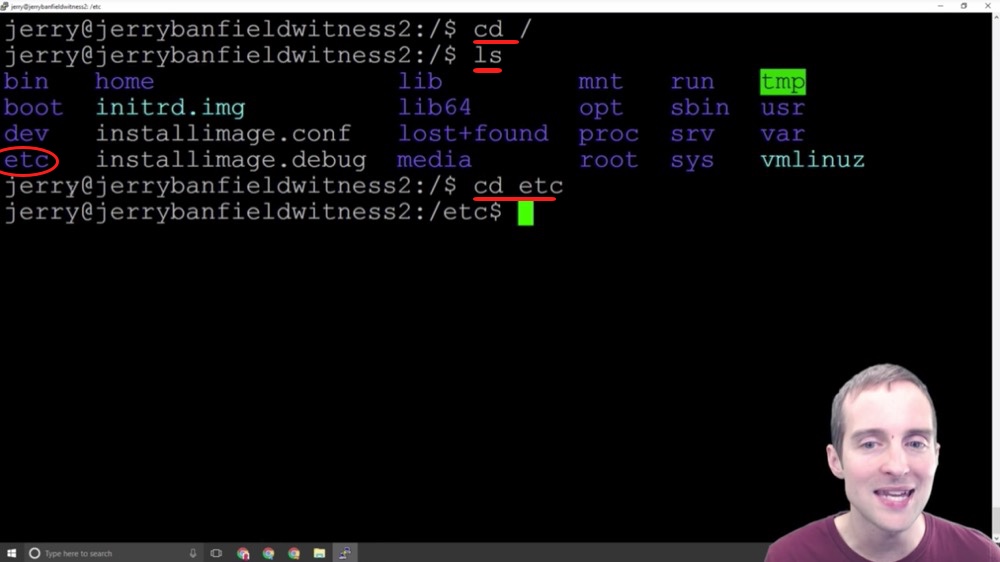
Then I can list, and you can see that there are all kinds of different files in the etc directory.
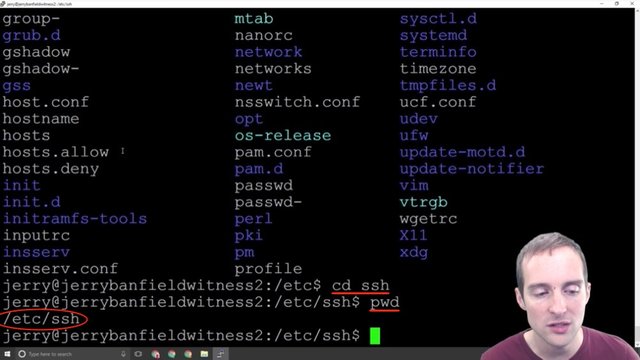
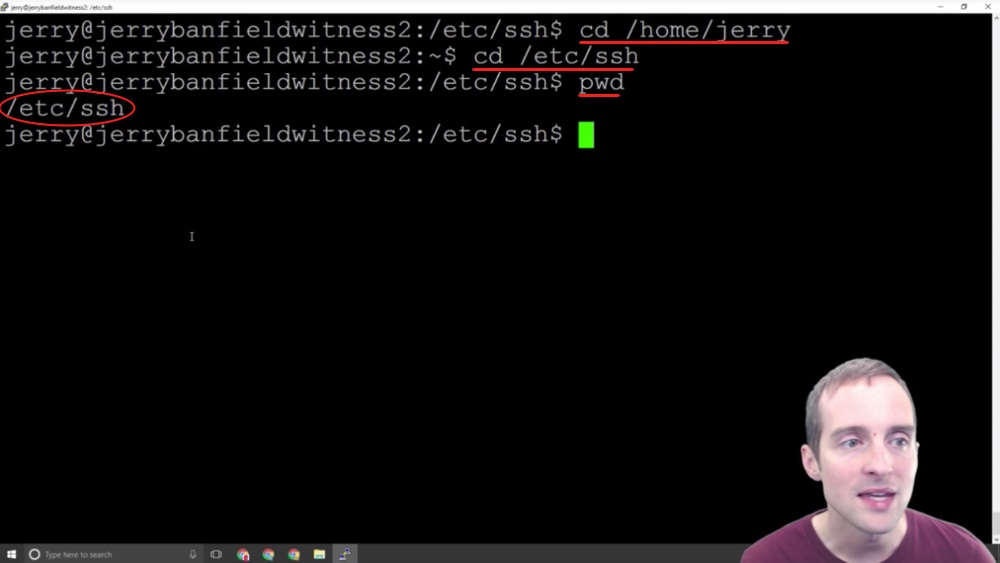
Now, what I want to do after is "cd" again into "ssh" and if I "pwd" you can see where I am at.
Now, let's say I'm in my user directory. I can just change directly into this by going to "etc/ssh" and that put me straight in the directory that way.
I use the command "cd /etc/ssh".
Now, the next thing I'm going to do is use the "cp" command under "sudo".
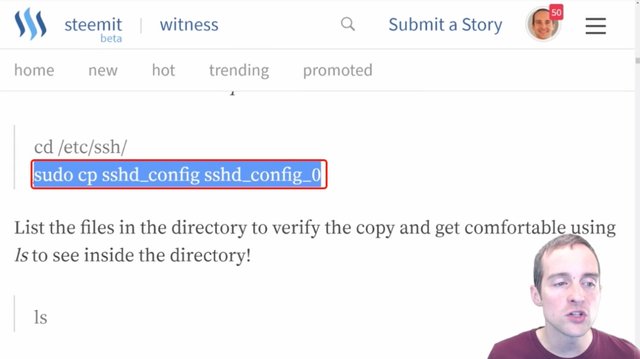
The command "cp" is going to copy the file I want to modify into another file, which will essentially be a backup file.
When I "ls" from here I can see that I have two files: "sshd_config" and "sshd_config_0".
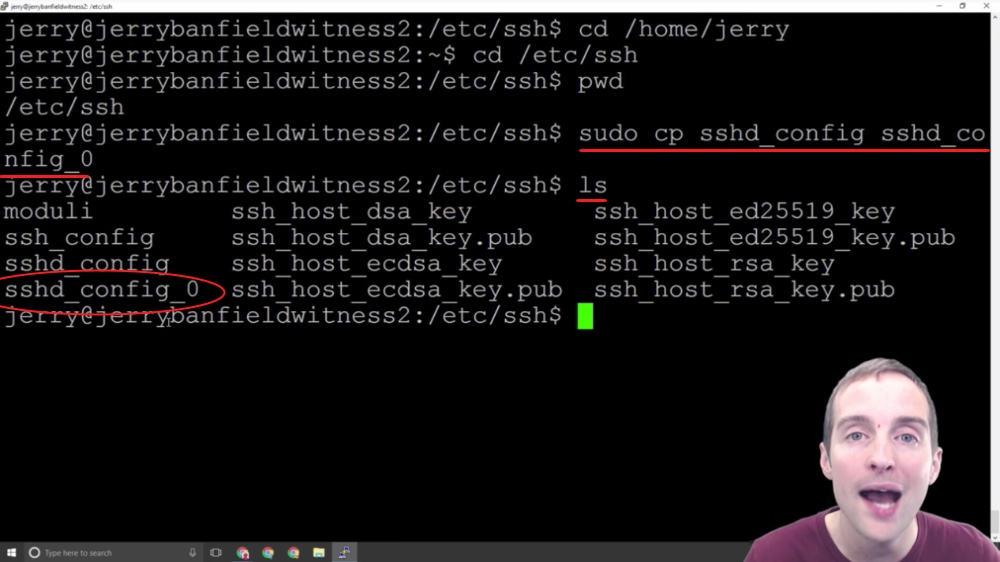
Now, this essentially gives me a duplicate copy of the original file I'm going to modify. This way if for some reason I mess the file up and I don't know where to start, as a new user the "cp" command is a good idea to just copy into a backup file. That way, if you're in there and you mess everything up, you don't know what you did, all you need to do is essentially delete the file and rename the other one to "sshd_config" and it will be okay.
This gives essentially a built-in backup, which I haven't had to use so far. It's just good peace of mind. This is for beginners, if you're advanced you're probably not reading this and don't need to take the extra time to make all these file copies.
After I listed to verify the files in there, then the next thing I want to do now is to use the command "sudo nano /etc/ssh/sshd_config".
I can do this straight from "home/jerry".
I can go back to my root directory if I want to and I can run this exact command from anywhere. I can run this "sudo ssh" and this will pull the file open from anywhere.
I hit CTRL + X to exit.
Or if you're already in the directory /ssh all you need to do is use the command "sudo nano sshd_config" and this will do the same thing.
I'm showing you these different ways to navigate because one of the key skills to get started with is to be comfortable navigating from place to place in the interface.
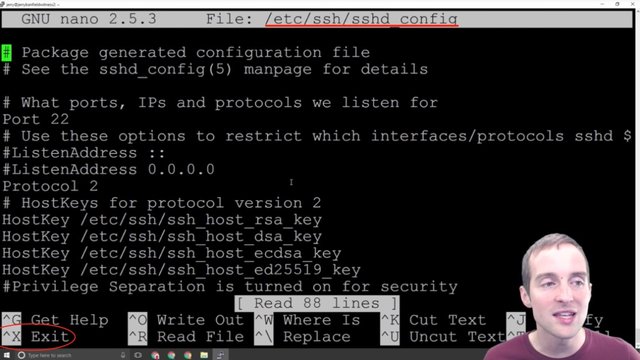
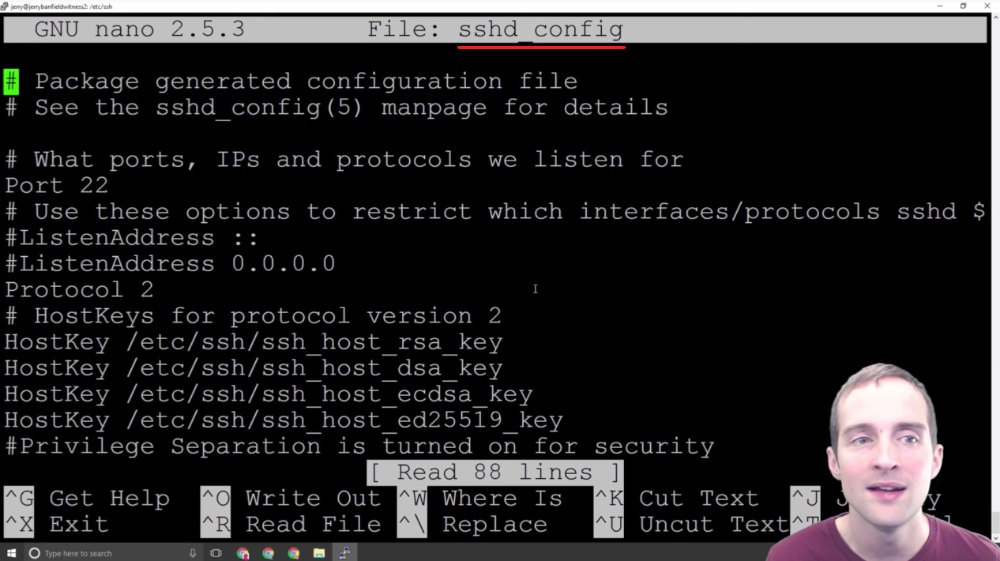
Now that we are in this interface there are two different things I want to change and notice that these # signs indicate a commented outline. The only things that are actually working in here are things that are not commented out.
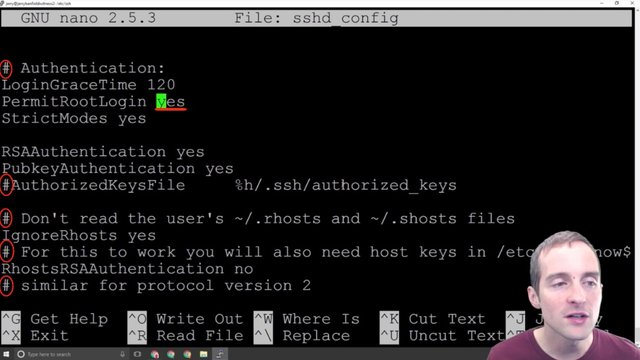
There are two basic things we want to change in here and the commented outlines are just helpful for explanations. What I want to do is focus on these two things.
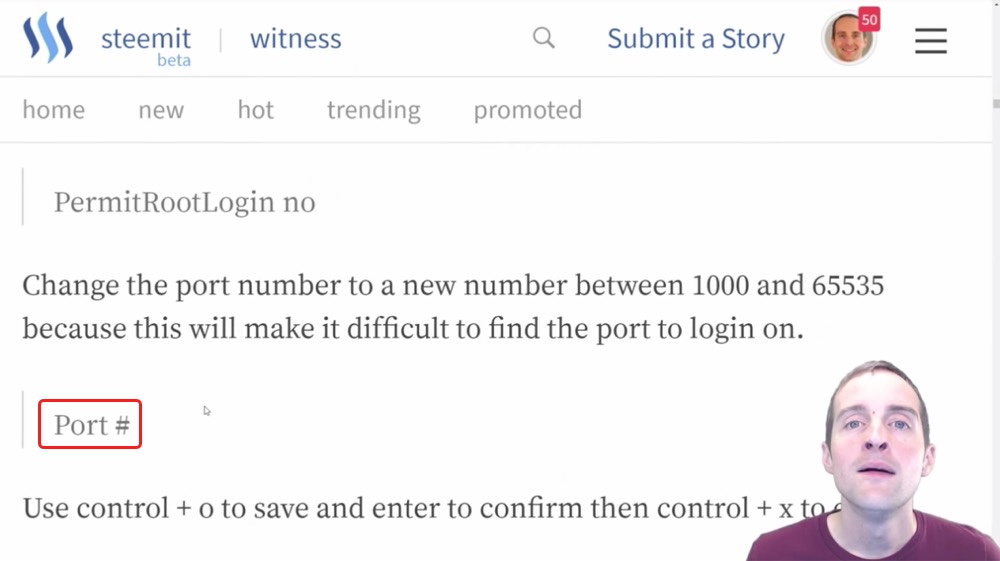
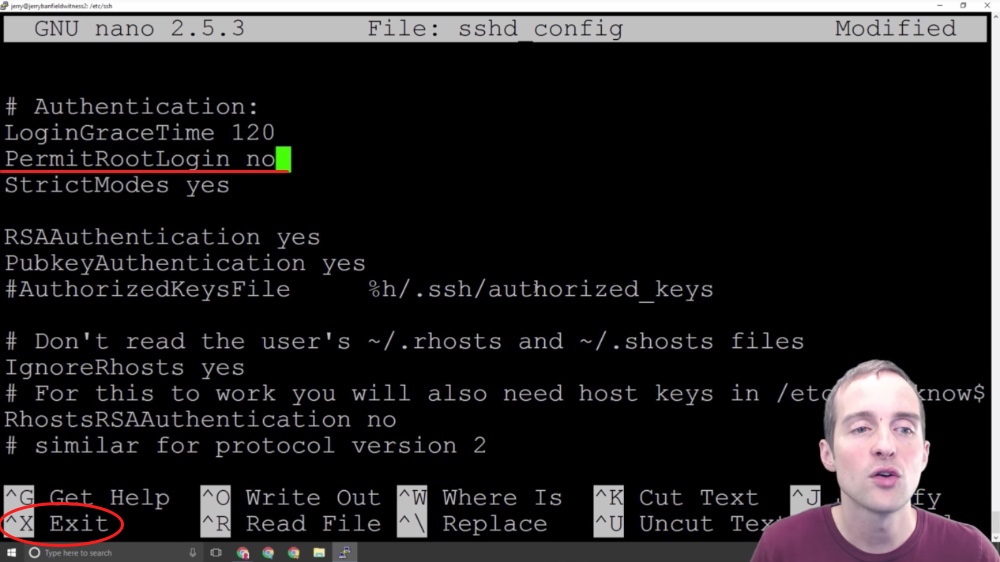
First, I want to change root login to no. Setting "PermitRootLogin" to "no" will not allow sign-ins directly from the root address anymore.
This is very helpful because I would imagine there are tons of server setup by beginners that just have root login allowed, and then it's very easy from a hacking point of view to just go after the root login, brute force the password, and then you're into the server.
The first basic thing we can do is turn the root login off. This will disable the ability to come into the server by a root login. I can now save this, so I hit CTRL + X to exit, and it gives me the choice between Yes, No or Cancel.

If I hit No it will leave the file restored to its original format and if I hit Yes, which I do, it will save my changes. Cancel would allow me to go back in and make more edits.
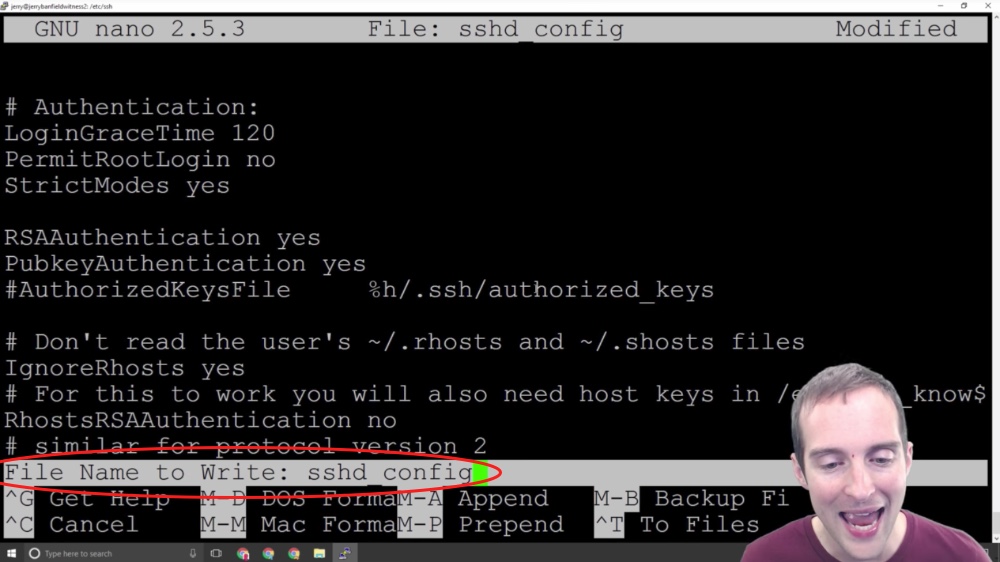
Now, I just hit enter to save the same name. That file has now been modified so that if I go back into it, the port is still the same, but root login has been changed to "no."
Once my root login has been changed to "no" it's a very good idea to try to sign in with the root login to make sure it's actually disabled.
Now, it's important before this that you've done each step I shared about earlier, make sure that you can sign in with your username and that it has proper permissions because if you haven't done this, you can be locked out of your server.
The final thing you need to do is restart the service to make this change valid.
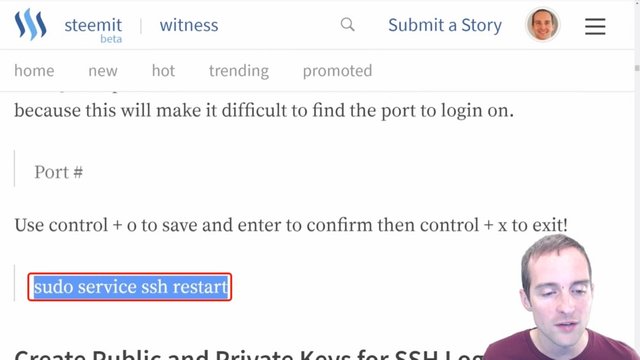
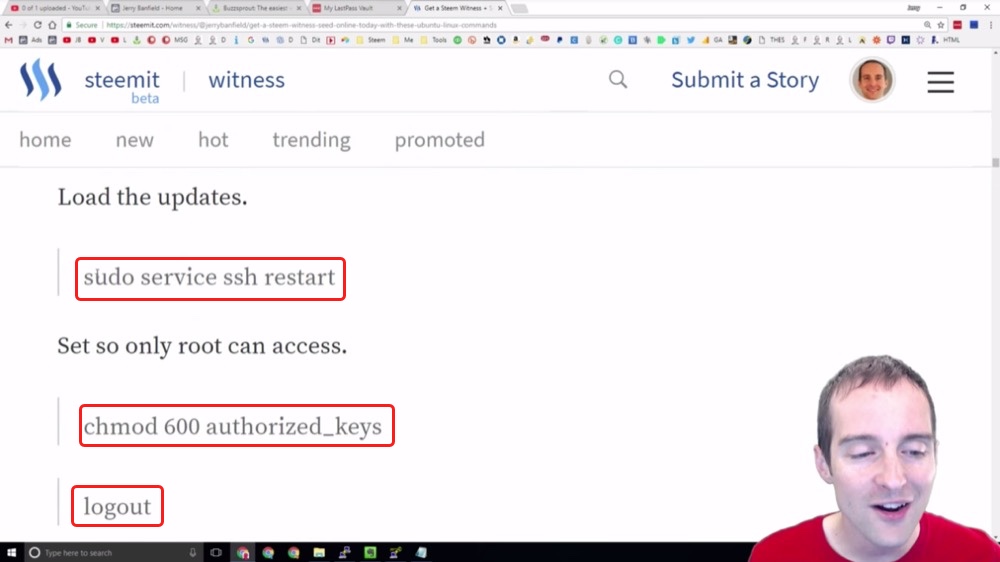
I paste this in here "sudo service ssh restart" and that restarts the service.
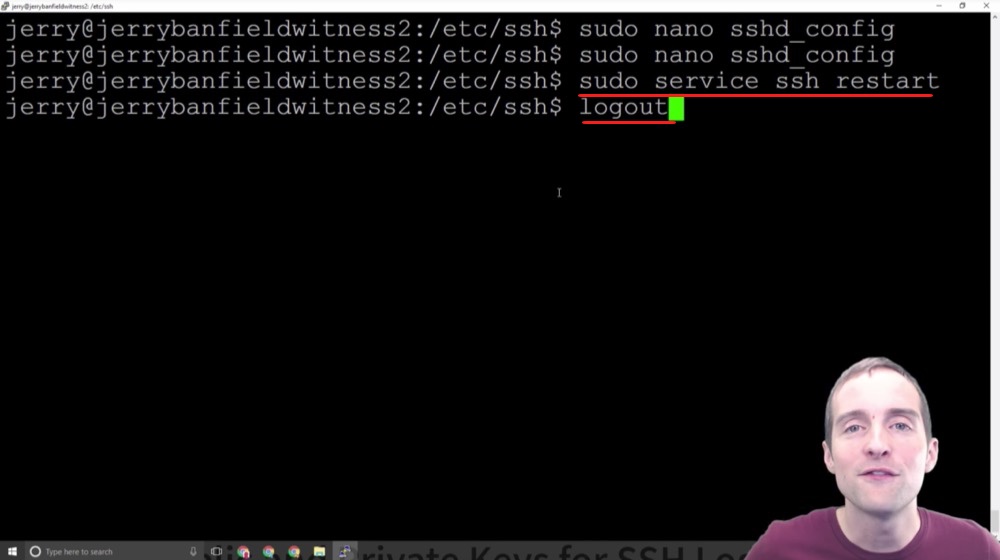
Now, if you go fool around and log out from here and your user doesn't have correct permissions, if you do this wrong you're locked out of your server at this point again, but if you can run "sudo" then you should have given yourself the right permissions.
I encourage to just make sure that everything's working, so I will sign back in and sign out, and then show how I change the port in Nano.
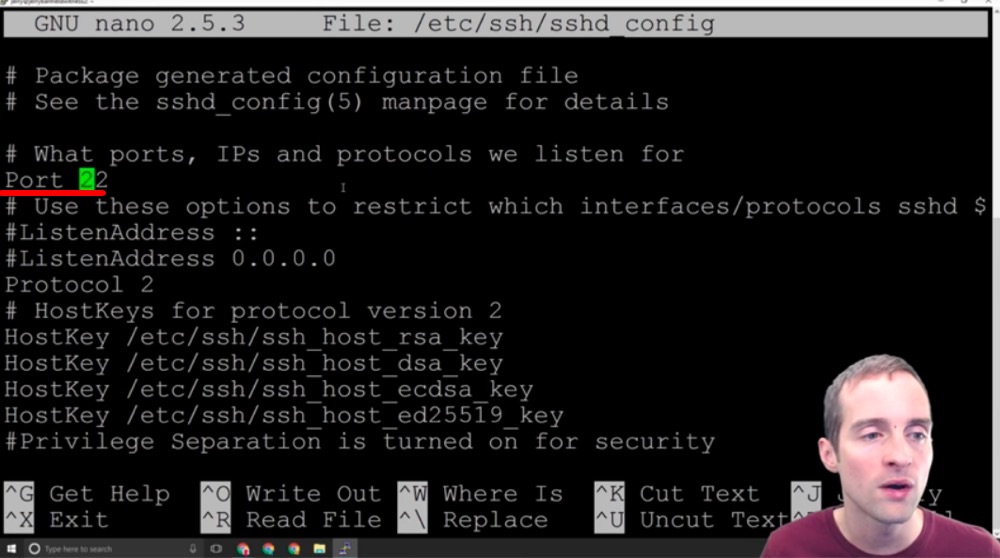
Step fourteen: Changing the SSH port from 22 to another number.
When we've done this correctly we are able to sign back in and we can verify we did this correctly because if we try to sign in with root@myipaddress, which I tried to make sure this worked, it will block. Even with the correct password, it said: "access denied." This way, the root access will not be able to work even with the correct password.
Now, the next step is to change the SSH port from 22 to another number and when I sign in I notice that my user by default starts in print working directory: "home/Jerry".
I want to go back and edit that file again so I just paste directly this one line "sudo nano /etc/ssh/sshd_config" and this will take me to exactly this file even though I'm in the user.
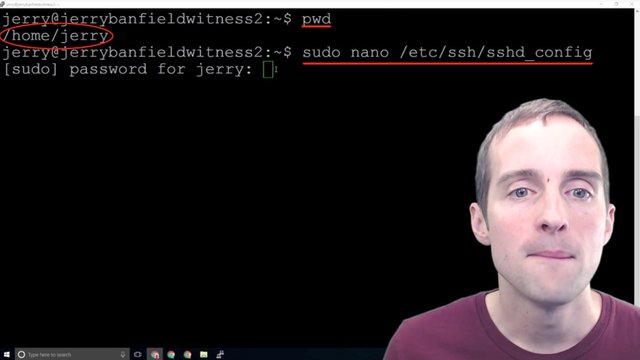
Now, what I need to do is put my user password in over there and this allows me then to open up for root access.
I had to sign in with my user password, and then I had to sign in with that same password again, but when we update this in the future we won't be having to use our password twice to sign in.
Note that in Nano you can only use the arrow keys to move around and if for example I changed my mind about the root login I could change it there.
Now, the second thing I want to do in this file is to change this port number to something else.
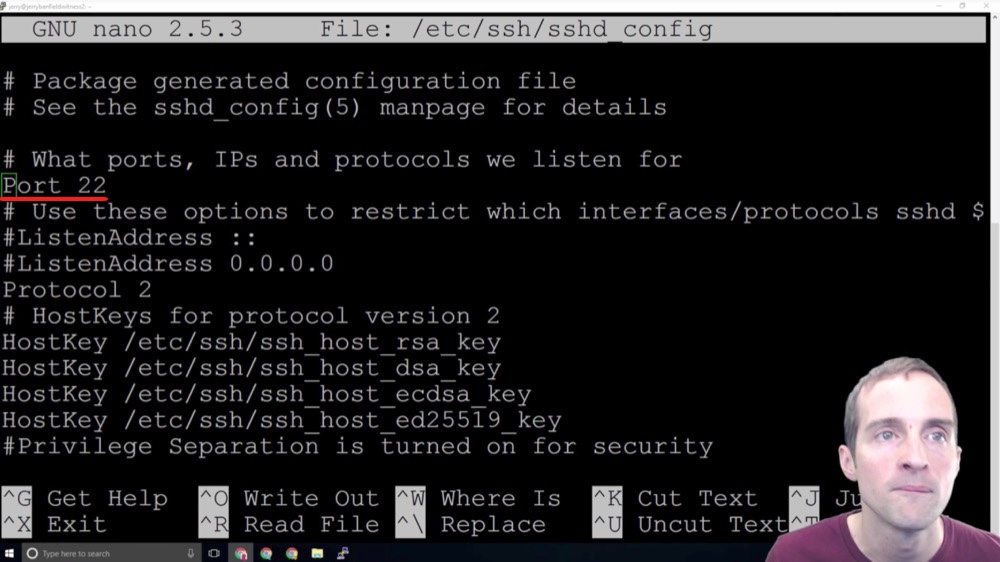
I don't want to use the standard 22 port number anymore because I want to put a port that's much more difficult. I want to pick a port between 1,000 and 65,535. This is apparently the range of ports I can pick.
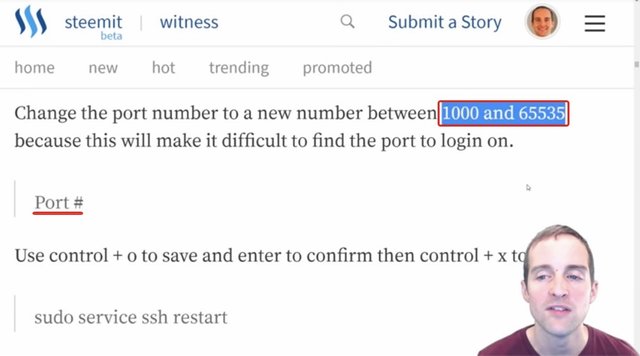
What I'm going to do is pick a random port, and I can even use a random number generator if I want to make it truly random, and then change this port to a different number because this then will change the port that it listens for sign-ins on.
Now, if you change this and forget it you can potentially lock yourself out, so make sure to save this. If you've got this in LastPass make sure to change it to this exact port in there.
This way, you can see now that someone trying to sign in by my root default on the IP with port 22, is going to have a very difficult time even getting in. This will make an additional security measure.
What I'm going to do is the exact same thing I showed before. I will change the port right here, then exit. I will restart my service, and then come back in on the new port to make sure it works.
Now, you can also add multiple ports and that might be a safe way to do it. You could add a different port alongside of port 22, I think you can do that with a comma, but just double check the documentation to make sure, and then you sign in on the new one and delete 22.
Since I already did this before I'm just going to delete port 22, use a random number generator to get a port number through here, put that port in, exit, restart the service, and then sign back into my server using the new port to make sure I didn't lock myself out.
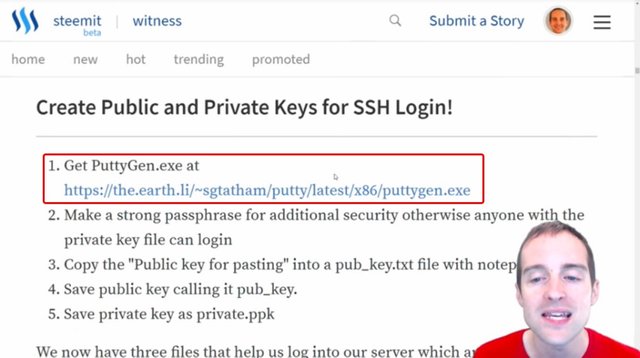
Step fifteen: Setting up RSA login by generating keys with puttygen.
To make our server even more secure beyond just having a password, now what we're going to do is set up an RSA public and private key. This will allow us to sign straight into our server without even using a password and this method will be even more secure than using a password.
We are starting to get our security to the point where amateur hackers should have almost no chance at getting into our servers. While then, the more of these security measures we put on, the more and more difficult we're making it to hack our servers. This RSA key one is extremely helpful because it eliminates the chance to even essentially crack the password because you have to have the approved key to log in.
Like the things I shared before, the problem with this is if it's done incorrectly, putting these public and private keys in, we can lock ourselves out of the server.
I will show you how to do it the right way here using PuttyGen.exe, and then putting the keys up in a way that you can make sure you can sign back into your server before you disable password logins.
You can use the RSA key to sign in, and then disable password logins after that.
What I'm going to do is show the exact process to generate a key after downloading Putty Key Generator.
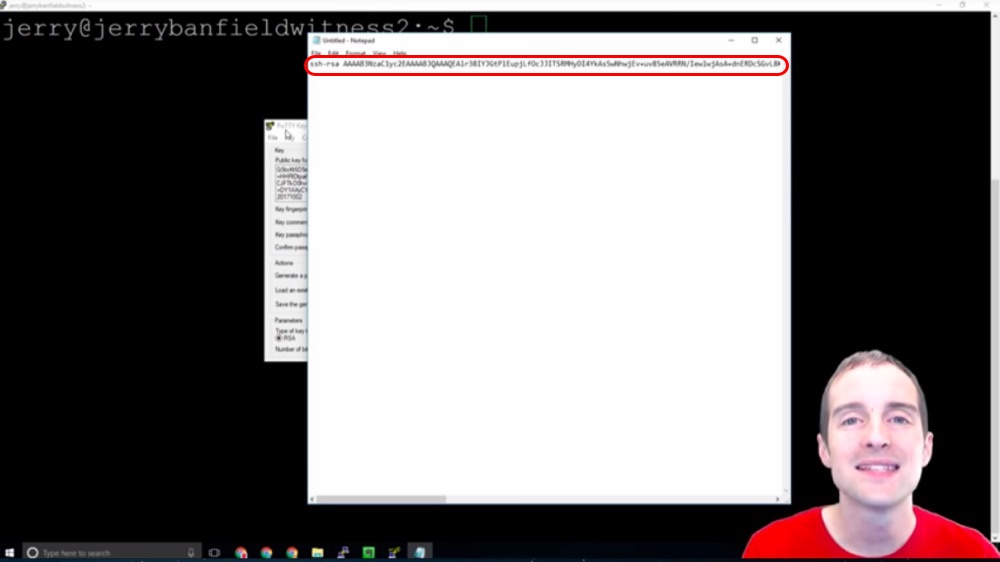
This is Putty Key Generator that I have just opened, and first I hit generate. Second, I just move the mouse all over the place randomly right here over the blank area and this allows it to create some random motion essentially, that turns into this key.
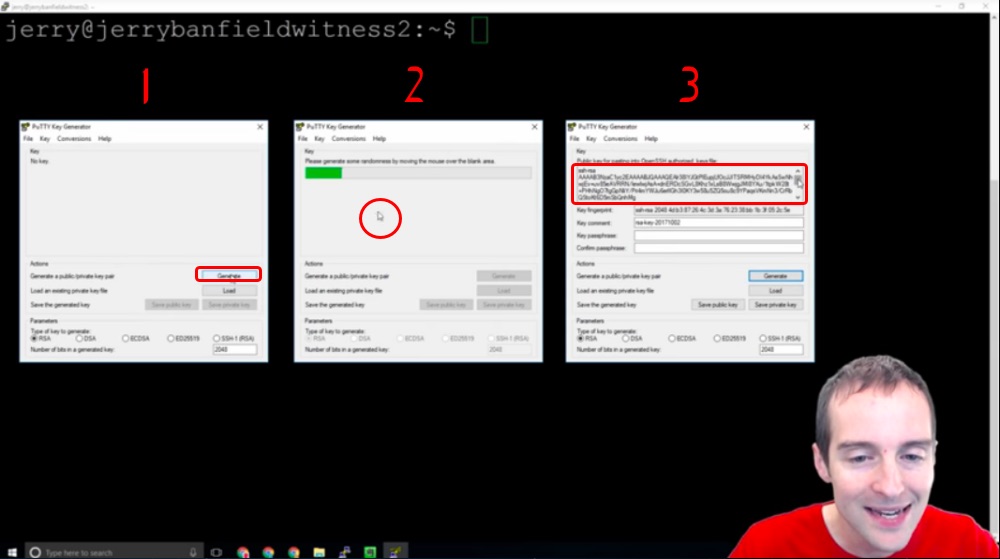
Now, I would not want to show you the key I'm actually going to use, so I will use this same process again after I've shown it to you.
What I will do is put this key on the server. I will put this public key for pasting directly into the open SSH authorized key files, and then I will save the public and the private key on my computer.
I will click "Save public key" and "Save private key," and I will put them both in a folder that is backed up also because if I lose the private key to my server I could lose the ability to sign in. Therefore, it's important to make sure that these private key files are backed up to make sure we don't lose access to our server.
The problem with having good security is it can be so secure that we can lock ourselves out and have to start our whole server over again.
We hit "Save public key," and then we've got the chance to save our files like this.
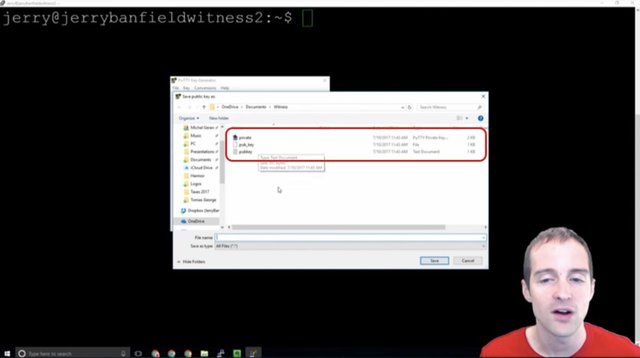
We have our public key, our "pub_key" and then our private key that we can save. We want to save each of them in turn. We save the public key and we save the private key, and we can use it without a passphrase as well, it puts it in the private key file by default.
Another good idea is to open up Notepad and just copy and paste. We can take the key like this and just grab the whole key, and then paste that straight in the Notepad.
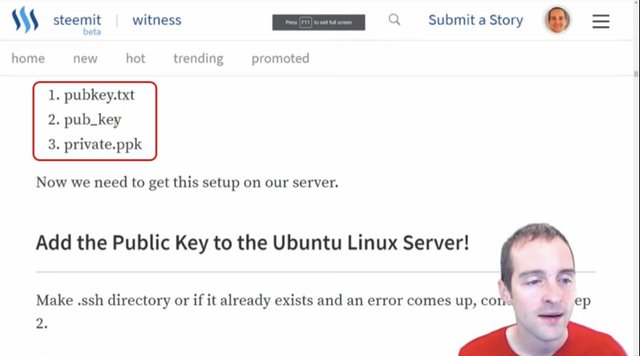
It's a good idea then to paste this key into a separate file that's just a .txt file because this is what we need to go put into our server and this will allow us to then access our server this way.
What we need to do this is a set of specific commands and these three files: pubkey.txt, pub_key and private.ppk.
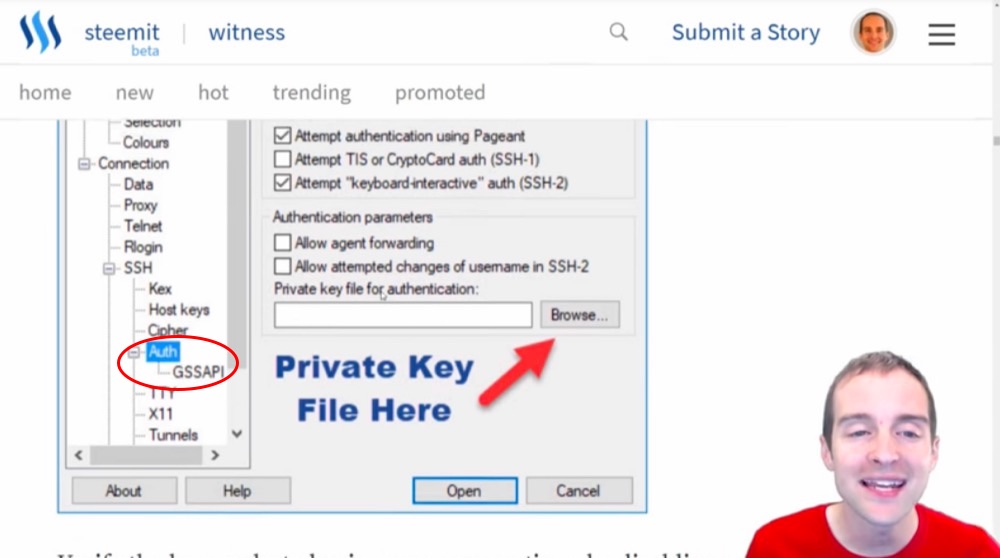
Now, what we will need to do is go into our Putty and add in the private key under Authorization. In order to sign in like this, we will need to put this under the "Auth" and put the private key file for authentication in.
At the same time what we will also do is add this public key to the Ubuntu Linux server.
I will walk through that right now. We'll copy the exact commands and we need to make sure to do this in the right location.
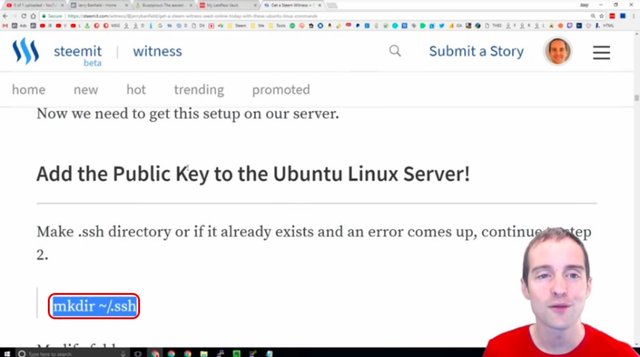
If we put this in the wrong location like I did on one of my servers, then it doesn't work. We need to be on the user home directory for this and if we are not, then the keys won't go in the correct place.
We can either "cd" first to the ~ which puts us in our user folder or we can just use command "cd ~/.ssh" in any directory to move into the right place. If the directory does not exist, we use "mkdir ~/.ssh". Make sure to use ~/.ssh to ensure it is in the user directory instead of /.ssh like I did in the wrong directory in the screenshot!
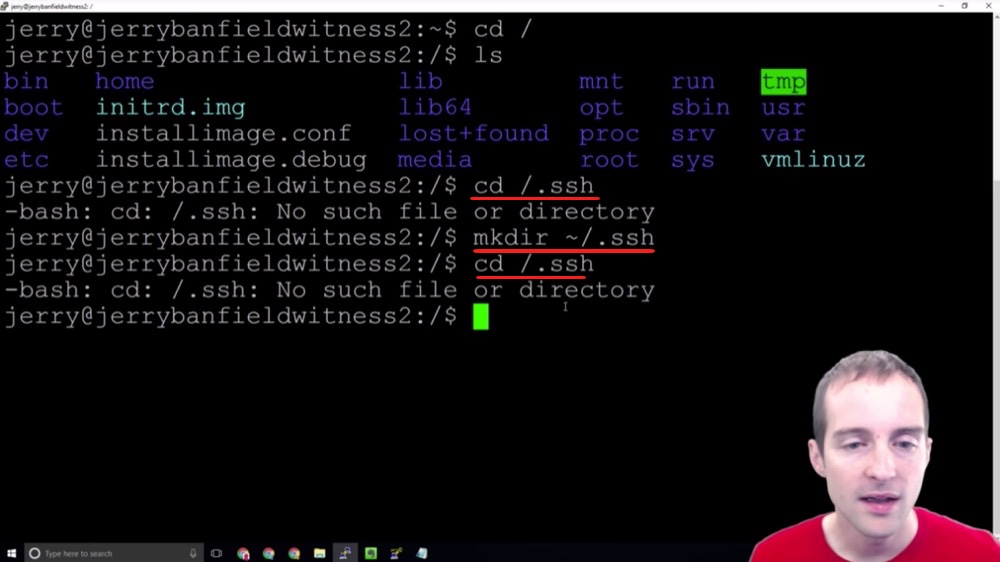
We've made a directory that's hidden, so we can't even see it!
What we can do is modify folder access because if anyone else is able to fool around with these ssh keys, then we're looking at having someone else either take the keys out or lock us out of our own server.
What we can do is we can modify the directory on this, and then we can change directory to go in the folder. I copy this over and paste it and now I'm in the folder.
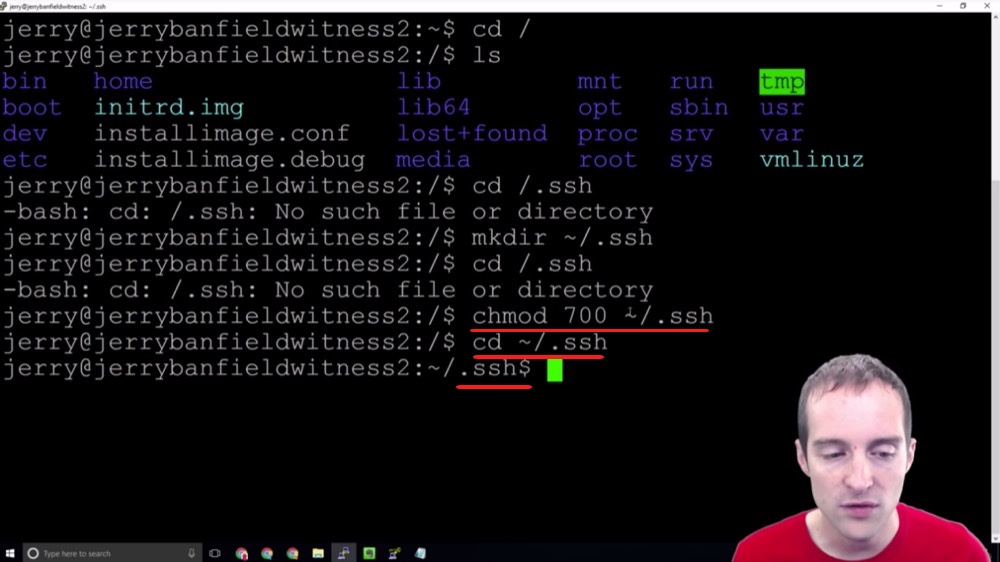
I didn't put the tilde sign previously on the "cd" so that's why it wouldn't let me change to that folder there.
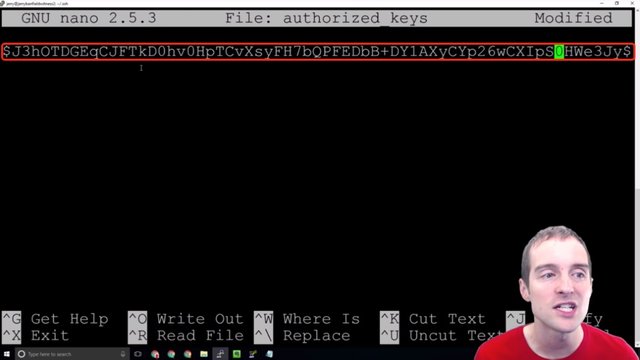
Now, the next thing I want to do is go over these authorized keys.

I paste this command "nano authorized_keys" and now you can see that there's no authorized keys on this folder currently. What I need to do then is put my authorized key in there.
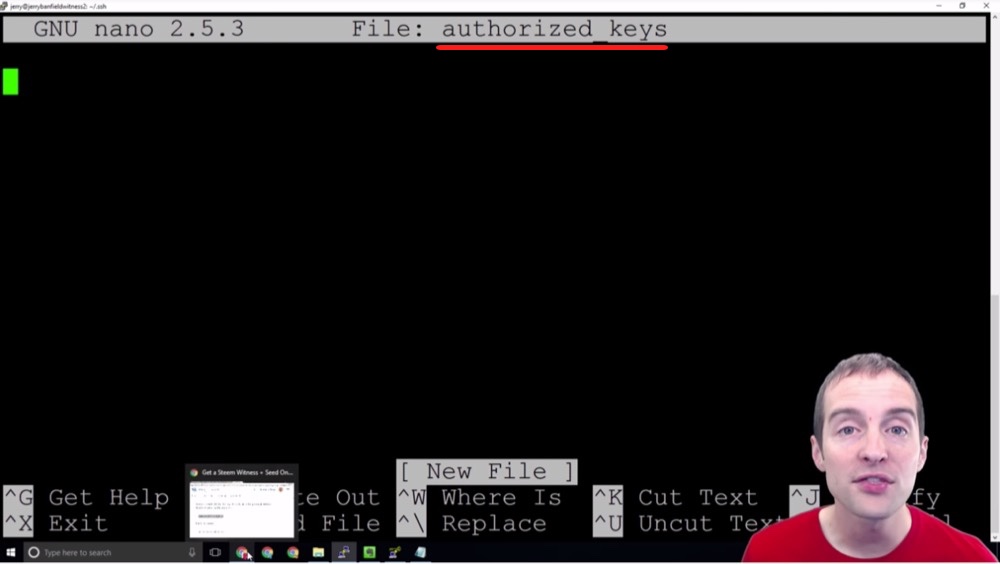
What I want to do is take my public key from the text file and put it straight in here just like this.
Now, I'm not actually going to use this public key because then you would be able to see what the public key is, and theoretically you could backward generate a private key from it, although I don't know how likely that is. It's still better to just keep the public keys secret on here.
Now, what you need to do after you put this in is write this out. You can just hit CTRL + O to write it out, but what I'm going to do is exit and hit no and that will keep the file unmodified.
What I will do after I paste my authorized key in here is restart the service. I will set this so only root can access it, and then I will log out.
Once I've logged out I will test. I will put the private key file in Putty under "Authorization" as I have shown earlier. I will put the private key file in, and then what I should be able to do is sign directly in without having to even put a password in.
This public-private key sign-in method will allow me to go straight into the server without having to put in any password because this server has a public key on it, and when my private key syncs up with the public key it knows, or should theoretically know, that I'm the right user. Therefore, it's more secure than logging in with the password.
You can even go crazy and put in a password on top of the system here so that you have to also put in a password to use a specific key, and that way if for example someone gets your private key and they don't have the password also, they can't use it.
Now, on my Witness and Seed, I have it set up that way so that on top of the sign-in with the public-private key, you then have to enter a password on top of it. If you steal my private key, and then you're able to sign in to my server, if you don't also have the password, you still won't be able to get in.
What I will do next is show you how this looks after I've set it up and I will follow my own instructions now.
Step sixteen: Disabling password logins and ipv6 listening.
I'm very happy to report that everything worked perfectly. I now signed directly into my server with the RSA key. All I had to do was load up Putty and save my existing settings with the private key file. I hit load and it goes straight into the server with no password and it's more secure than using a password.
Beautiful!
Now, that takes us to the next step.
Since I can log in this way I no longer need to log in with a password. The problem with doing this is you need to absolutely be sure that you signed in correctly without putting in a password because once password logins are disabled, it will only be possible to sign in through that public-private RSA key.
Therefore, if that private key file is lost, it may become difficult or impossible to sign back into the server. However, this makes it so even if someone gets the username, finds the exact port and tries the password logins, they are all disabled.
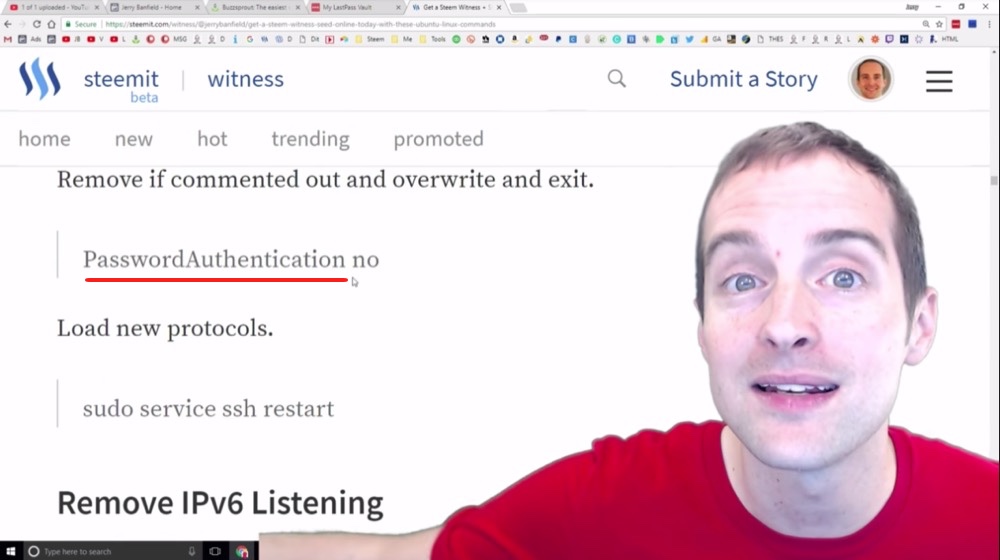
It's a pretty straightforward process. It's the same thing we did before to go in and change the port number, then to change the login with root. All we need to do is pretty straightforward, two lines that I will put together here: Disabled Password Logins and Remove IPv6 Listening.
We're going to do both of these at once and this is just a matter of putting these exact commands in. Now, I'm not actually going to show this though because it will also show my port, but it's the same basic thing as we did before.
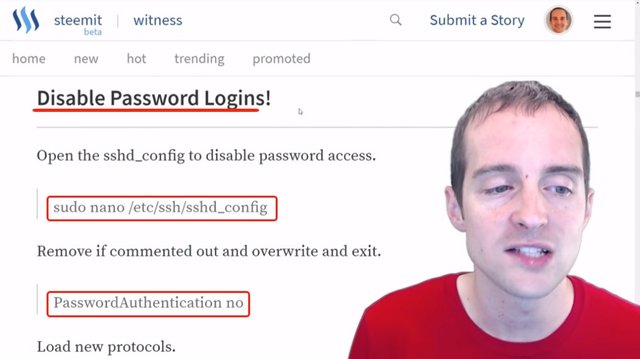
We go back in the config file with the command "sudo nano /etc/ssh/sshd_config" then we just switch over PasswordAuthentication to "no".
We restart the service with the command "sudo service ssh restart" or we can at the same time just run this specific thing right here: "echo 'AddressFamily inet' | sudo tee -a /etc/ssh/sshd_config" and then restart the service.
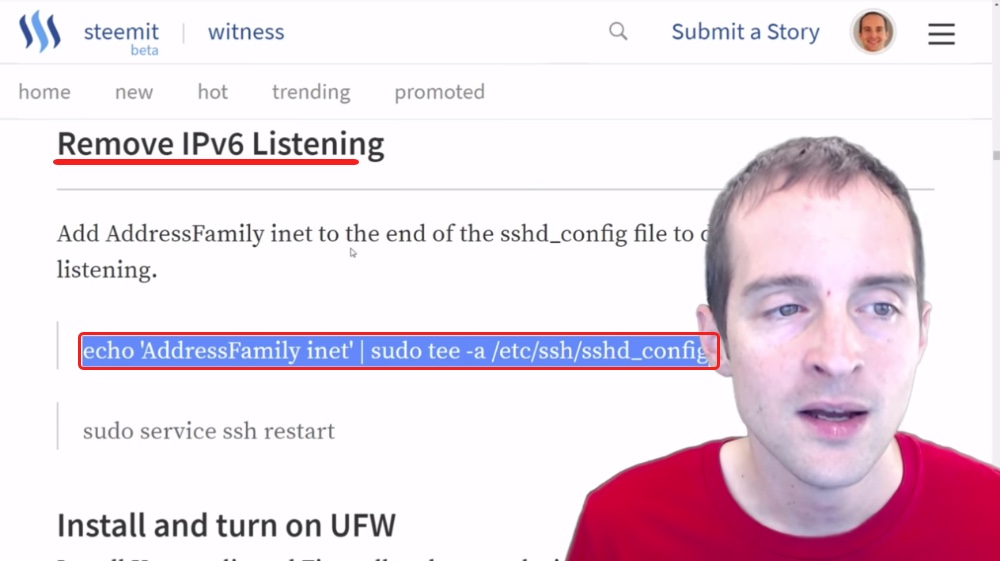
Actually, I can do these two at once, I can essentially add that to the end of the file.
I will restart the service and log back in after I have done that, and then we'll be at the next step.
Learn from my mistakes!
Wow! I just tried to add a second key into the server, I didn't go through and restart, and I disabled password logins, so I have to start all over again.
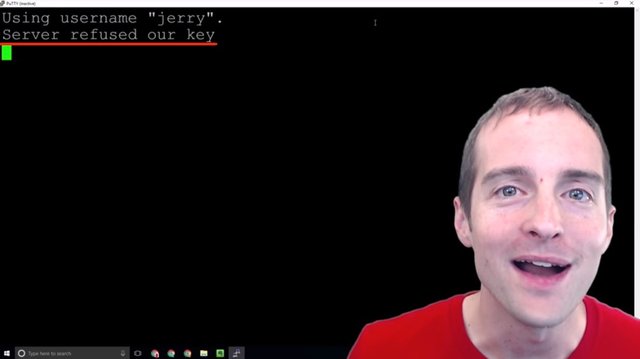
Make sure if you want to add new keys to the server that you enable password logins again because at this point my server basically has to be reformatted. I'm now completely locked out of the server. There's no way to get back into it with the security protocols I set up.
Ouch!
Learn from me!
It's good to get your security set up, but one thing you can do, make sure to hold off on getting yourself out so quick with password authentication because if you mess anything up with the keys, then you can get right back in.
The way I did it, I'm now locked out of the server. I have to get it reformatted or I don't even know exactly how to do that, but I'm going to have to ask my host to help me with that.
Make sure if you mess with the key file to turn password authentication back on, and then restart the service because if any little thing's not right in the file you get that error message I just showed you, which is, "Server refused our key," and that's it.
Now, the good thing is, if anyone tries to log into the server without that key this is the same thing they get as well, but wow, very humbling.
This is what we do, we learn, we make mistakes and we grow. Now I know, make sure that any key change, any key change at all, that you put password authentication back on and probably make sure that's on until you then do not need to modify that file.
Once I've set all of this back up again, then I will follow up with you and continue when I've got the keys correctly added.
One week later!
Guess who's back?
"Shady's back. Tell a friend. Guess who's back? Guess who's back?"
I'm back in my server baby. I've had to start from scratch. Everything I've done up to this point has been wiped. I've got a fresh server. Fortunately, I've learned one very important thing by doing this. I can stay signed into the server by using Putty in another instance.
The mistake I made before is hitting log out and not having any other instance of Putty in to verify that I could sign back in. Therefore I can open multiple instances of Putty at the same time while I'm changing these security settings, and then I don't have to worry about whether I can get back in the server or not.
If I can't sign in again on top of my existing sign-in, then while I am in the existing sign-in, I can simply undo whatever step I did before.
I pasted the RSA key in wrong before, I forgot to allow password signings and I completely locked myself out of the server. I had to do a hard reset to basically get the hardware reinstalled, to just delete everything on it and put in a brand new install with nothing before.
That's why it's nice to go through and do all the security stuff up front because imagine how dumb that would have been if I had already set the whole server up and had it running, and then had to do that. That would have been a complete disaster.
This is why it's also nice to have a backup server. You get things working and if something happens on one, you can just instantly or quickly sometimes automatically switch over to that other server.
Thank you for continuing this journey with me.
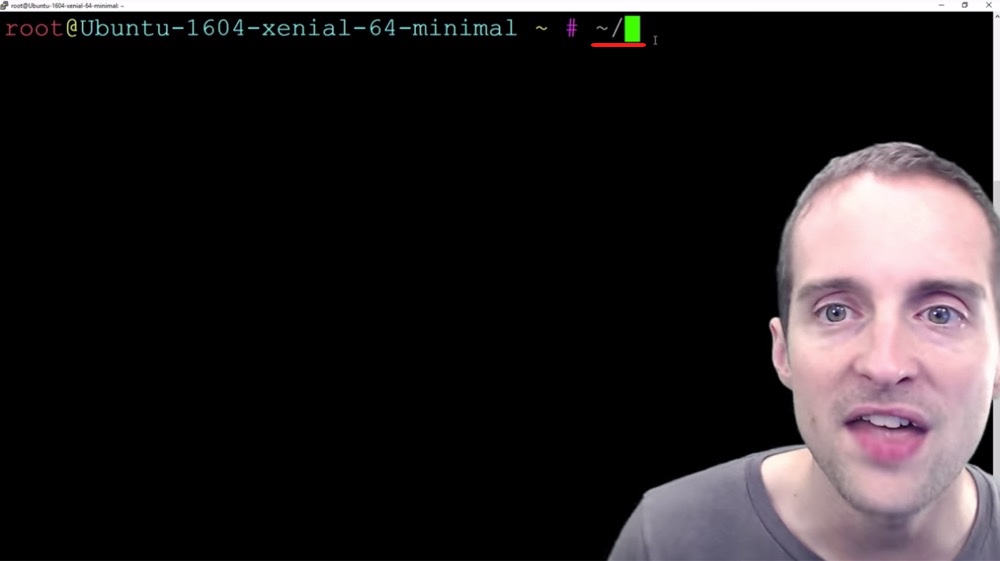
One other thing I want to highlight that I've learned so far, the tilde command ~, takes you straight to your user directory. If you put tilde in front of a file that will take you to the user directory automatically.
I may have said that wrong earlier.
"Guess who's back? Guess who's back? Back again! Jerry's back."
Yes, I'm excited I'm going to run through and do everything I've shown you up to this point, and then I will continue the tutorial picking up from where I left off before I got locked out of the server.
Step seventeen: Installing fail2ban to block IPs from repeated failed logins.
I have now, in 45 minutes, reinstalled the entire server and I'm signed in twice at once. I'm signed in on Jerry on my server and I'm signed in on the root level, and I can always print working directory or list if I want to, to make sure everything's working correctly.
This gives me the ability then, if I make any more mistakes, I can just use the root directory. I just sign out of one of these at a time, and then I'm set. I'm in, I can undo whatever I did before if I can't sign back in.
This is important for what we're about to do because theoretically if you did this wrong, if you were going to do "fail2ban" which will help minimize repeated unsuccessful attempts to access the server, you could theoretically lock yourself out or prevent yourself from signing in this way if you messed up your password too many times.
I'm going to follow this guide by Krnel who wrote this on Steemit. I already did "apt-get update" so what I'm going to do is just "apt-get install fail2ban".
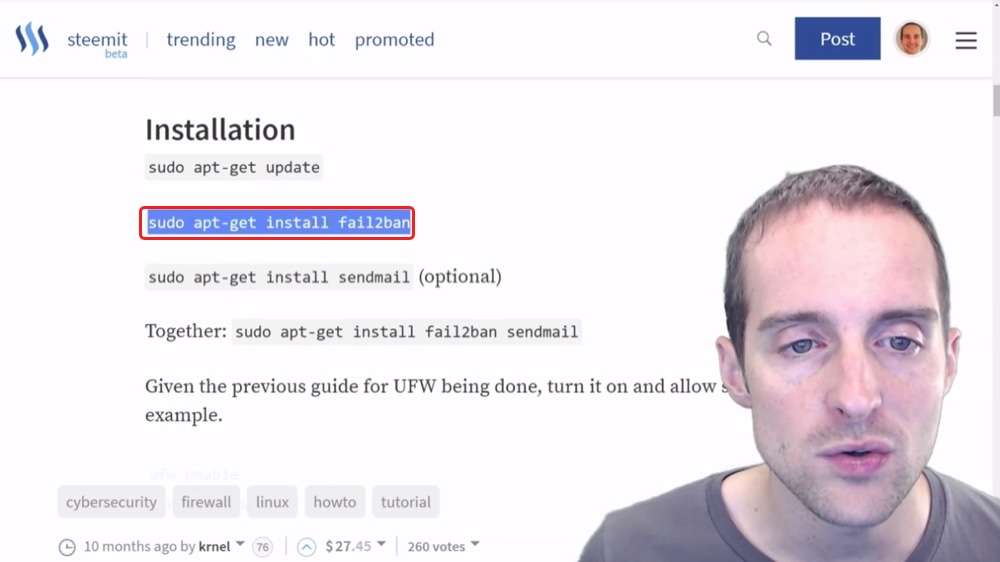
I just type "sudo apt-get install fail2ban" in here, run that in, and there it puts everything in.
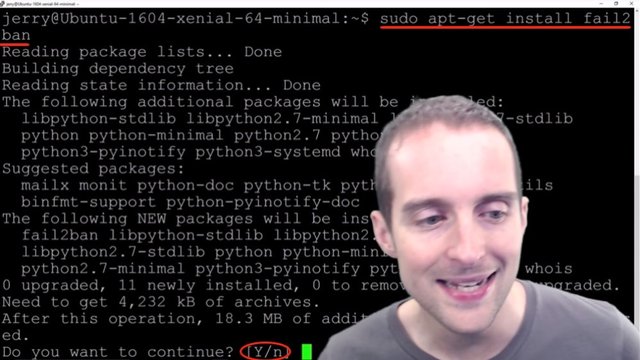
Now I hit Yes on this one, and it gets everything installed on here and it's unpacking everything. It takes a minute to install and now it's done.
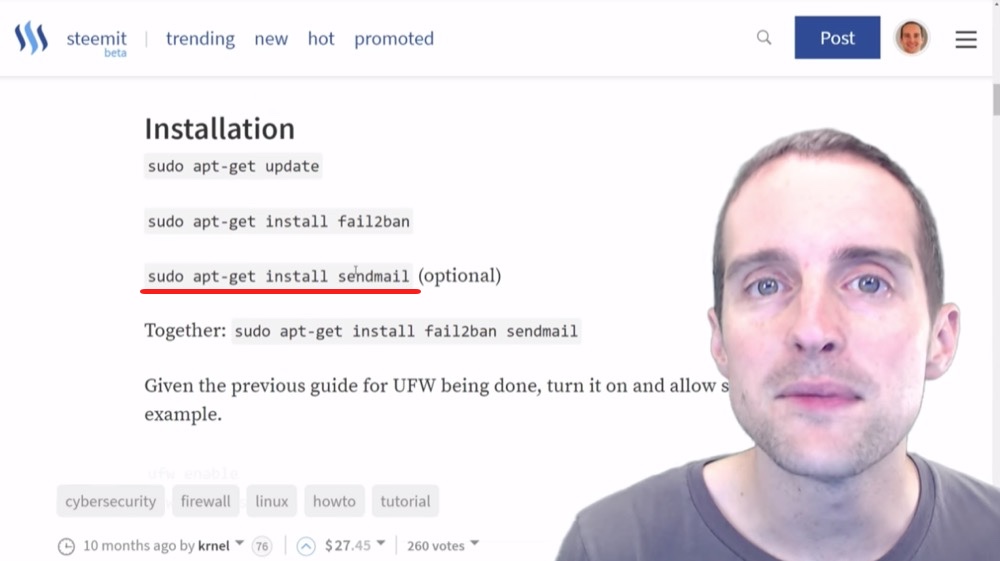
I've got "fail2ban" installed on here and now I could put "sendmail" to notify me of bans, but I'm not going to bother with doing that.
Now, what I want to do, I want to have uniform firewall enabled. I'm going to install that next though.
"Fail2ban" is pretty easy to set up and now I'm not going to actually change any of the settings, I think that they are fine.
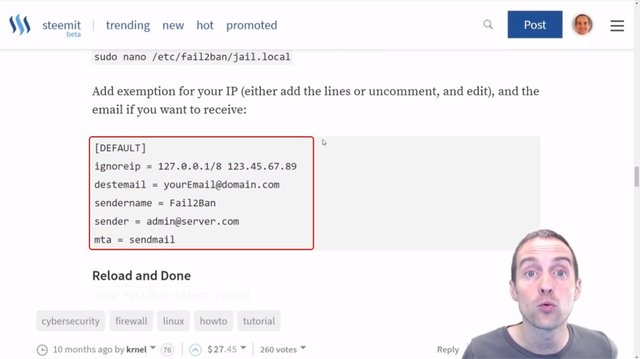
One of the security things that I do is change my own IP all the time. That way even if you get my IP one day, the next day you try to go back and I'm not on that IP. I don't have an IP that I can just put in, so all I'm going to do on this next one is essentially create a new file, comment it out, and then the new file will be the "jail.local".
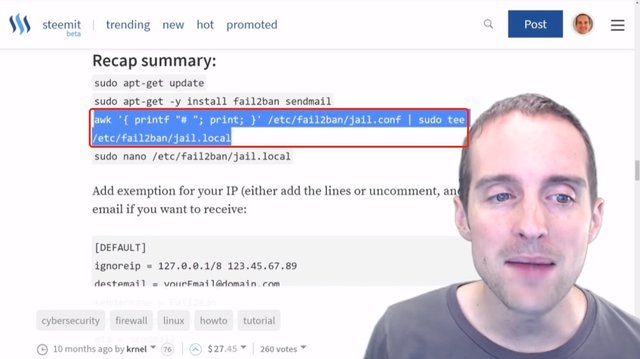
What I'm going to do, I'm just going to paste this command in.
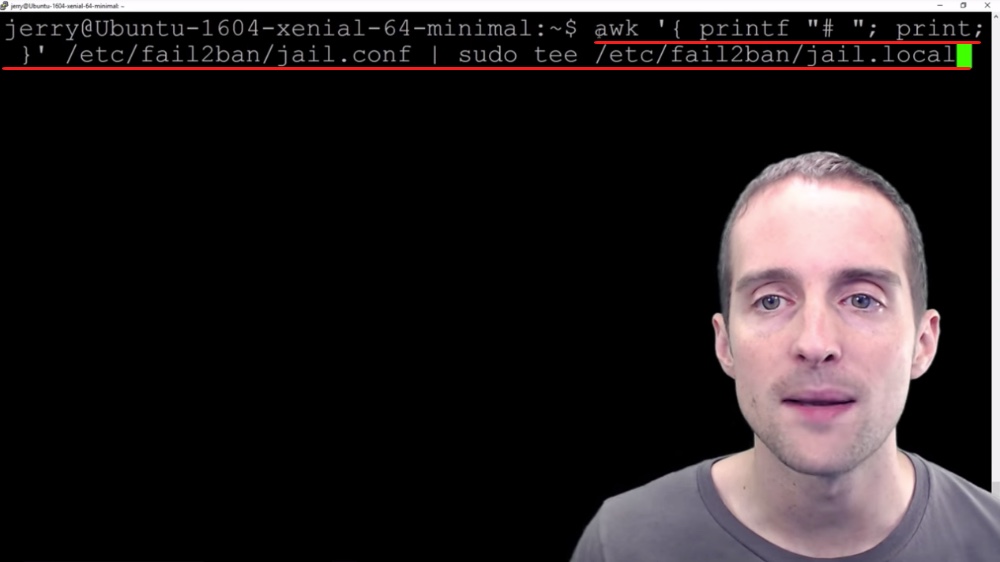
This command copies the file "jail.config" and comments the entire file out into this new file "jail.local".
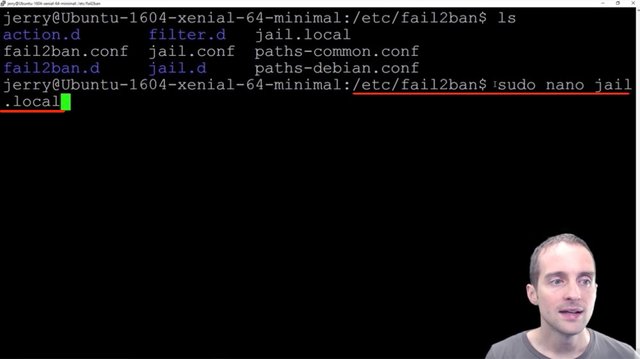
I will just go into there manually, I will change directory into the folder.
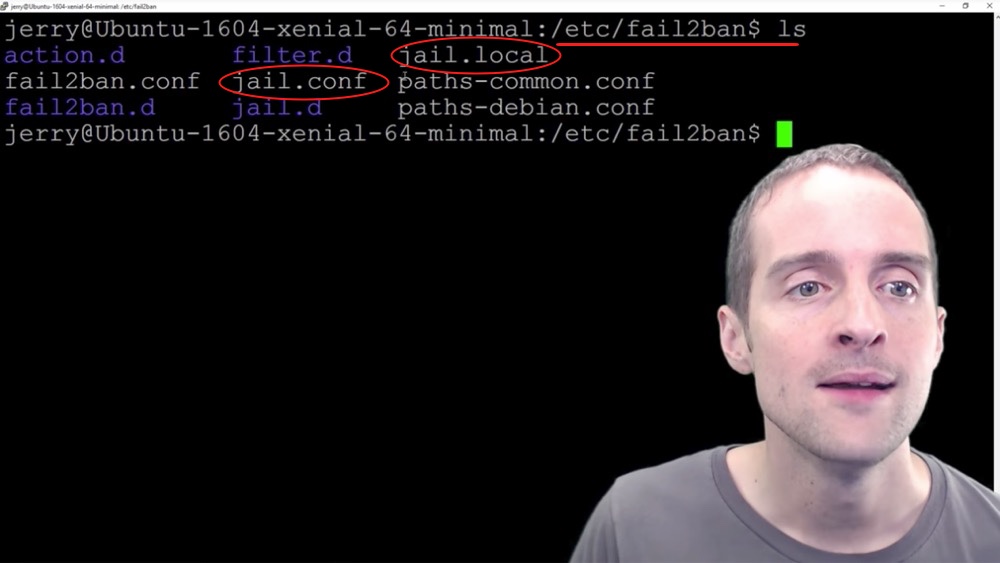
I'm now in etc/fail2ban and if I list, there's a "jail.local" file and there's a "jail.conf" file.
The idea is you change the local file by uncommenting whatever you want to be different, and then what it does it takes the "jail.local" and overrides essentially while it's running anything in the "jail.local" file over top of the "jail.conf" file.
"jail.conf" is a baseline file and "jail.local" is essentially the customizations. I'm not even going to do any customizations on here.
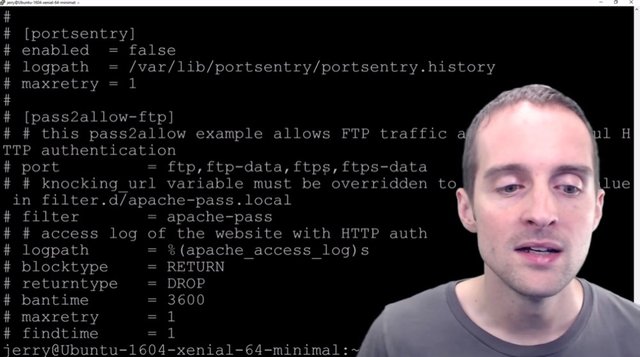
Now, if I did want to do customizations all I would need to do is go into Nano. I can type in "sudo nano jail.local" and this will allow me to make any customizations I want.
As you can see this file has lots of lines. Some of them are double commented out because the "jail.conf" file is commented out in some places. Then, in all the others, you can see that there's this hashtag, which is a comment on every single line. This is where all the various settings are.
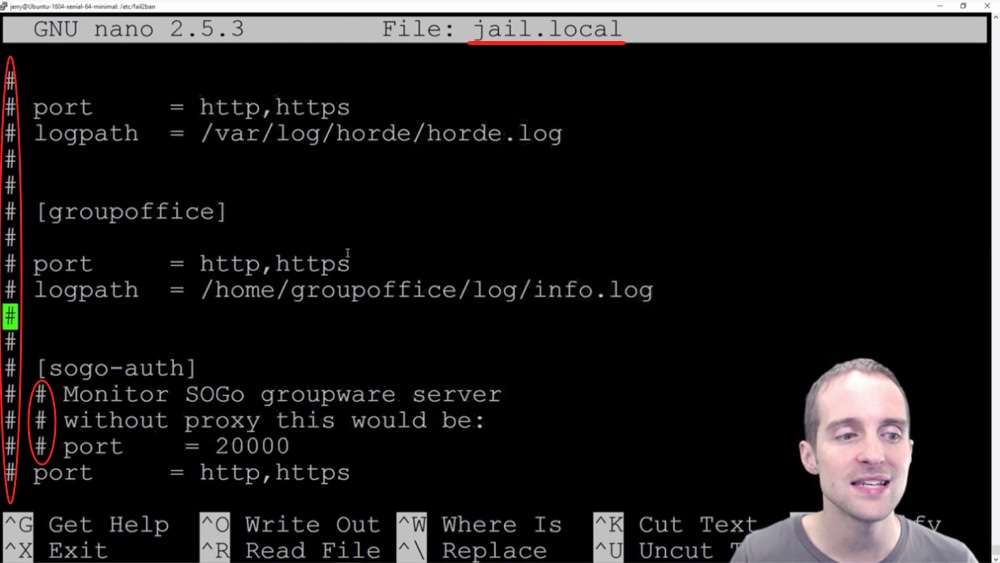
I'm not going to make any changes to it. I'm just going to use it as is.
I'm not going to add my IP because I hop in from a new one. Now, if I screw up my sign-in this puts me at risk of getting locked out of the server by "fail2ban" as well.
I've got backup servers that way if something goes horribly wrong. At least one of the servers should keep working.
Now what you need to do after you've changed this "fail2ban" file is reload this with the new "jail.local" settings using "sudo fail2ban-client reload" which technically didn't matter much because I didn't change anything.
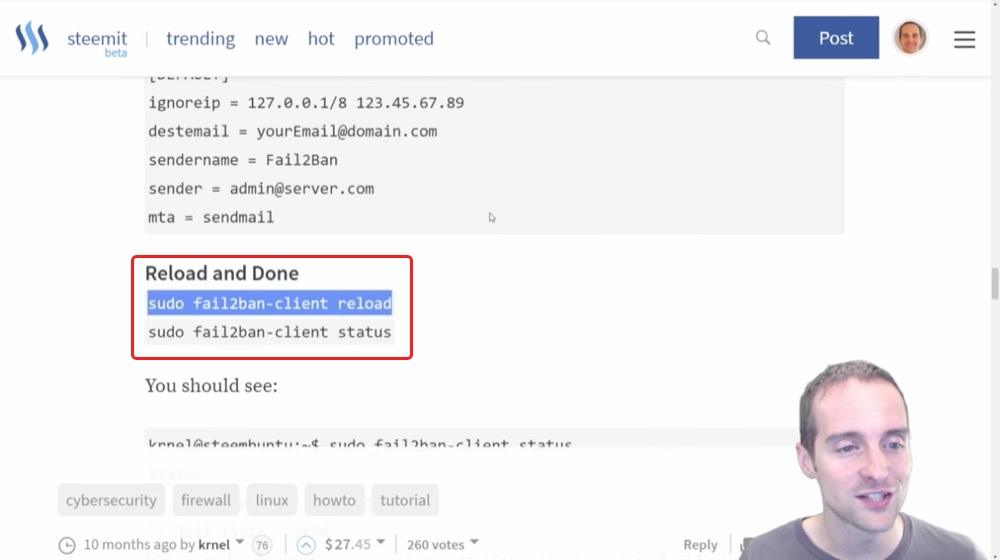
Next, I will hit "fail2ban-client status" and according to Krnel's guide, it should look like this.
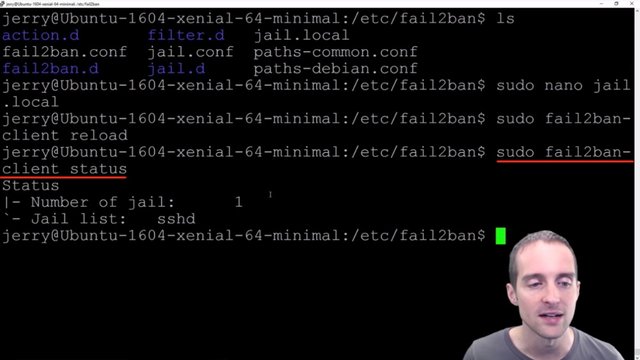
I've got everything set up for "fail2ban" now and what I want to do at this point is sign back into my server to make sure that I'm not locked out of my own server by getting in directly, to make sure that putting "fail2ban" on didn't somehow lock me out.
What I can do for that, I just log out from the Jerry account. Now what I will do is go back into Putty and sign back in on my existing sign-in, and then I will know that it hasn't locked me out. Meanwhile, if I've screwed something up, I can simply remove "fail2ban" since I'm already in this root directory.
I'm already signed-in on the root level and I can just go get rid of "fail2ban" if something went wrong, if somehow I locked myself out with it.
Step eighteen: Install UFW or Uniform Fire Wall to block some DDOS attacks and hacking attempts.
I signed back into my server with no problem after putting "fail2ban" on. Now, the next step is to disable or to actually put on the uniform firewall.
I've put on fail2ban, I've removed the IPv6 listening, I've disabled password logins, I've added the public key to my server, I've generated the keys and I've disabled the root login. Now that pretty much leaves signing in directly with an RSA key, and another thing I can do is just put the uniform firewall on to also help block more undesirable connections out there.
What I can do is put the uniform firewall on in here and do this pretty quickly.
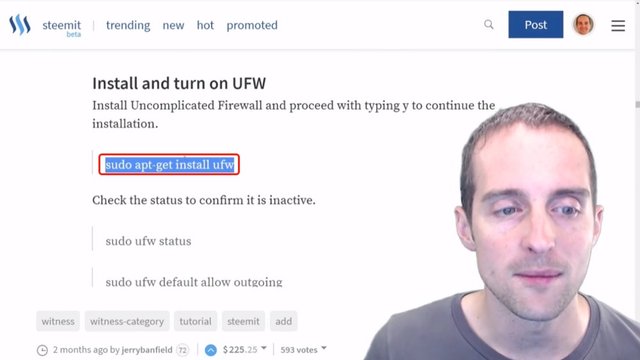
I'm going to just follow the commands here. I will get and install uniform firewall, put that in there and it's now installing uniform firewall in here.
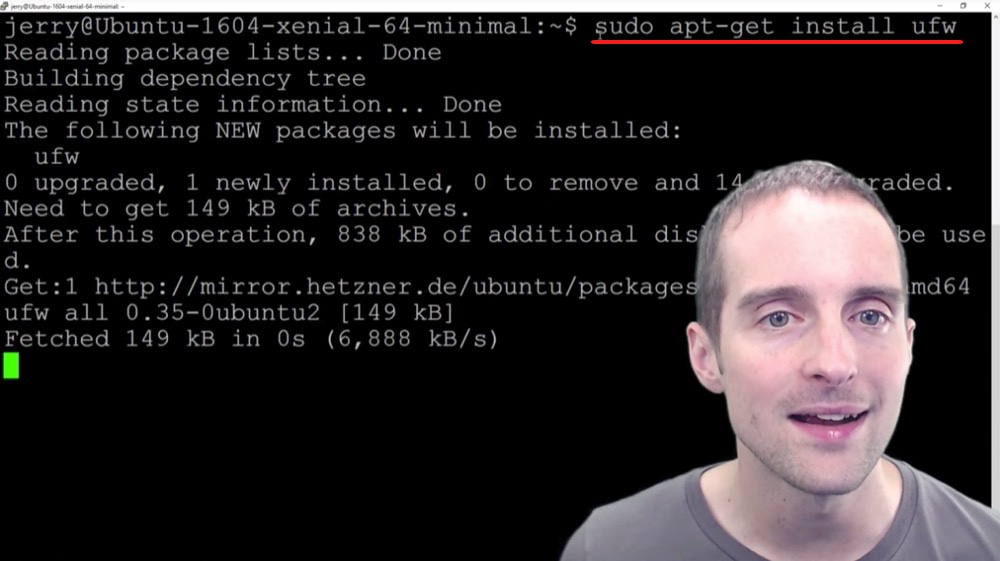
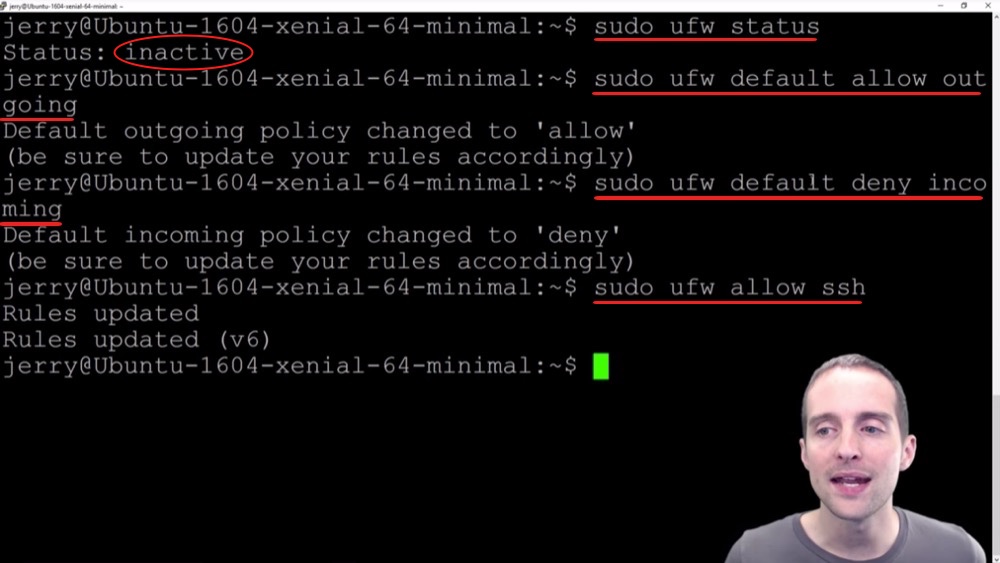
It's got uniform firewall installed now and I can then go to check access to make sure that it's currently inactive.
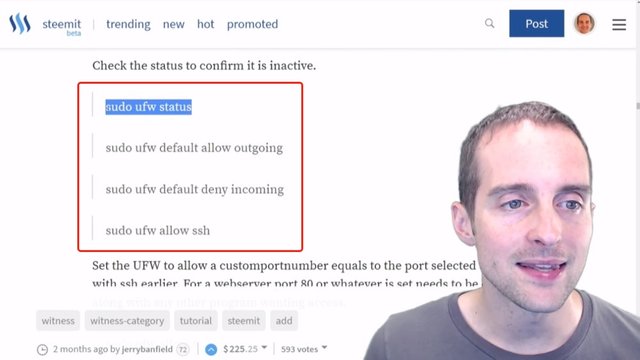
You can see that as I checked over here it's currently inactive. What I want to do now is just by default to allow the outgoing connections, and then by default to deny incoming connections.
Now, this is important to have an additional open connection because you can easily go in and modify these things if then for some reason they are set up wrong.
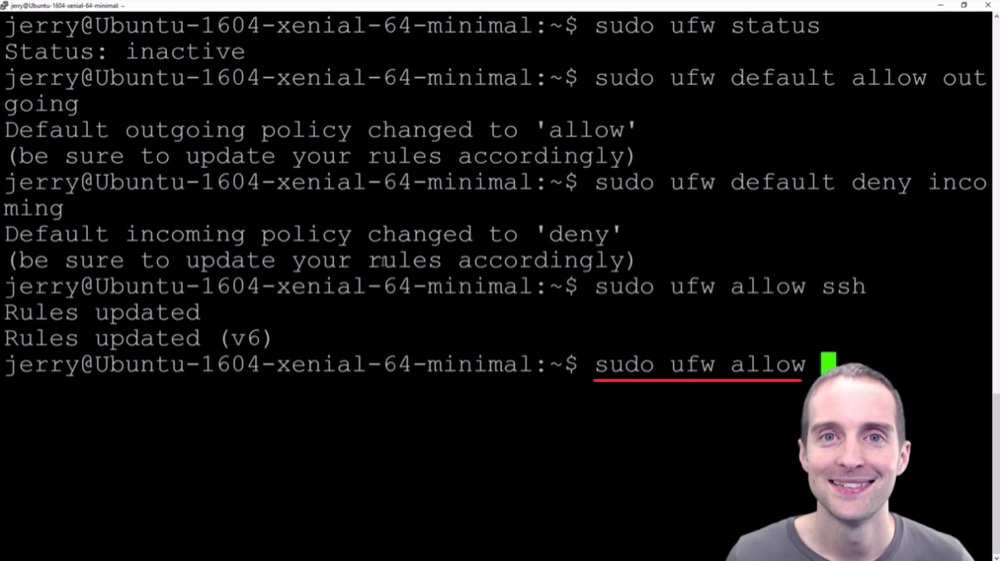
I then type "sudo ufw allow ssh" so I allow the ssh connections. Basically, I just allowed the outgoing connections, denied the incoming connections, then I allowed ssh, which will allow me to sign in.
Then, what I will do now is put in my exact port number in here to allow that connection to come in because theoretically, I could lock myself out from signing in if I don't put that exact port number in there.
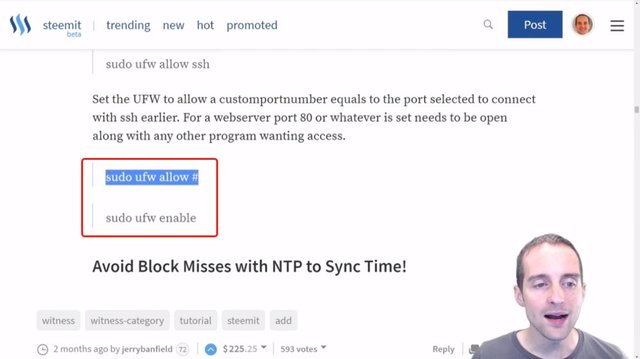
Then I will turn the uniform firewall on with the next command by enabling it.
I will enter the exact port number that I've kept ultra-secret here using "sudo ufw allow #", and then I will enable the firewall with the command "sudo ufw enable".
Finally, I will check status with "sudo ufw status" again to make sure it's active, and then that will be the end of this uniform firewall installation.
Step nineteen: Get NTP to minimize block misses as a Steem witness and time sync issues with other servers!
Wow!
I think I'm shell-shocked from getting locked out of my server before.
Every time I sign in and out it's so exciting.
I think, "Will I be able to get back in?"
I've still got both my windows open even though I did a uniform firewall. I got it on and active, and I restarted the services. I verified it's working and now I've got uniform firewall on.
The last thing I want to do specifically for a Steem Witness is to install NTP to sync time. If there's any service you're using your server for that needs to be an exact sync, for example, not off by a tenth of a second or something, but synced up exactly to avoid having problems, this might help.
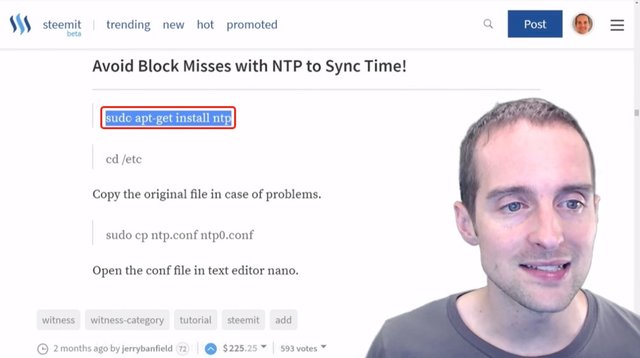
For a Steem Witness you get 3 seconds, or less, to crank out a block. Therefore, even if you're off just a tiny bit with the time, then you could end up missing a block because of that. Every quarter or percentage of a second counts with this.
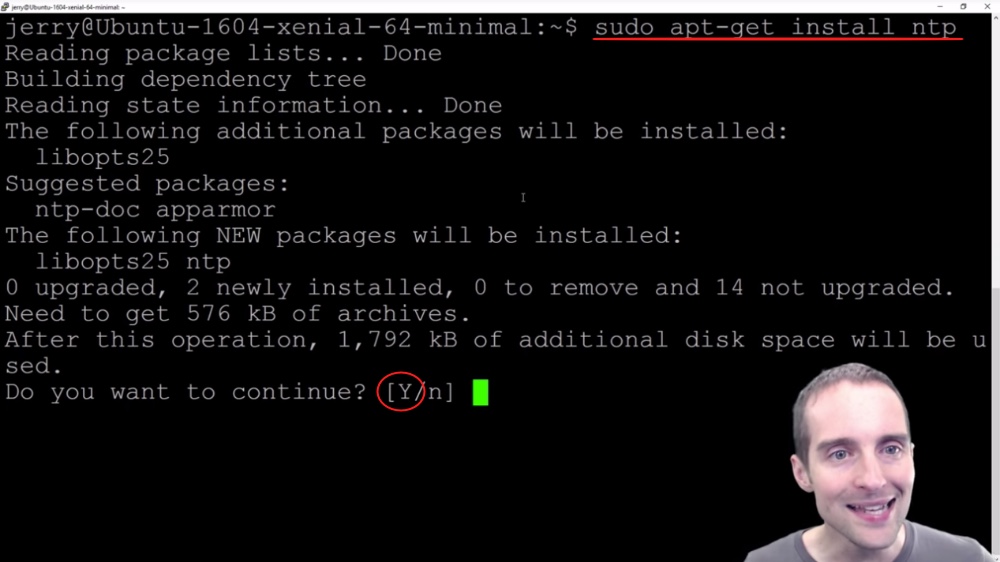
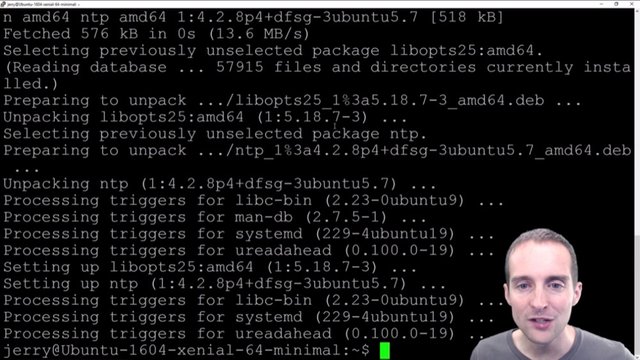
What I'm going to do is install NTP, which will help me minimize my block misses. I use the command "sudo apt-get install ntp" to do that. Now, it's putting NTP on and it asks me if I want to continue. I hit Yes, and then it installs it for me.
It's processing out all my triggers on and it looks like I am now good to go with NTP.
I want to change directory over to /etc and I can "ls" to see what's in here. I can then verify that I've got the NTP in here.
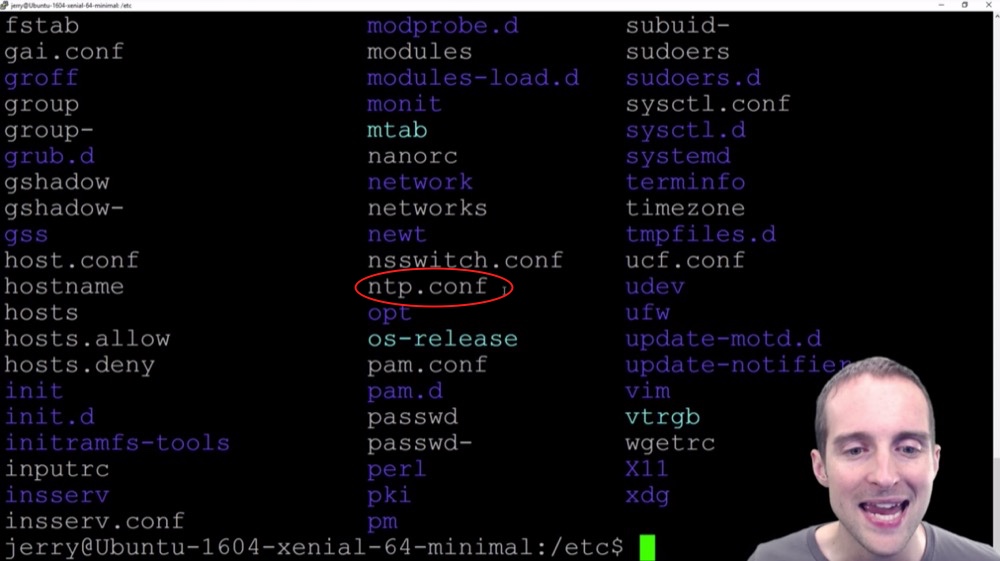
What I've got is the "ntp.conf" file in here.
What you can do is create an extra copy of this config file by using the command "sudo cp ntp.conf ntp0.conf". That way if you do something wrong in it, you can just easily revert to the last one without having to delete it.
I'm actually going to skip that step this time because I'm feeling pretty good about basically being able to make this really small edit in here.

What I will do is make this tiny edit, so I type "sudo nano /etc/ntp.conf" to open the file in Nano, which is the text editor.
Then all I want to do is add these two at the very end to help get my time synced up just right.
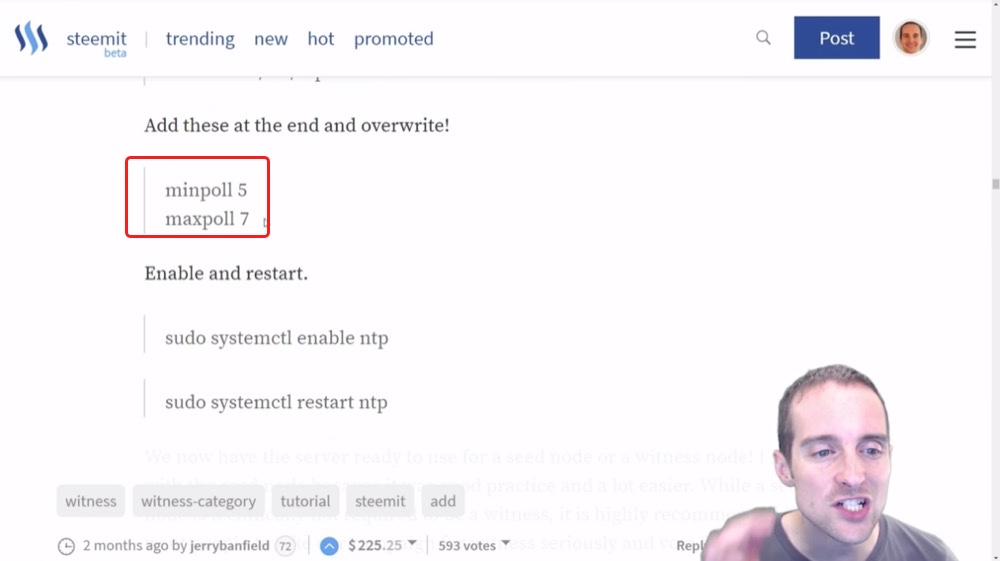
I don't remember why I added these, but this is how I ended up doing it. You can look around and see if these are in here already or if they're commented out, but I looked before and I didn't think they're in there.
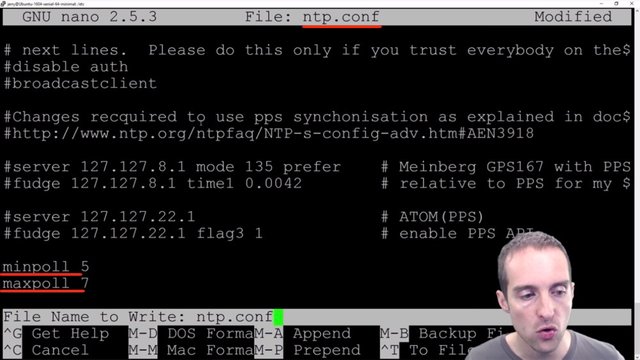
What I will do is just type these in manually: minpoll 5 and maxpoll 7.
It is now at the very end of the file and I use CTRL + O to write them out. I've got that set and now I do CTRL + X to exit.
Now what I need to do is enable NTP.
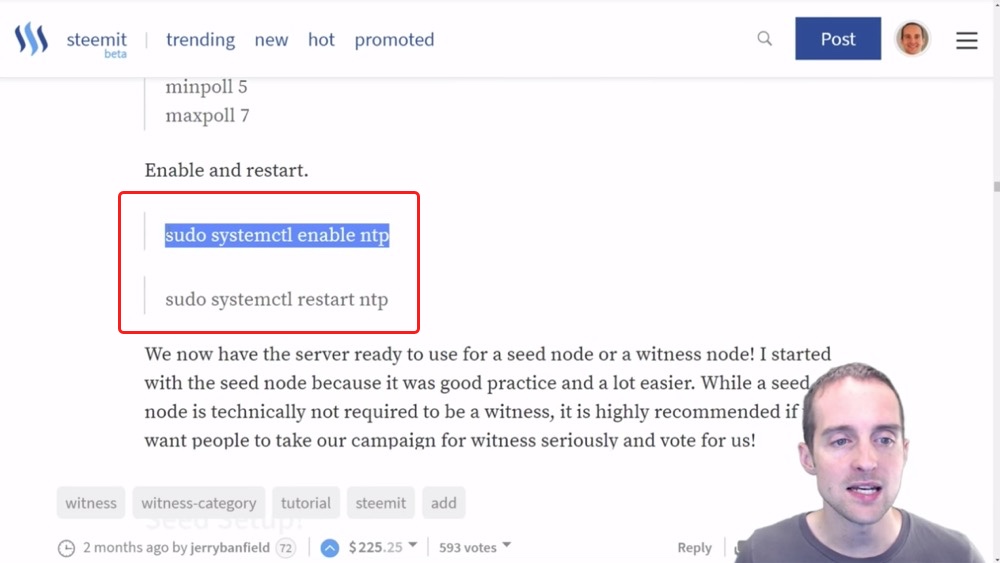
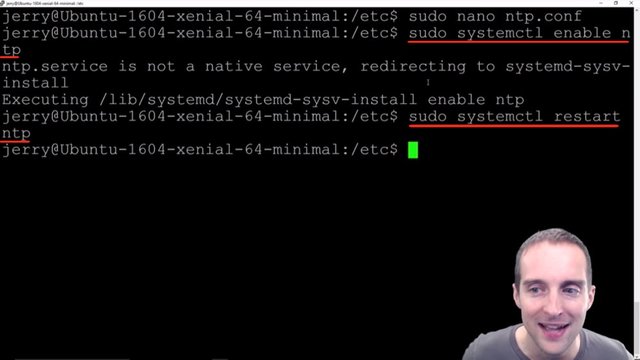
I'm going to put in "sudo systemctl enable ntp" which I would imagine is the system control or something like that, and then we'll enable NTP.
It's redirecting the system install, and then it's executed. Even though that's not the perfect way to go about it, it still works.
Now I can go "sudo systemctl restart ntp" and NTP should now be active. That way I've got it enabled, restarted and ready to go.
Now I can make sure everything is still working just fine on my other sign-in. I've got NTP ready to go and I appreciate you reading this tutorial. This has concluded all the basic steps to prepare for getting a witness server.
This is everything I've done before even putting any of the Steem Witness server on. These are all Ubuntu Linux basics that can be helpful for building many different kinds of servers.
I've got a server that's secured, my time synced up, and now I've got it in a position where I can run what I actually need it to do from here.
Final words
Thank you very much for finishing this complete tutorial showing just basic setup. Now there are much more advanced things you can do.
You can get emails any time some of these things trigger. You could get emails after a certain number of failed signings or after someone potentially has tried to change things on your server when you install a program called "Tripwire," which will allow you to monitor if any of the files have been changed.

You can go much further than this with security. I personally am happy with just setting this up immediately, and then going forward from there because this will stop most of the amateur hackers.
No matter what I do and how hard I try to set my server up, I still will be vulnerable probably to the very highest levels of hacking. Now, from here for me, I'm getting diminishing returns by adding additional security because I don't have that much experience with Ubuntu Linux. These basic things stop basic hackers.
If I try to go further I also risk messing up a lot more of my own server. I also risk getting things in place that I don't understand exactly how they work. I've put things that are easy to install and fairly easy to understand how each of them work, and that gives me a server that has decent security.
Therefore, that should be secure against most ordinary things and I hope that's good enough because that's what I'm doing with my servers today. I hope that sharing this complete full tutorial filmed in October 2017 in Ubuntu Linux 1604, then transcribed and edited in this blog post, is useful for you.
I found tutorials just like this extremely valuable for learning how to do this. How do you think I learned how to do all this?
I learned how to do this by reading other people's free tutorials. I didn't take any video classes. I didn't pay for anything. I just googled and learned all this for free. I give the same to you. I hope this is helpful for you. If you'd like to see what I'm doing with this essentially, I'm using this as a Witness server for Steemit.
If you have not signed up already, would you please join me on steemit.com/pick_account because this is the opportunity of a lifetime today?
If you're looking to blog or make free tutorials like this, I've made this as a free video tutorial first and now I'm posting it on my blog here. By posting it on my blog I will have the ability to earn money from doing this as a post and I will have the ability to earn money from ad revenue in terms of the income on YouTube.
I have made all of this server tutorial and I've learned Ubuntu Linux so I could run a Steem Witness because my server actually earns cryptocurrency in the form of Steem Power, which can be powered down into Steem and sold easily into US dollars every single day.
I'm grateful that I earn about 50 Steem a day, which is about $50 a day currently from my server and I'm planning to do a video tutorial when I set up my third, or second backup Steem Witness server, that will give me automatic failover into a third server as needed. I have pledged all of my earnings as a witness to ads for Steem as explained more recently at https://steemit.com/steemads/@jerrybanfield/new-52-second-animated-video-ad-7-for-steem.
I've shown you my second backup setup in this tutorial and I think after you have read this post and joined Steemit, you will thank me later, which is the exact phrase my friend used when he invited me to join Steemit.
He said, "Join Steemit. You'll thank me later."
I'm thanking him.
Steemit has been exactly what I've been looking for in terms of having a blog and being able to build an audience online, especially when you combine Steemit with YouTube, it's extremely powerful for organic discovery.
You've made it all the way to the end of this tutorial. Think about how you found me here. Even if you're more of thinking to go technical like, "I don't need to know anything about marketing." Think about how you found me here. Did you google this? Did you search on YouTube for it? If you read it on Steem after already following me, how did you originally find me? I bet it had something to do with Google search, YouTube search, word of mouth marketing, or some combination.
What's hard often is getting to the point where you can afford to essentially make free video tutorials and in the short term not earn anything, but in the long term, the earnings tend to be gigantic and automatic with repeated effort.
That's what I've done. I took a leap of faith four years ago and just started making the best free video tutorials I could and that has been the best decision I've ever made in my business, to share all of what I know completely for free out online. Steemit.com and my YouTube channel give me the ability to do this.
I'm grateful for the time you've spent with me here.
Thank you very much for reading this, which I hope has been helpful.
I love you.
You're awesome.
Thank you for reading this blog post, which was originally filmed as the video below.
I hope you've enjoyed this tutorial and I'll see you again in another video or another blog post on Steemit.
If you found this post helpful on Steemit, would you please upvote it and follow me because you will then be able to see more posts like this in your home feed?
Love,
Jerry Banfield with edits by @gmichelbkk on the transcript from @deniskj
Stay updated via email?
- Join at http://jerry.tips/steemposts to receive an email with every new post on Steem or
- Join at http://jerry.tips/emaillist1017 to get an email once a week with highlights!
Shared on:
- Facebook page with 2,244,744 likes.
- YouTube channel with 208,173 subscribers.
- Twitter to 104,788 followers.
PS: Would you please make a vote for jerrybanfield as a witness or set jerrybanfield as a proxy to handle all witness votes at https://steemit.com/~witnesses because 100% of the rewards I receive are spent advertising Steem? Thank you to the 1617 accounts voting for me as a witness, the 718M VESTS assigned from users trusting me to make all witness votes by setting me as proxy, and @followbtcnews for making these .gif images!
Or

Hey
I really liked your idea about becoming witness as always .But I have little confusion at some points .Please if you can make a video regarding this or you already done then share it's link .And I really appreciate your efforts. Thanks for this post @jerrybanfield .🙂🙂😘
Bookmarked and thanks, i plan on becoming a witness and need this to educate myself to make the needed adjustments and how to do it correctly, thanks @jerrybanfield be well bro.
Yes this is a huge post, but Jerry goes into good detail, You should sub this guy on youtube if you have not done so. I have followed his tutorials and they seem to work every time. I had one issue yesterday but it was an error on my part, not the tutorial I skiped a step...lol My Bad.
Keep the tutorials and info going Jerry.
Thanks M8
Jerry, can you give me a link which has a best description of what the witness is, how it works and what does the witness get from being a witness?
When I search google it pops out tons of articles but every time I open them I get irrelevant info, not what I was searching.
Thank you in advance.
Sure @bayuya Steem Witness Basic Training at https://steemit.com/witness-category/@jerrybanfield/steem-witness-basic-training explains the basic of what a witness is and an overview of all the steps needed to participate.
absuletly
Exxellentte. Thank you very much.
Great work @jerrybanfield ! I am your big subscriber on YouTube. Because of your video, I made decision to open Stimmit account. Hope you can help me get on to a quick start on Stemmit!? Thanks in advance!
Wow jerrybanfield you did it again!, excelent post, more security setup explained crystal clear! upvoted and resteemed for the benefit of my followers!
OMG this is really a huge post :O
@jerrybanfield This is fascinating to me but I still have a lot to learn about overall computer knowledge. I always enjoy your postings especially ONE Day at a Time. Much Love my Brother !!
Wow @jerrybanfield, this is very encompassing. Details about the Ubuntu Linux server setup for geeks and nerds like us. I think I'm going to become a witness soon. Lolx.
Thank you for always bringing hardcore information to the table for all of us to benefit and grow the steemit community.
Remain Awesome Sir!
Wow, amazing tutorial Jerry! Super detailed. I have been in the computer world for a long time and am super impressed. I look forward to your next post ...