12 Steps to Secure a New Ubuntu Linux Server!

Will you read this Ubuntu Linux security tutorial to see how to setup a new Ubuntu Linux server because these simple steps can block most basic hacking attempts? If you are hoping to setup a witness server for Steem, I hope this guide will help show what to do immediately after getting access to the witness server but before installing Steem and following the steps listed at https://steemit.com/witness/@jerrybanfield/get-a-steem-witness-seed-online-today-with-these-ubuntu-linux-commands.
Why Secure an Ubuntu Linux Server Immediately?
It's ridiculously easy for hackers to break into an unsecured server.
How easy is it?
I will give you the simplified steps right now.
Let's say you're hosting a game server. You've got a mobile app or a text game online that you're excited about. You hosted on an Ubuntu Linux server.
Someone comes in, doesn't like your game and all of a sudden says, "I want to trash this game."
They then google some basic ethical hacking tutorials and quickly find the IP of your server by tracking the connections while playing the game. The now amateur hacker with no previous experience then takes a few programs downloaded from watching maybe an hour of ethical hacking tutorials for free and starts using those programs to brute-force the password on your Ubuntu Linux server.

The hacker then gets in after you didn't change your root from the sign-in and didn't change the password from the one you got from the hosting company or just changed it to something different.
Now, the hacker is inside the server and unless you've set up ways to get notified about that, you have no idea. At this point, even with just not liking you and googling for information, within a few hours with no experience the hacker can now lock you out of your own game, and/or steal user data without you having any idea that's going on.
In the worst-case scenario, the hacker can post this on a list of hacked servers. This allows anyone anywhere in the world to go browse the sign-in information directly for a server. There are lists of things that have been cracked by hackers that are just out there where anyone can just go, then get the password and the sign-in.
All of a sudden, you might have 50 or 100 people just signing into your server looking around until one person changes a password and locks you out.
What I will do in this tutorial is show you very quickly with no coding experience required, even if you just use the Linux server to do some application where you never need to access it or code anything for some reason, even if you're an absolute beginner in here, how to do some basic precautions, basic security measures to block at least the amateur hackers who are just getting a hold of some information from Google.
Now, will these things stop the potentially intermediate hackers who've been working for years, the advanced hackers who really know what's going on?
Not necessarily!
They may slow them down a little bit and make things more interesting, but that just might get the excitement up and make the desire to crack it even higher. The good news is there aren't very many intermediate or advanced hackers in the world that have an interest in hacking everyday servers from users. There are a lot more lucrative targets to go after.

Therefore, the security measures we need are simply to block out the amateurs, the beginners, the googlers that go grab a few software programs and just are messing around for fun. Those hackers are the ones who are very likely to be trying to hack our servers. We want to block especially the amateurs out and what I will show you here are things that should lock out almost any amateur hacker from being able to get into your Ubuntu Linux server.
Now, there is one big problem with these things that I will show you too. They will make it easy to get locked out of our own servers. Even as I set this up and film the tutorial, I got locked out of my server for doing one little mistake. I could not sign into my server using any method even though I had all the passwords. I had to reformat my server and start over again. That was humbling and I've got great experience to share with you here because of that.
What I will give you at the very beginning is an easy tip to make sure when you're setting this up that you don't lock yourself out of your server. That's pretty much the worst-case scenario, at least for self-sabotage, to lock yourself out of your server. That's pretty newbish and that's why you want to set these things up as soon as you get a new server.
After I've gotten three new servers, I got a hold of my server and I just wanted to get everything up and running on it. I didn't want to sit there and take an hour to go through and put security on it.
"Oh, my God! I just want to get my Steem Witness running. I don't want to sit here and put all these security measures in place."
Well, these are essential because of how easy it is for an amateur hacker to just crack our servers. It's relatively easy to get an IP. It's relatively easy to get a program, then go with the root sign-in and brute force the password. If you don't have the things I'm showing you in place, it's very easy to end up with a compromised server.
What am I going to show you in here?
First, I'll give you the trick to make sure you stay signed in. What I'm doing is showing this in a Putty window. Now, a Putty window is what we use on Windows. You can use it on Mac, which also has native sign-in. I'm showing this on Windows and you can use this to sign in to an interface with the command line interface in the server.
Now, what can you do to avoid getting locked out of your server?
When you get that original root@ipaddress and password from your host or the username@ipaddress in your host, what you can do to avoid getting locked out of the server is to just keep that original sign-in window open on Putty, and then use Putty and do a duplicate sign-in every single time, and just the whole time you're setting these things up leave the window open with that original root sign-in.
That way if you screw up like I did, lock yourself out of the server, in terms of being able to sign in again that original root sign-in, you can just alt-tab over to that, undo whatever you just did before, and then you can sign back in and keep working from there.

Another thing you want to make sure, use some kind of a password manager because you want to have a really strong password that's not easily cracked. Although, with what I show you here you can go beyond password signings. You want to have a password manager to keep all these passwords safe and you want to backup the passwords because if you lose access to your password, you can also lose access to your server.
In this case, if you lost access to your password, the hacker could have access to your server, and then you need to get a hacker to help you get back in your own server.
Another quick tip on doing this is to just make sure every time after you do something, for example, after you put an RSA key in, that you can log back in and log out. Don't do all of these things at once, and then go back in at the end to find that you can't sign in, and then not even have an idea of how you went wrong at one point.
The best part is, I have very little actual Ubuntu Linux experience. I've only been using this for a few months, so you know that these aren't things that are very hard. In just a few months I have learned enough to teach at the beginner level just by reading guides like this. My favorite series is by @krnel and starts at https://steemit.com/witness-category/@krnel/complete-witness-installation-guide. I basically am doing a runthrough of these here.
If you've read this far, you might have been thinking that I've got a ton of experience and these things are over your head which I hope to change now!
These things are really simple to do. These are very easy even for an absolute beginner to do and it is essential to do them for the reasons I've already given you.
Thank you very much for starting this tutorial. I will go through each step with you. As for real live, I've set up this server that I'm actually inside right now.
12 Steps to secure an Ubuntu Linux server
Step one: Choosing a server host.
Unless we prefer to build onto our own machine, for maximum reliability, renting from a data center is ideal. In this section I show you the servers I use for greatest privacy in hosting.
Before we can even access our server we need to actually have a server to access. I think, especially for learning Ubuntu Linux, that it's very nice to have our own servers that we can play with and get to know. What I do is I rent servers out.
These are the specifications for my servers: my witness, my seed node and my backup.
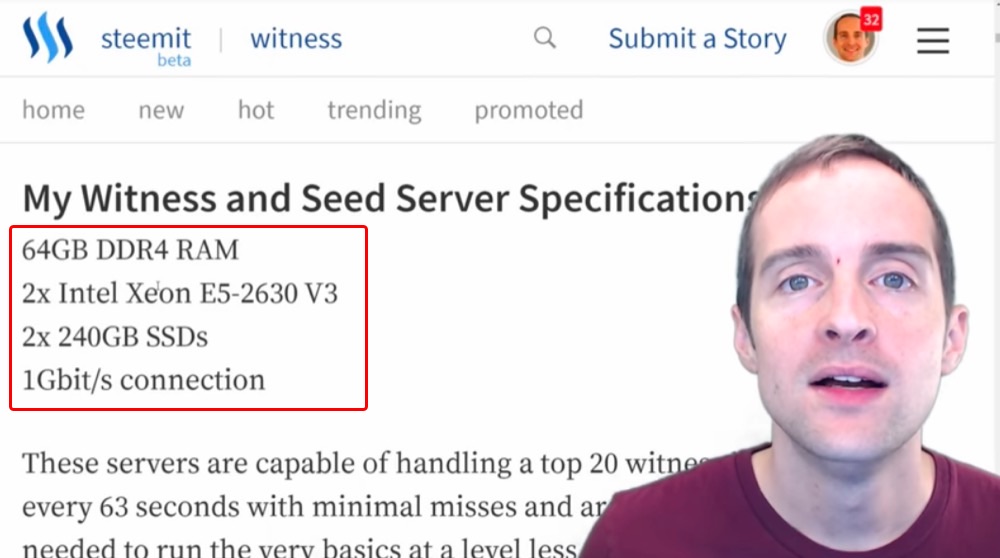
All of these are the same, and then I rent them from Privex. This is what I use because the CEO of the company is a member of Steem named @someguy123 and runs his own Witness servers and several other Witnesses run through these servers as well.
It makes it easier because the hosting company is then used to the exact purpose the servers are used for. There are tons of different places to grab a Linux server. This is just what I use and you're welcome to use whatever you want.
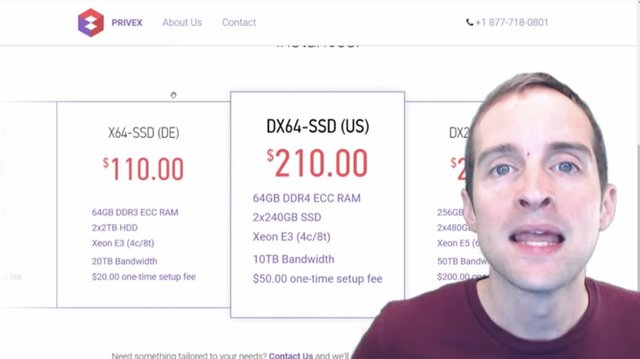
I have my main servers located in the USA because that keeps things simple for me from a business perspective and a lot of the other Witness servers are in other countries. Then, I have a backup server in Germany because, if you want to have servers with failsafe such as a backup, then it's important to have them on different continents just in case there's one temporary thing such as a weather problem in the US or a riot in Germany. Whatever, you want to have your data centers in separate places.
I've got three servers and about $500 a month in bills. I've got two servers in the US and one in Germany. These options are more expensive than what's possible. You can get cheaper servers with lower specifications to run a witness, the seed node or a backup.
I've chosen these servers because I want to set the same servers up and let them be able to run for years instead of going on the low end, and then continually upgrading. I think it's easier to just grab a server package that's good indefinitely.
At the same time, I've been in business six years, I'm grateful that five hundred a month is within my budget. I accept each of us have different budgets. If you're on the very smallest budget, you can set up Ubuntu Linux on your own computer at home and use your existing connection there.
Hosting options give us the chance to access our server. Once we've got our server wherever it is, whether it's on our computer or in another location, then we can access it.
That takes us directly to step two.
Step two: Access the server.
In this section I'm going to show you how to access the Ubuntu Linux server with Putty and signing in to root or with a username for the first time.
Once we've got our server hosting we will get some kind of email like this that says, "Thank you for using whatever host."
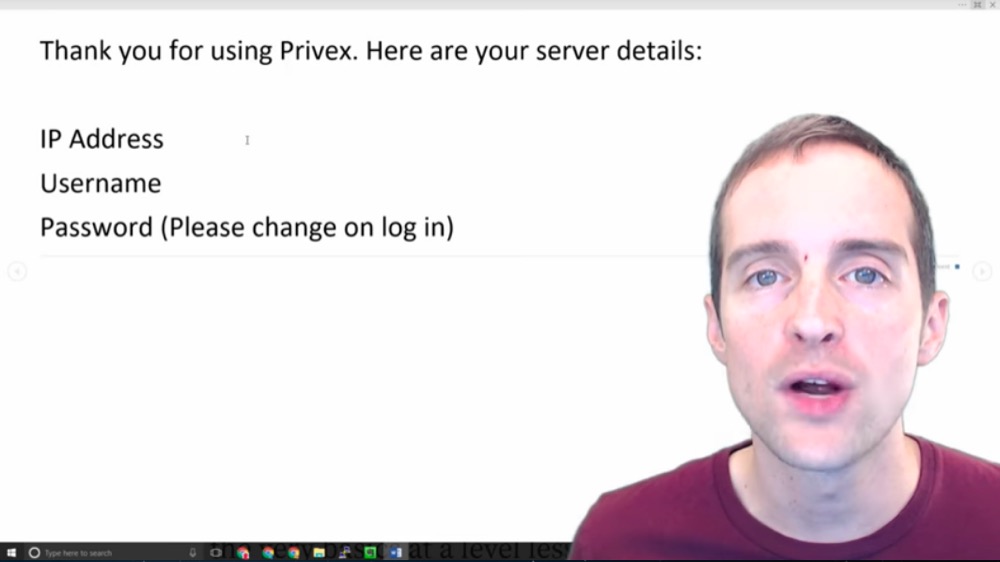
We get an IP address, a username, and then a password. Often the username will be something like "root" and the IP address will be a standard format, and then there will be some sort of password.
What we need to do then with that is to put this into a program that will allow us to then access, to sign into our server. What I use is Putty on Windows, and then here's what we do. I've explained all of this in my Witness guide.
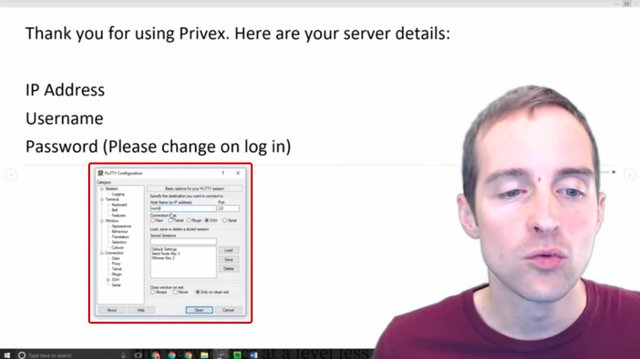
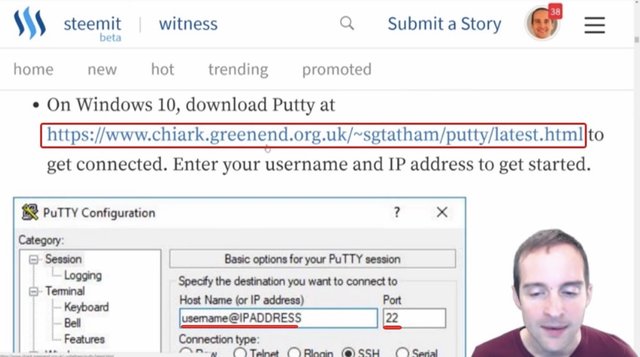
We put in the hostname or IP address. If you are given "root" as the username, you put in "root@" and then you put in the IP address right after that. I will show you this after I'm signed in next.
If you are given a different username such as Jerry, your username would be "Jerry@" and then you put the IP address. Leave it on port 22 by default unless you are given different instructions to sign in. Then, click "Open" and once you have done that on Putty, this will open up the window where you can then start to get into the server.
It will look like a black interface usually, and then it will ask for the password. Once you've got into the interface like this, and then asked for the password, what you do is copy the password first, and then go back into the command line and you right click to paste it. All you need to do is right click and hit enter, and that pastes the password directly in.

Now, for this particular step, I won't actually show you doing it because then I have to put my IP address and it's important for servers to keep that IP address private because if a hacker knows where the IP address is, it's essentially a sitting duck that's there to be worked on over and over again.
Therefore, keep that IP address secret. It's also best to keep all the other details of a server secret when possible such as the username and the password. What I will do is show you ways to upgrade sign-in so that a hacker can't just essentially brute-force the password.
Brute forcing means to just try all kinds of different combinations and eventually get in. Always keep security in mind with setting up any kind of Ubuntu Linux server because there are lots of hackers all over the world that are trying to control as many servers as possible and will pick the low-hanging fruit that are essentially easy to just hack into and start using. Think security from the very beginning, which is what I'm going to go through next.
Step three: How to download Putty for Windows.
Putty is what I use on Windows 10 to access the server and in this section I'm going to show you where to download it.
If you're on Mac, you can get Putty on Mac also, which is nice because then you can use the same private keys on both Windows and Mac.
You can also sign directly in with the terminal on Mac, which can be a good way to get started. However, it's better to be able to upgrade security with things like RSA keys, which you might want to use Putty for or another program.
This is where I get Putty for Windows 10: https://www.chiark.greenend.org.uk/~sgtatham/putty/latest.html
You can see the basic sign-in set up on Putty where you get that username and IP address that is provided by the host. Then, you see this page when you go to download Putty.
You can grab the "exe" files, you can get the Windows installer if you want to do the MSI.
I grabbed the "putty-64bit-0.70-installer.msi" file right here and that's how I got online.
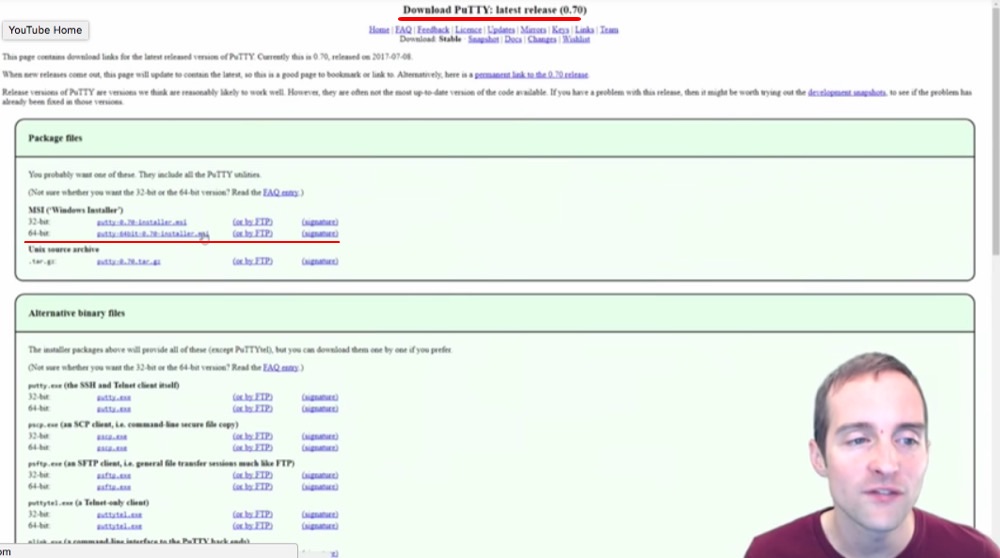
These are very easy installations and a lightweight program, easy to get started with and connect.
Step four: Using a password manager.
In this section I'm going to show you how to use a password manager like LastPass to keep the root and username passwords.
All right, we are signed in to our server now. As you can see it's set up with root@jerrybanfieldwitness2.
This is good because it's not showing my IP in this tutorial here.
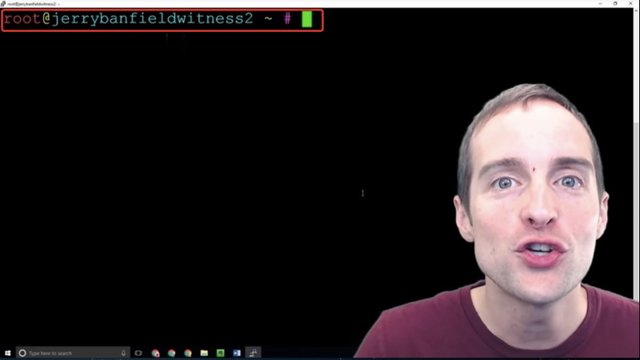
Now, the first action I need to do is change the password because my server host had the password and anyone interacting under the server host has the server password too.
It's a good idea to immediately reset or update the server password to something more long and secure because if someone else gets this server password and we don't take additional security as I'm going to show, then someone can sign straight into our server and do whatever he wants and we might not even realize that's happening until it's too late.
Now, if we reset the password, and don't keep good track of it or put it somewhere else, we might immediately lock ourselves out of our server. We do not want that to happen.
What I recommend is using some kind of password manager like LastPass.

LastPass is an awesome password manager that I use because it allows me to keep track of all passwords everywhere. It's really nice because LastPass generates passwords and saves passwords. I've then got access to my passwords whenever I can sign into my LastPass account.
Now, the one problem with this is essentially putting all our eggs in one basket. If we have a LastPass master password that gets cracked or something happens to LastPass, it's like a fire sale, all of our passwords everywhere are wide open.
Therefore, using a password manager is a great idea. However, make sure to have a secure master password that is only available by memory or in a secure offline location because this unlocks the vault essentially to our entire lives.
This is a great thing to use when generating a password because we can generate crazy long passwords then. I can have a 20, 30, 40, 50 or 60 character long crazy password for my Linux server that will then help make it ultra-secure, at least against password brute-force type attacks.
Therefore, I will generate a password for my server to update it, and then I will put that new password in with the password command.
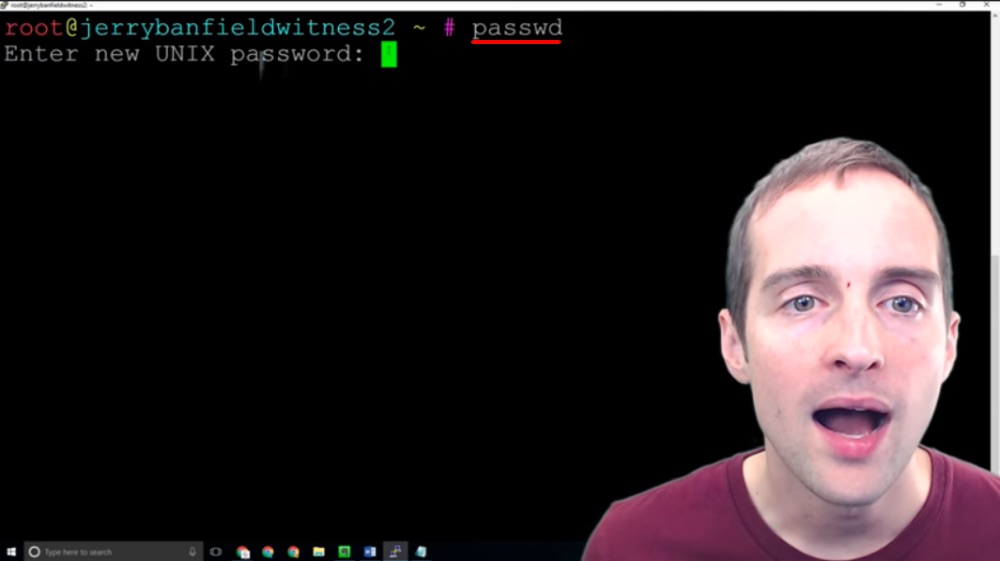
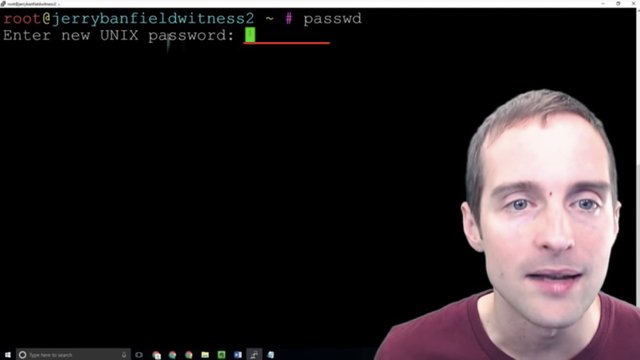
Step five: Changing the password with passwd.
Now, it's time to actually update the password and that's what I'm going to show now. If doing it incorrectly, if putting in mismatching passwords this error will appear right here.
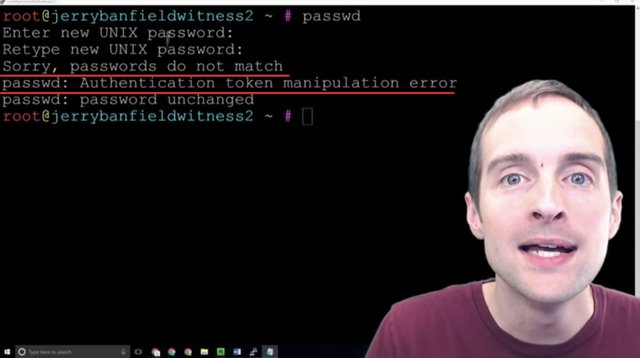
What we can do is CTRL + L to start fresh and I'll show you how to do it properly.
What I'm going to do is put "passwd" in to change the password for the root or the main system on this server. The old password will no longer work as soon as I do this correctly.
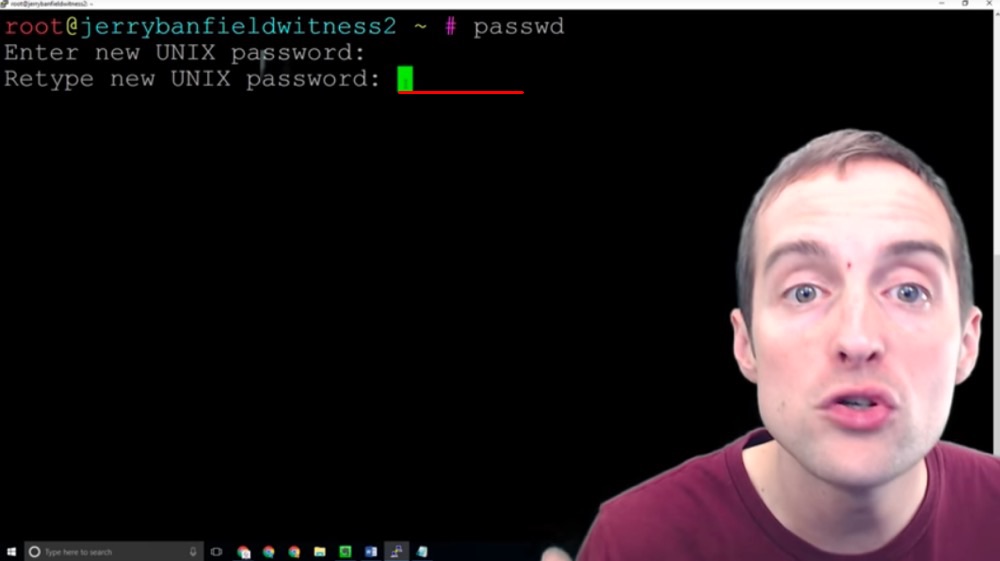
I'm going to do this two different ways. I generated the password in LastPass, therefore what I'm going to do first is copy the password with CTRL + C out of my Notepad in another window.
I'm going to then click over here and right-click the password in. I will then hit the enter key and paste that first password in.
Then next I will grab the password directly out of my password manager, and then go over here and paste it in. This way I've got the password entered from two different sources to make sure there's not something wrong with my password.
Now, this shows that I've successfully updated the password.
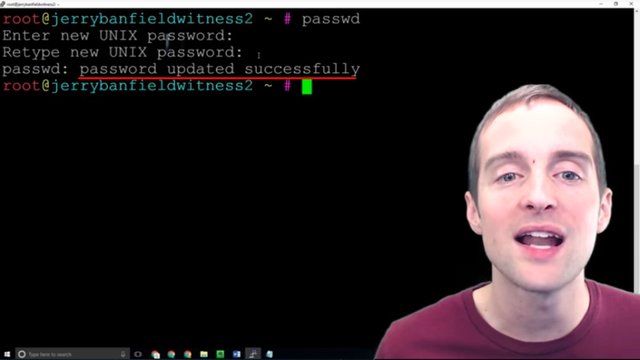
This means that the old password now is invalid and only this new password will work to sign-in.
What I do to verify this, I open Putty back up, I load back in and sign in with this new password to make sure I did everything correctly.
The easy way to do this is just to type "logout" which will close the session window.
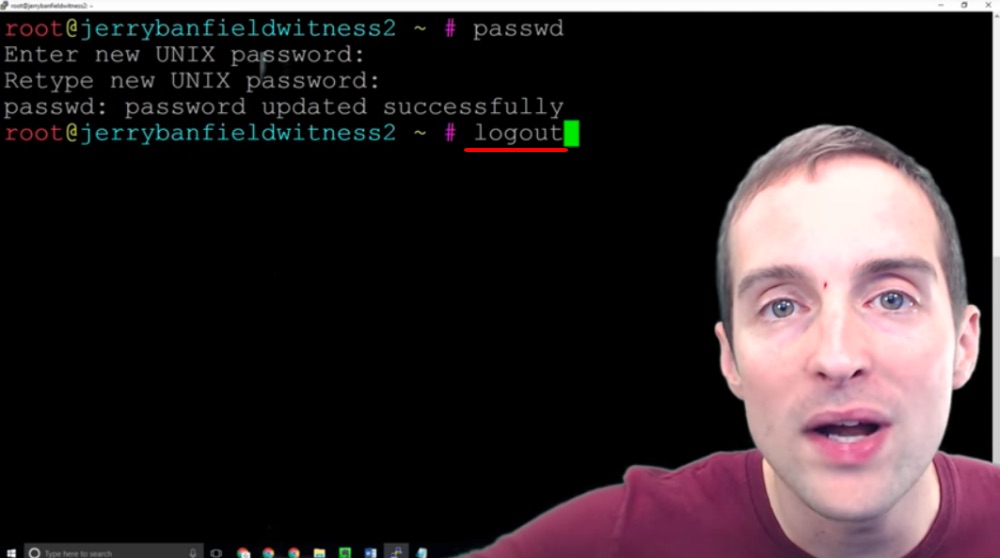
This way I verify that I'm actually going to be able to continue using the server. I wouldn't want to go through and set all this up and discover I didn't copy the password correctly, and then as soon as I go to sign back into my server I'm locked out.
What I do is I log in and log out a lot to make sure every change I'm doing is done correctly and therefore I don't risk setting the whole server up, and then being locked out of it. That's the trick with security, to get great security, but not to do it in such a way that it's so secure you lock yourself out of it.
Now that I've signed in and out, I've proven that my new password has worked.
The next step is to get a different user.
Step six: Adding a new user with adduser.
In this section, I'm going to show you how to create a new user.
We don't want to be fooling around as the root user because that's the main system level access. We want to set up our own individual user.
Krnel's guide on Steemit explains this very well.
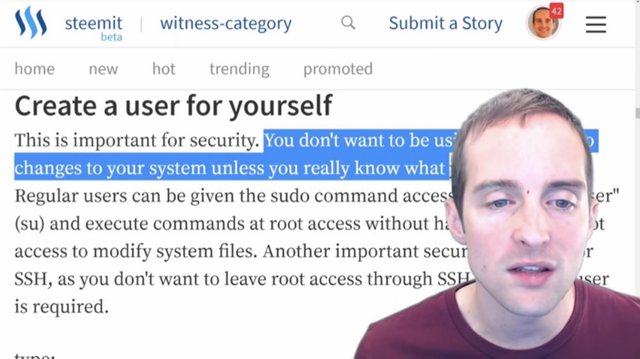
It says that you want to create a user for yourself because it's important for security. You don't want to be using the root unless you really know what you're doing. I'm going to take a leap of faith and say that if you're reading this you probably don't fall into the really-know-what-you're-doing category, because I am a total beginner at this myself relative to someone who knows what they're doing with this.
It can be easier to learn from a beginner if you're a beginner also in my experience, which is why I've taken the time to make this. Therefore, you want to follow the advice of more experienced users.
You want to set up and become a superuser and to create a new user. Now, this is the ideal way to essentially change the username to the highest permission.
The easiest way to set up a new user is just to use this "adduser" command.
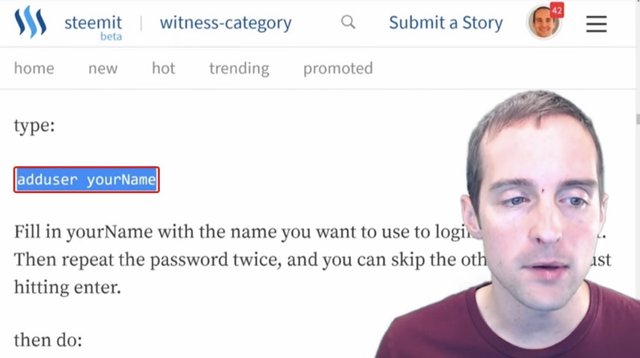
I'm going to name the user Jerry and as soon as I hit "adduser jerry" I have the user created.
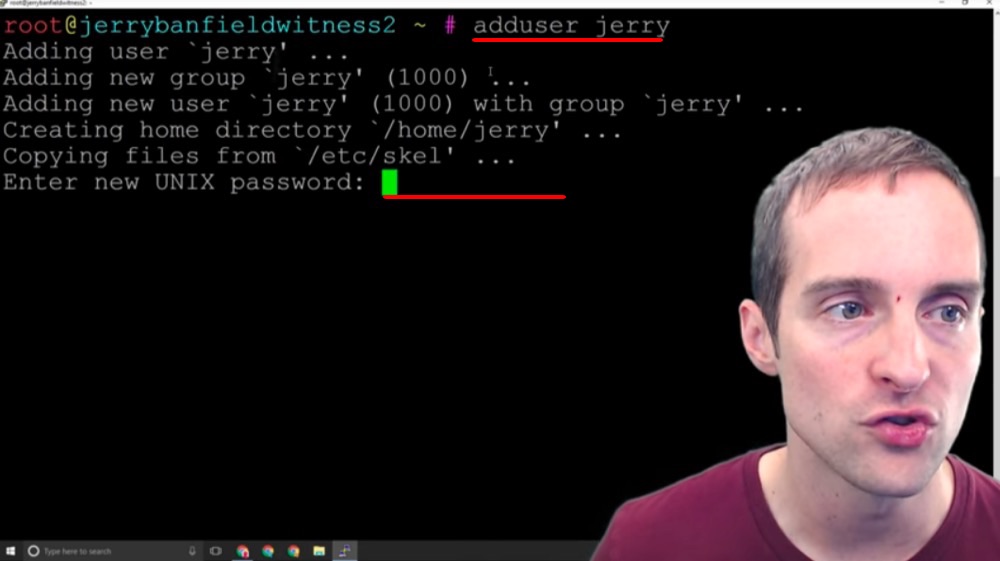
I have to put a new UNIX password in for this also.
I'm going to need a password for user "Jerry" because Jerry will now be able to sign in directly via IP address with Jerry's own password. Now, I need to go through and make a password just for Jerry, and then there will be a separate root password that handles root.
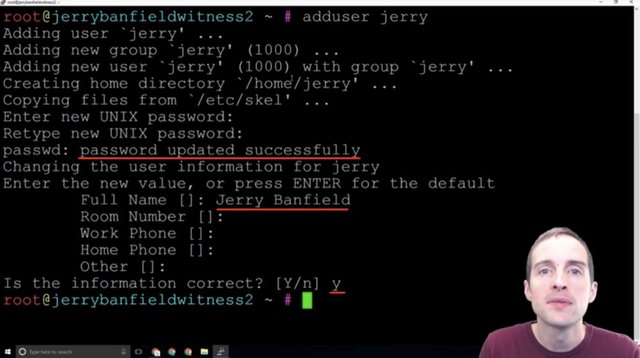
This is nice because then it's another layer of security, but it's another layer of complexity as well. Now, I will generate the new UNIX password, and then what I will need to do is before I log out, give myself sufficient permissions to be able to act, to run commands as root from being signed in as the "Jerry" user.
This is similar on a Windows or Mac machine, to making your own user account versus running as the system somehow, which is not available generally on Windows or Mac, you only sign in as a user.
I will set my password now, and then I will continue with you.
After putting the password in, it provides options to set the name, room, work phone, home phone and other. These aren't strictly necessary and you can leave all these blank. I just put in my full name and I left these other things blank, and then hit correct.
Now, the next key thing is to test signing into the server as this user instead of signing in as root. At this point, we will be able to sign in to our server if we've got a root. Also, if that was how we were given access to the server, we'll be able to sign in with both our username and root.
We want to be able to sign in with both of these to make sure they work and that we can access the server either way. What I will do next is log out.
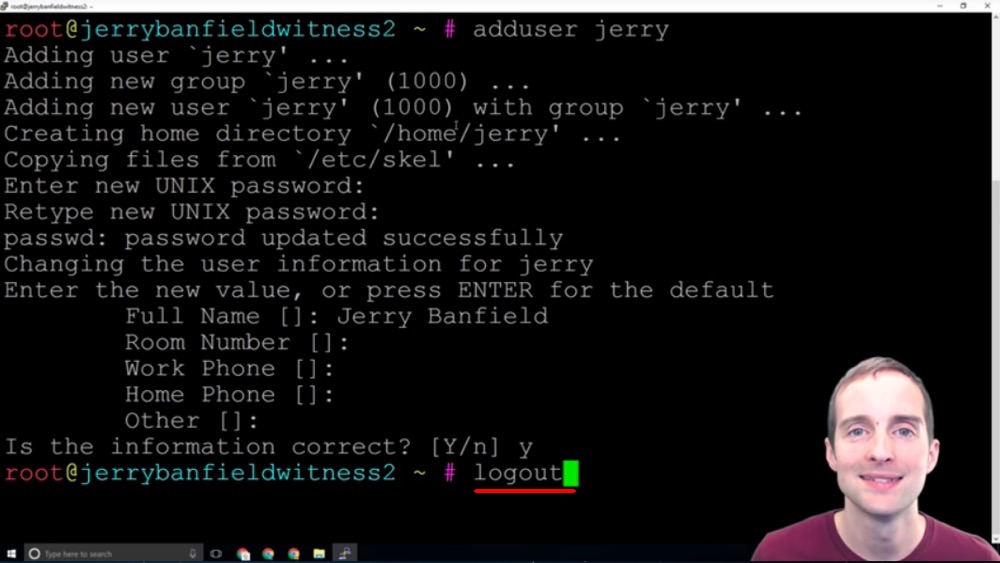
I will switch the username in Putty from root to Jerry and verify that I can sign into my server with Jerry as the username. Then, when I can do that, I'm ready to take the next step.
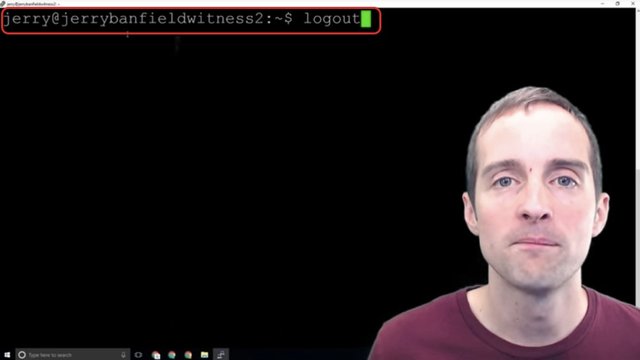
Step seven: Signing in with the added user.
Now, that I've successfully signed in with my new username I can verify that this works and I need to give myself the correct permissions.
Since I know that I can sign in with my username I now just want to sign in with my username. I don't want to bother signing in any other way at this point. What I want to do is then follow up by giving myself the highest level permissions from root, and then I also want to disable the root login because if the root login is open, anyone can essentially try to brute-force the route login, but if you don't know what the username to sign in is, that makes it significantly more difficult.
What I want to do is to log back out again, and then I'll log back in as the root user and give myself, on the user account Jerry, permission to act at the highest level.
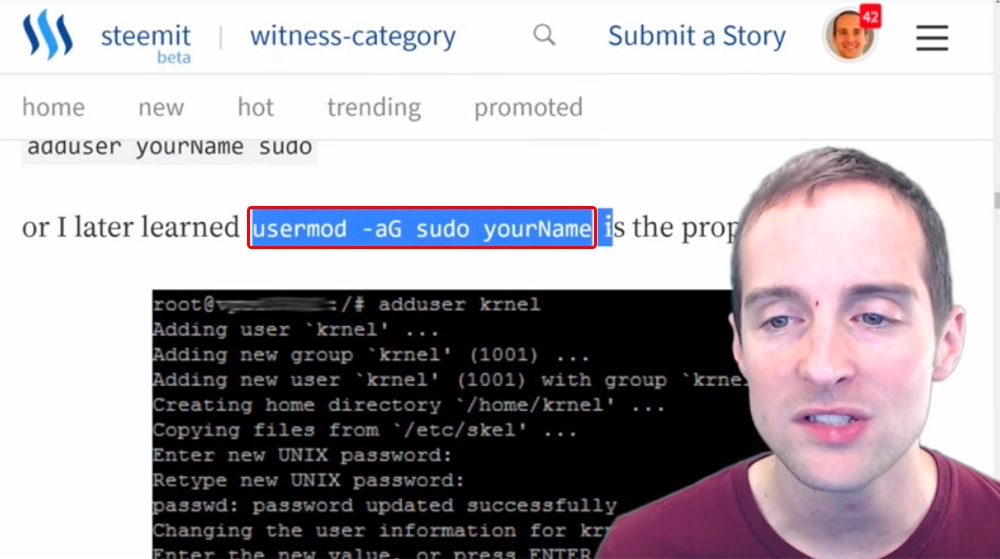
Step eight: Usermod to give the user sudo or root privileges.
Now, that I'm signed back in as the root and you can see the root@ over here, what I want to do is give myself on the "Jerry" account full permission to do anything.
Right now I have essentially just basic permissions and I can hardly do anything as a new user. What I want to do is use this exact command, "usermod -aG sudo" and then my name to modify this.
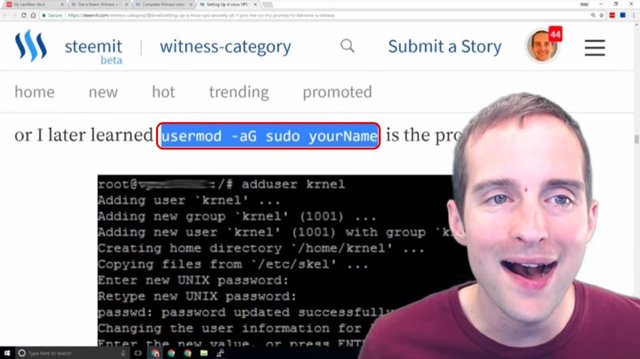
This will create a new user group and give every user in that group root level permission. What I'll just do over here is paste this command in and change my name to Jerry and now the command is "usermod -aG sudo jerry" which will give me the ability to do everything. I hit enter on this.
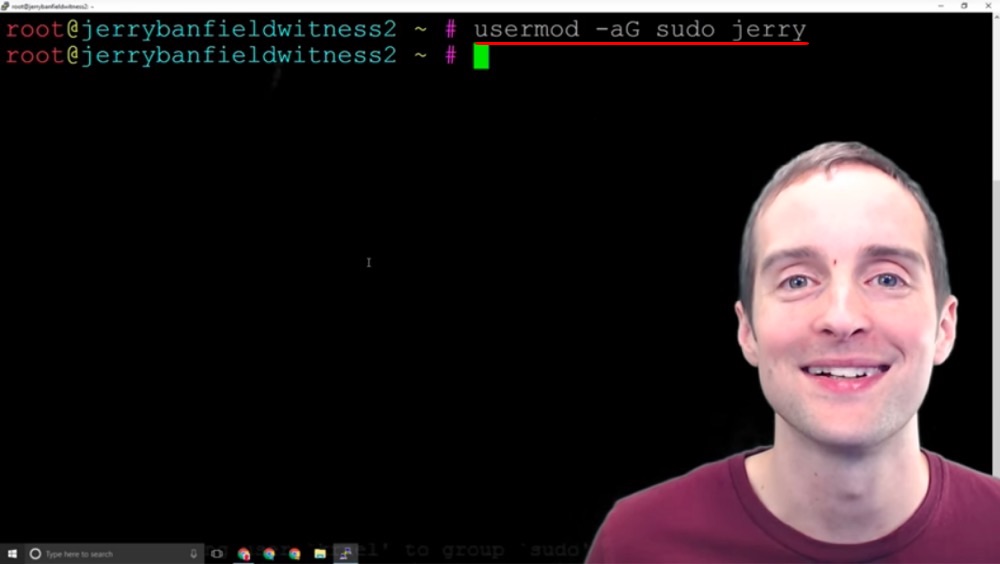
Now, I've created a new group of users here, and then I now have full permissions on this new user level as a higher-level user.
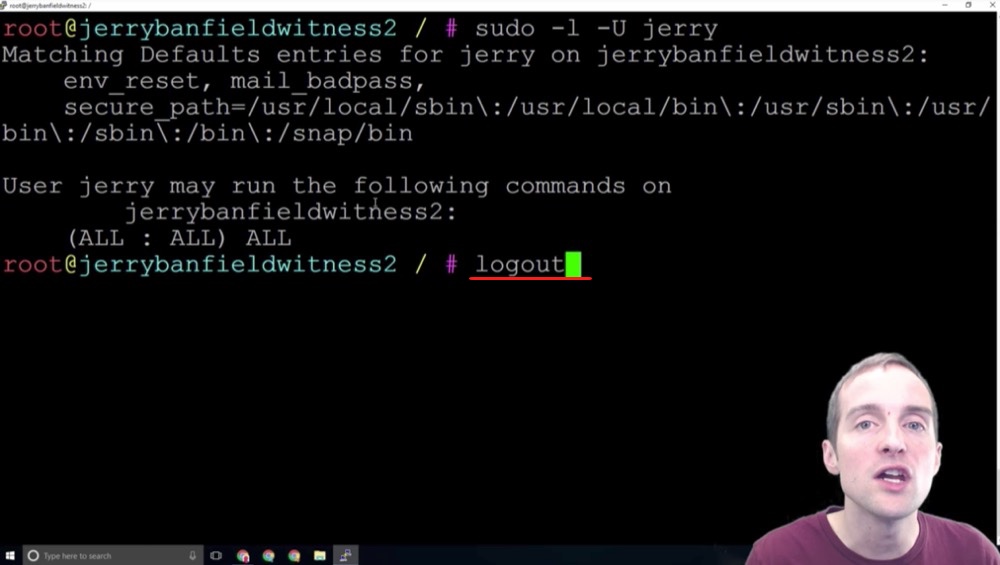
Step nine: Verify sudo access on user.
Before we log off, how do we check that we set our user permissions correctly?
The easiest set of commands to do this is "sudo -l -U" and then put the username in. If I hit the "sudo -l -U jerry" command, this essentially just tells me what level of access I've given myself.
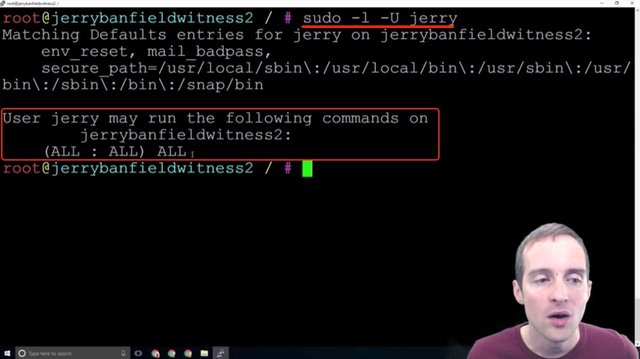
This shows that I can then run all commands on the server, and that's what we want to see before we fool around and do the next step I will show you in disabling the root command.
This means that when I'm signed in as Jerry I can type "sudo" to run something as needed at the root level. All I need to do now is log back out and sign in as Jerry, and then I can continue to the next important step of security, which is disabling the root login so that only Jerry can log in.
You can see that you would only want to do this if you verified you've got the highest level permissions on the server.
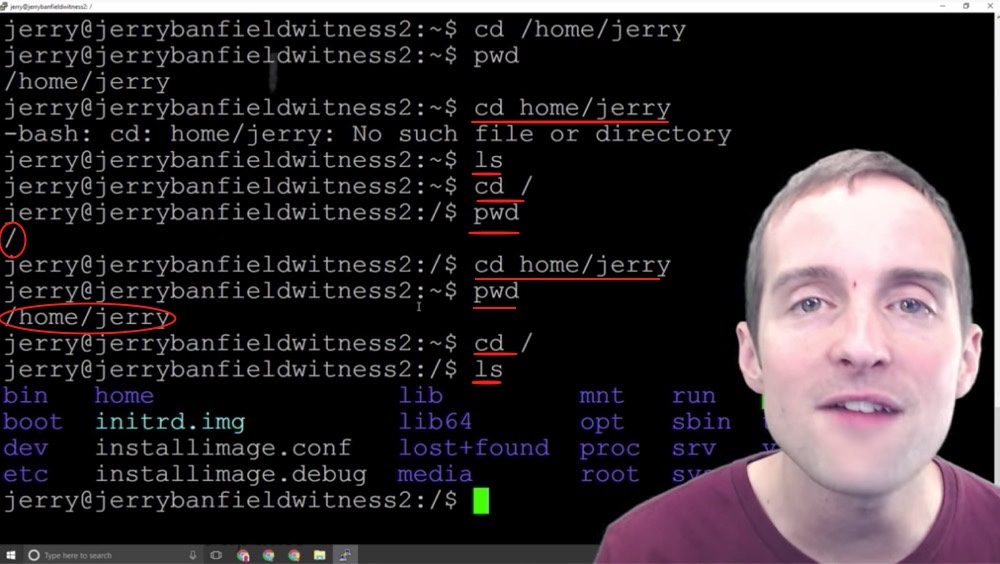
Step ten: Key basic Linux commands cd, pwd and ls.
Now, that we've got our user created and given the proper permissions, it's time to switch to the root directory with a few basic commands and get to work.
I will show you a couple of basic commands here that are incredibly helpful. One is called "cd" which is just change directory, and then this slash goes to the main one.
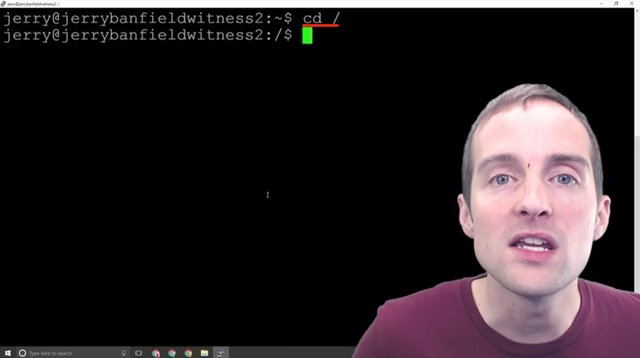
In the command-line interface in Ubuntu Linux, we want to make sure we essentially know where we're at and we control where we're at. You could think of change directory in the Windows Explorer interface as moving around into various folders.
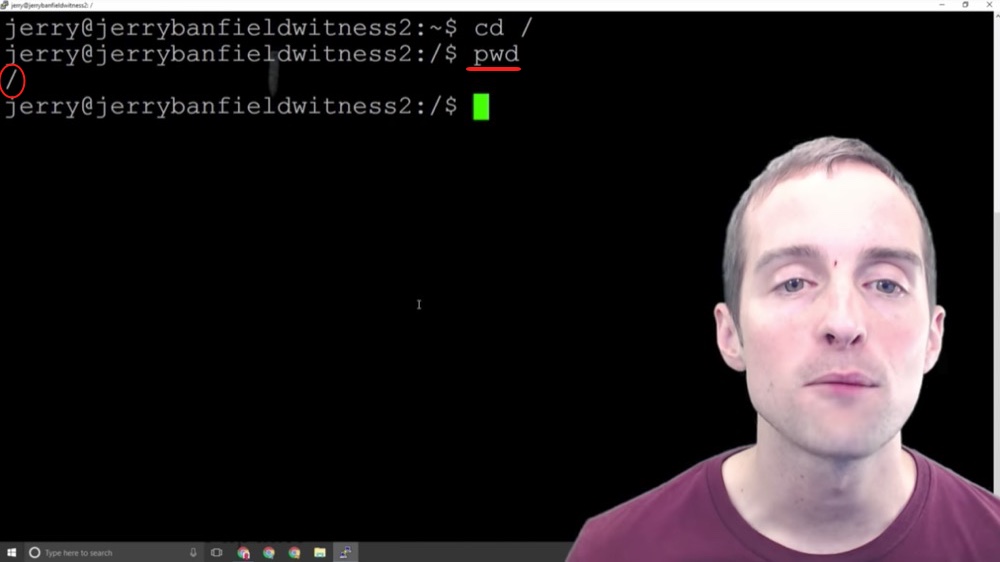
How do we know where we're at?
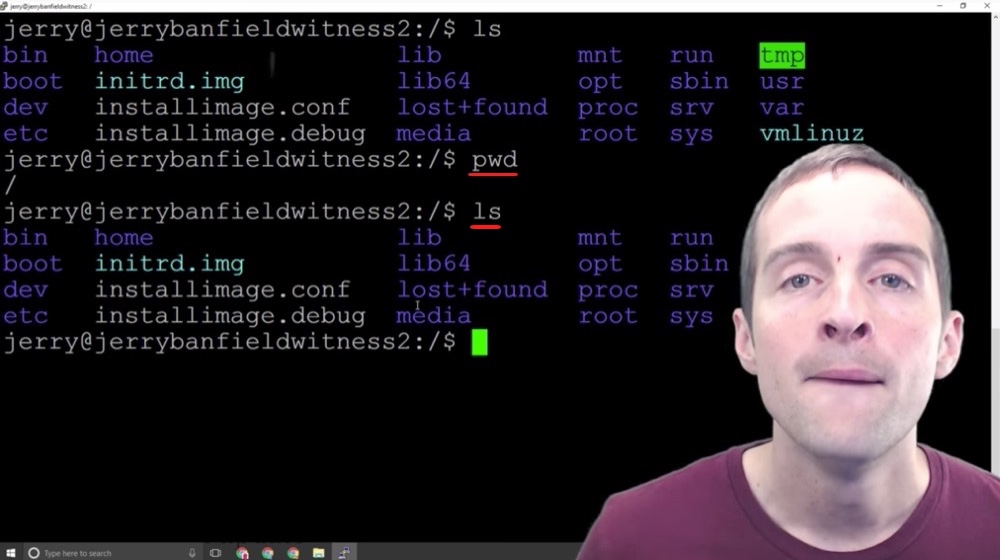
What we can do is do "pwd" which stands for print working directory and that shows us we are at the root level.
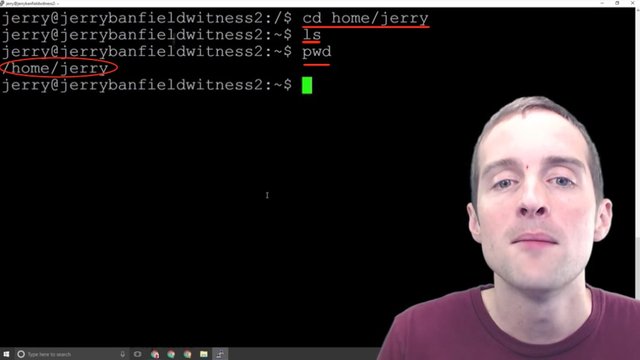
For example, if I change to "home/jerry" and then I print working directory, now it shows that I'm in "home/jerry".
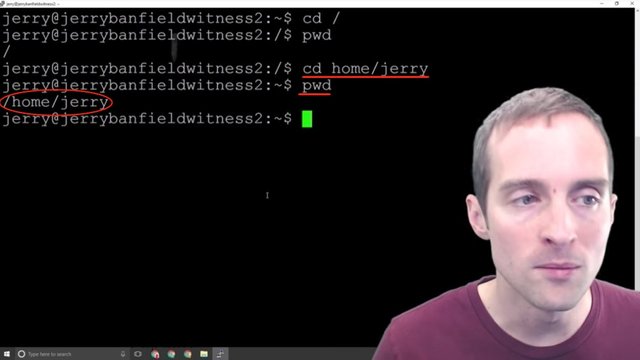
Now, I can't change to just "home" because that would essentially change me to the "home/jerry/home" folder, but if I put "cd" that takes me to the root, and then "home". That will take me over there, and then if I hit "cd" again, this will take me back to the basics.
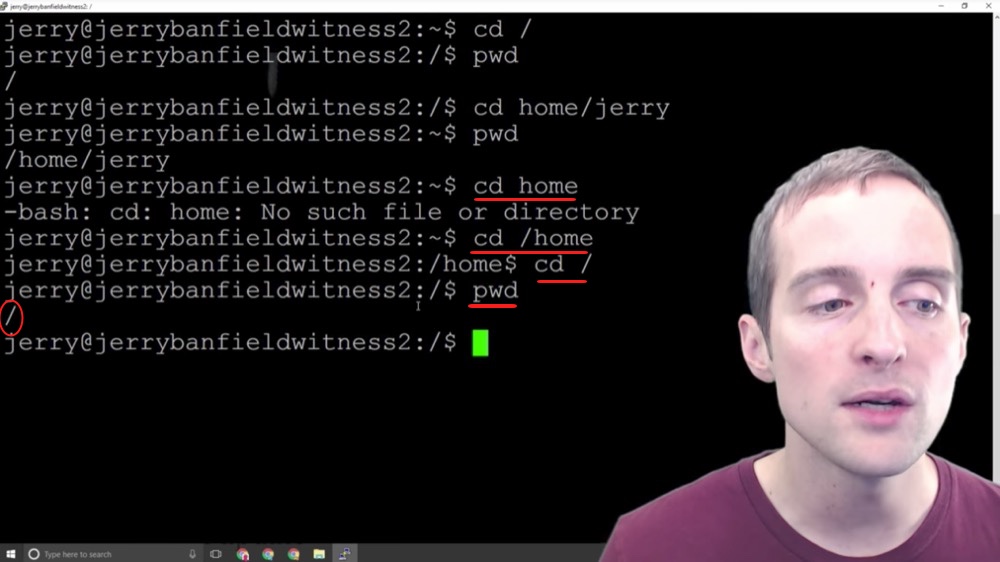
If I use print working directory, I can locate where I'm at.
One of the other most helpful commands is called "ls". I can essentially do CTRL+ L to clear the screen and I can hit "ls" to show it up here. This lists all the things that are in the folder I'm using. I can now essentially see what my choices are as to where I want to navigate.
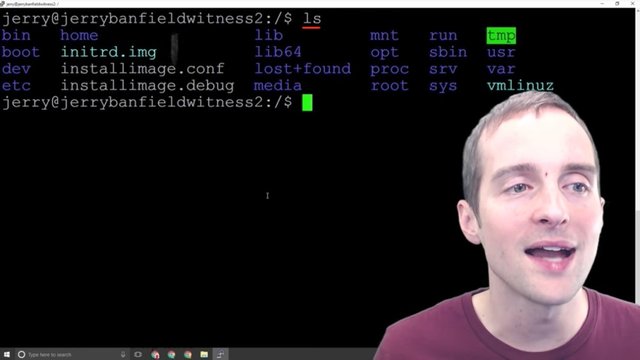
This helps me "cd" into the right place. If you're having errors and issues that seem unexpected when using Ubuntu Linux as a beginner, one of the most basic things is that you're in the wrong directory.
I've installed things in the wrong directory getting started. I've tried to run things and been in the wrong directory. The very most basic thing to do, is to use "pwd" and "ls" to make sure that you're in the right directory.
What we're going to do to install a Steem Witness down here, we're going to eventually create a directory in the home user. In order to navigate there I'll need to change to "cd home/jerry" and then I can "ls" and see that there's nothing in this directory.
I will end up putting in home/jerry the Steem Docker, which is where my witness will run. Now, once I'm in that directory I can run and execute all these commands, but if I'm not in that directory those same commands won't do anything.
Therefore, one of the basic things is just to get in the habit of knowing exactly, which directory we are in Ubuntu Linux.
I'm in home/jerry now and if I get lost or forget, I can just do "pwd". I can hit "ls" to see what's there and if I need to go back to the very top I just hit "cd" and that changes me to the root level where I can then list and go back to all my options.
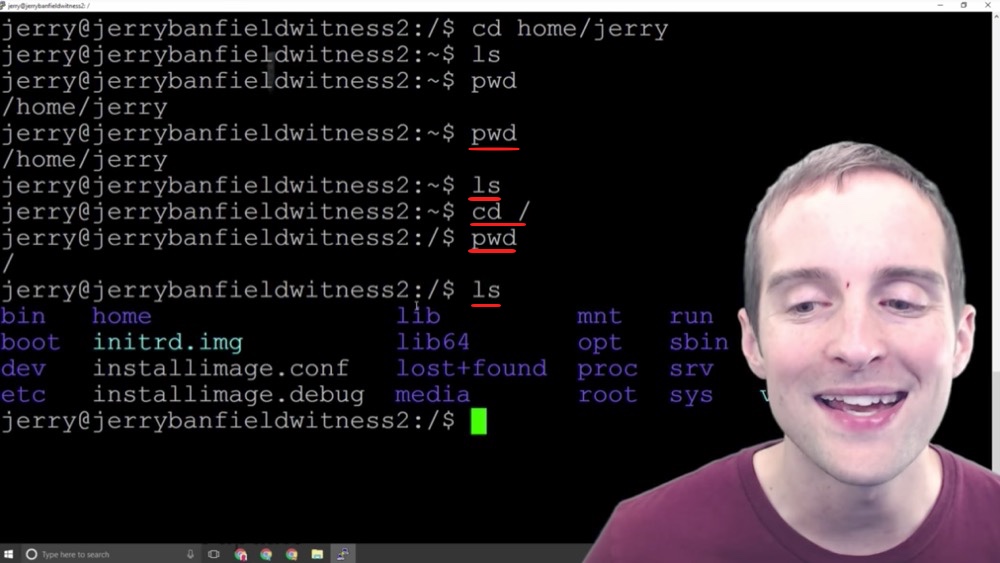
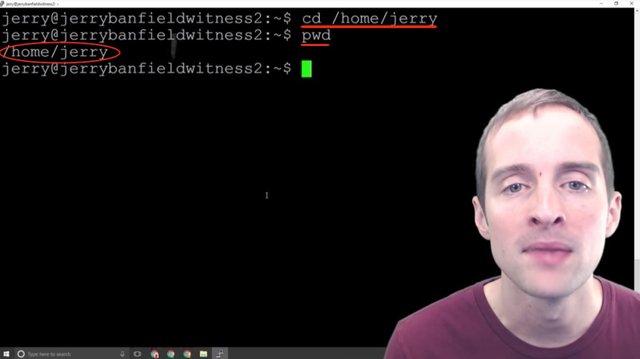
Now, if I want to just go back to my basic user directory from the top, I can always hit "cd /home/jerry" from anywhere, and then "pwd" to see where I'm at.
Any directory I'm in, I can do "/home/Jerry" but if I "cd" without putting that "/home" in, I'll get an error because as I list there's nothing actually in here.
The only way I can do that is if I change into the root directory, and then I can "cd" straight from "home/jerry" because I'm actually in there. If I "cd" back over here and list, I'm back in the main area.
Now, this is incredibly quick to learn. You can see how much faster I am with these commands. I knew almost none of these just a month or so ago. This is quick and easy to learn, you just keep googling the commands.
These are the first essential commands to learn and once we've got these essential commands, then it's easy to start the process next of getting our server ready to take some more serious security precautions and steps on it, and then to start installing and running something that we actually want to use our server for.
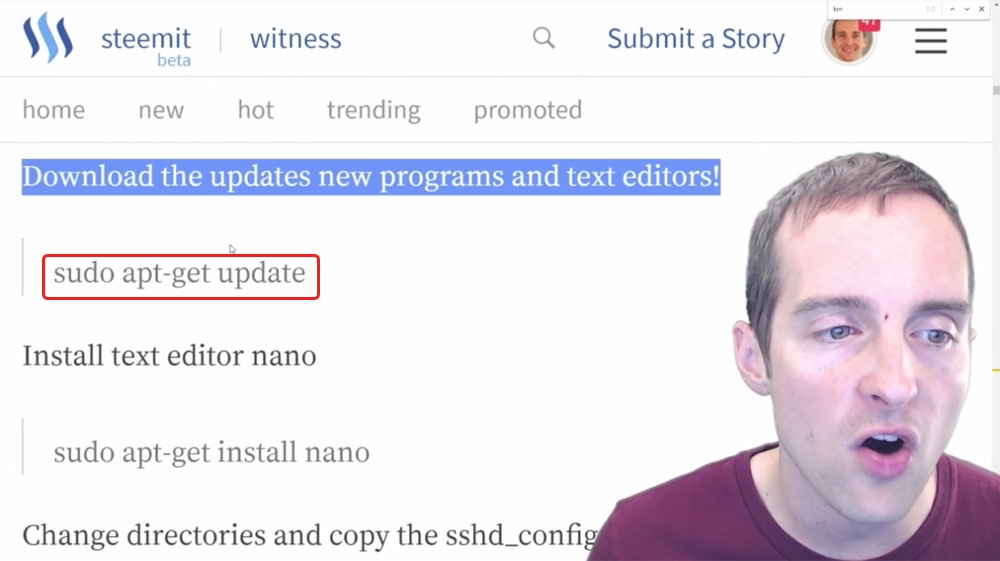
Step eleven: Updating with apt-get update.
Now that we know basic commands the next step is to start using them.
What I'm going to show next requires a text editor. Therefore, I need to actually have a text editor on the system.
When I first started, this took me about 30 minutes or an hour or more to figure out why the text editor wasn't installed by default.
In order to get the text editor installed by default, I have to run the update. In order to do that I want to change directory, so I switch directory to the root to get to work.
Then the next thing I want to do is download all the updates.
When basic servers are installed they often don't have all the updates. What I'm going to do now is run these series of commands, which will update all the apps on my server.
I'm just going to copy and paste this exact command "sudo apt-get update" and hit enter.
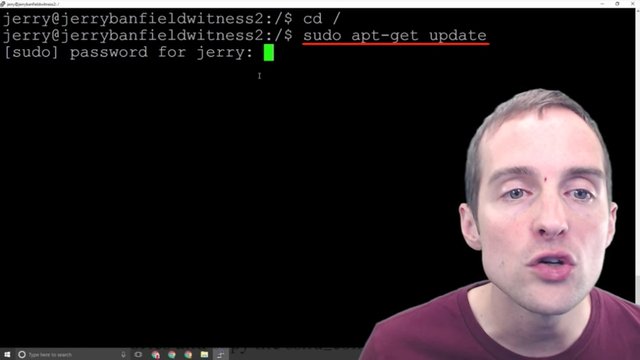
Now, what I need to do is put my root password in, and then as soon as I put my root password in, this then will allow all of these commands to run and all the apps to update.
As soon as I hit the password, then immediately I started getting all of these get commands. Get this, get that, and then all of these commands run based on, I think, where my server is located.
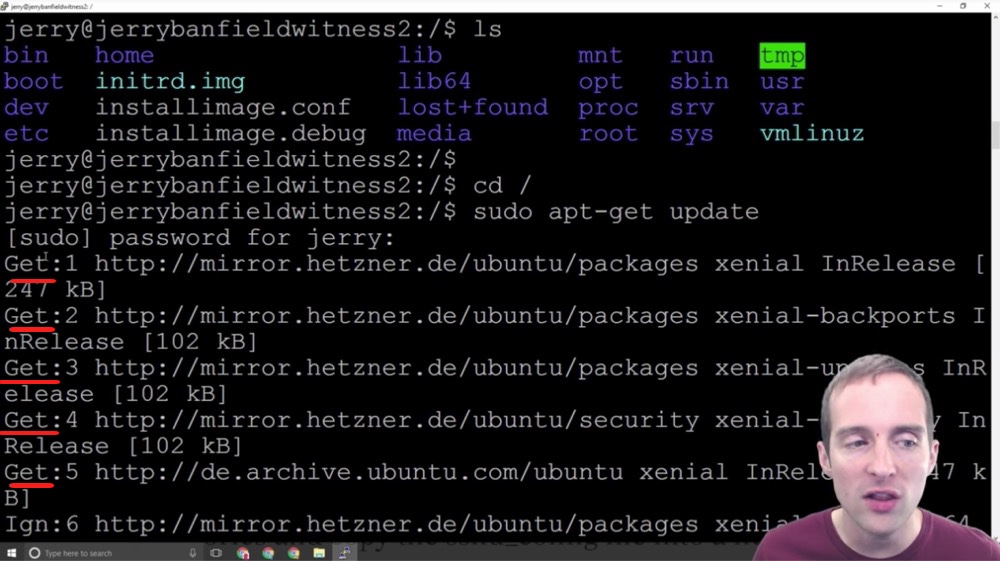
All of these are running from Germany since this server is in Germany.
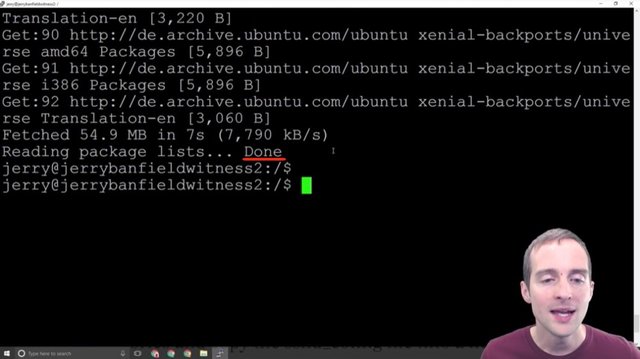
It pulled all these updates, so now that I've got all these updates added, I'm ready for the next step.
Step twelve: Installing the Nano text editor.
In this step I'm going to show you how to install Nano, which is the text editor.
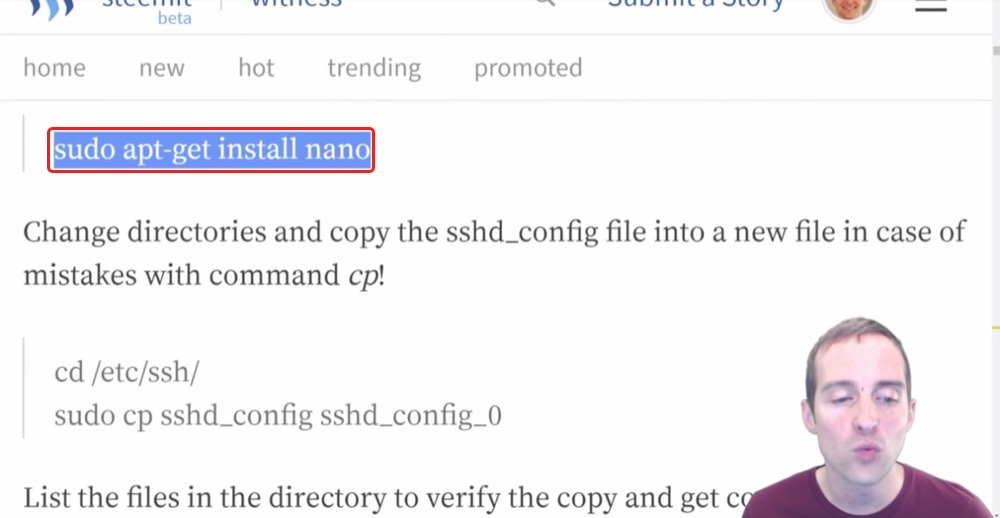
Now, this wouldn't have worked, I believe, if it was like my last server. This wouldn't have worked before running the updates, but now that I've got the updates, all I have to do is put "sudo app-get install nano" and bam!
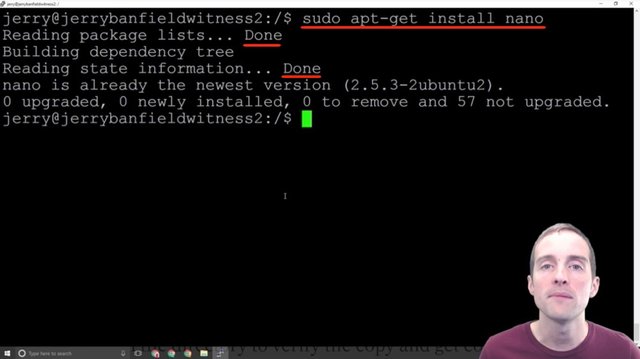
It puts the Nano text editor on and it says everything is already on the newest version. I didn't even have to run that. However, if you don't have that specifically, that might help for you. Mine, it looks like it was put straight in there with that last one. I've got the Nano text editor ready to go.
In order to continue from here, we want to have some text editor so that we can edit text files. Nano is kind of like a Notepad essentially for Ubuntu Linux.
Now that I've got Nano ready to go I can start editing some settings and disable the root login.
Final words
Thank you very much for reading these 12 Steps to secure an Ubuntu Linux server, which I hope has been helpful. This security tutorial is not completed as yet and in the next blog post I will show you seven more steps plus how a little mistake I made locked me out of my server. If you have suggestions to make it better, would you please share them in the comments?
I love you. You're awesome. Thank you for reading this blog post, which was originally filmed as the video below.
I hope you've enjoyed this tutorial and I'll see you again in another video or another blog post on Steemit.
If you found this post helpful on Steemit, would you please upvote it and follow me because you will then be able to see more posts like this in your home feed?
Love,
Jerry Banfield with edits by @gmichelbkk on the transcript from @deniskj
Stay updated via email?
- Join at http://jerry.tips/steemposts to receive an email with every new post on Steem or
- Join at http://jerry.tips/emaillist1017 to get an email once a week with highlights!
Shared on:
- Facebook page with 2,244,744 likes.
- YouTube channel with 208,173 subscribers.
- Twitter to 104,788 followers.
PS: Would you please make a vote for jerrybanfield as a witness or set jerrybanfield as a proxy to handle all witness votes at https://steemit.com/~witnesses because 100% of the rewards I receive are spent advertising Steem? Thank you to the 1617 accounts voting for me as a witness, the 718M VESTS assigned from users trusting me to make all witness votes by setting me as proxy, and @followbtcnews for making these .gif images!
Or

Hi @jerrybanfield, Your awesomeness never exhausts and you keep inspiring the world through your amazing content. Thanks for the great post/tutorial. I appreciate your efforts. Keep sharing more.
By the way, I mentioned you in my recent post. I hope you can spare a minute to respond to it. I'll appreciate it.
By the way, when will Steemit site be running smoothly? Any timeline?
Keep rocking man.
Steem On!
Thank you Yasir! Steemit appears to be making changes to allow the site to run more smoothly without being completely down and hopefully a system will come out soon making the interface more consistent! I will read your post after responding to this comment.
Hi @jerrybanfield, Thank You for your detailed response. By the way, do you have video ads course available? If yes, how can I buy that?
Nice Jerry! You're becoming quite the sysadmin/dev/technical guy lol
Cool walk through, and great advises for anyone planning on hosting servers :)
Excelent post and detailed tutorial, this step by step guide will help a lot to the Ubuntu-Linux begginers to find their way on the security for any ubuntu linux server!, congratulations and thanks for your efforts!
Very good guide Jerry. But how could you be so sure that Linux server can't be hacked? I might be wrong, but I used to hear that people believe that Linux is secure and won't get hacked easily because hackers barely target to Linux, and they barely target to Linux because most of their preys aren't on Linux.
Then if they find any value here they will surely start attack linux servers too, isn't it??
Please correct if I am believing the wrong theory.😏
thank you.
Almost anything can be hacked of course! I think taking the steps in this guide and the one that follows will help make it more challenging but not impossible, to hack!
Really your are good person in steemit
I think the same way @jerrybanfield. Thanks for your response. You are an Awesome person and I mean it!!🙏
Great technical info
Great information! Thank you for the tutorial, i will send to my friend who request the same info. thanks
Hi Jerry, I don't have a way to contact you privately so I will have to use this comment field on your latest post... I know that you are working hard on promoting Steemit, and I have thought of an excellent move we should make as a platform: Get STEEM listed on Binance and open STEEM up to Asian markets!
We can totally win the Binance community vote!
I made a post about my idea here, would you please have a look at it and if you think it's a good idea, perhaps you could organize this community effort? Don't even need an upvote or anything... we just need to get listed on Binance that's the most important to me. Thanks in advance!
I submitted a request to binance just now and upvoted your post!
Thanks so much!! I really hope we can succeed in this!
Thanks so much! I really hope we can make this work, I truly think it would be awesome for STEEM and Steemit!
Nice tutorial once again Jerry. I always love the way you explain things be it on steemit or on your YouTube channel. They are very informative. You are always understandable and I think that's the biggest reason for your success.
Great work and so much to consider when you take on the job of a witness. Still, I am concerned about steemit and the ability of everyone to post and upvote that is still extremely slow. People are getting very tired of this and I am sure leaving, so when will this be fixed?
Yo ,
Thanks for sharing