Verium pool mining with TinycorePure64 and cpuminer 1.4 (fireworm) on low end hardware
Date of publication: 17/1/2018 @ 22:52 GMT
Verium pool mining with TinycorePure64 and cpuminer 1.4 (fireworm) on low end hardware by 
Overview
Presented in this article is a complete guide and how to for mining Verium on low end hardware with cpuminer, creating a minimal size (32Mb) 64bit bootable Linux image of TinycorePure64, the amazing 64 bit release of TinyCore Linux.
This guide explain in detail how to compile and execute cpuminer 1.4 (fireworm) in TinycorePure64 and how to efficiently mine verium reserve on low end x86-64 hardware such as older Intel Atom micro ITX dual core motherboards with a bare minimum 1Gb of Ram installed. Each Atom board in the farm demonstrated in this guide has its own TinycorePure64 operating system installed onto a cheap as chips 120Mb usb stick. Many types of flash based media will work so use what ever cards or sticks you can get hold of in a cost effective way so long as they are bootable and have a minimum capacity of 32Mb*.
CONTENT
A) Introduction, power efficiency and profitability
B) Download and write CorePure64 image to disk
C) First boot of Corepure64 and configuring auto boot.
D) OPTIONAL OpenSSH server
E) OPTIONAL HOSTNAME change
F) Clone cpuminer 1.4 source code
G) Compile cpuminer 1.4 + install screen to auto mine at boot
H) Configure cpuminer 1.4 (fireworm) for pool mining and mine!
I) OPTIONAL Stream lining TinycorePure64 to reduce image size to minimal 30mb
J) About VRMdude and this guide.
K) Extra command line tips for Tinycore
Minimum required hardware needed for this guide:
- Monitor, Keyboard & mouse (for setting up)
- Flash media - sd or usb stick of min 32Mb*
- Miner hardware such as micro ITX Intel Atom motherboard with integrated dual core cpu.
- ATX Power supply (250W) + power leads if farming.
- Network switches and a cheap RJ45 kit
To build cpuminer from source It is necessary to initially use a disk of at least 120Mb capacity to allow cpuminer to be compiled, once built the source files, compiler and uneeded extensions in the image can be stripped out to free up space and it can be squeezed down to just 30Mb. writing the system on a 32mb disk would leave some room for persistence backups which is pretty impressive for a free bootable 64 bit Linux distro that can do all this and probably a lot lot more.
A) Introduction, power efficiency and profitability.
At the time this project was initiated by VRMdude after reading Birtys excellent article it was not immediately financially viable to mine verium in this way on such low end hardware however recently it has become viable because the value of Verium reserve has grown steadily as it has been adopted by the mainstream alt community and thus Verium can now be mined at profit using low end hardware in this way.
The increasing difficulty of Verium due to its growing popularity has also caused verium and vericoin to grow in value as a result of its expanding adoption and thus increasing value and so VRMdude decided to build and run a farm of 60 Intel Atom boards at an initial loss for some months with the expectation that the value of VRM and Vericoin would continue to grow long term, not just the value in Dollars or Bitcoin but the value as a good and useful crypto coin with its unique quality’s and attributes of the binary blockchain that Verium and Vericoin have introduced to the crypto world.
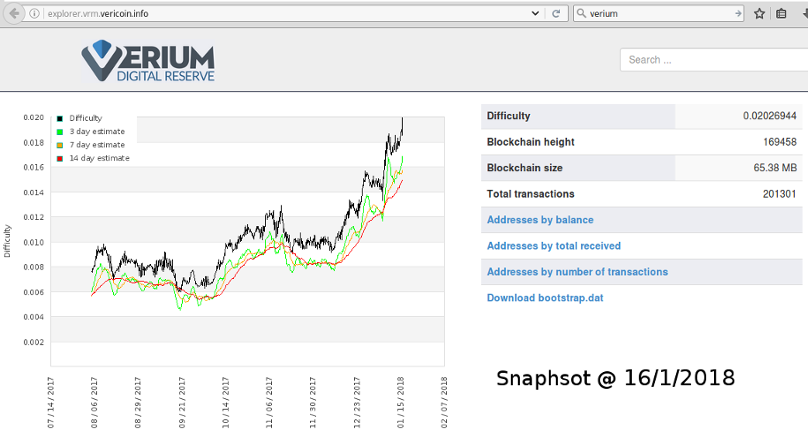
we can see by this snapshot of the Difficulty chart that VRM has exploded onto the crypto scene in the last few months and when this project was initiated the difficulty was around 1/3 of todays difficulty level and it appears to be showing no signs of slowing down which indicates that Verium will continue to grow in value as it becomes harder to mine however the markets can swing widely so it is upto those thinking about mining or trading crypto coins and tokens to conduct thier own diligence on the matter.
Source: http://explorer.vrm.vericoin.info/
So why 60 Intel Atoms?
The simple answer is that VRMdude had the Atoms lying around already from a prior project, these where actually all taken out of recycled ex commercial advertising screens as a result there was a really low ROI from the beginning for this project.
This guide was written from the Notes of VRMdude whilst setting up a farm of Intel Atom boards each requiring an operating system on its own usb stick. In this guide we will download and install Purecore64 to a usb stick or sd card of a minimum size of 120Mb and compile cpuminer, install a ssh server and screen so that we can mine in a farm of machines headless style. Or if you prefer you can use the info in this guide to setup how you like as tiny core Linux is very versatile and it is completely up to you how you wish to deploy it the final Tinycore image can be streamlined to just 30Mb.
VRMdude would like to thank Birty for his most excellent Odroid XU4 guide which can be found in the links below and without which this project and the resultant write up here just would not exist! If you have not done so please review these articles for a greater founding on the entire concept of farm mining and the requirements for the successful construction of such farms.
Birtys guide to farm mining with Odroid XU4's:
- PART 1 https://steemit.com/verium/@birty/cpu-mining-is-back-a-complete-how-to-guide-and-profit-analysis-for-verium-mining-on-a-farm-of-single-board-computers-part-1
- PART 2 https://steemit.com/verium/@birty/cpu-mining-is-back-a-complete-how-to-guide-and-profit-analysis-for-verium-mining-on-a-farm-of-single-board-computers-part-2
- PART 2b https://steemit.com/verium/@birty/cpu-mining-is-back-a-complete-how-to-guide-and-profit-analysis-for-verium-mining-on-a-farm-of-single-board-computers-part-2b
Feasible!
VRMdude is pleased to announce that a good and speedy ROI can be achieved mining VRM on low end hardware as detailed in this guide, but it does help if you can find some older and maybe unloved hardware to recycle (cheap or free) possibly to save this hardware from the dump!
It is anticipated that VRM will continue to grow in value and the Binary blockchain of Verium and Vericoin is unique in the crypto world as of the date of writing and so Verium reserve is a development to get excited about as it continues to grow in terms of both value and usefulness, the development team is pretty good to with steady delivery of its roadmap...
Please visit the official Verium and vericoin website for more details: https://portal.vericoin.info/
If you are new to Verium or vericoin and even if you are not there is a nice article to read on it at coinbase:
Verium - The Crypto 'Gold-Standard': A currency and a reserve
https://www.coindesk.com/press-releases/verium-crypto-gold-standard-currency-reserve/
Briefly about practical power efficiency….
There are better hardware choices for CPU mining in terms of efficiency alone if one is fortunate enough to have such a budget to spend and also does not have a quantity of hardware at hand, for e.g. this farm of 60 Atoms can achieve a peek total hash rate of 8232 H/m, and it consumes 1260W doing so as measured at the wall. In comparison a server such as Intel Xeon E5-2660 v2 can deliver similar Hash rate of 8150 H/m for a stated 300W which is a 1/4 of the power consumption of the Atom farm, according to the data in the spread sheet linked below. However at time of writing it is not clear to VRMdude how that power consumption of 300W was measured and so more input is needed to verify the power draw of that server at the wall.
VRMdude Atom farm details running cpuminer 1.4 (Fireworm):
Intel Atom LD945GCLF: 130 H/m x 36 = 4680 H/m
Intel Atom D425KT: 148 H/m x 24 = 3552 H/m
Total = 8232 H/m
60 x Intel Atoms = 120 CPU cores with 60Gb RAM both DDR2 + DDR3 @ 1260W = 6.5 H/W
1x Intel Xeon E5-2660 v2 = 64Gb RAM @ 300W ??? = 27.17 H/w
Comparing Atom effeciency to the Xeon: 6.5/27.17 x 100 = 23%
Intel Xeon data source: https://docs.google.com/spreadsheets/d/1O-hyFS-bqsopttmql6NgYWlWej9rZk_lm5MWivnehXg
So based on these figures we can determine that low end hardware may not be the best choice but if initial build budgets are tight or old hardware is lying around unused it is feasable to cpumine with it and at profit as of the date of writing.
Deeper Atom power inspection
When a single mini-ITX Intel Atom board is supplied by a single 250W PSU it seems to draw at peek around 50 watts of power from that 250W power supply measured at the wall. A better power efficiency can be obtained by running three Intel Atom mini-ITX boards from one single 250W power supply and combined like this, 3 Intel Atom boards draw a peak of 120W from a single 250W power supply measured at the wall but this effeciency can be improved further because we can run headless and minimize power consumption by the chipset since the intergated GPU and chipset on these boards is power hungry and we dont need a graphical output to mine.
This guide deals mainly with the software requirements and power supply setup and will not therefore provide any greatly detailed cost or profit analysis on the profitability of mining Verium on low end hardware, other than to advice that at time of writing (Jan 16th 2018), it is profitable to mine Verium on low end hardware and returns are currently 200% of the cost of electricity consumed daily and if you can reduce power usage further or alternatively or in addition to reducing the cost of energy by supplimenting with solar panels, wind turbins etc…
Initial build costs are provided at the end of section A.
1:3 ATX Power leads for improved efficiency.
It is necessary for those wanting to build a farm like this using lower end hardware to make there own 1:3 ATX power splitter leads since only 1:2 splitter leads seem to be available to buy in general and they are also relatively expensive. In total so far for this experimental project of 60 recycled Intel Atom boards powered by 20 x 250W PSU recycled from old Compaq pc’s, pulls at peek 1260W as measured at the wall. The average power consumption per board is therefore around 21W as measured at the wall and this includes power supply inefficiency as well, something realistic towards 20% lost there perhaps on these old ATX power supplies.
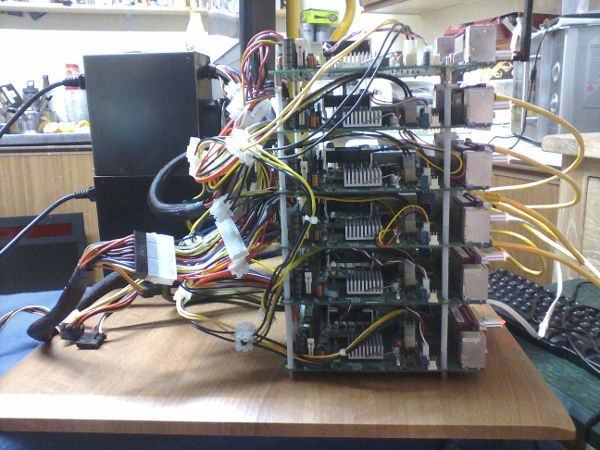
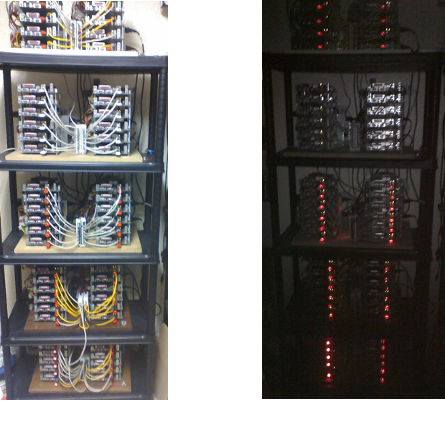
Side view shot of the first stack of 6 built with each block like this planned to hold 12 Atom boards in total, lengths of threaded bar and nylon spacers as per Birtys guide are used to hold them in place anchored by pcb mounts screwed into the base. This 'block' is shown under construction in the early days and only the first six have been installed and wired up to two PSU. The power connectors can be seen and the base is an ex display cupboard door bought cheap at a sale in a local DIY shop.
Atom -v- XU4
Each Atom board pulls on average 21W per board which is ok for these, now 10 year old Intel Atoms! An Odroid XU4 shames it in comparison given its 8 core delight but that is an arm device designed to be low power unlike these Intel x86-64 cpu's and there power hungry chipsets, but as nice as those Odroids are they are expensive in comparison to relatively cheaper and older lower cost hardware. It is possible to purchase easily three Intel Atom boards delivering 390 H/m and such a hash rate equals and even surpasses the performance of Odroid XU4’s in term of hashing power alone for a slightly lower initial purchase cost than a single odroid XU4 setup. Granted the Odroid is nice and new and much more energy efficient but the Intel Atoms are still effective and in the game, even if they are up to 10 years old and well used! Plus they keep your house warm through the winter so more financial savings can be had there, why pay to heat your home when you can be paid to heat it!
This farm of 60 Intel Atoms is the Equivalent hashing power of 20 Odroid XU4’s, but it is not as efficient to run and thus profit in comparison is lower than with an odroid farm but reduced initial outlay means ROI is as good if not better and if you like recycling hardware its also fulfilling for the soul and lets not mess about, a 200% return per day is well worth not sending this hardware to the tip just yet and think about all the fun you might miss!
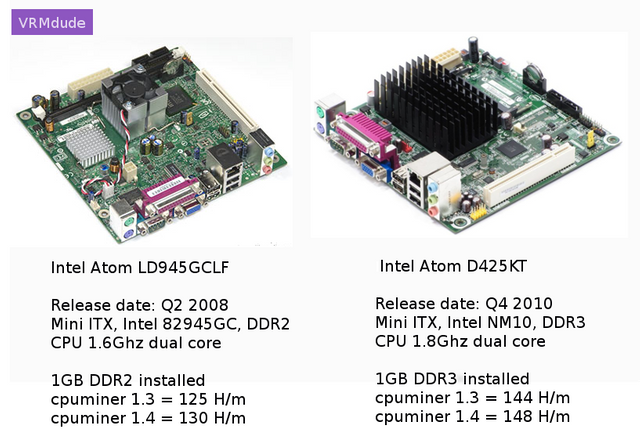
Specs and hash rate for the two types of Intel Atom boards used for this project
POWER!
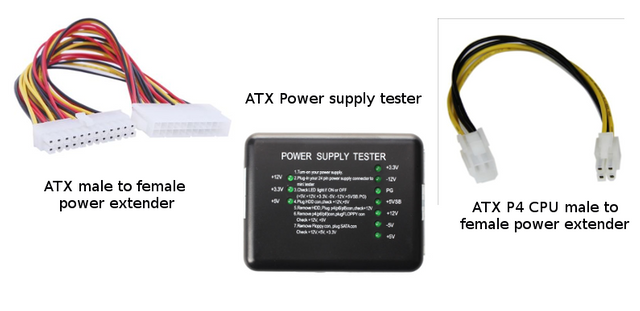
So back to powering these Intel Atoms, it is possible to purchase ATX 20 and 24 pin power extenders at much lower cost than the current price of readily available 2:1 ATX power Y splitters as of the time of writing. As such 20 or 24 pin ATX power extenders can be purchased instead cheaply enough from places like Ebay for just a few pounds each and then cut into half and rewired back together using terminal blocks with patience and prudence, to form a 1:3 power splitter. It is possible to also consider trying to salvage the power plugs of the ends of old and dead ATX power supplies if you can find them to recycle, try ask at the local computer shop they often have lots of parts going to the tip that they will give you to save the trip.
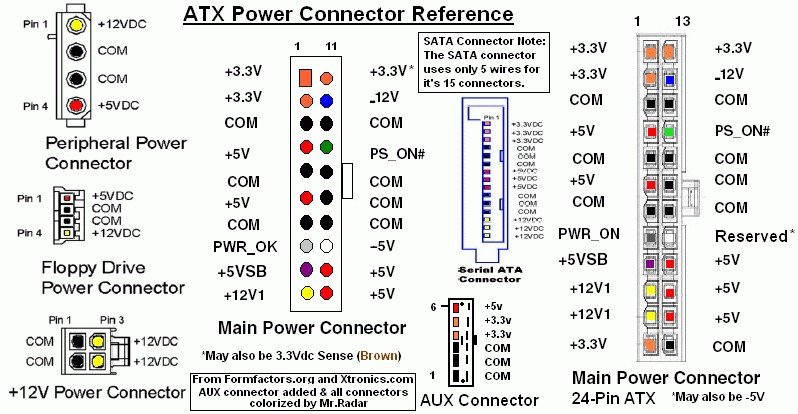
This can be very useful when making 3:1 power splitters.
Without question it can be timely to make lots of these 3:1 splitter leads and patience is required and its very advisable to purchase an inexpensive ATX power supply tester in order to detect any errors in wiring before powering up the hardware from these home made three way ATX power splitters. See the diagram above for a reference on ATX power pinouts.
VRMdude has not yet powered more than three boards from one 250W power supply but perhaps in the future he shall do more testing on that front as there may be room for improvement on the power efficiency.
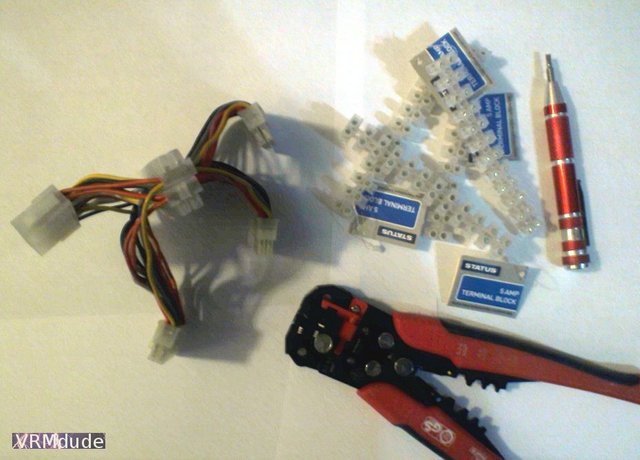
Home made 1:3 ATX power supply splitter and its great the 5amp terminal blocks shown come in lengths of 12 as two work perfectly back to back for 24 pin ATX
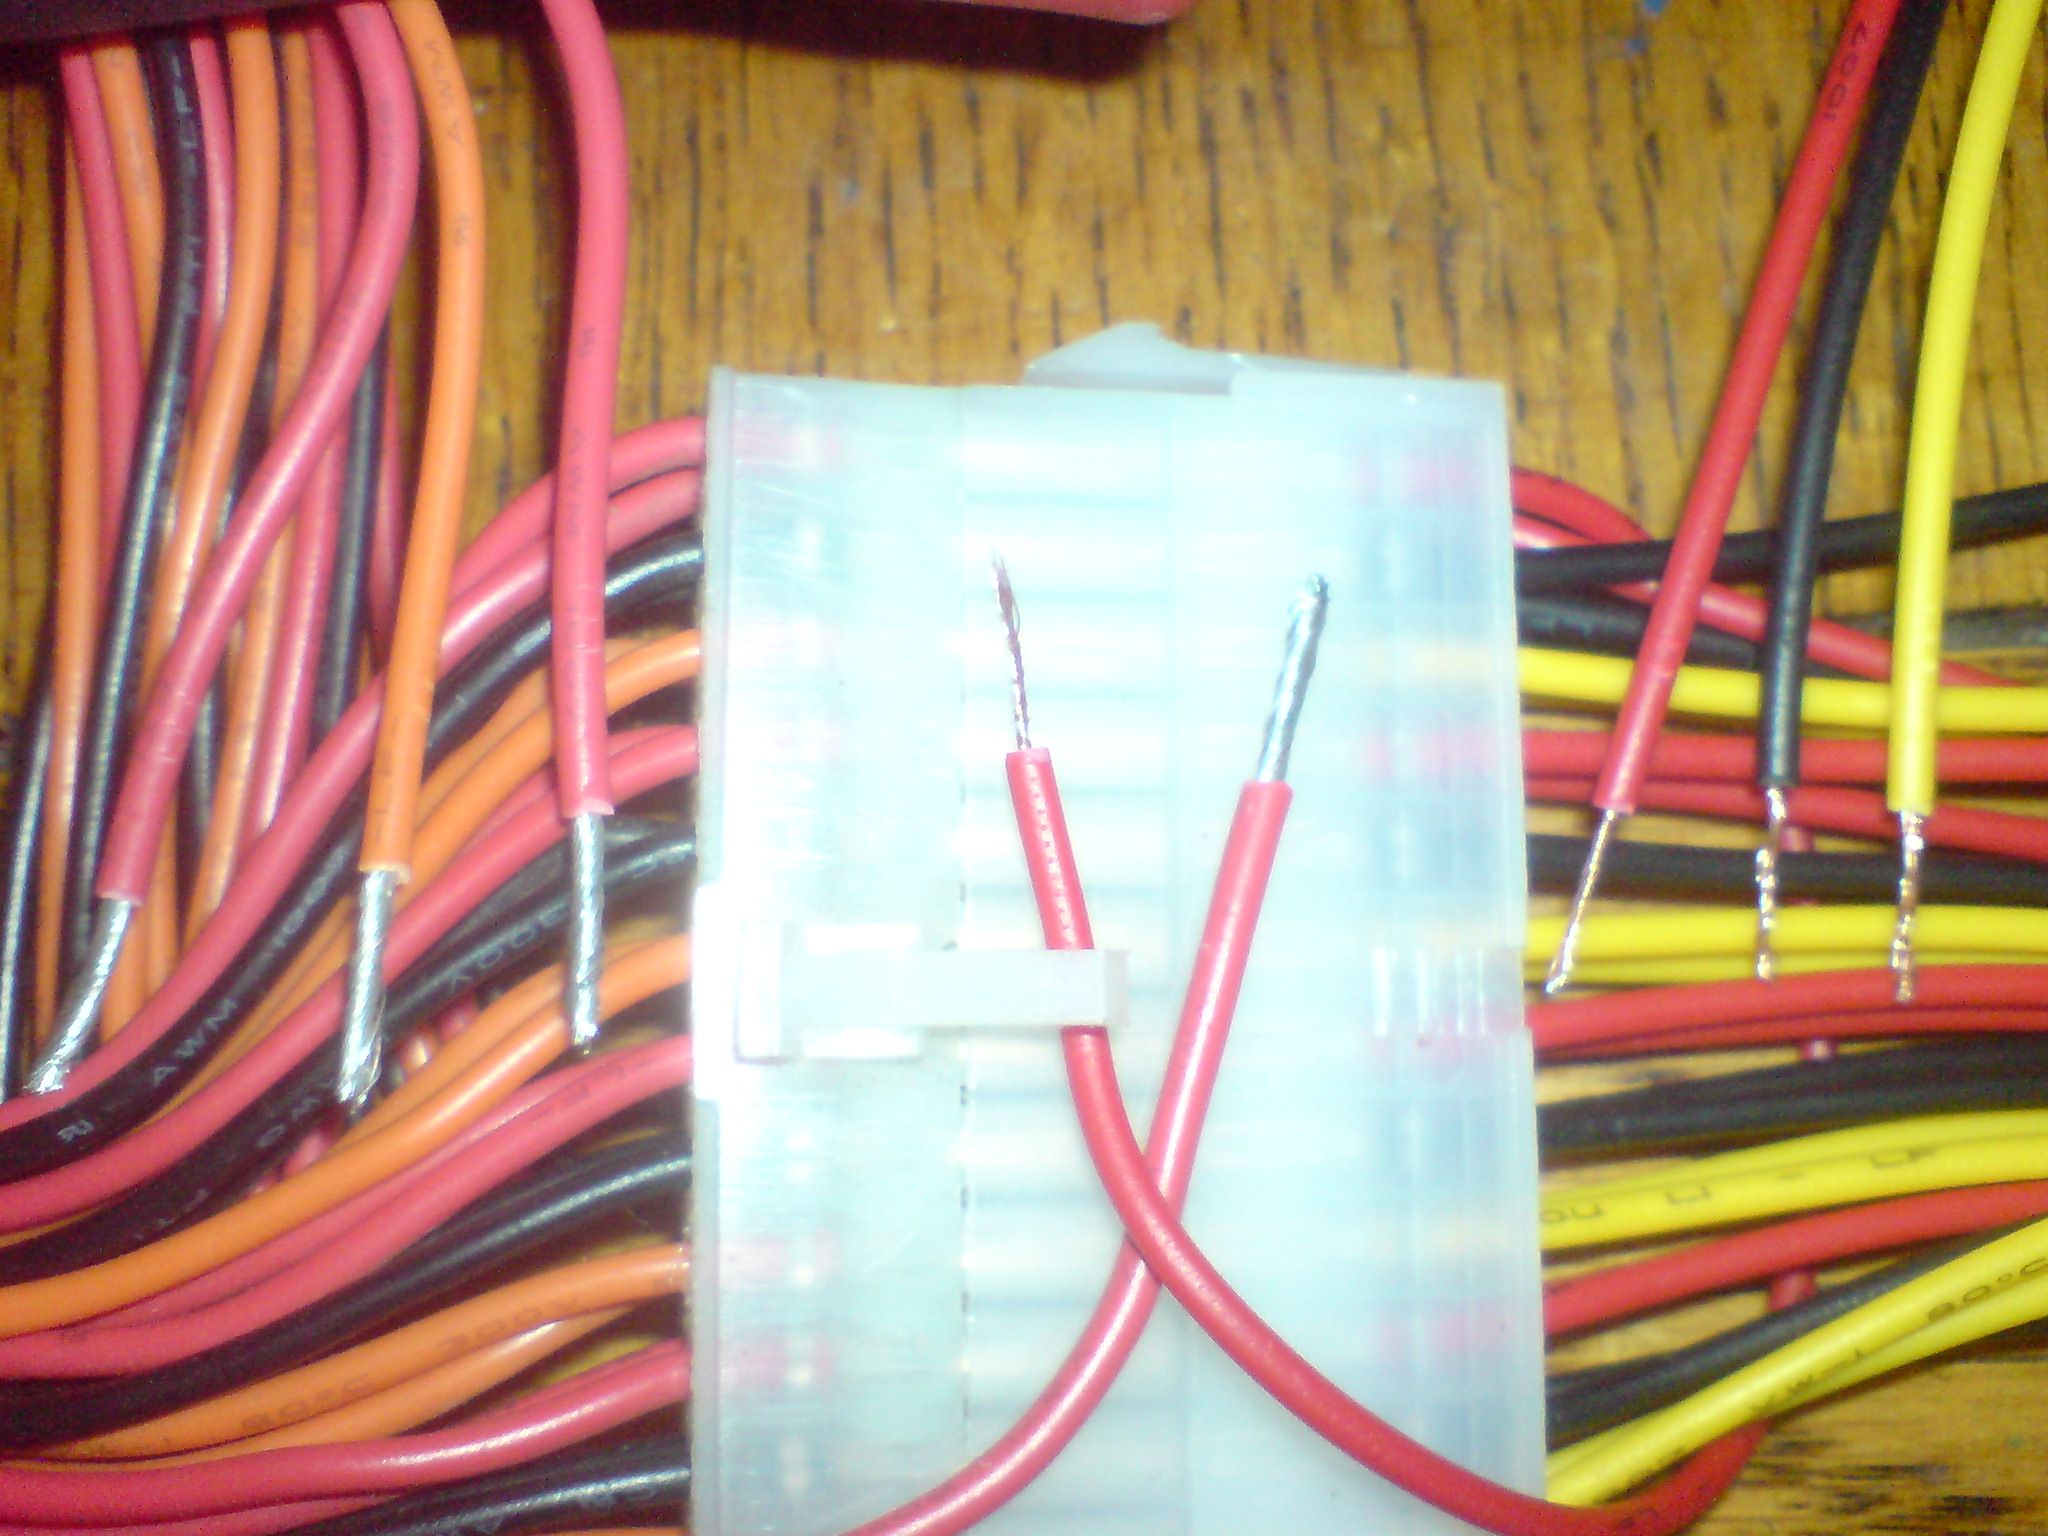
When purchasing ATX power extenders from places like Ebay, watch out for low quality wires where there are just 8 strands of copper inside a rather chunky thick plastic insulation. It seems that not all wires are made equal and these where not used for safety and stability reasons
P4 CPU POWER
In addition to the main 20 or 24 Pin ATX power requirements, we will also need to procure some 4 pin ‘P4’ CPU power extenders to chop up in the same way because for each 250W PSU, VRMdude needed to make one 3:1 ATX 20 or 24 pin power splitter in addition to a single 2:1 P4 CPU power splitter for the CPU's power supply. VRMdude utilised the 12v supply from a molex connector for the third CPU power connector needed by cutting off the molex plug and wiring a 4 pin P4 CPU connector onto the 12v and ground in order to spread the load nicely on the power supply. Not that a 5W tdp Atom CPU pulls much power lol, the chipset itself is much hungrier by some 400% at peak over the CPU draw but the chipset is powered from the main 20 or 24 pin ATX power connector and since we are running headless with nu gui the chipset and its intergrated Graphics should not be unduly hungry.
Of course if you are fortunate enough to have a generous budget to spend you could buy lots of the expensive 2:1 splitters ready made and if Verium raises in value significantly as expected it would be easy to avoid all the DIY, but it wont be as fun, tidy, or as cheap to do and it wont recycle old parts that might end up in the tip or on a beach in the third world somewhere! However the choice is yours and if you could afford something like that Xeon server compared earlier its unlikely you would do anything like this anyway, but you will miss the fun and the learning!
And all this assumes you actually might have a quantity of low end hardware to setup a farm like this but the fact screams out loud and clear, low end CPU mining is here and it is good for both the pocket and the planet and you also get to learn some really cool stuff along the way.
ATX power lead extenders typical costs and usage for 60 boards.
P4 CPU extender male to female 99p x 40 (Ebay) Total = £40
Two of these needed per PSU as PSU already has one male we can cut off and rewire and such a male to female P4 cable will be cut into two and 1:2 splitter made using terminal blocks. If you can find male to male P4 you will only need half the amount since we do not need to use the female plug on it
P20 + P24 ATX power extender male to female £1.43 x 60 (Ebay)
Total = £85.80 or 40 = £57.20
Depending on how you are going to wire them you could cut cost by not using the female end and instead cut the male ATX plug off the psu instead of plugging it into the female end of the extender (if no resale value of the PSU later? ). You will have lots of spare female plugs whatever way you do it which is unavoidable, but keep them safe i.e. don’t cut em to short as never know how useful they may be one day to wire back up in some other project.
Networking
Each 'block' of 12 boards is hard wired to a router asigning IP addresses by DHCP and each 'block' needs two 8 port switches, they dont have to be fancy and at time of this build some nice TPlink 8 port switches where available for £6.50 each and so two where purchased for each 'block' and linked togethor to form a 14 port switch and then 5 of these where linked to togethor one for each "block".
In order to keep costs down VRMdude made his own short lengths of ethernet patch cables using locally bought ethernet cable and a £20 RJ45 crimping set from Ebay which came with 200 RJ45 plugs and a tester and crimping tool. This job is a little time consuming especially when there are 60 cables to make meaning 120 ends need crimping on but its much cheaper than buying them ready made and you do need extra because not every end will crimp right till you find your rythm and even then some of them can be devils!
Summary of build costs excluding Atom boards.
- 60 ATX power extenders £85.80
- 32 P4 CPU power extenders £40
- ATX PSU tester = £5
- 5A Terminal blocks 50 ish x 50p = £25
- Network switches 10 x £6.50 = £65
- Ethernet cable and crimp kit = £30
- Threaded bar, nylon spacers = £30
- ATX PSU 250W 20 x £4 = £80
- Time = Free
Total outlay = £360.80 (incl vat)
Final thoughts on viability of this project
If one where to factor in the cost of the Atom boards if not fortunate enough to have them to hand already then ROI time would increase a bit obviously but even if a quantity where bought second hand at £20 each for say 60 then it is an total cost of £1200 + 360.80 = £1500.80.
At time of first draft of this guide one VRM is worth around £8, however by the time this guide was finalised for publication VRM along with all other Cryptos where in the middle of a market adjustement because of threats from some Asian countries and Brazil to Ban Bitcoin, despite Global public outrage at this move.
As of Publication date, VRM is worth around £5 due to this market volatility created by states concenred about losing there influence over us all but we must remeber that in 2017 alone, BTC gained 2000%+ plus and so a longer term view is recomeneded for those wishing to mine VRM on low end hardware because it is profitable despite the volatility and those who hold what coins are mined may well find there gains increase substainlly over the longer term but VRMdude offers no investments advice.
Remeber, mining and trading should be viewed as a fun investment for the longer term and there are ofcourse better choices of hardware to utilize over Intal Atoms, if mining is no longer fun for you then perhaps you should re-assess your position and motivation for engaging in the crypto world.
Next on VRMdudes to do list might be to build another farm using full ATX spec motherboards since Verium is GPU and ASIC resistant so it will soon if not already so, be feasable to do that and will likely save those old boards from being discarded for a few years more yet? And for that we have Verium and its core developers to thank! THANKS!
Next PART B, Download and write TinycorePure64 image to disk.
B) Download and write CorePure64 image to disk.
ABOUT TinycorePure64
TinycorePure64 is very Capable of mining verium reserve in the most optimal way to date using the newly released cpuminer 1.4 (fireworm), forked from effectsToCause cpuminer 1.3, which itself was forked from cpuminer by tpruvot et al, all credits due.
The Corepure64 operating system is cool and we are using the recently released TinyCorePure64-8.2.1, which is an amazing compact version of Linux which is very capable indeed for such a small image size!
Please visit the Tinycore website to get up to speed on tiny core and let the developers know how great you think this version of Linux really is!
http://forum.tinycorelinux.net/index.php
Before we begin, first A quick and essential word on TinyCore Linux....
Tinycore Linux is a very nice development of Linux and is most suited to usb sticks and sd cards because of its small size and the important fact it has minimal writing to the usb or sd disk because it loads the kernel and system and files and extensions from the disk at boot time into RAM and thus creates a virtual system in RAM. This is great for protecting the life of the disk since USB sticks and sd cards have a limited number of writes for there lifetime.
Take note unless save the system to disk before shutting down "backup -b" command, any changes made to the system including downloaded files placed in the system or home directory will not be saved as there is no persistence until backup is executed. However, all extensions installed are saved to the tce directory of the boot media and this is really the only time after boot that Tinycore reads or writes anything to the boot media which is pretty nifty.
Any extensions installed are downloaded to the "tce/options" (Tiny Core Extensions) options folder on the the boot medium and they are loaded into the core system at each boot time as stated in the "onboot.lst" plain text file which is also located in the tce directory. The xtensions are located on the disk at: mnt/sda1/tce/optional.
When the "backup -b" command is executed all changes made to the system are written to a file in: /mnt/sda1/tce/mydata.tgz. All of this is explained in much more detail in the guides and resources that can be found on the Tincore website: http://forum.tinycorelinux.net/index.php
Lets get on with it then!
Download to any windows, Linux or mac machine a copy of CorePure64 image 8.2.1, (latest version) http://tinycorelinux.net/downloads.html
Direct download link: http://tinycorelinux.net/8.x/x86_64/release/CorePure64-current.iso
Write the TinycorePure64 image to a suitable usb stick or sd card using free tools such as Rufus or Linux live usb creator (lili), whatever your medium of choice and writer of choice so long as your build media is at least 120 Mb in size as that is the minimum which permits us to compile cpuminer from source, it can all be stripped down to 32Mb when completed. For reference we used lili installed on a windows 7 machine and 120mb "cheap as chips" USB stick to build the image.
We are now ready to do the first boot of the miner hardware and configure the system so please remove the stick from the system used to write it and prepare the mining rig for boot. You could edit the syslinux config file now before removing in the system used to write Tinycore if you wish but in the next step you will be shown how to do this from within a terminal on the miner machine at first boot which is something you might be able to boast about to your geeky mates.
C) First boot of Corepure64 and configuring auto boot.
Setup the miner machine with a good wired network connection and Boot Tinycore.
(We used some cheap old 120Mb usb sticks that wouldn’t boot if usb2 mode was enabled in bios)On first boot if all has gone well you should be presented with a boot option screen menu so select option 2 "Corepure64 with wait 5 seconds for slow devices", as we may be using slow usb or sd and need to wait 5 seconds for mounting. No may about it for VRMdude infact he had to increase the wait time for some stick to 10 seconds
Once fully loaded to the Corepure64 gui click "apps" down the bottom and set fastest mirror and set the tce directory by clicking set and then again click on it on the upper left of the screen, you may also manually create folder "tce" on the root of the medium if you wish to skip this step.
Now edit boot options in syslinux config file so that we dont load a gui and boot into command line automatically.
4a. vi is an older txt editor and a bit quirky but it works, I will leave you to figure it out but "Ctrl Z" to close it without saving changes, open a terminal and edit the boot config in vi by typing the following
sudo vi /mnt/sda1/boot/syslinux/syslinux.cfg4b. Once opened in vi make the following changes to the boot config file to allow quick auto booting of default selection stated as corew which is basic command line only with low resources and waitusb=5.
 TIMEOUT 1
 ONTIMEOUT corew
4c. Under 'LABEL corew' replace cde if present with 'tce=sda1', the line should look as below.
APPEND loglevel=3 tce-sda1 waitusb=5 vga=7914d. The entire syslinux config file now looks like below example, save it and exit vi
DEFAULT tc
UI menu.c32
PROMPT 0
TIMEOUT 1
ONTIMEOUT corew
F1 f1
F2 f2
F3 f3
F4 f4

MENU TITLE TinyCore
MENU MARGIN 10
MENU VSHIFT 5
MENU ROWS 5
MENU TABMSGROW 14
MENU TABMSG Press ENTER to boot, TAB to edit, or press F1 for more information.
MENU HELPMSGROW 15
MENU HELPMSGENDROW -3
MENU AUTOBOOT BIOS default device boot in # second{,s}...

LABEL tc
MENU LABEL Boot TinyCore
TEXT HELP
Boot TinyCore with Embedded X/GUI extensions.
Boot media is removable. Use TAB to edit options for specific needs.
ENDTEXT
KERNEL /boot/vmlinuz
INITRD /boot/core.gz
APPEND loglevel=3 cde

LABEL tcw
MENU LABEL Boot TinyCore (on slow devices, waitusb=5)
TEXT HELP
Boot TinyCore with Embedded X/GUI extensions, if using a slow device.
Boot media is removable. Use TAB to edit options for specific needs.
ENDTEXT
KERNEL /boot/vmlinuz
INITRD /boot/core.gz
APPEND loglevel=3 tce=sda1 waitusb=5

LABEL core
MENU LABEL Boot Core (command line only).
TEXT HELP
No embedded X/GUI extensions are loaded. User extensions scanned or specified
will be loaded, and will need to provide X/GUI if required.
ENDTEXT
KERNEL /boot/vmlinuz
INITRD /boot/core.gz
APPEND loglevel=3

LABEL corew
MENU LABEL Boot Core (command line only on slow devices, waitusb=5)
TEXT HELP
No embedded X/GUI extensions are loaded. User extensions scanned or specified
will be loaded, and will need to provide X/GUI if required.
ENDTEXT
KERNEL /boot/vmlinuz
INITRD /boot/core.gz
APPEND loglevel=3 tce=sda1 waitusb=5 vga=791
Reboot the machine and if all went well you should now be greeted by the command prompt:
tc@box:~$
The next step in this guide is to instal OPENSSH server for remote management but this is optional and if you dont intend to manage remotely you may skip Part D. Setting a HOSTNAME is described in Part E and this is also optional so if not required you may skip ahead to Part F directly to download cpuminer source code and prepare to compile cpuminer 1.4 (Fireworm)
If there are problems booting
Go back and check the boot config file is edited correctly and is saved in the correct place with the correct name as shown below and note these filenames and directorys are caps sensative
/mnt/sda1/boot/syslinux/syslinux.cfg
D) OPTIONAL OPENSSH server.
Configure ssh server for ease of management and if headless
The following link contains an excellent guide borrowed from heavily to achieving this step including the use of keys not covered here, please visit the page and review it and note the express instructions listed below are derived from it and so we nod to the author, Pradeep Singh accordingly and with thanks.
https://iotbytes.wordpress.com/configure-ssh-server-on-microcore-tiny-linux
Please click the link above and read in full, the express instructions are provided below.
INSTALL OPENSSH
tce-load -wi opensshCONFIGER OPENSSH
cd /usr/local/etc/ssh/
sudo cp ssh_config.orig ssh_config
START OPENSSH SERVICE
sudo /usr/local/etc/init.d/openssh startCHANGE PASSWORD FOR USER tc
passwdCHECK IPADDRESS
ifoncfig -aCHECK SSH IS RUNNING
sudo netstat -anp | grep 22CONNECT FROM REMOTE MACHINE
ssh tc@IPADDRESSMAKE PERSISTENT
sudo echo '/usr/local/etc/ssh' >> /opt/.filetool.lst
sudo echo '/etc/shadow' >> /opt/.filetool.lst
sudo echo '/usr/local/etc/init.d/openssh start &' >> /opt/bootlocal.sh
If you see this message '-sh: can't create /opt/bootlocal.sh: Permission denied'
Then add the line that starts openssh at boot manually in vi:
sudo vi /opt/bootlocal.shSAVE TO PERSISTENCE FILE
filetool.sh -b
E) OPTIONAL HOSTNAME CHANGE, RECOMMENDED FOR FARMS
(makes management easier to view by hostname rather than ipaddress)
Configuring hostname is best practice since dhcp is assigning ip addresses so to make it easier to see machines by hostname in the network when multiple miners are running on same the network.
Hostname is stored in a script called ‘bootsync.sh’ so open it to edit and save:
sudo vi /opt/bootsync.shBootsync example below showing default hostname "box"
#!/bin/sh
# put other system startup commands here, the boot process will wait until they complete.
# Use bootlocal.sh for system start up commands that can run in the background
# and therefore not slow down the boot process.
/usr/bin/sethostname box
/opt/bootlocal.sh &
We now need to perform a backup to make this change persistent so execute.
filetool.sh -b
On reboot you should find the machine is configured wiith your stated hostname.
F) Clone Fireworm71/VeriumMiner/cpuminer 1.4 source code
In this section we will download the source code and dependencies for cpuminer 1.4 (fireworm)
check you are in the correct directory before proceeding '/home/tc', please check and double check as we are about to clone the source files from github.
pwdInstall git:
tce-load -wi gitClone source files directly from github:
git clone https://github.com/fireworm71/veriumMiner.gitWe are nearly ready to move onto the next section to compile having the source files downloaded and unpacked by git in: '/home/tc/veriumMiner', if you are using a disk larger than 120Mb lets do a backup to write all of this to persistence in case something errors in next steps. However, If like VRMdude you are using 120mb or less disks then do not backup at this time because there will not be enough disk space to save all extensions and the 'mydata.tgz' persistence file. See NOTE below.
filetool.sh -bOPTIONAL ADVANCED steps if unable for whatever reason to download cpu miner 1.4 directly to the corepure system...
Download cpuminer 1.4 source to another system connected to the internet and copy the files over to veriumMiner directory of Corepure64 by scp or if you like do it offline by inserting the corepure64 usb stick into a machine already running and copy the source files to the root of the stick which can then be copied to corepure system by booting it and finding the files in the root of the corepure stick: /mnt/sda1 .
Don’t forget to chown after you copy the source to corepure64 system or you may encounter problems with ownership:sudo chown -R tc: veriumMiner
NOTE:
Git will not be used again in this project until another update of cpuminer is released so feel free to remove the extension if disk space is a concern at this stage, you should have a disk usage before backup of 32.2Mb and after backup of 83.9Mb (70% of the 120Mb stick). Remember cpuminer source files are loaded into RAM until you do a backup, but we can reduce the disk usage to around 32Mb again after we have finished compiling by removing unneeded extensions and cpuminer source files then running backup again. see stripping down in this guide for that.
It is neccesary if the build disk size really is tight like a 120Mb stick, like its 1996 again lol to avoid running backup after cloning the source files form Github and just compile cpuminer whilst all files are hosted in RAM, assuming we have enough RAM installed given its 1996 lol. We then move the cpuminer binary out of the source directory after compiling and remove the source directory and contents before moving the cpuminer binary back to a newly created empty veriumMiner DIR hosted in just the system (RAM). This is covered in the next section after compiling so lets not get to far ahead here, tinycore is very versatile and so it really could be configured many ways just as the user see's fit
G) Complie cpuminer 1.4 (fireworm) and set miner to auto start
Next up we must Install the compiler, dependencies and then compile cpuminer 1.4 (Fireworm71).
Install the following extensions one by one.
tce-load -wi cmake
tce-load -wi autoconf
tce-load -wi automake
tce-load -wi compiletc
tce-load -wi curl-dev.tcz
We should now be ready to compile cpuminer 1.4. Make sure you have entered the 'veriumMiner' directory and execute each command in turn when ready:
./autogen.sh
sudo /bin/sh ./build.sh
Any warning about a missing 'm4' DIR can be safely ignored but purists in fear for the lifes would create an empty m4 DIR if they wish to supress this message.
NOTE
Executing just ' ./build.sh' will result in error as the shebang in the script is set to use 'bash' not 'sh' which is an alternative to bash used in corepure64. The reason bash is not installed by default is in order to keep the image small in size so as a result of this we need to tell the script to use 'sh' and not 'bash' or we can change the shebang of build.sh to state sh instead of bash, because currently by default it is set to bash by the developer.
#!/bin/bash >> #!/bin/sh (one would open the script in vi and edit)however you wish to do it and maybe this detail is beyond what we need to know to compile cpuminer but understanding such a concept is a nice general linuxing understanding to have, experiment!
If all went as expected you should now have a binary called cpuminer located in DIR '/home/tc/veriumMiner'. This Binary is all we need to mine and the rest of the content of this directory can be deleted as follows to reduce disk usage if required, but it is not essential unless like VRMdude, you are building this image on a 120Mb stick and in that case see step 3 below.
FOR 120Mb disks we need to free space before we can backup as we currently have 100% full disk because of all the extensions saved to the boot media, as a result the source files which are still loaded into RAM will not fit onto the disk if we backup without removing them first from RAM. We can remove the cpuminer source by copying the binary out of the 'veriumMiner' directory and then delete this directory including its contents (-recursive), then recreate the veriumMiner directory and move the binary back there as follows:
cd /home/tc
mv ~/veriumMiner/cpuminer ~/cpuminer
rm -rf ~/veriumMiner
mkdir veriumMiner
mv cpuminer ~veriumMiner/
If all went well executing cpuminer from within '/home/tc/veriumMiner', should yield a nice and useful cpuminer usage guide:
./cpuminer --help
If cpuminer works as it should we shall move onto performing the backup to keep cpuminer inside the system at next boot if we dont it will be purged from RAM and lost, feel free to do a backup if you want to at this stage remembering only the extensions we installed are saved to disk until we do 'backup -b'.
If there are problems then go back and check you have followed the instructions here to the letter, that you have installed all depencies and cloned the source files to the correct directory and that you are within the 'veriumMiner' DIR when you execute './cpuminer -help'.
Please review the instructions from github for further understanding.
https://github.com/fireworm71/veriumMiner
H) Configure cpuminer 1.4 (fireworm) for pool mining and mine!
At this stage there should be a cpuminer Binary located in '/home/tc/veriumMiner', as per the previous section. If building on a disk of 120Mb then it might be necessary to to make room for the screen extension on the boot media, please see the Stream lining section later before proceeding.
To execute cpuminer to test run the following command: ' ./cpuminer --help', but to mine of course we need to pass arguments for the pool to cpuminer as below, there are many pools to choose from so choose wisely. The following example contains a test pool account of VRMdude which you are invited to try.
./cpuminer -o stratum+tcp://eu.vrm.mining-pool.ovh:3032 -u VRMdude.VRMtest -p passwordOn screen you should then see something like this:
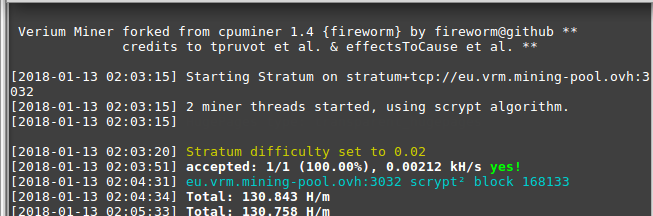
To stop mining press 'Ctrl + C'
Next we are going to make a script to start cpuminer at boot automatically inside a screen session so first we should stop cpuminer if still running and install screen:
tce-load -wi screenNow we create a simple script called 'mine.sh' that we will call at boot to run inside the screen session:
vi /mnt/sda/mine.shcopy the text below into the above 'mine.sh', script and edit to suit then save and exit vi.
Here is the content of the script 'mine.sh", the important lines are the shebang and the last line calling cpuminer with arguments the rest is swanky polish#!/bin/sh echo "waiting five seconds for network before starting miner" sleep 5 clear echo "started cpuminer in screen session..." echo "" echo "Press Enter to return to command prompt" echo "" echo "To view mining type 'screen -r' and to leave screen press Ctrl then A and D (mining will continue in screen)" echo "" echo "To stop mining type 'sudo pkill cpuminer'" echo "" echo "To restart mining type 'sudo /mnt/sda1/mine.sh" echo "" sudo -u tc screen -dmS cgm sudo /home/tc/veriumMiner/cpuminer -n 1048576 -o stratum+tcp://eu.vrm.mining pool.ovh:3032 -u VRMdude.VRMtest -p passwordNOTE 1
Of course we don’t have to install screen but if running headless in a farm it is useful to prevent unwanted termination of mining if we close a terminal session by mistake, plus we can access the command line outside of the screen session whilst not disturbing the mining session running inside screen....
Check that the script is saved ok and looks good by using the 'cat' command to write the content of the file to screen like this:
cat /mnt/sda1/mine.shTo execute the script manually like this:
sudo /mnt/sda1/mine.shTo stop the miner, maybe for pool change etc?:
pkill cpuminer or ctrl cFinally we need to tell Tinycorepure64 to execute the mine.sh script at boot and run filetool to save these important change. This step is achieved by adding the mine.sh start line to the bootlocal.sh script as follows:
sudo vi /opt/bootlocal.sh
Example of 'bootlocal.sh':#!/bin/sh # put other system startup commands here /usr/local/etc/init.d/openssh start & sudo /mnt/sda1/mine.sh
In the example of 'bootlocal.sh' script above you can see that openssh server is also started at boot time, if you dont have or want SSH that’s fine to omit it and in fact if you haven’t installed openssh extension then you should omit that line!
Thats it we now need to reboot to test everything is working ok and check we have the cpuminer started automaitcally in a screen session, but don’t forget to execute 'filetool -b', before rebooting or you will have to redo this section.
NOTE 2
The mine.sh script is saved on the usb stick root to make changing worker simple and quick when writing multiple images for a farm setup since a backup command is not needed each time as the script is saved outside of the corepure64 system, i.e. 'mine.sh' is not loaded into RAM at boot time but called from its location on the root of the boot media by bootlocal.sh. You may change this behavour if you like but don’t forget to reflect any change of location of the mine.sh script location in the bootlocal script or it will not find the mine script so mining will not start and also execute filetool to save such a change.
HAPPY TINY-MINING :-)
Below is a screen shot comparism between cpuminer 1.3 and cpuminer 1.4 on an Intel Atom micro ITX board.

left side: Tinycore Linux (x86) cpuminer 1.3. Right side: Tinycorepure64 (x64) cpuminer 1.4
I. OPTIONAL Stream lining to reduce image size to minimal 32Mb
Perhaps this section might not really be useful in practical terms like who has or even needs a 32Mb flash media anyway but VRMdude includes it since he took the time to figure this out and hopes others may find the information useful, it certainly would fit on embedded system but the point of that is debatable lol this is therefore mainly academic.
With reference to the table below we can see the disk usage caused by the installation of each extension required for this project, these extensions are all downloaded into the 'tce/optional' directory of the boot media and listed in the file ' /tce/onboot.lst'. If wishing to strip the image down to the minimal 32Mb then simply remove the extensions and clear the 'boot.lst' file accordingly and thats it but note 'curl-dev' cannot be removed since it is an essential dependency
try it and see what happens you can always add 'curl-dev' back again ;-)
| Extension or File/s | Total Mb Used | % Disk usage (120Mb) |
|---|---|---|
| TinycorePure64 | 25Mb | 20% |
| OPENSSH | 27.2Mb | 23% |
| Git | 32.2Mb | 25% |
| Cpuminer 1.4 source* | 32.2Mb | 25% |
| Cmake | 47.4Mb | 40% |
| Autoconf | 62.4Mb | 52% |
| Automake | 62.9Mb | 52% |
| compiletc | 117.5Mb | 98% |
| curl-dev | 119.7Mb | 99% |
*The source for cpuminer was kept in RAM and not backed up to the boot media only the binary was removed for use and on reboot it had magically disapeard :-)
Screen extension is not included in this list it was installed after performing a Stream linin.
There are extensive guides and FAQ's on the TInycore website going into detail about the nature and usage of the distribution and how it all works and as stated at the begining of this guide, thee is advised to visit:
J) About VRMdude
VRMdude is a relative newcomer to the Linux world though he is no stranger to the windows environment like most and he has been into mining since the early days of Litecoin but packed his GPU's up when Litecoin became unprofitable to mine with GPU's back in '14 or thereabouts. This is his first Steemit article for which he had to learn a bit of Markdown to write it and it has had several drafts before finding the guide he wanted to find himself.
VRMdude states clearly to any who ask that his occupation is life and in this life the goal as ever is the pursuit of happiness not just for self but for humanity.
VRMdude studied Electronics and electrical service and repair for a number of years as a young dude and so has a good grounding in the basics of the subject which makes work like this fun though all he knows about computers and software is self taught.
VRMdude started this project after becoming inspired by Birtys article on creating a farm of Odroid xu4's as published in the Odroid magazine, this article here actually:
https://magazine.odroid.com/wp-content/uploads/ODROID-Magazine-201708.pdf
Inspired and encouraged by that article by Birty VRMdude chose to engage with the new wave of alts and chose to mine verium reserve currency after some brief research and updating on the evolution of the crypto scene since 14. He was excited by the binary blockchain idea of verium and vericoin and since he was already in possession of an Odroid XU4, VRMdude followed Birty's guide extracting enough knowledge to setup his XU4 to pool mine Verium reserve and after this little adventure he decided to recycle a quantity of Intel Atom boards that he was in possession of for this project.
Why did VRMdude need such a small bootable Linux image to cpu mine with?
The simple fact is there are as of writing 60+ Intel Atom machines in the Kitchen of VRMdude, each requiring there own operating system on a usb stick and those sticks for a 8Gb or 16Gb suitable to fit a full fat version of Linux like Ubuntu onto, they cost around £5 each at the time of writing and fiat currency is as tight as ever. So instead VRMdude, wishing to achieve this goal at a minimal cost and wastage utilised what resources he had to hand and those being bags of time and willingness to learn and a box of cheap 120mb usb sticks that he had lying around.
It took some time and learning with many nights of torment, frustration and even modest bouts of limited rage and of course the delight at each successful completed stage but it was very satisfying in the end to achieve the goal of a bootable Linux image with cpuminer that was no larger than 120Mb (ideally less to allow persistence file backups. And of course the learning, oh the learning :-)
VRMdude built his first Tiny Miner verium mining image successfully in mid 2017 by using Tiny core Linux and cpuminer 1.3 (effects to cause), however cpu miner 1.4 was released not so long ago and this method required better understanding and refinement of the process to achieve the same result on the x64 platform as required for the new cpuminer 1.4. Since cpuminer 1.4 contains 64bit library’s and would not compile on x86 platform of tiny core Linux.
So more time, more learning and shouting a bit if honest, he even had to bother some knowledgeable folks on the Tinycore forums for which he is grateful for there patience and understanding and hay presto, TinyMiner was borne...
*not 100% sure if honest but despite the claims to date VRMdude is unable to compile cpuminer 1.4 on x86 Tinycore but it no longer matters. :-)
Till next time...
VRMdude 2018
- Please don’t just follow this guide, take time to learn and then share! ;-)
This guide was gifted to you by VRMdude who received some of the information from others credited in this document and after countless hours of personal research and learning to produce this guide. If you feel like it then VRMdude would welcome any donation if this has been useful to you and if you feel inclined to do so.... THANKYOU
Verium donation (VRM) : VFXj6cwmP767EpfNeDZuYeGyP9hjJFA114
Bitcoin donation (BTC) : 1Dy8gxyCQvda4Gs3QumZydLi5XB4aqAgEz
Litecoin donation (LTC) : VFXj6cwmP767EpfNeDZuYeGyP9hjJFA114
Ethereum donation (ETH) : 0x15820da10d77e1fe3fad1fd59734c6d165f717d3
Please don’t forget the hard work of the core developers, if you feel inclined to donate to them instead or in addition to :-) and VRMdude offers the info in this guide free of charge and without warranty or guarantee offered or implied otherwise so use this info at your own risk always.
K. Extra's
Check disk usage
df -h | grep sda1

tc@VRMdude:~$ df -h | grep sda1
/dev/sda1               119.9M    30.5M     89.4M  25% /mnt/sda1
                         Size     used   available  Use
PSSH
This info is useful to help manage a farm remotely from another system via SSH, any commands are issued from the client machines terminal unless stated otherwise.
To send commands to multiple machines on the network at the same time we need pssh (parallel ssh)
Install pssh on client:
sudo apt-get install psshTo use pssh effectively we must first install openssh on the target machines (servers) if not already installed there and also setup a key so that passwords wont need to entered multiple times when the client connects ot each server..
Setup a 'hostfile' containing the hostnames or /and ipaddress of each server.
Create a directory to store pssh host files in and call this DIR what you like, in this example we called the directory ‘psshVRMman’:mkdir psshVRMmanCreate a minerhosts file for pssh in our new directory:
nano minerhostsMinerhosts file example:
Each line in the host file are of the form [user@]host[:port] and can include blank lines and comments lines beginning with #

tc@box1
tc@box2
tc@box3

#or/and

tc@IPADDRESS1
tc@IPADDRESS2
tc@IPADDRESS3
Execute a command to all online miners in the farm listed in the minerhosts file, this example will show uptime of each machine:
parallel-ssh -i -h minerhosts uptime
Remote file upload and download.
scp (secure shell copy) is useful for uploading and downloading all file types including completely updating the system by uploading new Tinycore releases directly.
To upload a single file:
scp /localfile USERNAME@HOST:/remoteDIRTo upload a directory and its contents:
scp -r /localDIR USERNAME@HOST:/remoteDIRTo perform remote system update using preprepared zip file of a new Tinycore Kernel, system and whatever is needed we shall copy the zip to the home DIR (RAM) and then extract it to the Boot media overwriting the boot media files and directorys:
From local machine.
scp -r ~/TinyMiner-v.1.4/UPDATE.zip tc@TinyMiner1:~/After succesfull upload to remote machine, log in and unzip the package to the boot media. WARNING this example will overwrite files and directory’s in the bootmedia if files or directorys in the zip are of the same name so we use '-o' to overwrite any files in the zip and -x to omit files and directory’s that we do not wish to extract at this time, (please read the manual to understand these arguments fully:
sudo unzip -o ~/UPDATE.zip -x ldlinux.sys -d ~/mnt/sda1In the example above the file in the zip named 'ldlinux.sys' is not extracted, please see the manual for unzip
Finally REBOOT to load new system into RAM :-)
Create markdown tables quickly and simply
http://www.tablesgenerator.com/markdown_tables#
Outstanding matters
According to Fireworm71 from the Github source, cpuminer requires HUGEPAGES to be optimal however at time of writing it is understood HUGEPAGES is not supplied as default in the Tinycore kernel so VRMdude intends to compile a new kernel in order to assess the gains in hash rate and if worthwhile an update to this guide with that will be published.
VRMdude believes it would be useful to compile cpuminer releases for other crypto coins to build a multi coin cpu miner or "TinyMiner Multi" hopefully this can be made to fit on the 120Mb usb stick.
Feedback welcome, I hope you found this guide helpfull in some way.
VRMdude
Great article - will be checking out that Linux version - burning the images was incredibly painful at 4gb
Hi mate thanks :-). You know what that's another great feather in tinycores cap that i never really thought about till you mentioned it! :-) It took about 30 seconds to read an image of the disks and a minute or so to write it to these 120Mb usb 1 sticks lol.
Nice guide! I wonder if anyone tried setting this up on an XU4 and see how the hashrates are. I am building a 40 XU4 cluster for VRM mining and I wonder if I can get better results from this fireworm miner.
Congratulations @vrmdude! You have received a personal award!
Click on the badge to view your Board of Honor.
Do not miss the last post from @steemitboard:
Congratulations @vrmdude! You received a personal award!
You can view your badges on your Steem Board and compare to others on the Steem Ranking
Do not miss the last post from @steemitboard:
Vote for @Steemitboard as a witness to get one more award and increased upvotes!