Node Setup For Blender Cycles Material
Repository
https://github.com/dfelinto/blender
What Will I Learn?
- You will learn to create a simple material in Blender Cycles
- You will learn to configure and connect nodes
- You will learn about Noise texture node and ColorRamp
- You will learn about RGB Curves and Geometry Pointiness Node
Requirements
- Blender software. It can be download at the following link: https://www.blender.org/download/
Difficulty
- Intermediate
Content
This is a tutorial about material in blender with node setup in cycles. It is a simple and easy way to create authentic material in blender cycles. Extra details are added to the model with this material, than the basic color.
The procedural generated textures are originally generated textures with high resolution. They have unlimited flexibility and options and can be applied to any type of models.
1. Starting point
Object in nature are not ideal and have a lot of irregularities and details. Putting just a material with basic color makes the model look artificial and dull.
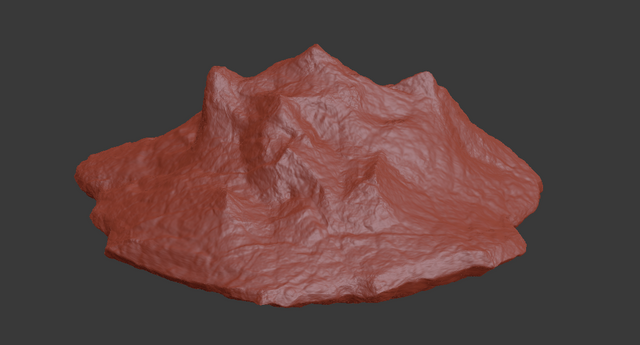
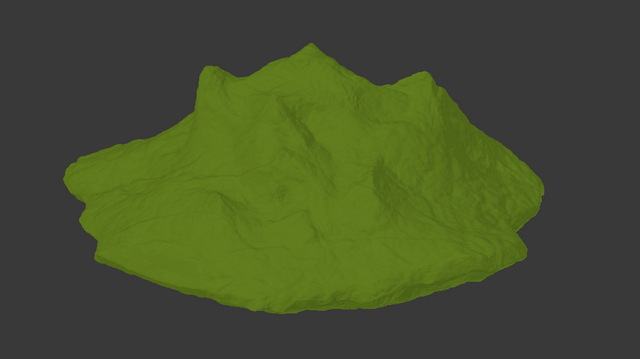
For this post and the need of the presentation I will be using this model.
This is the model without any material on it but seen as with matcap.
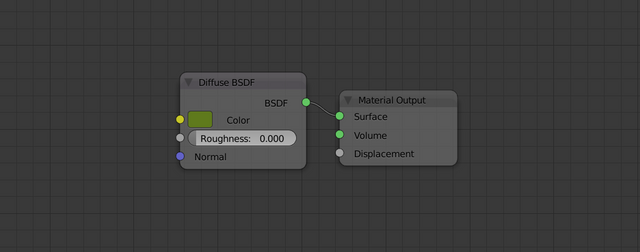
When the node editor is open, and a material is applied for the firs time, the node setup looks like this.
The diffuse shader is applied as default. From here there is option to change the color of the model. Here how the model looks when the color is applied.
It is one color all over the model and it is not detailed at all.
2. Noise Texture
Start building the node tree with adding noise.
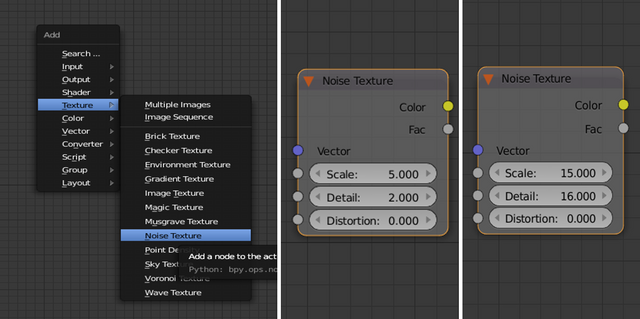
To add Noise Texture in the node editor window press SHIFT A then from the menu choose Texture -> Noise Texture.
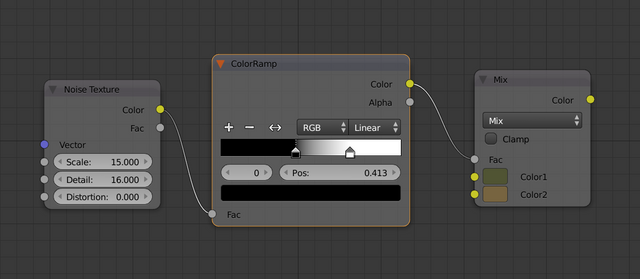
Adjust the scale to 15, and the detail to 16, as show on the picture below.
Use the mouse wheel to zoom in and out.
3. ColorRamp
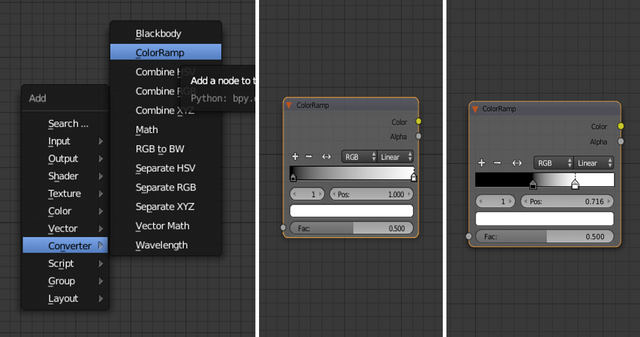
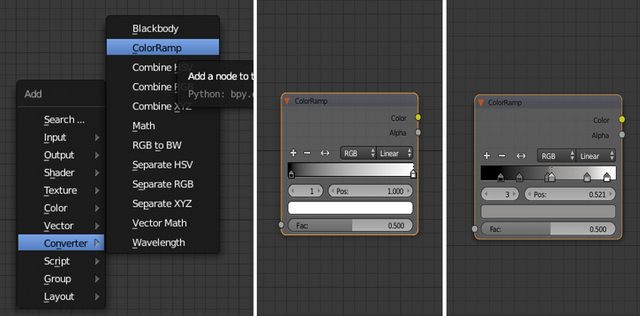
To add the ColorRamp, in the node editor press SHIFT A then from the menu choose Convertor -> ColorRamp.
The nob from the left is at position 0,413, and the nob from the right is at 0,716. Adjust the nobs from the left and right to this value as shown below.
4. MixRGB
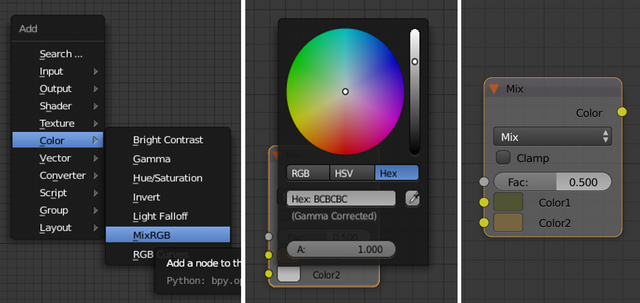
SHIFT A then from the menu choose Color -> MixRGB.
Adjust the top color to hex 505433, and the bottom one to hex 776440.
5. Form the Noise Texture Group
Connect the Noise Texture, the Color exit (yellow dot) with Fac entry in the ColorRamp (grey dot), and the Color exit from ColorRamp with the Fac entry in the mix node.
The noise texture is giving the noise. With the nobs of ColorRamp the influence of the white and the black is adjusted. Then this is going in the mix nodes and is controlling the mixing of the two colors.
The black nob is for the top color, and the white is for the bottom one. With adjusting the nobs of the ColorRamp you set the influence of the colors. Here they are approximately the same, but you can play with it and test variations.
Here how the model looks when this node group is applied.
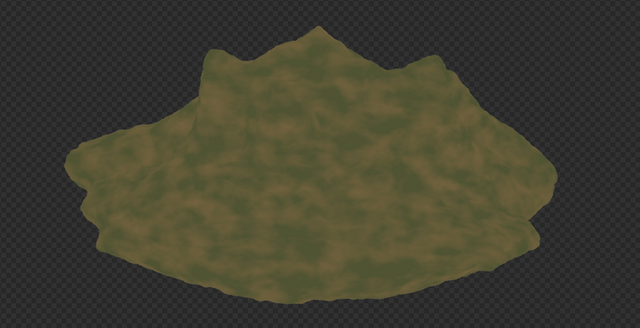
6. Make light and dark variation of the colors
The light and dark variation of the colors will be used to give shape of the model. They will be mixed with the help of the pointiness node.
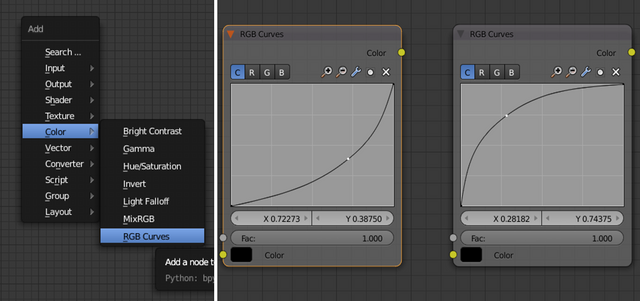
To create the light and dark variation of the colors we will use RGB Curves.
Shift A ->Color->RGB Curves.
Add two RGB Curves nodes and make one a little darker and the other one lighter. Adjust the curves as shown below.
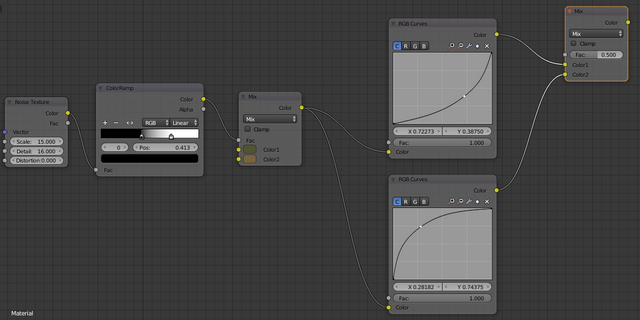
7. Connect the RGB Curves
After the RGB Curves are added, they are connected with the node tree. Two connection are made from the MixRGB, one with the light, and one with the dark variation. After that they are put in other MixRGB Node. The dark in the top color slot, the light in the bottom color slot.
8. Pointiness Geometry Node
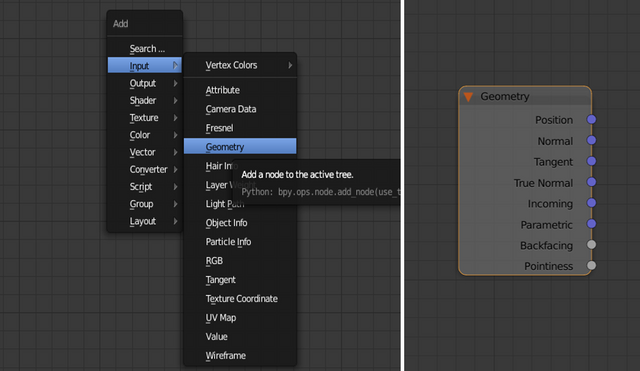
To add the geometry node press shortcut SHIFT A, the add menu will appear choose Input -> Geometry.
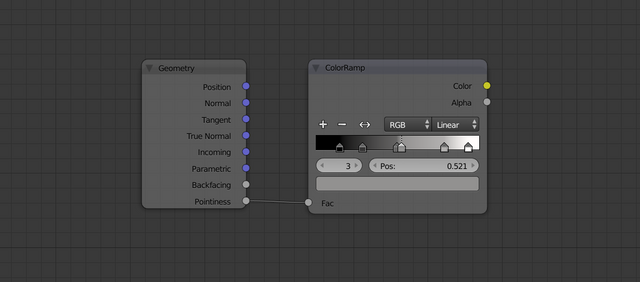
The geometry node has more futures but now we will be looking only in to Pointiness, that is on the bottom of the node.
What the pointiness future does is looking for the geometry of the object and highlights the edges of the model and darkens the cavities. It acts as a cavity map, only you can adjust and play with it quite a lot.
Next comes the ColorRamp, SHIFT A -> Convertor -> ColorRamp.
Adjust the ColorRamp as shown below. I add 6 nobs on the ColorRamp. The two middle in the middle are very close to each other.
Next connect the pointiness future of the geometry node with the ColorRamp.
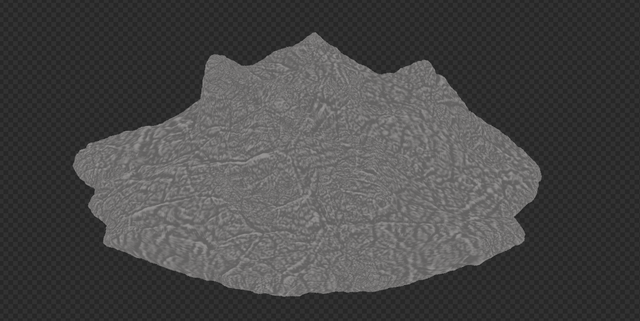
Here is a preview of this setup, and what it does to the model.
9. Connect the Pointiness Geometry Node with the node tree
The Pointiness Geometry Node is conceded in the factor value of the MixRGB node of the node tree.
In this way it plays a role of mixing the light and dark variation of the colors. The light variation is on top of the edges of the model. The dark variation of the color is in the cavities.
The look of the model with this node tree.
The pointiness has done it job. The model has light edges and dark cavities. It gives shape of the model.
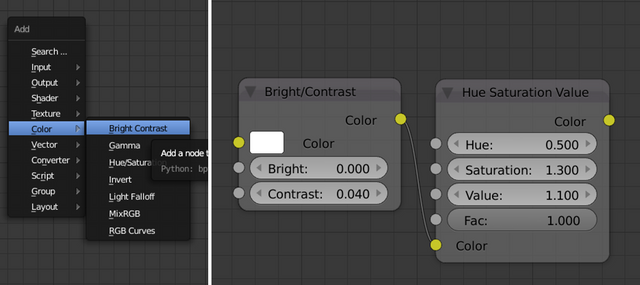
10. Contrast and Hue Saturation
We are now almost over. But I will add contrast and hue saturation to make the color more alive. This is a personal thing, and I preferred to do it.
To add this node go to SHIFT A ->Color->Bright Contrast, and Hue/Saturation.
Adjust the value of the contrast to 0,04. The values of Hue Saturation to 0,5 1,3 and 1,1, as shown below.
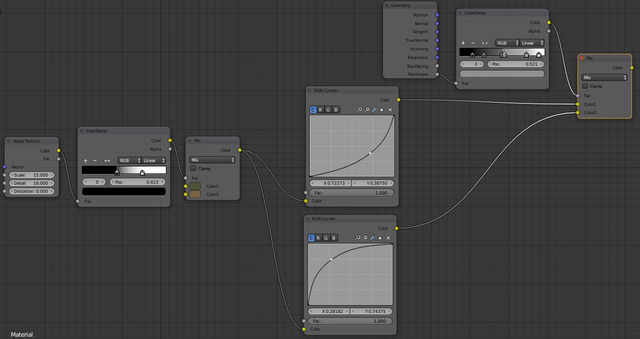
11. The Final Node Tree
Here is the final node tree, with everything connected.
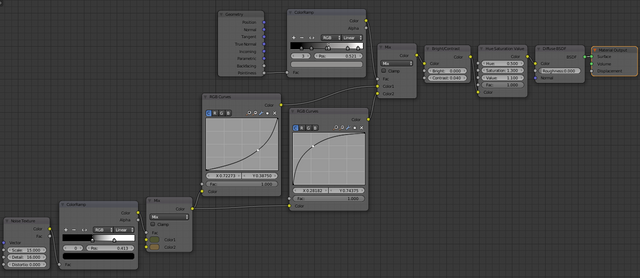
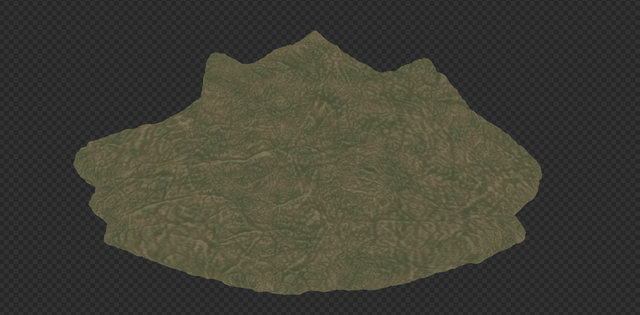
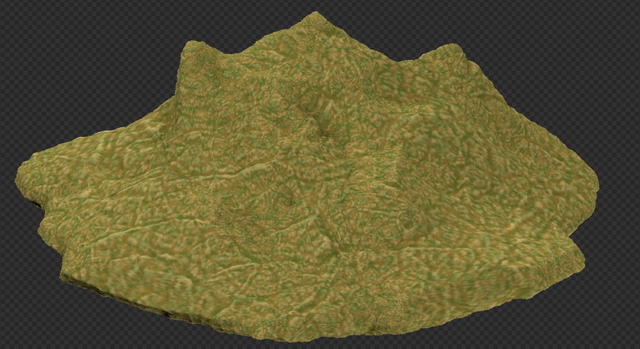
The Final Look Of The Model
11. Variation
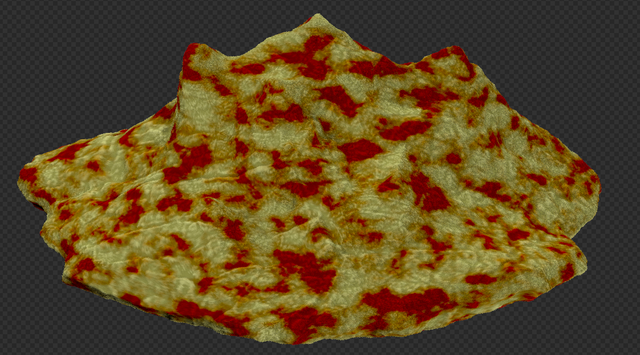
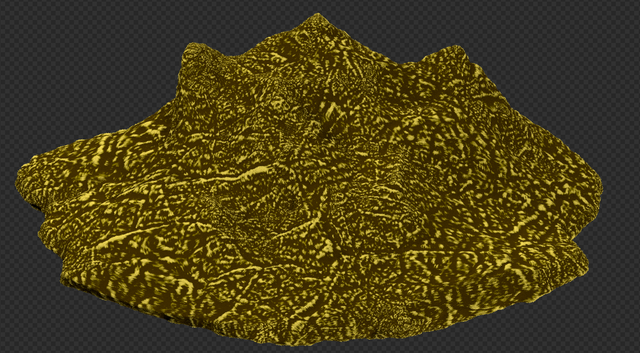
The main advantages of this process are that it creates original textures, and very flexible as well. It allows a lot of variants with a simple tweak of the nodes. Let’s make some.
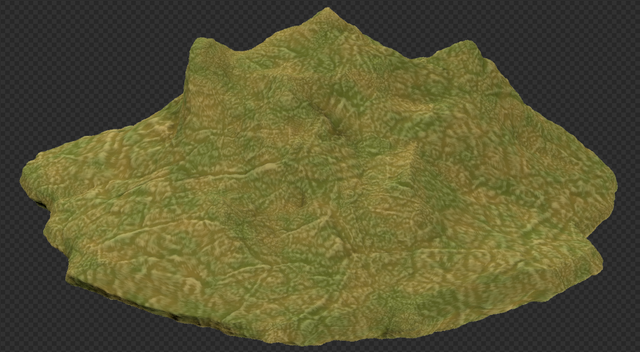
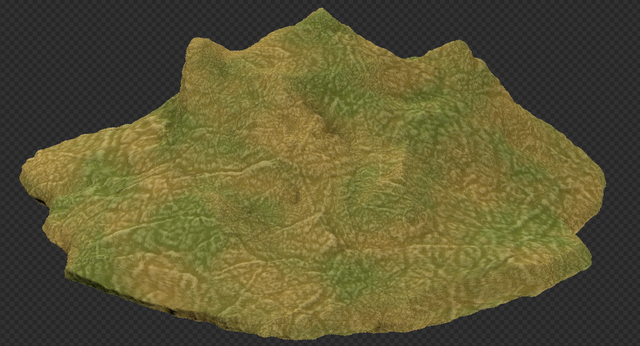
- Less noise
The scale value in the noise texture set to 5.
- More noise
The scale value in the noise texture set to 60.
- Different color
Change the color in the MixRGB node.
- Brighter edges
Change the ColorRamp of the pointiness node.
Curriculum
- Basic Material in Blender/Cycles and Generated Textures - Simple Node Setup
- Pointiness Future in Blender Node Setup – Give Shape To Your Model
Proof of Work Done
The model that I used for the tutorial. It is .obj format.
https://drive.google.com/file/d/1rxmIhBxqUznnCeR-vQCwoOG_Gj0KzGPE/view?usp=sharing
Thank you for your contribution.
The utopian tutorials are specifically to be used in a technical way to help the open source community learn new content.
Please read the guidelines here.
Your contribution has been evaluated according to Utopian policies and guidelines, as well as a predefined set of questions pertaining to the category.
To view those questions and the relevant answers related to your post, click here.
Need help? Write a ticket on https://support.utopian.io/.
Chat with us on Discord.
[utopian-moderator]
Thank you for your review, @portugalcoin!
So far this week you've reviewed 17 contributions. Keep up the good work!
Thank you for the fast review.
Fun.
I liked how the curves accentuated things. Handy. Pretty procedural. I guess you could export the result for a displacement map also.
Yes it can be done. But it need to go through the process of retopology and baking :).
It's a Dynatopo sculpt? Have you used the Instant Remesher addon/application? What would you bake?
Thanks for sharing buddy.
You welcome. The model is made with subdivide and displacement modifiers using textures.
I'm using Instant Meshes, it's very helpfull. I have post on that actually :).
Hi @dalz! We are @steem-ua, a new Steem dApp, computing UserAuthority for all accounts on Steem. We are currently in test modus upvoting quality Utopian-io contributions! Nice work!
Thanks.
Congratulations! Your post has been selected as a daily Steemit truffle! It is listed on rank 9 of all contributions awarded today. You can find the TOP DAILY TRUFFLE PICKS HERE.
I upvoted your contribution because to my mind your post is at least 7 SBD worth and should receive 111 votes. It's now up to the lovely Steemit community to make this come true.
I am
TrufflePig, an Artificial Intelligence Bot that helps minnows and content curators using Machine Learning. If you are curious how I select content, you can find an explanation here!Have a nice day and sincerely yours,

TrufflePigHey @dalz
Thanks for contributing on Utopian.
We’re already looking forward to your next contribution!
Want to chat? Join us on Discord https://discord.gg/h52nFrV.
Vote for Utopian Witness!