Mining Bitcoin & Ethereum @ home: let the beast go!
I’ve always had a huge interest in science and technology. Now and then I throw myself in a new technology project, not really knowing if my crazy plan is actually going to work out or not. I’m having a lot of fun messing with stuff, using trial and error to get it working. My wife is still thankful for the media-center and server I set up, coming from zero knowledge of Linux and servers and so on. I really had a good time building and configuring those things. It was worth my while, because when my six year old daughter wants to watch a movie on the media center, she always calls it “one of daddies movies”. :)
In 2013 I learned about something that sparked my interest. The Bitcoin. A friend of mine was talking about it and told me what it was and what one could do with it. Turns out Bitcoin is the first decentralized Cryptocurrency payment system ever invented by an entity known as Satoshi Nakamoto. The cash of the Internet, so to say. So I started learning more about Bitcoin, how it worked, and what it’s possibilities were.
I liked the idea of being able to do payments to others over the Internet in a fast, safe and even anonymous way. To me it’s fascinating to see how Bitcoin works under the hood and how all of this is connected to the blockchain, which might actually even be more important than the Bitcoin itself.
I eventually found out it was possible to mine Bitcoin. “Mining Bitcoin” means your hardware has to do some hard calculations and send them to the Bitcoin-network. In return you get some Bitcoin back, which you can keep in a Bitcoin Wallet.I was hooked from the beginning. Not because of the money aspect, but again, just for the fun of it! Those are projects I like getting myself into. For people who want the learn the basics of Bitcoin and mining, feel free to click here: basics of bitcoin and mining. Another good article can be found here. I won’t go into too much detail here, that’s not the essence of this piece.
So, earning money by mining Bitcoin, you say?
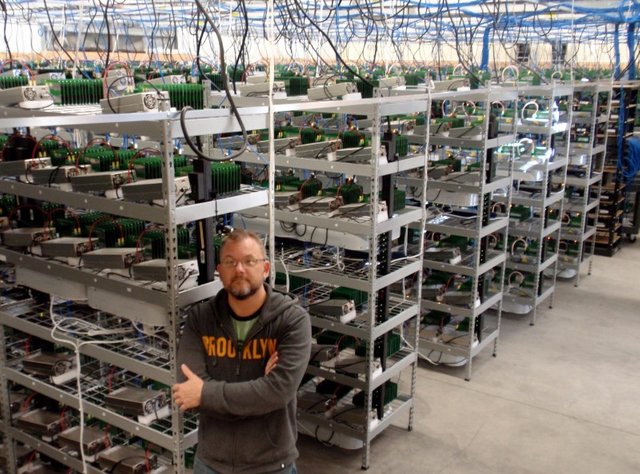
Before you get any idea’s: mining Bitcoin yourself has become nearly impossible now. It’s like a gold rush on a field somewhere. Eventually everyone knows about it, showing up with their shovels and pickaxes, digging in the ground. Only the people with the best and most expensive material will actually find something in the end, as you have to dig deeper and deeper to find something. This is called the difficulty of mining. Technically, there is a different explanation of how mining works, but like I said before, we won’t go that way. Just so you do get some idea: this picture below is from 2014, showing the biggest Bitcoin mine at that time. Those green things you see are all pieces of hardware, doing the necessary calculations to get Bitcoin in return. Trying to compete against this would be total madness due to the massive electricity costs.
So, don’t try it at home. Back in 2013 it was still possible to have some profit so I decided to give the mining project a shot. To get everything running I needed:
- A raspberry Pi, Model A. A raspberry is a small computer, originally made in England to learn kids how to program. You can do lots of other great projects with it, like building your own Gameboy with it :) Google is your friend if you want to know more.
- The miner itself, back in those days I got myself a 7 GH/s Jalapeno from Butterfly labs. A miner is the piece of hardware that does the calculations on the bitcoin-network and for which you get Bitcoin in return. GH means gigahash. A hash is the unit for the calculation speed.
- An Internet connection, preferably via cable
- Another PC to monitor the Raspberry Pi
- Some knowledge of Linux
- Some luck getting everything up and running in a decent time frame… :)
My setup looked a bit like this:
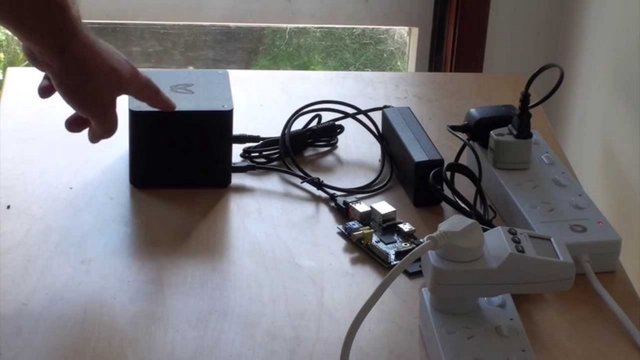
A short notice of how it actually works:
- The miner is being connected to the raspberry Pi. I configured both systems to interact with eachother and the miner gets started from a single command from the Raspberry Pi.
- I monitor the Raspberry Pi from my PC within my home network, via the RDP protocol
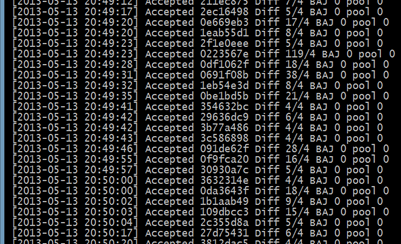
The earned Bitcoin gets delivered to my wallet online, which was at “Slush’s Pool” at the time. Below you can see a picture of the bitcoin mining process.
One thing I didn’t really think of was that miners are really loud monsters. They are like airplanes taking off! They also generate a lot of heat. I placed it in our small storage room at our apartment, hoping it would cover the noise, but it didn’t really help much. I remember my wife coming in right after I turned it on, first looking at the miner, and after that looking at me, giving me the roll-eyes. Still, I love her for putting up with me and my crazy idea’s…
It even got better when the place became hot as hell when the miner, washing machine and dryer each were minding their own business… :)
I had to pull the plug on the project after six months. The mining difficulty had become so high by then it was no longer affordable to mine due to the high electricity costs in Belgium. I had to end it because my electricity costs were higher than my revenues from mining. And finally some silence back in the apartment. At least my wife was happy.
The most important part is that I learned a lot from doing that little rather short-lived project. From that time on my interest in Cryptocurrency and mining was born and I started following up on stuff concerning Bitcoin and everything around it. The whole concept had a lot of potential and could be used for a lot more than only for digital payments.
The Bitcoin itself became popular, but it also had its flaws and limitations. I unhappily refer to the transaction malleability bug back in 2014 and not to forget: the bankruptcy of Mt. Gox, an exchange site for Bitcoin where people could also have their own Bitcoin-wallets. I am sure a lot of people lost a lot of money that day.
Things got really interesting when a brilliant guy by the name of Vitalik Buterin co-founded Ethereum in 2013. The basics of Ethereum can be found in how Bitcoin works, but Ethereum has a whole different purpose.
Ethereum is a decentralized platform that is able to run smart contracts and other applications, also being called decentralized applications (Dapps). A smart contract is a programmed contract that is automatically executed when the conditions of the contract are met.
An example: I have to pay a certain amount of money to my landlord every month. This amount gets deducted from my bank account and gets added to the bank account of my landlord. If I do not have enough money on the account, the payment fails and I can expect an angry phone call. It is perfectly possible to program these conditions in a smart contract.
The big difference is the word “decentralized”. This is a key difference between how a bank works, and how a smart contract works. A bank is a central authority who has all the say about my bank account. The Ethereum platform (and Bitcoin as well) is decentralized.
“Decentralized” means that every system connected to the Ethereum platform has a copy of the contract. This makes sure you cannot tamper with the contract, and downtime is also not an issue here. Another advantage is that you do no longer need a “central authority” like a bank or a notary as everything is being arranged by those “smart contracts”. A good explanation into further detail about smart contracts can be found here .
Next to all these features, Ethereum is also a Cryptocurrency, like Bitcoin is. Even better news: it can also be mined, for now. With Bitcoin, I was able to buy a miner. Now I would have to build one (which is easier than it sounds actually).
As explained before: mining is actually doing calculations to confirm transactions (for example: a payment of a Cryptocurrency from person A to person B) on the network. With Bitcoin, we had a miner who did those calculations. With Ethereum, these calculations are preferably being done by the graphics card (or GPU, graphical processing unit) of the miner. So, to build a good miner, I needed a system with one or two good graphics cards. Below I will explain how I did it all. It’s a bit in detail, but it’s a good reference for people who want to try the same thing.
I had to take a few things into consideration before I went building:
- What is my budget for this miner? Eventually I went for around € 500.
- What GPU’s was I going to buy? I needed GPU’s that were actually good at mining. And also: where was I going to buy these? They were going to be the most expensive part of the system so I had to be careful there. I decided to buy 2 used AMD Radeon 7950 GPU’s at Amazon.
- Where was I going to put my miner? I didn’t want to have it in my house due to the noise and heat. So I went for my garage. I had to provide Internet there. I managed doing that by 2 PLC’s or Power-Line-Connectors. Internet via the grid, so to say.
- What OS was I going to use? Windows or Linux? As I like to learn new stuff along the way, I went with Ubuntu Linux. It’s also a free OS, which makes my choice an easy one here.
- I also wanted to be able to connect to this PC from my apartment , so I needed to implement an RDP-connection between the two systems so I could monitor everything from the PC in my apartment . This way I could fix small problems from my house instead of walking to the garage if the miner would decide to go haywire.
I went for the following configuration:
- Motherboard: Gigabyte GA -B85M-D3H. It’s small, but it does suffice for what we are doing here!
- Processor: Celeron G1840 Boxed. The processor won’t have to do much in the mining process.
- RAM: Kingston 8 GB RAM which I had laying around somewhere. In the end, I eventually installed 4 GB, as one of my sticks is probably broken somehow.
- HDD: SSDnow KC400 128 GB (Will be more than sufficient.)
- PSU: Antec 700VP (which provides 700W), before this I had a Seasonic S12II-Bronze 520W which did not provide enough power for the two GPU’s.
- GPU’s: AMD Radeon 7950 x 2. Good GPU’s at mining and with 3GB RAM. Your GPU must at least have 3GB of ram, or else it will fail when loading the DAG-file. See more info down below.
- Case: An old case I had laying around somewhere which would fit for the job.
- Internet connection: being provided with 2 PLC’s, where one is being connected to my router, and the other one to the miner in my garage.
- Other: 1 cheap LCD screen, keyboard and mouse, for comfort if I needed to check out the system in the garage.
- OS: Ubuntu 14.04 . I strongly advice against Ubuntu 16.04 as I had a lot of trouble getting the AMD-drivers running. Eventually I bailed out and fell back to 14.04 which went fine from the start.
It’s been a long time since I built my last computer actually. Made some dumb mistakes there:
- I oriented the CPU-fan away from its connector of the motherboard, so I had to mess around a bit with the cable to get it connected. (I was worried I was going to break stuff when I was to dismount the fan again, so I decided not to.)
- I was looking for about half an hour to find the connectors for the power-, reset-button and HD-LED’s. The reason I could not find them was because I already placed my mammoth-GPU’s on top of them. Evil me!
- I forgot to connect my PC speaker and the PC didn’t want to boot for some reason at the first time. Took a while before I found out I didn’t connect the speaker and, after that, it seemed that one of the RAM’s was faulty. So I decided to go forward with 4 GB ram, which should also do the trick.
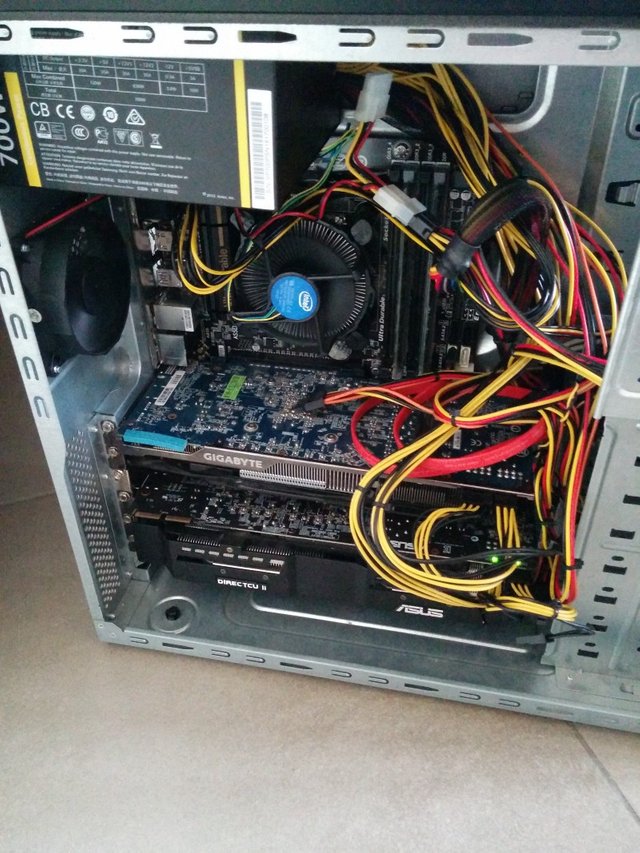
Anyway, I got everything working in the end. This is how the miner looks like:
Time to install Ubuntu!
Due to lack of a DVD-drive I installed Ubuntu 14.04 with a USB-stick. All you need is the ISO of Ubuntu and Rufus, a small program to make your stick bootable and installs the ISO for you on the stick. Great program. The installation of Ubuntu is pretty straightforward. Best is also to have an Internet connection during installation to have the most recent software and repositories installed.
Once Ubuntu is installed, it’s time for the real work. Hook the miner up the Internet if you didn’t do that already and start a terminal. First thing you need to do is getting all the necessary repositories for your AMD GPU to work. In my case the guide found here was a great help.
Download the AMD APP SDK (don’t be like me and get the 64bit driver!) from here and the AMD display library from here, save them to your home folder and unpack them. Download the most recent versions. After that, run the commands below from your home folder (e.g.: /home/thomas/). Remember you can check your current folder by typing “pwd”.
$ sudo su


$ ./AMD-APP-SDK-v3.0.130.136-GA-linux32.sh # Get the 64bit driver!


$ ln -s /opt/AMDAPPSDK-3.0 /opt/AMDAPP


$ ln -s /opt/AMDAPP/include/CL /usr/include $ ln -s /opt/AMDAPP/lib/x86_64/* /usr/lib/


$ ldconfig


$ reboot
The command “sudo su” makes you being superuser after you type in your password. Else you’ll have to type “sudo” every time you issue a command, which is too cumbersome for me, but feel free to do as you please.
Once the miner has rebooted, open the terminal again and install the fglrx drivers (the AMD Catalyst drivers of windows). “aticonfig --list-adapters” will display your AMD-GPU.
$ sudo su


$ apt-get install fglrx-updates


$ aticonfig --adapter=all --initial


$ aticonfig --list-adapters
“aticonfig --list-adapters” will display your GPU(‘s). You should get an output looking like this:
* 0. 01:00.0 AMD Radeon R9 200 / HD 7900 Series


  1. 06:00.0 AMD Radeon HD 7900 Series
* - Default adapterThis means that everything so far has been properly installed and we can continue with the next step, which is to install curl, git, geth, cpp-ethereum and Ethereum:
$ apt-get install curl


$ apt-get install git


$ bash <(curl https://raw.githubusercontent.com/ethereum/frontier-release/master/bin/install-go.sh)


$ add-apt-repository ppa:ethereum/ethereum-qt


$ add-apt-repository ppa:ethereum/ethereum


$ apt-get update


$ apt-get install cpp-ethereum
What do all these programs do anyway and why do I need them?
- Curl is a program used for sending or downloading files using the URL-syntax. This will be used in the next step to download certain files we will use to generate the Genesis Block.
- Git is used (in this case) to download files from Github, a famous platform which houses lots of software-projects and keeps track of version-history. We will need to download certain software from Github to get everything working.
- Geth: program which will be the “communicator” between you (the node) and the software which does the mining itself (ethminer). It can be used for a lot, lot more, but for now this explanation will suffice. Geth will be installed by the script we run in step 3 (bash<(curl…)
- cpp-ethereum and Ethereum: the software needed to do the actual mining of Ethereum.
Next we have to install the Genesis Block. The Genesis block is the first block of a Blockchain (in our case: the Ethereum-Blockchain), the ledger in which you can find all the transactions of the cryptocurrency. Note that Ethereum has its own Blockchain, as Bitcoin does.
$ curl -O https://raw.githubusercontent.com/ethereum/genesis_block_generator/master/mk_genesis_block.py


$ curl -O https://bootstrap.pypa.io/get-pip.py


$ python get-pip.py


$ pip install bitcoin


$ pip install --upgrade bitcoin


$ python mk_genesis_block.py --extradata 0x11bbe8db4e347b4e8c937c1c8370e4b5ed33adb3db69cbdb7a38e1e50b1b82fa > genesis_block.json
Almost there. Time to create our own wallet, the location where we will store our Ethereum. This wallet is being represented by a bunch of letters and numbers and can only be accessed by the user knowing the password. These addresses are being created by Geth and yes, they look a bit weird. e.g.: 0x123f681646d4a755815f9cb19e1acc8565a0c2ac
You will be asked for a password. Type it in, and do NOT lose it, as it cannot be recovered. If you lose your password, you lose your Ethereum. It’s like putting your money in a box, locking it and throwing the key away.
Next, we must load the Genesis Block created in the previous step, and sync it with the network.
$ geth account new


$ geth --rpc --rpccorsdomain "*" --genesis "~/genesis_block.json"
Now, we should be able to start mining. But…there is one more important item: the difference between solo mining and “pool mining”.
As explained before: Mining is where the miner does complicated calculations in an attempt to confirm the translations done by the users on the network. As these calculations are pretty difficult, you can choose to help “solve” these calculations in a pool, so, by a group of miners. Once a solution has been found the miners get rewarded by a certain percentage of the reward for providing the solution. There is also the pool fee, which you have to pay for using the pool.
If you go solo-mining, you alone are trying to solve calculations, without the help of others. If you have a small miner it’s not recommended to try this, because getting a reward is more based on luck, as you are competing against the whole world, finding a solution.
Needless too say, I advice you to start pool-mining, as this will guarantee a certain income of Ether.
At the moment, I’m using Dwarfpool as mining pool. Registration is not required. All you have to do is tell your miner where it has to go to start pool mining. You will be able to follow the mining process at the Dwarfpool-website, which can be found here.
So, the command to get the miner up and running is:
ethminer --farm-recheck 400 -G --opencl-device 0 -F http://eth-eu.dwarfpool.com:80/08ceda86012b77a0e780ba852f4ce7318d1d15a2/worker0 --cl-local-work 256 --cl-global-work 16384- --farm-recheck is the frequency in milliseconds that ethminer will ask geth for new calculations to be done.
- Parameter -G indicates we want our GPU to do the mining. You can also mine with your CPU, which is not recommended.
- -F: here we indicate we want to do farm mining, instead of solo mining
- “Device 0” is my primary GPU. Remember this output? Device 0 is the first line and is the default GPU.
* 0. 01:00.0 AMD Radeon R9 200 / HD 7900 Series


  1. 06:00.0 AMD Radeon HD 7900 Series
* - Default adapter- http://eth-eu.dwarfpool.com:80/ is the URL of the pool. 08ceda86012b77a0e780ba852f4ce7318d1d15a2 is my own Ethereum wallet and worker0 is the name of the GPU as being known to Dwarfpool. On the site I can follow how the GPU performs by knowing its name.
- cl-local-work 256 and cl-global-work 16384 are fine-tuning option for the GPU. i will not explain it in full detail here. It does seem to yield the best results though.
Certain people might notice that under these circumstances, now only one GPU will mine. I actually forgot this the first time and it suddenly occurred to me while I was not at home. Activating the second GPU to mine is not hard, once you get the hang of it: remember you must change the value of your device from 0 to 1 and the name of the worker from 0 to 1. Actually, it doesn’t matter how you call you worker. Call it “African_Swallow” or “American_Swallow”, if you like.
ethminer --farm-recheck 400 -G --opencl-device 1 -F http://eth-eu.dwarfpool.com:80/08ceda86012b77a0e780ba852f4ce7318d1d15a2/worker1 --cl-local-work 256 --cl-global-work 16384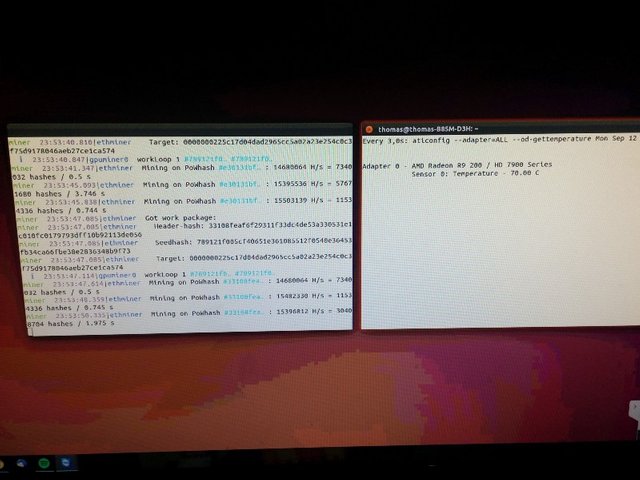
At first, the miner will build the DAG (directed acyclic graph) and will load it up into the ram of the GPU. You need to have a GPU with more than 2GB RAM or else the DAG-file will not be loaded, leaving you unable to mine. Once this has been done, the actual mining will start. You can see this on the picture above.
It is most interesting to monitor the temperature of your GPU’s. To do this, open a second terminal window and type:
watch -n 3 aticonfig --adapter=ALL --od-gettemperatureThis command will watch the temperature of all GPU’s and update it every 3 seconds. The temperature of my cards balance between 70 and 80 °C, which is OK. If the GPU’s turns too hot, your miner will hang as a safety precaution. Check this output:
adapter 0 - AMD Radeon R9 200 / HD 7900 Series


Sensor 0: Temperature - 73.00 C


ERROR - Get temperature failed for Adapter 1 - AMD Radeon HD 7900 Series
I still gotta look for a workaround for the error on adapter 1. It’s a known problem which can be fixed. Both GPU’s are around the same temperature though.
There are other interesting commands out there, but these should do for now. For example: it is possible to keep your miner below a certain amount of °, or letting the fans work at a certain % of their full capacity. Never run your fans at 100% by the way.
Last but not least I installed Teamviewer on my desktop at my house and the miner in the garage. It will do for now, but once everything is running smoothly I will install TightVNC viewer and server on the home desktop and the miner. The installation of Teamviewer is pretty straightforward as you can download it from here, choose the Debian package and let Synaptic do the rest of the work for you. Once installed you can register both systems at Teamviewer to make the connection more conveniently. If both Internet connections are stable, the connection between the two systems should go without a problem.
I hope this article sparks your interest in this fascinating technology and who knows, maybe you will even start mining yourself? Don’t hesitate to share, ask questions or comment on my story. You can follow me by clicking here!
A sidenote: I also ran experiments with Monero mining. I might write a short article about this in the future :)
Edit: Sorry about my codeblocks going haywire. It's my first post here and I seem to have messed up a bit...
So nice to see a mining post for a change, thank you for that.
As a fellow miner may I be so bold as to suggest turning your PC on it's side, use riser cables to extend the graphics cards clear of the housing and wooden dowels found at hardware stores to suspend the cards up. Riser cables are very inexpensive on ebay.
@bluehorseshoe: Thank you for the advice. I will definitely look into it!
Wow. The second part that article got a bit heavy there but cryptocurrency definitely is on the way in. There are some who say that paper currency is about to fall apart, one reason being that ALL countries are using quantitave easing to get through our moeny problems at the moment. Apparently, this devalues whatever money is already in circulation. So the 'centralised' system is doing something that we really can't influence. The decentralised' cryptocurrency (Bitcoin, Fuel coin etc) are all on other people's computers throught the world and so I don't believe this can be done. Quantitative easing, that is. I mean, this is done by a government, but they can't touch the decentralised currencies. Apparently, more and more BTC (bitcoin) is being mined, which, if I'm right, slowly brings down the value of BTC over time. FuelCoin on the other hand, has produced all the currency that will ever be produced, right at the start i.e that mining took place at the start of the process. Not a lot of people know that BTC is listed on the financial markets, and I know that it is being accepted in places like Starbucks in the UK. Yes, you can pay for a cup of coffee with BTC. Yep, you're right. It is a fascinating development. I heard somebody say the other day, that cryptocurrency is a bigger development than the internet starting off. Time will tell.
@paulpuk2000: I know the second part is more technical. I wanted to write a story of how it felt to me working on the whole cryptocurrency thing and learning as I went. So it's a bit of a personal story. The technical part is for the people who want to jump in and start to mine as well.
@omnicron. Sure, I get that. Just saying that's all. Feel free to upvote my comment if you think my comment had some value. Let's keep in touch on this cryptocurrency thing !
Very nice article. Your build is powerful, however the case is a little bit small for the heat to dissipate. I have done the similar build like you. After around 2 months, both of my GPU have wore down though.Bad luck!
Due to the high difficulty to mine ether, I will never resume my mining tool.
Thanks for the post. As you mentioned bitcoin is taken over by major companies and not worthwhile. Ethereum is great but newest version of Ubuntu doesn't support ATI graphics drivers so tough to follow your setup.
You mentioned Monero which is what I mine using Ubuntu. The payback is pretty good, no video drivers are needed if CPU mining, and the script is such that specialized USB miners are unlikely like they have for bitcoin.
Thanks for the post.
@richardterrace: Why don't you do like I did, and get yourself an older version of Ubuntu? I struggled with it all the same and went for Ubuntu 14.04. If you do that this guide should do the trick!
I tried Ubuntu 14.04 and did get the video drivers installed. Then found out that they weren't compatible with the mining pool I was using. Since my video card wasn't great (Radeon 7750) I just let my CPU do the mining :)
Congratulations @omnicron! You have received a personal award!
Click on the badge to view your own Board of Honor on SteemitBoard.
For more information about this award, click here
Interesting
I will follow you to see your future posts!
Congratulations @omnicron! You have received a personal award!
Click on the badge to view your Board of Honor.
Do not miss the last post from @steemitboard:
Congratulations @omnicron! You received a personal award!
You can view your badges on your Steem Board and compare to others on the Steem Ranking
Vote for @Steemitboard as a witness to get one more award and increased upvotes!