#BonsaiNews: My personal favorite [Top3] most beautiful bonsai species
I can imagine getting gunned for writing this despite the fact that I have been working on this piece for well over a week to make sure that not only does it read well and look good but that it is as crammed with information as possible - and now, I believe it is even idiot proof, almost anyway.
So, before you get started reading (some of you probably just scrolling looking at the images and moving on after leaving a fake comment like: nice photo. PS. These are not my photos - all from free sites) this, and I hope you will because this article will also contain information on how to successfully grow these trees from seed and not just showcase pretty pictures - your time is valuable and so is mine.
To be honest, I've not been doing bonsai for that long however, I've been playing in the garden since I was a kid and have grown quite a few things and, in so doing, have learnt quite a bit but I'd of course never consider myself an expert in the field of bonsai - I can dream so I'll say maybe one day.
At present, I have around 40 bonsai-in-training of which the majority are still babies and aged around 3-4 years of age.
And sadly, I wish my apple tree could look this great - herewith, my favorite tree for bonsai and coming in at number 1:
Apple tree:
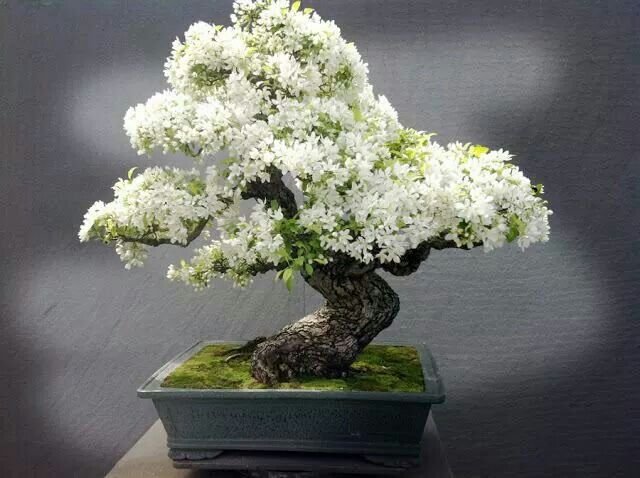
I bet you never thought that an apple tree in bloom could look as beautiful as this as a bonsai?
Before you start with simply sowing apple seeds it is very important for you to know that it would not only be better for you to consider buying a young apple tree from a nursery but perhaps even starting one from a cutting.
An interesting fact about apple trees is that even though you can grow them from the seed of the fruit, the apples produced in future trees will never be the same.
Apple farmers spend forever crossing thousands of trees to get apples right, so, if you are not growing them for the fruit, you are pretty much good to go.
Germination:
From my personal experience with apple seeds, I've never had more than three seeds germinate successfully from an apple so, I advise you to use multiple apples - ripe apples only folks.
Now that you have successfully cut open the apple and removed the seeds, it is time to collect the seeds and place them in a double folded, wet paper towel which you will fold close to keep the seeds inside.
From this point on, you will place the paper towel containing the seeds inside a plastic zip lock/sandwich bag which you seal tightly and move them to the vegetable drawer of your fridge for 28 days - ensure that you check back with them every so often to make sure that the paper towel remains moist and that the seeds have not begun to sprout - they may sprout during this process.
In my experience, the seeds always sprout during this process so, once they do, carefully plant them up keeping in mind that the 'white looking thing' goes into the ground and the actual seed coat ever so slightly above the surface.
If they have not sprouted during this time, leave them for another week.
Your planting mixture should consist of a mixture of compost and perlite. You can also mix in some sterile seed starting mix if you like. Ensure that you have thoroughly soaked the mixture prior to sowing and allowed it to drain off excess water.
I sow my seeds individually using 6 by 8 trays, meaning I can plant as many as 48 seeds at a time. If you are sowing them all in one single tray or big pot, sow them in rows, at least 5 centimeters apart.
Provide full sun during morning and partial in the afternoon.
Moisten daily using a soft spray until the sprouts have become proper seedlings of at least 10cm tall. (They are now ready to be transplanted and should have proper sets of leafs).
Very important: Do not remove the actual seed casing - it wall fall off once it is ready.
Once they have taken properly, generally after 3 months, move to watering once per week by thorough watering.
Azalea:
.jpg)
Azalea make for some of the most visually stunning bonsai depending on what design you implement - forget what I said, they'll look amazing regardless of what you do.
Now, without further ado, let's begin discussing the germination process.
Germination:
First off, get yourself some sterile seed starting mix, peat moss and perlite - soak it (mix of the starter mix and perlite*) with water once you've placed some in starter trays/pots or whatever you are using to plant the seeds in, leave a quarter depth space open on the surface and, once the water has stopped running out from the drainage holes, sow the seeds and cover them with an inch of fine peat moss - if you can get Canadian peat moss that'd be best.
Some people have advised me that soaking the peat moss separately works better than mixing it into the seed starting mix and perlite - which is why I mentioned * above)
Try and get the peat moss as fine as possible.
Please keep in mind that your mixture must not be dripping wet when you sow the seeds.
The best time to sow the seeds are during winter - here comes the fun part, they still need light so, you can make use of a desk lamp with a white fluorescent bulb.
And at long last, Winter has arrived meaning I can do the same.
Cover the top part of the tray/starter pot with clear plastic - your seeds should germinate within, or slightly after a month.
Once they have grown two sets of leaves, they will be safe to transplant and you can even use the same exact mix in the new pots.
Mist the seedlings after they've been transplanted - be careful when transplanting them as they are fragile.
You can also make use of a liquid fertilizer after you've transplanted them, just to give them an extra boost - place them back under the light until winter has come to an end.
Wisteria:
.jpg)
And in third place, we have the Wisteria - I am growing one at present which surprisingly shocked me since I thought that all my seeds had rotted - be careful and do not water them often during the germination process, more on that soon as first, we needed to get the visual display of this beauty.
Germination:
To be completely honest, I have no idea how I got this right although, I do have notes on where I believe I went wrong so I have adapted these and it is pretty much a work in progress however, I believe it should work.
First off, Wisteria seeds require a 24-hour pre-treatment in warm water which you will allow to cool off, so as to weaken the outer seed coating - do not pierce the seed coat at all.
Once this has been completed, proceed to prepare your growing mix which should consist of sterile seed starting mix and Canadian peat moss - during my first test run I used sphagnum moss which made the mixture retain too much water. I opted for Canadian during the second test run and well, I have a Wisteria now.
Soak this mixture in boiling water to ensure that it is 100% sterile as fungus gnats love this specific seed and will not hesitate to encroach upon it - wait for it to drain off and cool off before sowing your seeds at a depth of 1cm.
Cover slightly with peat moss.
During this period, it is advised that you use a mixture of water and an organic pesticide to ensure that the mixture remains free of any and all pests. (Do this every week even if no growth is visible).
Water with a mist hand sprayer every second day, and make sure to cover your pot (I used a seed propagator without heating) to ensure that the level of humidity remains balanced. Move the tray indoors at night.
If you are luckier than I am, you should see growth within two to three weeks - I only saw growth after a month.
If you can, do what I did not and opt to order/buy more seeds and use them all to avoid disappointment (I planted five in both trials).
Vital Tip: Do not use plain garden soil even if sterilised - these seeds are very nitrogen rich and will struggle greatly to deal with regular garden soil.
My seedling should be ready to transplant within the coming weeks and I have opted to use an organic bonsai mixture for when it is ready - consult your local nursery for a pre-mixed bonsai mixture.
Bonsai style ideas
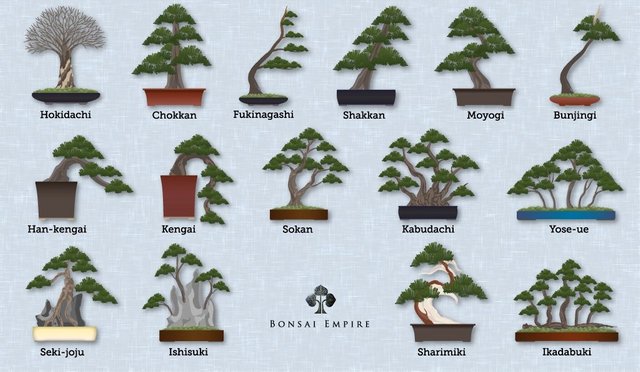
(IMAGE SOURCE: bonsaiempire.com)
END OF ARTICLE:
Read some of my other articles:
#BonsaiCommunity: Our roots are starting to flare, join us now
#BonsaiNews: Some good old solid basic bonsai care tips for beginners
#BonsaiNews: Zelkova, another perfect bonsai option for beginners
#BonsaiNews: If you like flowers on trees, the Jacaranda tree is perfect for you!
#BonsaiNews: Grow your own Marula tree (Complete Guide)
#BonsaiNews: (Complete Guide) Do you want to grow your own avocado tree?
JOIN OUR #TeamBonsai and #TeamHorticulture:
The known #BonsaiCommunity | #TeamBonsai | #TeamHorticulture members include (and you should follow them for cool content):
@creativetruth | @daniellozada | @romanolsamuels | @bonsaiaustin | @imagendevoz | @synekto | @shadowolfdg | @mrbloom
Comment below with your handle and, if you post bonsai/horticulture related content your handle could appear above.

COMING SOON

Resteemed by @resteembot! Good Luck!
Check @resteembot's introduction post or the other great posts I already resteemed.
This post was upvoted and resteemed by @resteemr!
Thank you for using @resteemr.
@resteemr is a low price resteem service.
Check what @resteemr can do for you. Introduction of resteemr.
Oooh you have me an idea for another bonsai post. I think I should also reveal which bonsais I love the most. Love this post man. Great work.
Thanks a million - If I get a chance I am going to try and start with the oranges this weekend but I think that will have to wait until next weekend, which just means I have to re-buy oranges. Great call on the pomegranate tree, I never thought of that before.
Thank you! Yeah, pomegranate has been a great desire of mine to grow into a bonsai, but when we bought our home and I had a garden to grow trees, I decided I wanted a large tree instead. Now I can grow a bonsai again. Looking forward to it.
I have tried growing orange pips before, but I always forget to check on them in the windowsill and they dry out. Now that I have my indoor bonsai nursery again, I think I should attempt it again. Thanks again for #teambonsai.
Do you mind if I steal the same format of your post for mine? I will of course link to this post of yours as the inspiration.
I have no issues at all - go for it. No need to link back unless you want to.
Very nicely done! The content shows that you did indeed spend time on getting it right. You succeeded! As a gardener of long-standing, I enjoyed the read and the information.
Do you have any idea how old the flowering apple in the photo is?
If I recall properly, it is one of the oldest - 380 or 390 years of age. Thank you for the awesome feedback
You are welcome, but you earned it!
The tree is fascinating! Just imagine all the care and attention and expert grooming it has received over so many years! It is a real treasure for some family. It must have an interesting story to tell.