The AutoCAD (Autodesk) ICONS and SHORTCUT keys that never been revealed by Teachers and Professor
AutoCAD in any version is the same use. I started using Autocad is in the year 2006 and the version, of course, is 2006. I never learn this in school and no one teaches me at the beginning. I just saw this in one my colleagues when I was an office assistant before. AutoCAD is a part of the Autodesk company like 3D MAX, MAYA, STINGRAY and much more.
All students with a course of AutoCAD think that this is not easy to learn. But they are wrong about that. In AutoCAD, at first, you must know how capable AutoCAD is. You must know first the basic, the icons. This is the important things you must know in AutoCAD. Once you know the meaning of each ICON in AutoCAD, you must study by your self of how to use it by clicking on each one of them.
Do not be afraid of clicking the icons. Most people who're using AutoCAD is afraid of clicking on icons because they think that they did something wrong. Do not be afraid to discover something while you are clicking on any icon of AutoCAD. That is the beginning of a clever mind.
There's a lot of explanation of how to use AutoCAD for beginners. But what I'm explaining is the easiest way. I will show all the basic icons that you need to know including the shortcut keys. But, take note! You must know first the use of each icon before using the shortcut keys. We will start from the 2D AutoCAD icon. Pay attention.
The Basic ICONS (DRAW)
In the toolbar of AutoCAD, we call this "Draw".
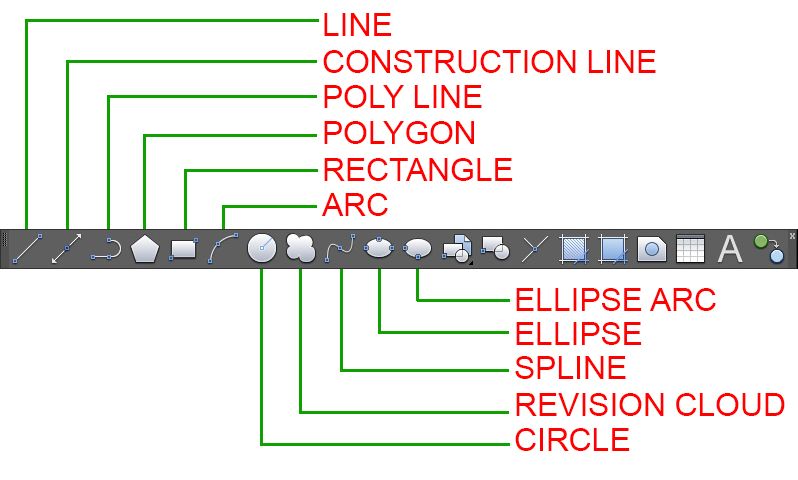
- LINE - with the line, you can create a series of contiguous line segments. Each segments is a line object that can be edited separately.
- CONSTRUCTION LINE - Lines that extend to infinity, such as x-lines, can be used to create construction and reference lines, and for trimming boundaries.
- POLYLINE - A 2D polyline is a connected sequence of segments created as a single planar object. You can create straight line segments, arc segments, or a combination of the two.
- POLYGON - you can specify the different parameters of the polygon including the number of sides. The difference between the inscribed and circumscribed option is shown.
- RECTANGLE - Creates a rectangular polyline from the specified the rectangle parameters (length, width, rotation) and type of corners (fillet, chamfer, or square).
- ARC - Create an arc using three points.
- CIRCLE - Creates a circle using a center point and a radius.
- REVISION CLOUD - You can create a new revision cloud by dragging your cursor, or you can convert a closed object such as an ellipse or polyline into a revision cloud. Use revision to high light parts of a drawing that are being reviewed.
- SPLINE - creates curves called nonuniform rational B-splines (NURBS), referred to as splines for simplicity. Splines are defined either with fit points or with control vertices. By default, fit points coincide with the spline, while control vertices define a control frame. Control frames provide a convenient method to shape the spline. Each method determines advantage.
- ELLIPSE - The first two points of the ellipse determine the location and length of the first axis. The third point determines the distance between the center of the ellipse and the end point of the second axis.
- ELLIPSE ARC - The first two points of the elliptical arc determine the location and length of the first axis. The third points determine the distance between the center of the elliptical arc and the endpoint of the second axis. The fourth and fifth points at the start and end angles.
The Shortcut Keys
- Line - (L)
- Construction Line - (ray)
- Polyline - (PL)
- Polygon - (POL)
- Rectangle - (REC)
- Arc - (A)
- Circle - (C)
- Revision Cloud - (revcloud)
- Spline - (SPL)
- Ellipse - (EL)
- Ellipse Arc - (ellipseA)
The Basic ICONS (MODIFY)
In the toolbar of AutoCAD, we call this "MODIFY"

- ERASE - Instead of selecting objects to erase, you can enter an option, such as L to erase the last object drawn, P to erase the previous selection set, or ALL to erase all objects. You can also enter ? to get list of all options.
- COPY - With the copy mode system variable, you can control whether multiple copies are created automatically.
- MIRROR - You can create objects that represent half of a drawing, select them, and mirror then across a specified line to create the other half.
- OFFSET - You can offset an object at a specified distance or through a point. After you offset objects, you can trim and extend them as an efficient method to create drawings containing many parallel lines and curves.
- RECTANGULAR ARRAY -Distributes object copies into any combination of rows, columns, and levels.
- MOVE - Use coordinates, grid snaps, object snaps, and other tools to move objects with precision.
- ROTATE - You can rotate selected objects around a base point to an absolute angle.
- SCALE - To scale an object, specify a base point and a scale factor. The base point acts as the center of the scaling operation and remains stationary. A scale factor greater than 1 enlarges the objects. A scale factor between 0 and 1 shrinks the object.
- STRETCH - Objects that are partially enclosed by a crossing window are stretched. Objects that are completely enclosed within the crossing window, or that are selected individually, are moved rather than stretched. Some types of objects such as circles, ellipses, and blocks, cannot be stretched.
- TRIM - To trim objects, select the boundaries. Then press Enter and select the objects that you want to trim. To use all objects as boundaries, press Enter at the first Select Objects prompt.
- EXTEND - To extend objects, first select the boundaries. Then press Enter and select the objects that you want to extend. To use all objects as boundaries, press Enter at the first Select Object prompt.
- BREAK AT POINT - valid objects include lines, open polylines, and arcs. Closed objects such as circles cannot be broken at a single point.
- BREAK - You can create a gap between two specified points on an object, breaking it into two objects. If the points are off of an object, they are automatically projected on to the object. The Break is often used to create space for a block or text.
- JOIN - Combines a series of infinite linear and open curved objects at their common endpoints to create a single 2D or 3D objects. The type of object that results depends on the types of objects selected, the type of object selected first, and whether the objects are coplanar.
- CHAMFER - The distance and angles that you specify are applied in the order that you select the objects.
- FILLET - An arc is created that is tangent to both of the selected lines. The lines are trimmed to the ends of the arc. To create a sharp corner instead, enter a radius of zero.
The Shortcut Keys
- Erase - (E)
- Copy - (CO)
- Mirror - (MI)
- Offset - (O)
- Rectangular Array - (ARRAYRECT)
- Move - (M)
- Rotate - (RO)
- Scale - (SC)
- Stretch - (ST)
- Trim - (TR)
- Extend - (EX)
- Break at Point - (BR)
- Break - (BR)
- Join - (J)
- Chamfer - (CHAM)
- Fillet - (F)
To master this icon and shortcut keys, you need to use it always. Try to imagine a thing, like a simple glass or a box. Create something that is easy. When I start AutoCAD, I did a box then I did a very simple school chair and a table.
If you want to know about CAD, put your comment below...
Excellent to find this topic here, I stopped a bit of using Autocad for my vision, previously all the monitors were like the first color TVs, I'm talking about using Autocad from version 9 or 7, I do not remember well, I know it was As in 1993, I think it was called VersaCad, because it was so versatile. Well I do not use it so much now unless they ask me for specific jobs, what I see is because I'm daltonic (it has its scientific name: Deuteronopia), and that's why the colors I see are much brighter and my eyes get very dry, when come the LCD and LED monitors, I saw the glory and I could continue working with Autocad. I really wanted to say something about the abbreviated and personalized commands, of course all you mentioned are the most used, but you can create your own abbreviated commands and / or even change the abbreviation, for example, for my cutting it was better and faster to place only the letter "C" as abbreviated command, these latest versions of Autocad simplified those customization functions, that is found in the sub-files called AutoLisp. look over that, it is very useful and speed up the work ... bye
Thanks for dropping by! Let me see that AutoLISP? A lot of changes right now in AutoCAD and a lot of useful shortcut keys. An example is this,
C - Circle
L - Line
O - Offset
E - Erase
M - Move
PL - PolyLine
and many more...
I memorized 140 shortcuts key in AutoCAD including 3D extrusion. But I think it is not too late for you, you can still continue if you really want?
God 140 shortcut keys in AutoCAD, that's incredible but the daily practice does that, I do not remember now how many I used, if of course I do very particular works of topography and some changes in cctv and security systems. Excellent I will keep it in mind, thanks for the welcome, Greetings to all
Your welcome! (^_^)
Can you tell me how to insert a shaft break. I am using autocad 2019. In auocad mechanical it present but in autocad i didn't find it
Increible ya está el Autocad 2019 ?, eso es lo bueno de usar los comandos abreviados, puedes usar cualquier version de Autocad, y mas aun , puedes guardar tus comandos abreviados en un archivo con extension .Lsp y ponerlos un tu nueva version de autocad y listo , no tienes que volver a reprogramar tus comandos abreviados, es como las configuraciones de Plotte, las guardas en un archivo y listo
My sister in Dubai took AutoCAD as well.
Excellent, I thought that everything was already built there. I have seen some projects and they are really tempting and risky talking in a constructive way. It should not be easy for an engineer to interpret and take to the work what the plans say and even more, the responsibility of a draftsman to express exactly what the architect and engineer want to see in the plans
Wow! Great... I'm in abu dhabi, working as architectural draughtsman.
Excellent, I thought that everything was already built there. At one time I observed many job offers for Dubai, but I was very young and did not want to leave my family, of course, now I regret not having chosen the option of those jobs.
How old are you right now? I went here to the United Arab Emirates at the age of 21 last August 11, 2005. It is not too late for you... Qatar has a lot of opportunities...
ok, now I am 50 years old and I work in several construction areas, I really like it is to supervise that the work is done exactly as the plans say and with the quality that is required, for example to follow each concrete pouring from that the selection of the water components is carried out until the resistances check is made 7, 21 and 28 days after the emptying of that concrete. But right now in my country I have to do everything.
Exactly on the website could I see those job offers that you tell me?
Cool. My sister is working in Nakheel as Quantity Surveyor.
amazing the architecture of that state
This post has received a 21.62 % upvote from thanks to: @kennyroy.
For more information, click here!!!!
The Minnowhelper team is still looking for investors (Minimum 10 SP), if you are interested in this, read the conditions of how to invest click here!!!
excellent, it contributes a lot for the use of that program
Yes, it is...
Thanx for sharing the shortcuts..its saves the alot..thums up..
Ohhh..... you came back for this! Well, you are really a reader... Great Job!
Ohh...thanx