Addendum to What Most Tutorials Don’t Tell You About Steemit.com
If you have not read my previous article (https://steemit.com/steemhelp/@happyme/what-most-tutorials-don-t-tell-you-about-steemit-com) then I strongly suggest that you read that first, because this is only the ADDITIONAL information that I discovered AFTER I made the first article.
Additional portals to the blockchain information:
https://busy.org/ Another portal to Steem. Use your same username and password.
https://mentions.steemdata.com/ Locate posts in which you are mentioned.
https://steemstats.com/#!/ VERY SWEET set of statistics!
https://steemdb.com/labs/flags Who’s getting flagged most and who is doing the flagging.
https://steemviz.com/pendingpayouts Pay-outs pending.
For the real technical people: https://github.com/steemit/steem
Where did the resteem button go?
I wanted to resteem an older posting I came across but for the life of me, I couldn’t find the resteem button! After some time searching for that elusive button, I began to wonder if perhaps it disappears after the 7 day pay-out period has elapsed. I looked at the dates of articles and discovered that the resteem button does in fact disappear from posts after 7 days (after the pay-out is made).

Witness voting
In order to vote for a Witness on Steem, you need to be logged in with your ACTIVE (password) key. Here is the link to cast your votes: https://steemit.com/~witnesses
A series of articles with fantastic explanations about Steem (I got a lot of my information from here):
https://steemit.com/steem-help/@sykochica/answering-common-questions-i-m-getting-frustrated-are-my-expectations-too-high
Another article with many of the links that I already provided, plus a few more. https://steemit.com/help/@reggaemuffin/complete-guide-to-what-is-steem-it
Curation
Currently you can cast 40 curation votes /24 hrs. After hard fork 19, you get 10/24 hrs. You can vote more but your Steem Power goes down and you give less and earn less on votes.
When voting, the dollar value displayed is not updated in your browser until something causes the page to refresh (voting will cause the page to refresh). So if you want to see how much your vote really ads, you will need to refresh your page, see how many have voted, quickly vote, then make sure yours was the only additional vote. Then you can subtract the new dollar value from what the old value was.
FANTASTIC DETAILS about curation: https://steemit.com/curation/@liberosist/mind-your-votes-ii-a-guide-to-maximizing-your-curation-rewards
Adding images using a PC
To add an image with a reply, you can drag an image from your PC into the editor box. TIP: If you plan on re-using an image at some later time, copy the address that appears in the editor to a file and label it with some name that associates it with your image. Then when you want to re-use that image, you simply copy the URL from your file and paste it into your new post.
A Steemit wiki is being developed.
If you wish to contribute to the Wiki or simply look something up, go to:
https://www.steem.center/index.php?title=Main_Page
Markdown
I haven’t had time to actually use this yet, but I grabbed it from a post by @superfreek
To make images sit side by side in one row, use the following code:


To make images clickable, @herzmeister says:

And lastly, a link that describes how to wrap text around an image along with other very useful information: https://steemit.com/free-templates/@rubellitefae/how-to-wordwrap-your-images-like-a-boss
Why don’t I get paid the amount I see at the bottom of my article?

If you look at an article that has already been paid out and click the icon next to the pay-out amount, you will see that the amount has been divided between author and curators. The split is a VERY complicated calculation and can alter the results significantly. I kept reading that the split was 80% and 20%, but this particular example is much closer to 90% and 10%.
Converting Steem Dollars (SBD) into Steem Power (SP)
I originally anticipated this to be a very simple operation but when I actually had some SD and tried to convert it, I was confused as to what I should do. When I clicked on the CONVERT TO STEEM button from the drop-down menu next to my SBD in my wallet I was presented with a warning:

I reached out to experienced users and was told that since Steem is selling at above $1.00 USD, I should NOT use the CONVERT TO STEEM button but rather the MARKET button and I would get more Steem for my SBD. Here is how I made my very first conversion:
NOTE: In order to perform transactions with your money, you will need to be logged in with your ACTIVE or MASTER keys.
Go to your WALLET and from the drop-down menu next to STEEM DOLLARS, choose MARKET (Sorry, I captured this image AFTER I had already moved my SBD so it shows zero SBD. It did show 12.199 before I converted it).

You will see a page that looks similar to this:

WHAT THE HECK!!!!?? THIS LOOKS LIKE I NEED TO BE A DAY TRADER TO UNDERSTAND!
After studying it with my trade in progress, here is what I concluded:
The graphs at the top show the total volume of trades made with $ on the X-axis and the price point at which the trades were made on the Y-axis. In the middle is the volume of trades that are just being made at the current selling price. I could be wrong but it doesn’t really matter that much to me because I don’t know what to do with that information anyway.
Under the graph are 2 columns. On the left in green is where you BUY STEEM (since I am selling my SBD for Steem, this is what I used). On the right in red is where you can SELL STEEM. The PRICE fields were already filled in for me and I left them at default (had I understood what I was doing, I would have lowered my price by a few decimal places to get a quicker deal). I left the AMOUNT field blank and entered the value of the SBD that I had to sell (12.199) into the TOTAL box. You can enter any value you want up to the maximum that you hold (shown as AVAILABLE below the TOTAL field box). After entering the TOTAL amount, the AMOUNT box was populated with a calculation of what I would receive in STEEM (note that I got 14.190 STEEM for 12.199 SBD). If you want to be more strategic, study the numbers that I commented on in blue and green in the image before deciding on what price you wish to try and get. You can also study the trades made in the 3 columns below the BUY AND SELL columns. The column on the far right indicates in red, trades made at lower than your asking price while trades made at higher than your asking price are in green. Seeing that people HAVE traded at higher than the price that defaulted into the PRICE field, I decided to give it time and see what happens.
After clicking the BUY STEEM button, I saw what appears to be my offer to buy at the top of the BUY ORDERS column.

I don’t understand why the PRICE amount had a discrepancy. Perhaps it shows the price adjusted to the current average?
Below the 3 columns for BUY ORDERS, SELL ORDERS and TRADE HISTORY is a list for OPEN ORDERS. Here you can cancel your order if it has not gone through yet. (The price value changed again!)

After several hours I checked my wallet and at the very bottom I noticed that my purchase was made in 2 transactions an hour apart. All my SBD have been sold and I bought STEEM with them.
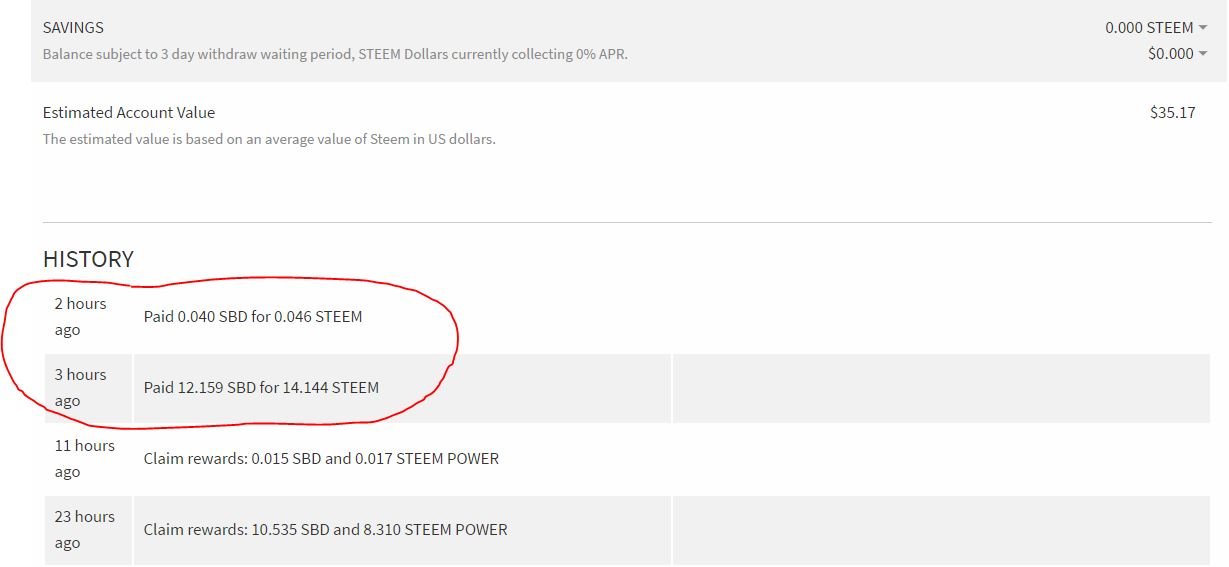
As you can see, I now have no SBD and 14.190 STEEM; the transaction had completed successfully!

The next step for me was to POWER UP. Still in my WALLET, I clicked on the icon beside the STEEM value and then clicked on POWER UP from the drop-down menu.

A new window popped up asking me how much of my Steem I wanted to use. I entered the entire balance (I’m such a big spender! LOL).
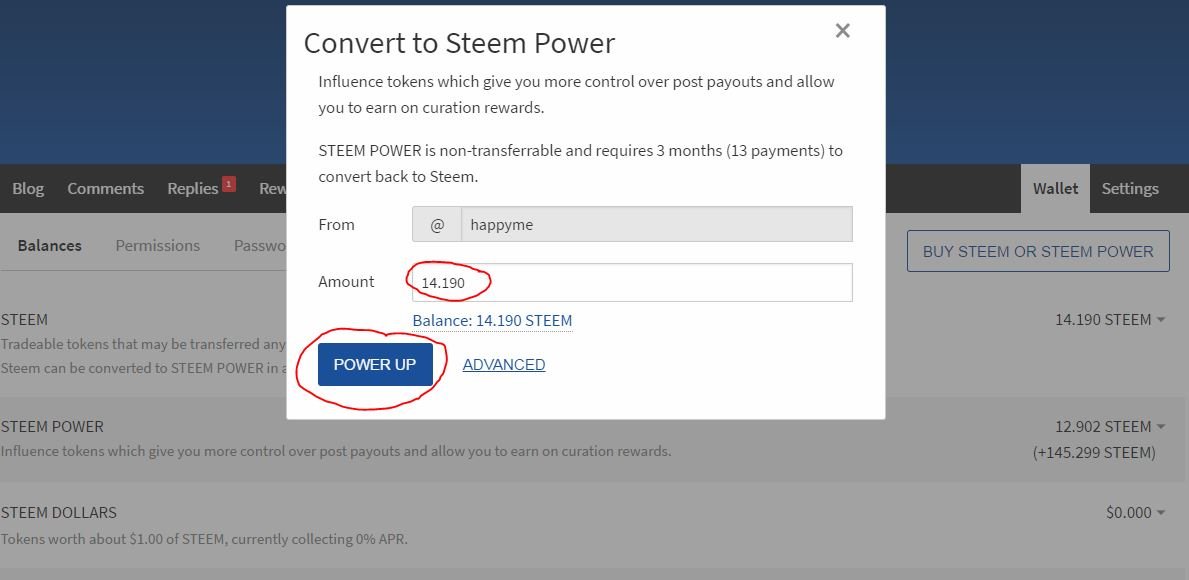
After clicking on the POWER UP button, I now have zero Steem and zero SBD. Everything is in SP.

Lastly, I logged out and then logged back in using my POSTING key. I prefer not to take any chances with security!


Such good information. I haven't found some of this stuff anywhere--like the markdown, for instance--and yours is by far the clearest example of the Market function I've seen. Thank you for taking the time, and I'll be following.
I appreciate the compliment. Perhaps I should have become a teacher? All throughout my high-school years I was constantly trying to help the teachers explain things when students couldn't grasp an idea the way the teacher was telling it.
As for the market example: yea... I couldn't get a full answer from all the searching I did, so I just dove in and tried it out to learn on my own.
Really glad you did.
Thanks again for all your hard work.
I'm pleased to be able to assist others. I'm so glad you found it worthy. My biggest frustration is when these sort of posts get buried and hardly anyone sees them.