Photography 101 - #2 - The Basics (Shutter Speed and Focus)
Photography 101 - #2 - The Basics (Shutter Speed and Focus)
Welcome back to my Photography 101 series where I’m going right back to basics, covering everything you could possibly need to learn about the art and, more importantly, the science behind Photography. In this edition I’ll be covering everything you need to know about Shutter Speed!
Remember, this guide is aimed at beginners but it’s not been created exclusively for them, I’d encourage photographers of any level to brush up on their photography knowledge from time to time. I know plenty of professionals who DON’T know this stuff, so it’s by no means a necessity however I’ve always truly believed that the more knowledge you have about the science behind photography, the better your images will become.
If you’ve not had a chance to look through part one I’d encourage you to do so, you’ll find more information for those starting out, the first part is all about Aperture and Exposure
Aperture + Shutter Speed + ISO = Exposure
I like to think of Aperture, Shutter Speed and ISO as the holy trinity of Photography knowledge. It doesn’t really matter whether we’re talking about camera’s from 1910 or 2010 or even years from now, if you understand Aperture, Shutter Speed and ISO you’ll be able to take a great image. Exposure kind of messes up the Holy Trinity a little, making it more like an equation where Aperture + Shutter Speed + ISO = Exposure.
You can’t ever truly understand any individual element (Aperture, ISO, Shutter Speed and Exposure) without understanding the rest. They are so inextricably linked, they ARE your photographs. Sure, you might have chosen file settings and edited the images, but they are made up of those 4 elements first and foremost! We’ll be discussing plenty more aspects of photography as the weeks go on, but these first two parts along with the next installment all about ISO, will be the most crucial for learners!
If you need to recap on Aperture and Exposure please check back with the last article here. Throughout this post I’ll refer to Exposure, and terms explained in the last article, so please do have a quick brush up if you need to!
Shutter Speed
You may remember in the last article I said that Shutter Speed and Aperture were different to ISO in that not only do they have the ability to change the exposure of your image, but they also have the ability to change the LOOK of your image.
Let’s start by looking at the parts in an SLR camera.
You may or may not be using an SLR/DSLR at the moment, in all honesty that’s not too important, but lets have a quick run through the image above all the same. First of all lets look at the light path, it goes through the lens, gets redirected by the Mirror and Pentaprism to be seen through the viewfinder. When you click the shutter button the mirror lifts up allowing the light onto the shutter. Immediately after the mirror lifts the shutter opens, allowing the light onto the image sensor. Now the mechanisms vary, you may well have an EVF (Electronic View Finder) in which case the light travels slightly differently and is interpreted differently, however understanding the basics of a traditional SLR is usually the easiest way to explain things!
So what IS a shutter?
A shutter is essentially a ‘curtain’, traditionally formed by super thin blades of metal that prevent light from reaching the camera’s sensor. When activated these blades move at a speed decided by the user (your ‘Shutter Speed’!) to create a rectangular opening which is moved across the camera sensor, allowing light to reach each part of the sensor. By moving from the top to the bottom of the sensor the shutter allows light to reach each part of the sensor completely evenly. You’ll see in the image below how a shutter can create different sized gaps depending on the shutter speed that is being used.
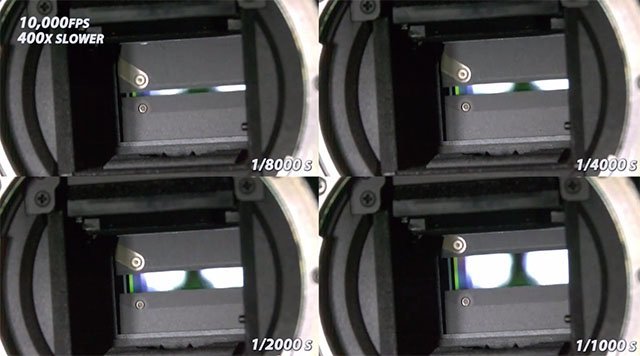
The image above is from a PetaPixel article which has a video made by the Slow Mo Guys which is well worth checking out! Here.
How Does a Shutter Work?
Ok, so our shutter moves across the sensor allowing light to reach it. Therefore it’s logical to conclude that a slower moving shutter (A slower Shutter Speed) will allow more light to reach the sensor right? Absolutely! And the opposite is true for a fast Shutter Speed which will move across the sensor faster therefore allowing less light to reach it.
Shutter speeds are measured in seconds although you may well have noticed that you’ll see readings such as ‘1/500’ and ‘1/125’ etc? That is the shutter speed as a fraction of a second. So 1/500 would be one 500th of a second – 2 milliseconds whereas 1/125 is one 125th of a second – or 8 milliseconds! On most modern DSLR camera’s you can expect to see shutter speeds from 1/4000 (250 microseconds in case you were wondering) all the way through to 30’ (30 seconds!), you probably also have a Bulb option, usually represented by the ‘B’ symbol. Bulb simply refers to an unlimited shutter speed. So you click and hold the shutter open for as long as you like.
Bending Light
So that’s how Shutter Speed affects our Exposure, but that’s not all you need to know. Because of the way Shutters work there is always going to be some movement in your shot. More often than not that’s going to be imperceptible to the human eye. Remember, the shutter allows light onto the sensor from top to bottom. Even though this is most often done at a fraction of a second, there is always a slight difference in time between the top of your image, and the bottom.
In video, we see this as ‘rolling shutter’, you may notice this when you see lines that should be perfectly straight appearing to ‘bend’. Imagine a moving image, as the shutter moves the ‘straight’ line will move across the image, creating a curve in the final exposure. This is really more of an issue in video. In Photography we can use this to our creative advantage and do more than just lighten and darken our subject.
’Sharp’ Images
Ok, if we’re talking about the basics most people want to get ‘sharp’ images. If you imagine for a second our moving shutter, let’s think for a moment about our subject during that time. If our subject (and our camera) are TOTALLY still during the exposure, we’ll see a sharp image regardless of whether the shutter speed is 1/4000th of a second or 30 seconds. In the real world however most subjects will be moving to some extend and unless you’re using a Tripod you’re almost certainly going to be moving the camera a little too!
You’ve probably guessed that faster Shutter Speeds are better suited for ‘freezing’ a moment in time and keeping that image sharp. It ensures that there is going to be as little movement in both the subject and the camera as possible.
That’s not to say you need a 1/4000th of a second just to take a photo!
For a ‘sharp’ image your Shutter Speed should be relative to the speed of your subject
When I say speed I suppose I could more accurately call it the amount or intensity of movement within your subject (and camera too!)
What I mean by that is this, if you’re photographing a Formula 1 race, with cars racing by you at hundreds of miles an hour, you’re going to need a FAST shutter speed! If your subject is slower you’ll be able to use a SLOWER shutter speed. See, it’s really not that complicated right?

A Quick Rule To Live By For Sharp Shots
Ok, I’m skipping ahead a bit here. I am going to talk about lenses in future articles, but there’s one rule that I’d like to share with you all here. I’ll almost certainly use it again in the future, but it’s a rule every photographer SHOULD know.
It’s a simple rule to work out the minimum shutter speed you’ll need for a sharp image. This essentially means the lowest speed that your own camera movement will allow. You see whenever you’re holding a camera, it’s moving. We’re not robots after all! The moving parts of our image may still be blurry (Remember, the shutter speed should be relative to the speed of your subjects!) but this method is a sure-fire way to find a good starting point.
Bonus #1 – Effective Focal Length
First you’ll need the ‘Effective Focal Length’ of your lens. I’ll try and make this brief as it is something I want to address later. You’ve heard people talk about a ‘50mm’ lens right? I say 50mm because it’s my favourite, but it could be any number really. That number is your lenses focal length. The lower that number, the ‘wider’ your lens, a higher number is a ‘tighter’ or ‘telephoto’ lens (essentially low number means a wide field of view, high number means a closer in field of view). Still with me?
In the ‘old days’ that would be all you’d need to find your Effective Focal Length. You see Effective Focal Length is always measured against 35mm or Full frame equivalent, and over the last ten years we’ve seen a plethora of new Image Sensors hit the shelves. Each of those sensors is measured against ‘Full Frame’ – the name we give to a 35mm image sensor. A sensor that is exactly half the size of 35mm would have a crop factor of 2. I’m not going to go into all of the possible fractions but you see where I’m going with this right?
Your camera may be full frame, in which case working out your Effective Focal Length is easy, it’s just your lenses Focal Length. If not, you simply multiply the Focal Length by your camera’s crop factor. So if you’re using a 50mm lens on a sensor with a crop factor of 2, your effective focal length will be 100mm. In other words, it will give the same field of view as a 100mm lens would on a 35mm sensor!
If you’re unsure what your camera’s crop factor is, you should be able to find out online, if not just let me know what camera model you have in the comments below and I should be able to let you know!
Enough Build Up, Wasn’t There Some Rule We Needed?
Yes! The all important rule! Ok, I know I go to excessive detail sometime, but it just helps with the understanding process. You’ll be pleased to know that if you concentrated on the Focal Length bits and bobs above, this part will be an absolute doddle!
Here’s the all important rule for getting ‘sharp’ images.
Your shutter speed should always be equal to or higher than your effective focal length
So if you have a 50mm Effective Focal Length you’ll need to shoot a shutter speed of AT LEAST 1/50th of a second. For a 200mm lens you’ll need to shoot at AT LEAST 1/200th of a second.
Remember his is a handheld rule of thumb. Tripods totally nullify this rule as, to some extent, does image stabilisation. But it’s always a great place to start. As I said above, if you’re shooting sports cars or Humming Birds then you will most likely need something a LITTLE faster!!
Surely that’s all we need?
So we’ve gone through how to use shutter speed to expose a shot – it’s really very simple – Faster Shutter Speed = More Light (More Light = Brighter Image) and a Slower Shutter Speed = LESS Light (Less Light = DARKER Image) and we’ve even gone through a the basic rule for getting sharp images.
But shutter speed can be used for so much more.
Shutter speed allows us to include an extra element in our photography; Time.
That’s not meant to sound cryptic, we’ve already talked about the idea of ‘freezing’ time, but what about going the other way. Your camera has that Bulb mode for a reason and it’s probably my favourite way to use my camera settings creatively.
Blurry = ….bad?
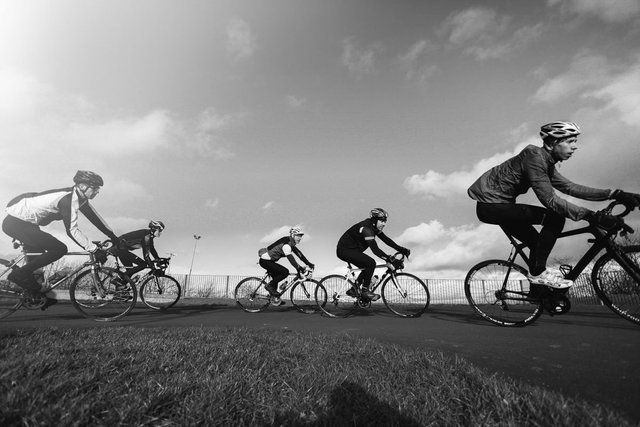
That’s what we’re always told. Images should be sharp, in focus and ready to print. But they don’t really NEED to be! Sometimes we want a bit of blur in our shots to emphasise movement.
Blurry shots can look incredible and it’s something I myself don’t do enough of. The most common example is ‘panning’ shots. Essentially you aim your camera at a fast moving subject and ‘pan’ with it as you take the shot. Lets image there are cars whizzing in front of us from right to left. We get the car in our viewfinder and swing our camera to the left, keeping the car in the viewfinder. As we move the camera we click the shutter.
In doing so the stationary background moves, and the moving car looks still. This is how that effect is created and, used wisely, can make for a really impactful photograph.
It’s not all about the Blur
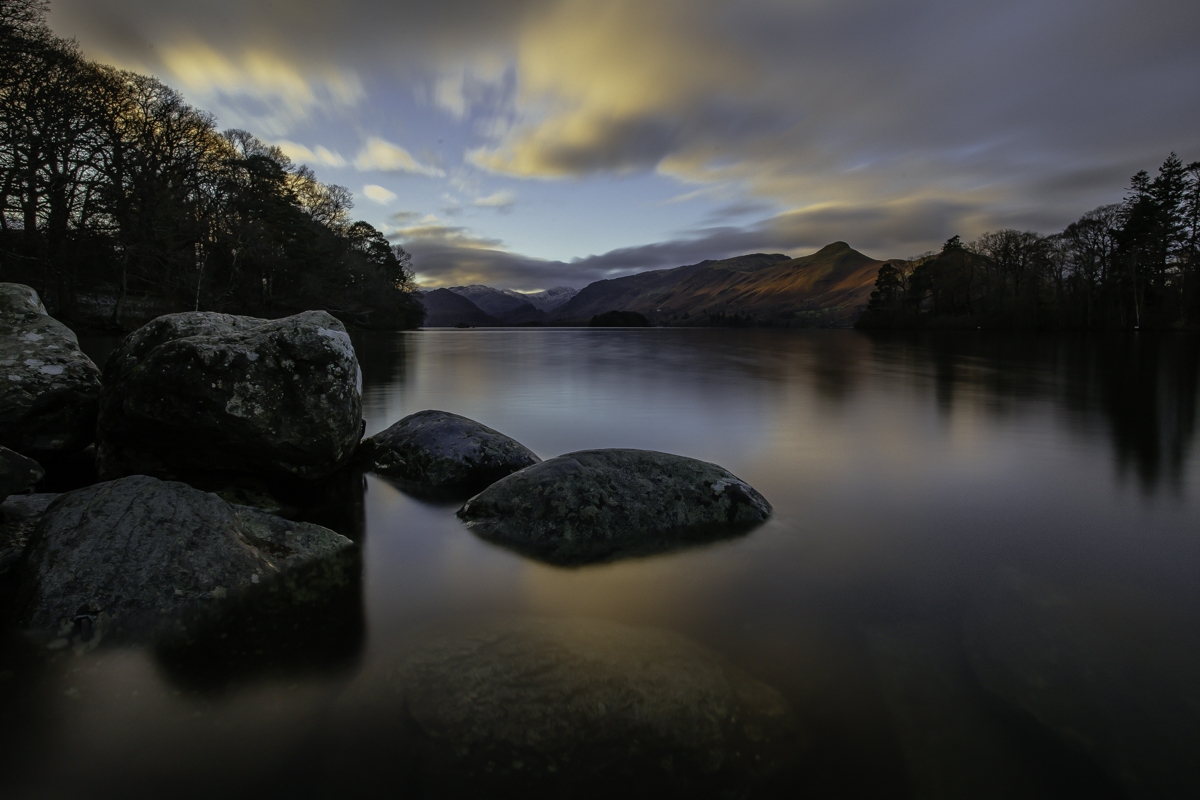
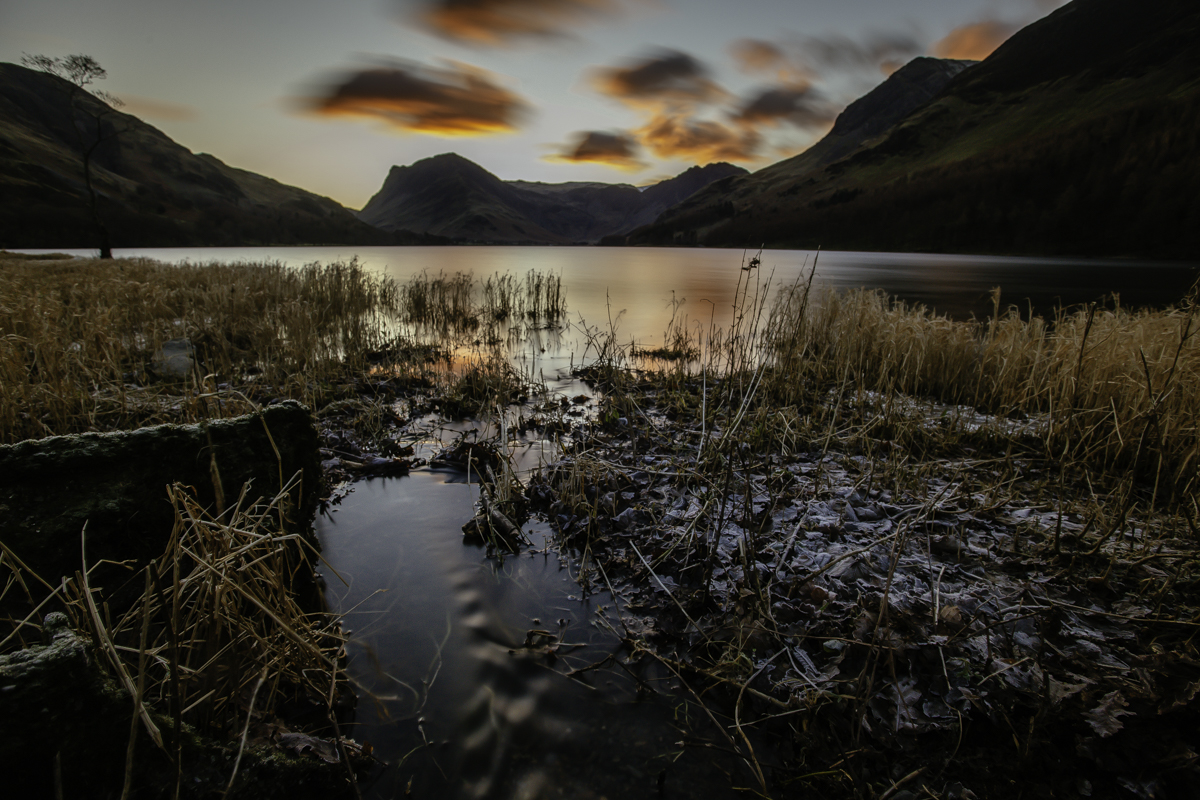
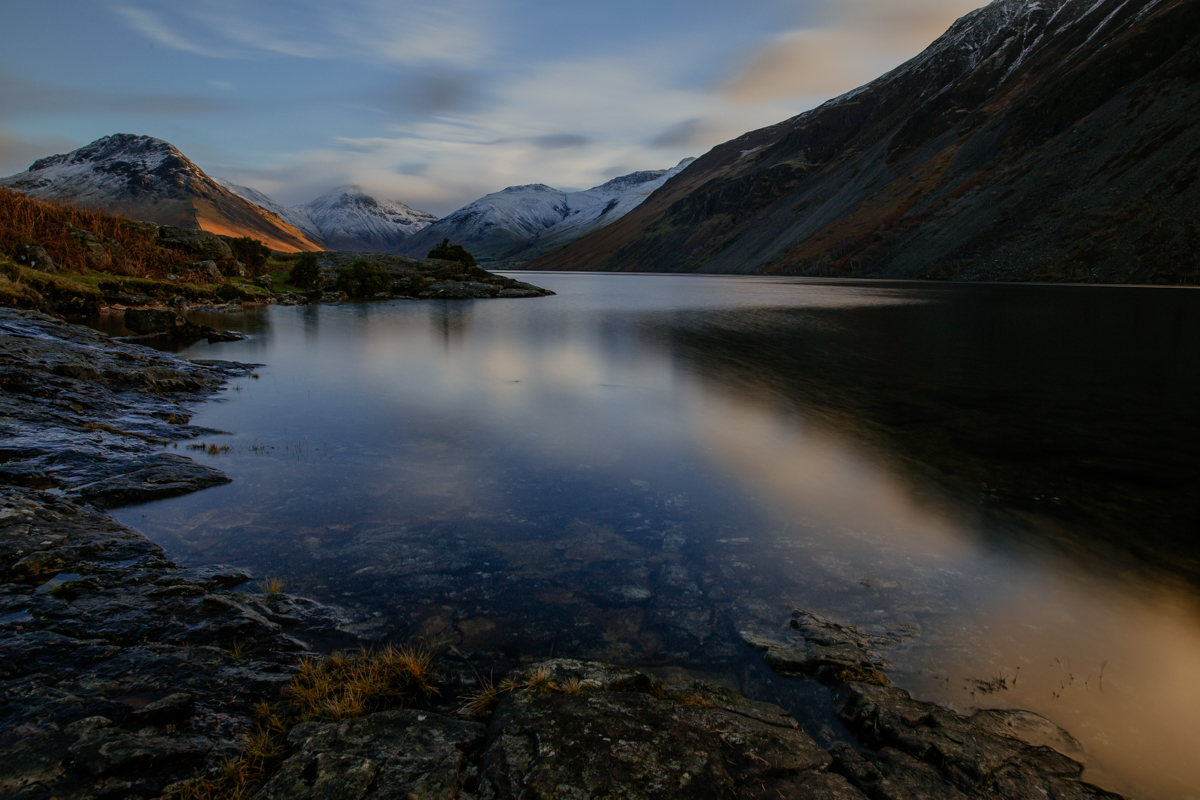
Well, it kind of is, but in a different way. My favourite way to use shutter speed creatively is through long exposures. I’m never actually sure what the ‘definition’ of a LONG exposure would be but really it could be anything under that rule that we talked about before. Essentially any speed where we’ve introduced blur. I use my long exposures primarily for Landscape Photography, such as in the shot below:
.jpg)
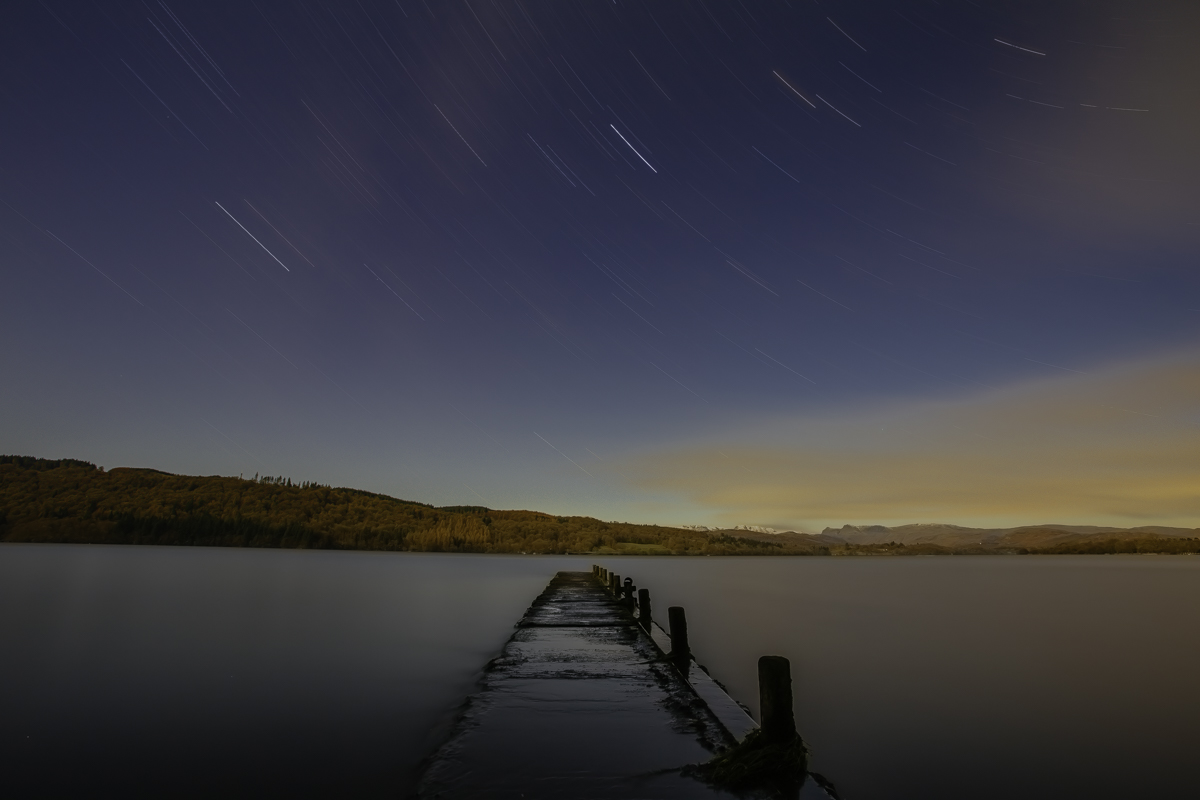
Long exposures bring that TIME element right into the shot, anything moving will leave a trail of sorts. You’ll notice in the shot above how the long exposure has blurred the water, leaving a totally unique look. In the shot below I’ve used it to accentuate star movement over the space of 45 minutes:
Shutter Priority
Now you [hopefully] remember that – aside from your homework after each post – you are strictly forbidden from using anything other than Manual mode on your camera. However you may also remember that in my very first article in this series I relaxed that rule to allow the use of Aperture Priority for your practise.
Well I’m going to do the same again here. Shutter Priority (Often denoted as ‘Tv’) essentially means you select a Shutter Speed and the camera works out the appropriate ISO and Aperture to exposure the image. Like Aperture Priority (Av) Shutter Priority allows you to choose a shutter speed for a specific reason. For the sake of practise that might be cranking the Shutter Speed up super high to capture moving cars or wildlife. It might also be slowing the shutter right down and seeing what you can create.
Either way, while you’re learning and exploring how Aperture and Shutter Speed affect the look of your image it’s a great way Aperture/Shutter Priorty can be really useful tools.
As Always – Get Out And Shoot!
If I ever publish these articles on a website I might have to think of a new ‘catchy’ sign off phrase, but as you all know this is the one I really believe in! Get out there and experiment, try different shutter speeds and see what it does to your images! Seriously, practise is the best way to learn this stuff!
Other Usefull Articles
On my Steemit blog you’ll find lots of articles dedicated to Photography, but just in case here’s a quick roundup of my guides that are currently online:
Photography 101 #1 - Aperture
How ANYONE Can Make Money From Photography (From Home!)
Long Exposure Photography 101 #1
Long Exposure Photography 101 #2
Long Exposure Photography 101 #3
Long Exposure Photography 101 #4
So You Want To Be A Professional Photographer? #1
So You Want To Be A Professional Photographer? #2
How To Make Money From Photography
Photography Industry 2017 Year In Review
How To Use Flash Like A Pro
Guide To The Best DSLR/Mirrorless Camera's To Buy (Jan 2018)
5 Exercises To Improve Your Photography
What Does It Mean To Be 'Great'?
How To Get The Best Shot
How ANYONE Can Make Money From Photography (From Home!)
Thanks for Reading! If you have any questions, comments, or if there’s a subject you’d like me to talk about please let me know below!
All Images are mine and copyright belongs to me.
Please RESTEEM if you like my work.
Please Upvote my work to help support my content on Steemit
World of Photography Beta V1.0
>Learn more here<
Thank you for participating in #longexposurephotography, the weekly selection will be released on Monday.
You have earned 6.50 XP for sharing your photo!
Daily photos: 1/2
Daily comments: 0/5
Multiplier: 1.30
Server time: 19:52:39
Total XP: 1271.94/1600.00
Total Photos: 60
Total comments: 154
Total contest wins: 19
Follow: @photocontests
Join the Discord channel: click!
Play and win SBD: @fairlotto
Developed and sponsored by: @juliank
Great post :)
You did it again! This is an awesome explanation for those getting started or for those that may need a refresher.
I hope you you get compensated for your time putting this together.
Thanks dude, I know it's in depth but it's actually really enjoyable writing it all down! I don't expect anything huge tbh but if I can get one post a day thats over 5$ I'm pretty stoked tbh. The only shame is it makes it tricky to get new followers, I think so far I'm up 1 from this post! Still, every little helps!
You should consider teaching people. Or do an online course.....
https://www.learningrevolution.net/sell-online-courses/
Another cracking article mate. Well done. Some of the best photography articles on Steemit.
Thanks dude, I really appreciate that, especially coming from you! Today was the first time I looked at how much I've done in the past month, I don't think I've ever written so much in a month in my life!
Hi! I'm new here. Really need help. Please vote My articles. I vote for yours. They are very good. Thank You!
Another great post. I admit to have skipped some of your post, but for newbie this is a great series ;)