Long Exposure Photography - Waterfall (EXPLAINED)
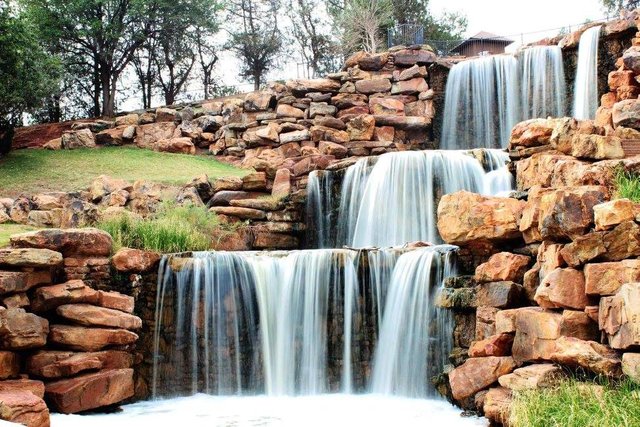
Took this photo on my way from Houston, Texas to Rocky Mountain National Park, Colorado on a road trip, stopping at a small town in Texas named Wichita Falls. Since the original falls dont exist anymore, this miniature waterfall was restored in a park in Wichita Falls.
As a photographer who is always learning, I like to help out others explaining the technique behind the shot to fellow enthusiasts and learners.

This photo of the falls was taken under the following camera settings:
- Aperture: f/22.0
- Shutter Speed: 0.3 sec
- ISO: 100
Taken with a Canon T3i around 9:00 AM in good lighting conditions. Also, tripod used
1. Aperture setting explained - f/22.0
f/22.0 aperture denotes a lens aperture setting which is very small in size. Larger the f-number, smaller the hole or aperture that permits the light.
This setting was chosen because of two reasons.
1) Small aperture results in high depth of field. In simple terms, everything in the image will be sharp and clear. I wanted everything in the scene - the rocks, the grass and the trees to be in focus and come out sharp. Please research Depth of Field further and its relation to aperture size. (Example: If you want to focus on a single flower in a field, keep it sharp and blur out everything else that is before and after it, you would use a low depth of field, to keep only the flower in focus)
2) Small aperture means very less light is permitted onto the camera sensor where the image is captured. This allowed me to slow down the shutter speed to compensate for the low lighting caused by the small aperture. More details below.
2. Shutter speed setting explained - 0.3 sec
Slow shutter speed = long exposure time. Having a slow shutter is obviously the central point of any "long exposure shot". It is the slow shutter speed that allows the photographer to capture the motion of the moving water in blur. Longer or slower the shutter speed, greater the blurry motion captured in the photo. Since the aperture was selected very small, I could slow down the shutter speed to 0.3 seconds to capture the motion of the water, without overexposing the photo.
At 0.3 seconds shutter speed, obviously a camera tripod was used to take this photo. As a rule of thumb, at any speed lower than 1/30th of second, most photographers are unable to prevent the shake of their hand movement from causing a blur. Hence barring some exceptions, all long exposure shots are always taken with a tripod.
3. ISO setting explained - 100
ISO 100 denotes very low sensitivity of the camera sensor (the lowest value). Generally speaking, high ISO values such as 800, 1600, 3200 etc are used only in low light conditions such as indoor photography. Otherwise, in outdoor conditions and wherevever else permitted, ISO value should be kept as low as possible to prevent any grains, digital noise and get the highest quality image. Since this image was taken outdoors around 9:00 AM in good lighting conditions, there was no need to increase the ISO.
How this image could have been made better
Due to lack of choice, I took this image at 9:00 AM in the morning, in bright and sunny conditions. Had I been able to take this at time of day when the lighting was less - for example: early morning or late evening, it would have allowed me to slow down the shutter speed even more to 1 sec or 3 sec or even 10 seconds. This would have brought out even better motion blur of the falling water. As a remedy for this, photographers also tend to use polarizing filters (which can be fitted on the lens), to artificially reduce the lighting. I was not carrying the filters with me either. Using a filter could have also allowed me to slow down the shutter further to capture better blur of the falling water.
Summary
1. Low aperture size used to get the whole scene in focus and to reduce the amount of light falling on the sensor.
2. Slow shutter speed used, with the camera kept on tripod to capture the motion of the falling water.
3. ISO kept as low as possible as there was no need to increase the sensitivity of the camera sensor.
---------------------------------------------------------------------------------------------------------------------------------
As a photographer who is always learning from others, I like to share the technique behind my shot with fellow enthusiasts and learners. Any comments/criticisms are most welcome.
I maintain my photography profile the social site VIEWBUG.COM
Heres a link to my bio on viewbug - https://www.viewbug.com/member/Krishna_Kumar#/Krishna_Kumar/bio
This photo originally uploaded by me on Viewbug, July 2013 - https://www.viewbug.com/photo/3862926
---------------------------------------------------------------------------------------------------------------------------------
Nice capture. Thanks for following me.
Welcome. Nice to meet.
Up voted and up voting my blogs will be appreciated.
https://steemit.com/funny/@hanamana/jokes-of-the-day-the-best-two-line-jokes
Go to my blog that teach you how get more upvotes and followers:
https://steemit.com/newbie/@hanamana/dummies-guide-to-attracting-more-up-votes-for-newbies
https://steemit.com/howto/@hanamana/dummies-guide-to-attracting-100-followers-as-a-newbie-yes-i-attracted-101-followers-as-of-today
Thank you for your kind words. I will surely check out your blog.
You are welcome.