[Matplotlib] 08. Plot Main: Imshow
08. Plot Main: Imshow()
전편의 plot() 함수가 선을 그어주는 함수라면, imshow()는 2차원 데이타를 평면에 색깔을 이용하여 그려주는 함수입니다.
Axes.imshow(X, cmap=None, norm=None, aspect=None, interpolation=None, alpha=None, vmin=None, vmax=None, origin=None, extent=None, shape=None, filternorm=1, filterrad=4.0, imlim=None, resample=None, url=None, *, data=None, **kwargs)
(그림이 복잡해질수록 옵션이 많아집니다...)
2차원 평면에 그림을 그리기 위해
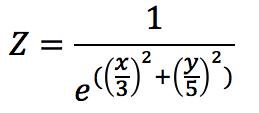
 을 구현해 보도록 하겠습니다.
import sys
import numpy as np
import matplotlib.pyplot as plt
#from matplotlib.ticker import AutoMinorLocator, MultipleLocator

###--- Synthesizing data to be plotted ---###
xlin = np.linspace(-2,4,7)
ylin = np.linspace(-3,5,9)
X,Y = np.meshgrid(xlin,ylin)
## Z = 1/(e^((X/3.)^2+(Y/5.)^2))
Z = 1./(np.exp((X/3.)**2+(Y/5.)**2))

###--- Plotting Start ---###
##-- Page Setup --##
fig = plt.figure()            # Define "figure" instance
fig.set_size_inches(6,4.5)    # Physical page size in inches, (lx,ly)
suptit="imshow() Example"
fig.suptitle(suptit,fontsize=15)   # Title for the page

##-- Plotting for axis1 --##
ax1 = fig.add_subplot(1,1,1)   # subplot(# of rows, # of columns, indicater)
pic1 = ax1.imshow(Z,cmap='jet')     # plotting with color map "jet"

ax1.tick_params(axis='both',which='major',labelsize=10)

##-- Add Color Bar --##
cb = fig.colorbar(pic1)

##-- Seeing or Saving Pic --##
#plt.show()   #- If want to see on screen -#
outfnm = "./08_plot_main.imshow01.png"     # File format is decided by the file name, eg. png here
#fig.savefig(outfnm,dpi=100,facecolor='0.9',bbox_inches='tight')   # dpi: pixels per inch
fig.savefig(outfnm,dpi=100,facecolor='0.9')   # dpi: pixels per inch

sys.exit()
(1. numpy.meshgrid()가 이용되었습니다. x축과 y축을 따라 원하는 값들을 정의한 뒤, meshgrid() 함수를 이용하면 2차원 격자가 생성됩니다. 2. "Color Map"과 "Color Bar"는 다음에 더 자세히 다루도록 하겠습니다.)
위 프로그램을 실행시키면 아래와 같은 그림이 나옵니다.

imshow()는 기본적으로 2차원 행렬 (Array or Matrix)을 그대로 그림으로 보여줍니다.
x축과 y축은 기본적으로 0부터 시작하는 행과 열의 번호가 붙습니다.
또한 y축 시작점 (0번)이 상단부터 시작하여 하단으로 내려오는 점도 주의하시길 바랍니다.
우리는 보통 하단에서 상단으로 y축이 증가하는데 익숙해져 있으므로 다음 옵션('origin')을 이용합니다.
pic1 = ax1.imshow(Z,cmap='jet',origin='lower') # "origin" option is altered
그리고 x축과 y축에 행과 열의 번호가 아닌, 실제 x, y 입력값을 표시합니다.
ax1.set_xticks(range(len(xlin)))   # x tick location
ax1.set_xticklabels(xlin)          # x tick label
ax1.set_yticks(range(0,len(ylin),2))  # y tick location
ax1.set_yticklabels(ylin[::2])          # y tick label
그런데 위 프로그램을 자세히 보신 분이라면 격자를 만들 때, x 축으로 7개, y축으로 9개, 즉 63개의 격자점만 생성한 것을 알 수 있습니다. 따라서 위 그림에 표시된 행렬 Z은 63개의 값 밖에 없는데, 그림은 어떻게 저렇게 매끈하게 나올까요? 그 이유는 imshow() 함수 자체적으로 Interpolation (내삽? 보간?)을 행하기 때문입니다.
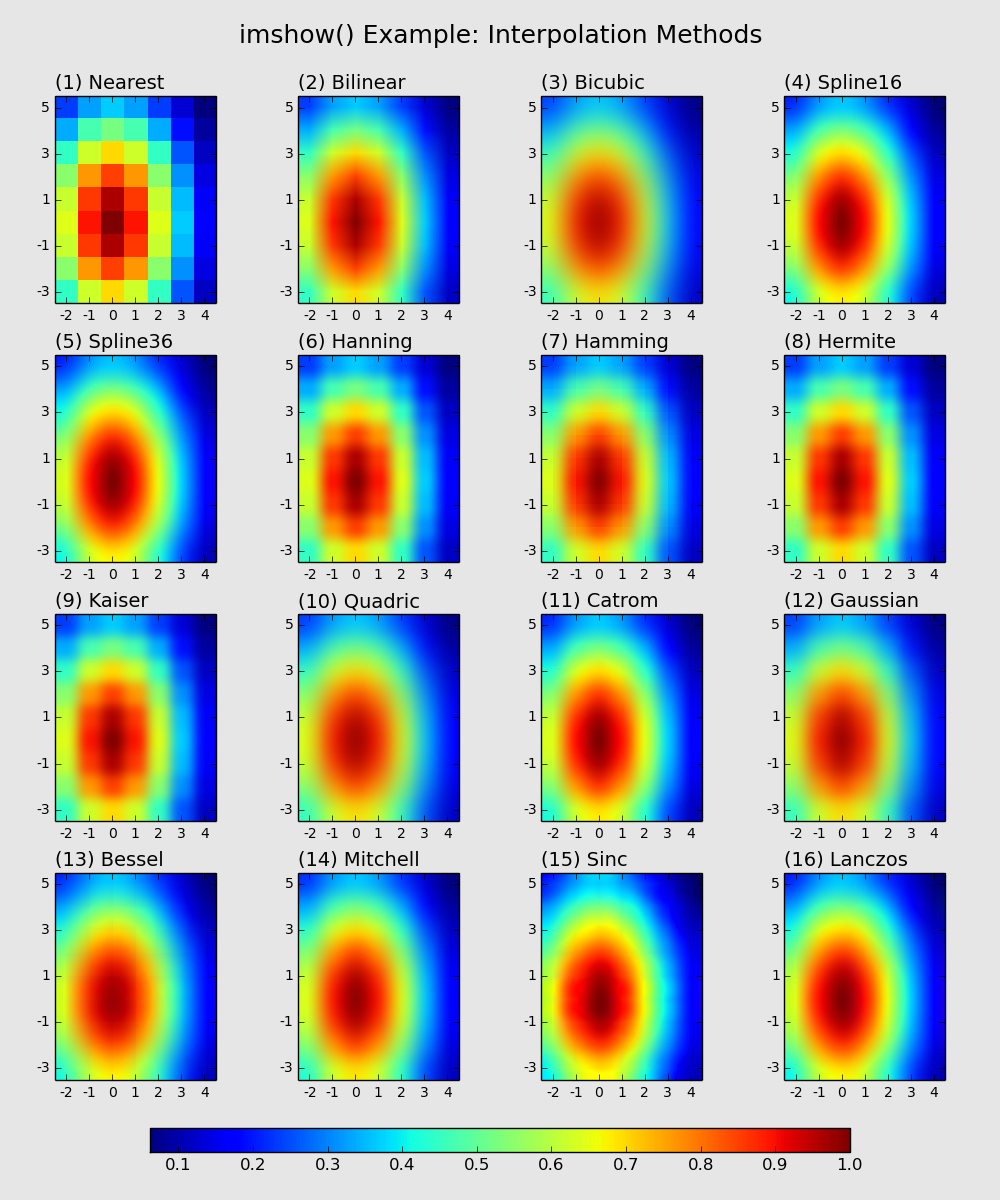
imshow() 문서에 따르면 모두 16개의 Interpolation 방법이 쓰일 수 있는데요, 'interpolation=None'이면 16개 중 어떤 게 쓰이는 걸까요?

(프로그램은 이 글 끝에 따로 쓰겠습니다.)
16가지 보간법을 비교해보니 Bilinear가 기본 인 것 같군요. 하긴 Bilinear가 가장 간단하긴 하죠.
그럼 16가지 보간법 중 어떤 방법이 원본을 가장 잘 표시할까요?
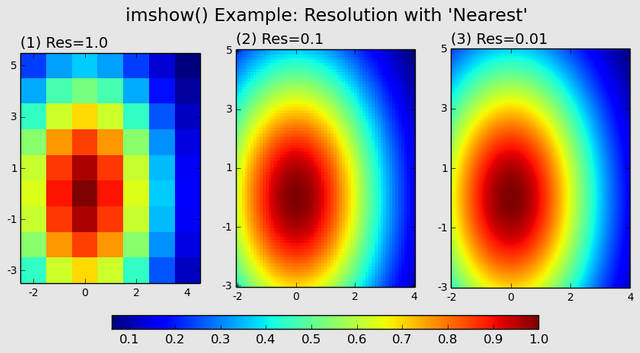
그걸 알기 위해 'interpolation="Nearest"'를 이용해 해상도를 증가시켜 보겠습니다.

(역시 프로그램은 이 글 끝에 따로 씁니다.)
정답은, "고해상도 원본 Source가 최고다"가 되겠습니다. ^^
복잡한 필터들은 필연적으로 그에 상응하는 Artifact가 따라오니 이 점 항상 염두에 두시기 바랍니다.
이상 imshow()에 대하여 알아보았습니다.
참고로 유사품으로 matshow()라는 함수도 있습니다. 매트릭스 값들을 보여주는 함수인데, imshow(interpolation='nearest')와 동일합니다.
다음에는 Color Map에 대하여 더 알아보도록 하겠습니다.
16가지 보간법을 그려주는 프로그램
import sys
import numpy as np
import matplotlib.pyplot as plt
#from matplotlib.ticker import AutoMinorLocator, MultipleLocator

###--- Synthesizing data to be plotted ---###
xlin = np.linspace(-2,4,7)
ylin = np.linspace(-3,5,9)
X,Y = np.meshgrid(xlin,ylin)
## Z = 1/(e^((X/3.)^2+(Y/5.)^2))
Z = 1./(np.exp((X/3.)**2+(Y/5.)**2))

intpl_methods=['nearest', 'bilinear', 'bicubic', 'spline16', 'spline36', 'hanning', 'hamming', 'hermite', 'kaiser', 'quadric', 'catrom', 'gaussian', 'bessel', 'mitchell', 'sinc', 'lanczos']
###--- Plotting Start ---###
##-- Page Setup --##
fig = plt.figure()            # Define "figure" instance
fig.set_size_inches(10,12)    # Physical page size in inches, (lx,ly)
suptit="imshow() Example: Interpolation Methods"
fig.suptitle(suptit,fontsize=18)   # Title for the page
fig.subplots_adjust(left=0.,right=1.,bottom=0.1,top=0.92,wspace=-0.1,hspace=0.25)

##-- Plotting for axis1 --##
for i in range(16):
    ax = fig.add_subplot(4,4,i+1)   # subplot(# of rows, # of columns, indicater)
    pic1 = ax.imshow(Z,origin='lower',cmap='jet',interpolation=intpl_methods[i])

    subtit='({}) {}'.format(i+1,intpl_methods[i].title())
    ax.set_title(subtit,fontsize=14,x=0.,ha='left')
    ax.set_xticks(range(len(xlin)))
    ax.set_xticklabels(xlin.astype(int))
    ax.set_yticks(range(0,len(ylin),2))
    ax.set_yticklabels(ylin[::2].astype(int))
    ax.tick_params(axis='both',which='major',labelsize=10)

#tt=np.arange(0.,0.51,0.1)
cb_ax = fig.add_axes([0.15,0.04,0.7,0.02])   ##<= (left,bottom,width,height)
cb = fig.colorbar(pic1,cax=cb_ax,orientation='horizontal') #,ticks=tt)
#cb.ax.set_yticklabels(tt)
##-- Seeing or Saving Pic --##
#plt.show()   #- If want to see on screen -#
outdir = "./"
outfnm = outdir+"08_plot_main.imshow04.png"     # File format is decided by the file name, eg. png here
#fig.savefig(outfnm,dpi=100,facecolor='0.9',bbox_inches='tight')   # dpi: pixels per inch
fig.savefig(outfnm,dpi=100,facecolor='0.9')   # dpi: pixels per inch

sys.exit()
해상도에 따른 변화를 그려주는 프로그램
import sys
import numpy as np
import matplotlib.pyplot as plt
#from matplotlib.ticker import AutoMinorLocator, MultipleLocator


###--- Plotting Start ---###
##-- Page Setup --##
fig = plt.figure()            # Define "figure" instance
fig.set_size_inches(8,4.5)    # Physical page size in inches, (lx,ly)
suptit="imshow() Example: Resolution with 'Nearest'"
fig.suptitle(suptit,fontsize=17)   # Title for the page
fig.subplots_adjust(left=0.,right=1.,bottom=0.1,top=0.92,wspace=0.2,hspace=0.3)

##-- Plotting for axis1 --##
for i in range(3):
    ###--- Synthesizing data to be plotted ---###
    xlin = np.linspace(-2,4,6*10**i+1)
    ylin = np.linspace(-3,5,8*10**i+1)
    X,Y = np.meshgrid(xlin,ylin)
    ## Z = 1/(e^((X/3.)^2+(Y/5.)^2))
    Z = 1./(np.exp((X/3.)**2+(Y/5.)**2))
    res = 1./(10.**i)

    ax = fig.add_subplot(1,3,i+1)   # subplot(# of rows, # of columns, indicater)
    pic1 = ax.imshow(Z,origin='lower',cmap='jet',interpolation='nearest')

    subtit='({}) Res={}'.format(i+1,res)
    ax.set_title(subtit,fontsize=14,x=0.,ha='left')
    ax.set_xticks(np.linspace(0,len(xlin)-1,4))
    ax.set_xticklabels([-2,0,2,4])
    ax.set_yticks(np.linspace(0,len(ylin)-1,5))
    ax.set_yticklabels([-3,-1,1,3,5])
    ax.tick_params(axis='both',which='major',labelsize=10)

#tt=np.arange(0.,0.51,0.1)
cb_ax = fig.add_axes([0.15,0.04,0.7,0.04])   ##<= (left,bottom,width,height)
cb = fig.colorbar(pic1,cax=cb_ax,orientation='horizontal') #,ticks=tt)
#cb.ax.set_yticklabels(tt)
##-- Seeing or Saving Pic --##
#plt.show()   #- If want to see on screen -#
outdir = "./"
outfnm = outdir+"08_plot_main.imshow05.png"     # File format is decided by the file name, eg. png here
fig.savefig(outfnm,dpi=100,facecolor='0.9',bbox_inches='tight')   # dpi: pixels per inch
#fig.savefig(outfnm,dpi=100,facecolor='0.9')   # dpi: pixels per inch

sys.exit()
"""
제 개인적 목표는
- Object-Oriented Programming과 친해지기
- Github와 친해지기 입니다.
이 목표에 닿기 위해 일단 제가 나름 좀 아는 Python, 그 중에서도 Numpy와 Matplotlib로부터 시작하려 합니다.
"""
List
[Matplotlib] 00. Intro + 01. Page Setup
[Matplotlib] 02. Axes Setup: Subplots
[Matplotlib] 03. Axes Setup: Text, Label, and Annotation
[Matplotlib] 04. Axes Setup: Ticks and Tick Labels
[Matplotlib] 05. Plot Accessories: Grid and Supporting Lines
[Matplotlib] 06. Plot Accessories: Legend
[Matplotlib] 07. Plot Main: Plot
[Matplotlib] 08. Plot Main: Imshow


promobot: 2 steem (2.5배 기준 $5 기대)
99.92%에 글 포스팅
“Your bid has been added to the following round since the post is less than 25 minutes old.”
2시간만에 보팅 ㅠㅠ
전체 대기 물량은 31.73SBD+6steem.
스팀가격 $1.95, 스파 479,682, 100% 보팅시 $64.82일 때,
보팅 5.41% 받아서 $3.55 받음.
총평:
여전히 https://steembottracker.com/#bid에 예상 보팅 가격이 정확하지 않음. steemnow.com 계산기로 계산했을 때 $64.82인데, 위 트래커에는 $92.69로 나옴.
글 생성된 지 25분이 지나지 않으면 다음 라운드로 자동 넘어감.
글 쓴지 30분 안에 보팅 못 받는 것도 문제지만, 막판에 눈치싸움할 수도 없어서 이번처럼 지원이 몰렸는데도 그저 구경만... 한마디로 망…
프로모봇은 배제하기로.