Lección 05: Introducción a la Aplicación de Dibujo Ibis Paint X, Parte 4 – Lesson 05: Introduction to Ibis Paint X Drawing Application, Part 4 / @carlaisl
Saludos mis queridos amigos de Steem Kids. 💜🎨
Me complace presentarles mi quinta publicación en la comunidad como Tutora de Dibujo Digital. Mediante mis lecciones de dibujo, les estaré enseñando y guiando en el maravilloso mundo de colores, en base a todo lo que he aprendido autodidácticamente. ¡Espero que sea de su agrado mi trabajo y que aprendan mucho!

¿Eres nuevo en el dibujo o ya tienes experiencia? Mi querido niño, igual puedes participar en esta lección y aprender cada día mas, porque “No necesitas ser un experto para ser un gran artista” – Rui Torres.
Hoy les presento mi quinta lección, relacionada con la Aplicación de Dibujo Ibis Paint X, la que estaré utilizando para las lecciones y será la mayor protagonista de las mismas. Puedes descargarla mediante el siguiente link: Ibis PaintX
En la LECCION 4, tuve la oportunidad de leer, apoyar, comentar y dar la respectiva retroalimentación, a la tarea para el hogar de la siguiente alumna:
| Estudiante | Link de la Tarea del Hogar | @madilyn02 | Publicación |
Mi alumna elaboró un hermoso dibujo digital utilizando la herramienta "Difuminar" explicada en la lección pasada. Te invito a ver y apoyar su hermosa publicación. 💜🎨
Aprovecho para invitar a participar a todos los niños de la comunidad, y a quienes participaron en la 1ra lección con buenas tareas: @kishwarsumbal @madilyn02 @ikramullah430 @ghani12 @leyxi209 @ibtisamwaqas
¡Ahora sí! Comencemos con esta lección.
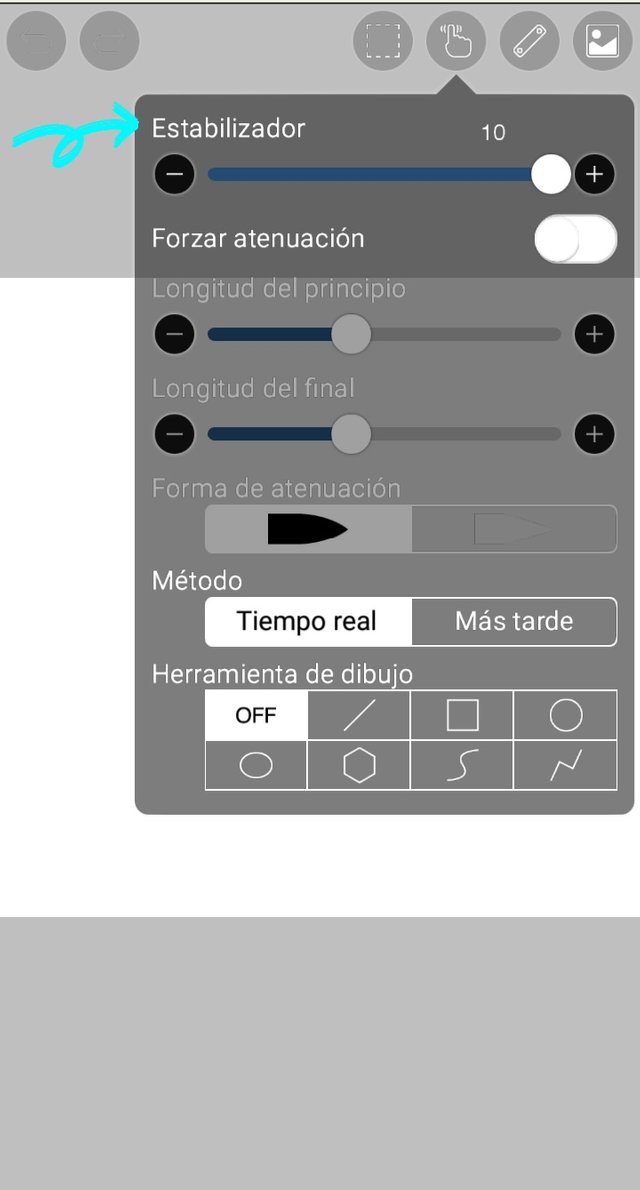
Herramienta "Estabilizador"
Esta herramienta está ubicada en la parte superior del lienzo de Ibis Paint X, representada por una mano con un dedo:
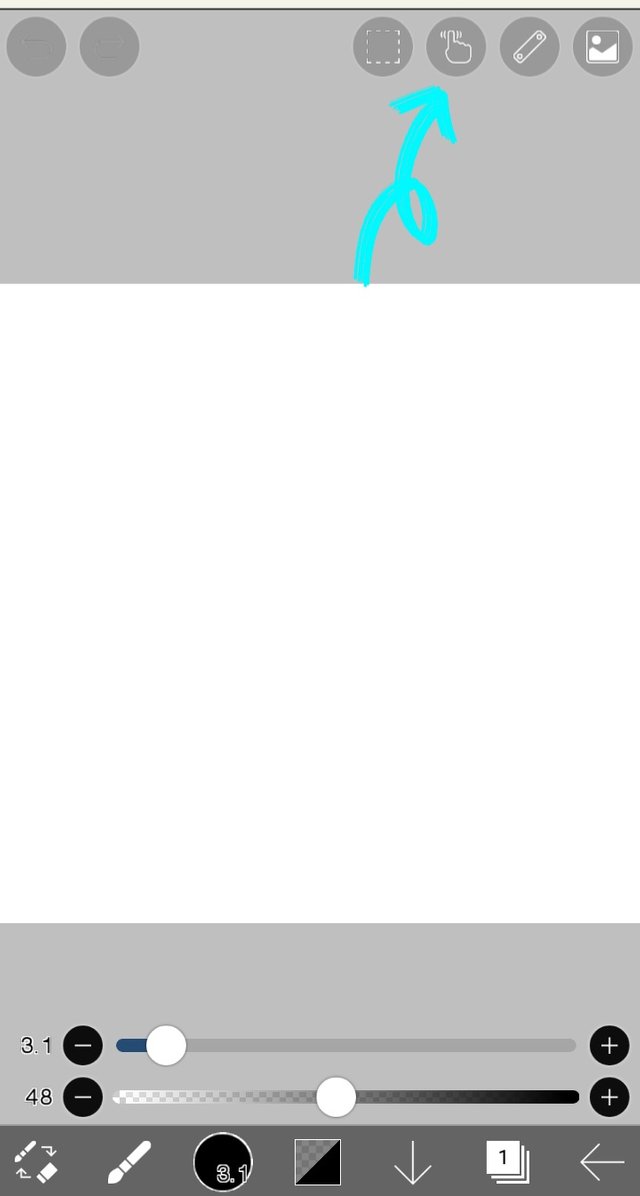
Al hacer clic en el mencionado ícono, aparecerá la herramienta "Estabilizador" la cual es genial para quienes están aprendiendo a dibujar en digital, porque da un mejor acabado a las líneas que se dibujan. Tal como su nombre indica "estabiliza o da un mejor aspecto a las líneas del dibujo". Esta herramienta tiene un grado de aplicación del 1 al 10, el cual puedes cambiar moviendo el círculo de derecha a izquierda, o utilizando los botones + y -.
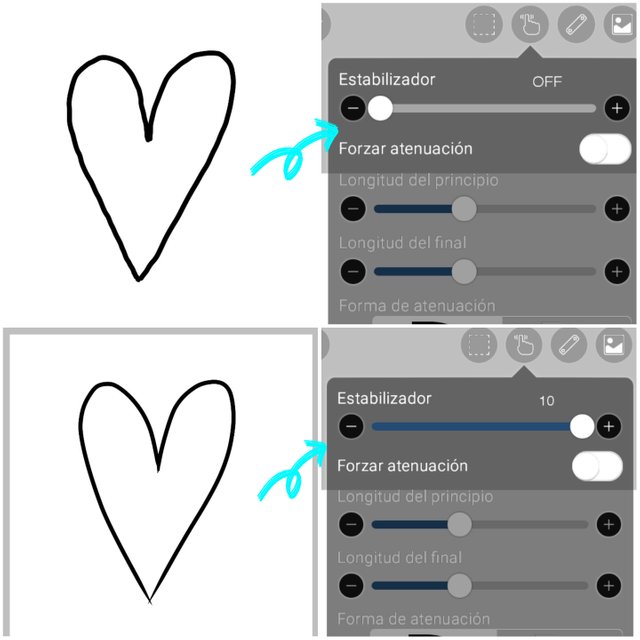
En la siguiente foto puedes visualizar la diferencia entre no usar el estabilizador (foto 1) y usarlo al grado 10 (foto 2). En la primera foto el corazón tiene ligeras curvas en sus líneas, a diferencia de la foto dos, donde el Estabilizador corrigió esos ligeros errores en las líneas.
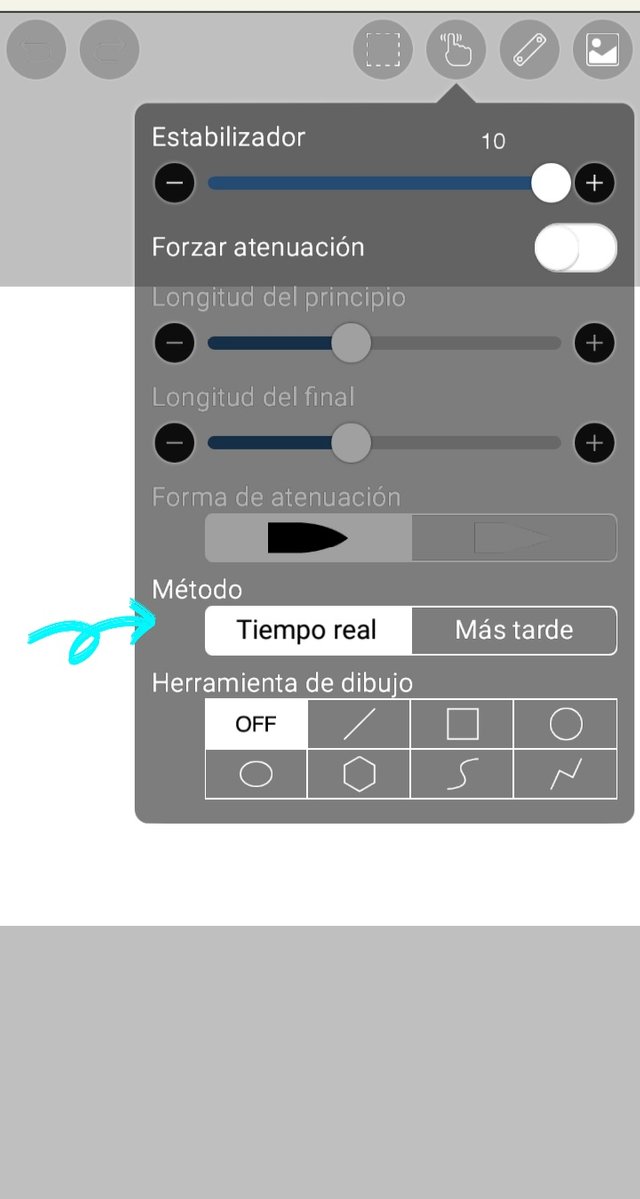
En la sección "Método" aparecen dos opciones para usar el Estabilizador. La primera "Tiempo real" que aplica el corrección del estabilizador al momento que estás haciendo tu línea, y "Más tarde" que aplica la corrección del estabilizador una vez que culminas de trazar la línea. Ambas opciones generan el mismo resultado.
Herramienta "Forzar Atenuación"
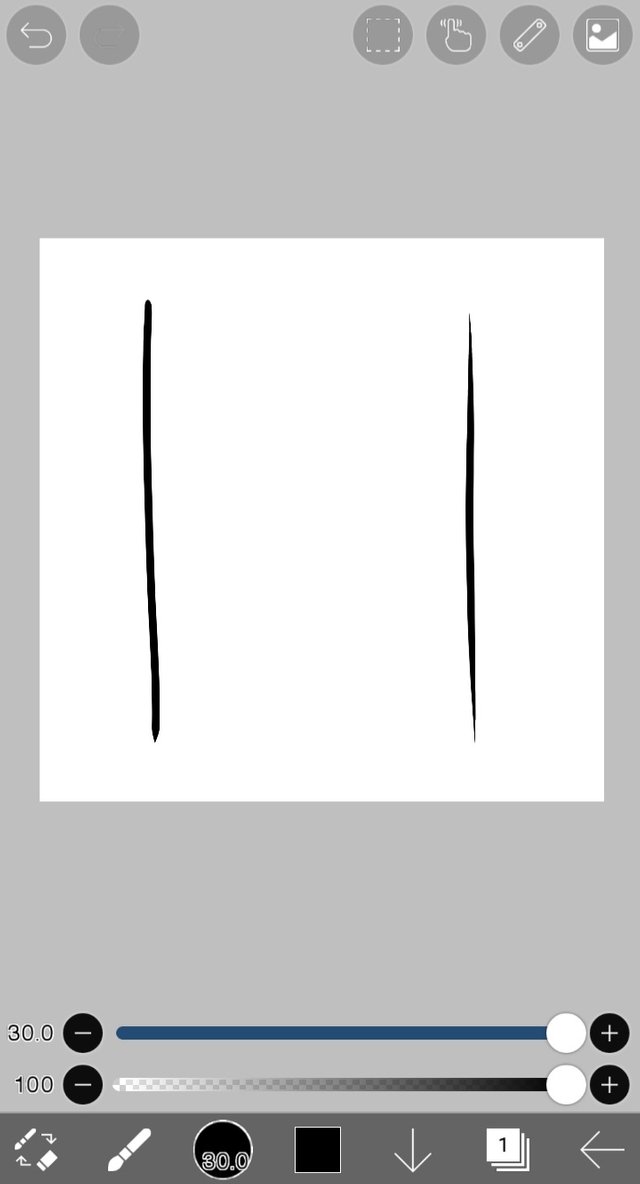
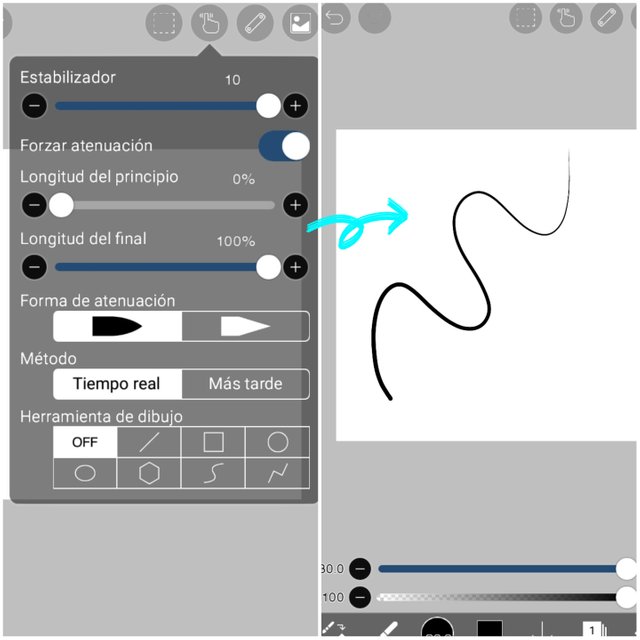
Esta ubicada abajo de la herramienta "Estabilizador", y permite dar un acabado más fino o más grueso al inicio y final de las líneas, tal como se presenta en la siguiente imagen, donde la línea izquierda no tiene aplicada la herramienta y la derecha si:
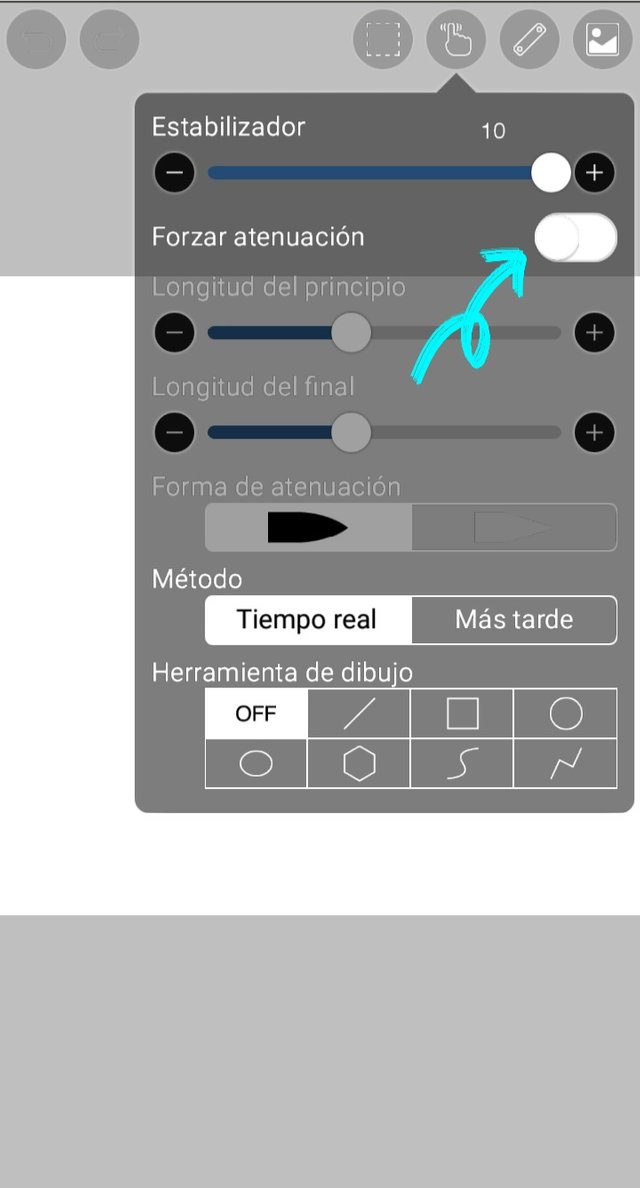
Para usar esta herramienta debemos activarla, haciendo clic en el botón de al lado:
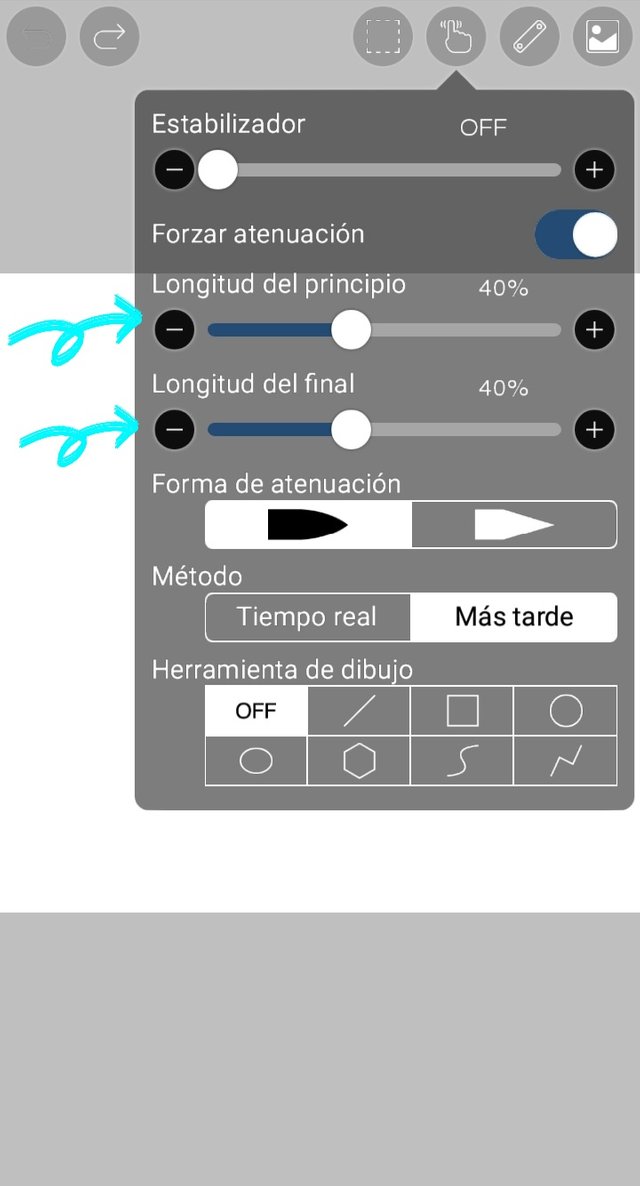
Luego se activarán las dos opciones de abajo "longitud del principio" que es el grado de grueso o fino al inicio de la línea, y "longitud del final" que es lo mismo que la anterior, pero al final de la linea. Los grados de grueso o fino de la línea los cambiamos en cada una de las dos opciones explicadas, moviendo el círculo de derecha a izquierda o usando los botones + y -.
A continuación te presento un ejemplo donde uso una longitud del principio de 0% y una longitud del final del 100%:
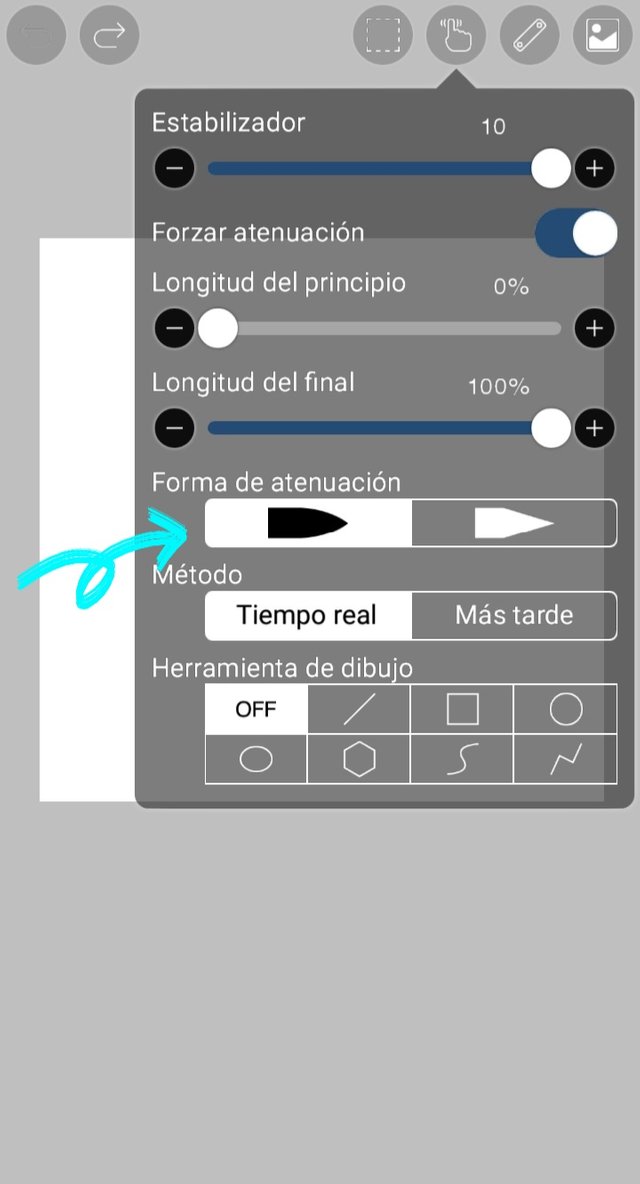
Otra opción dentro de la herramienta "Atenuación" es la forma. Tu puedes elegir la que más te guste, pero personalmente pienso que son casi iguales.
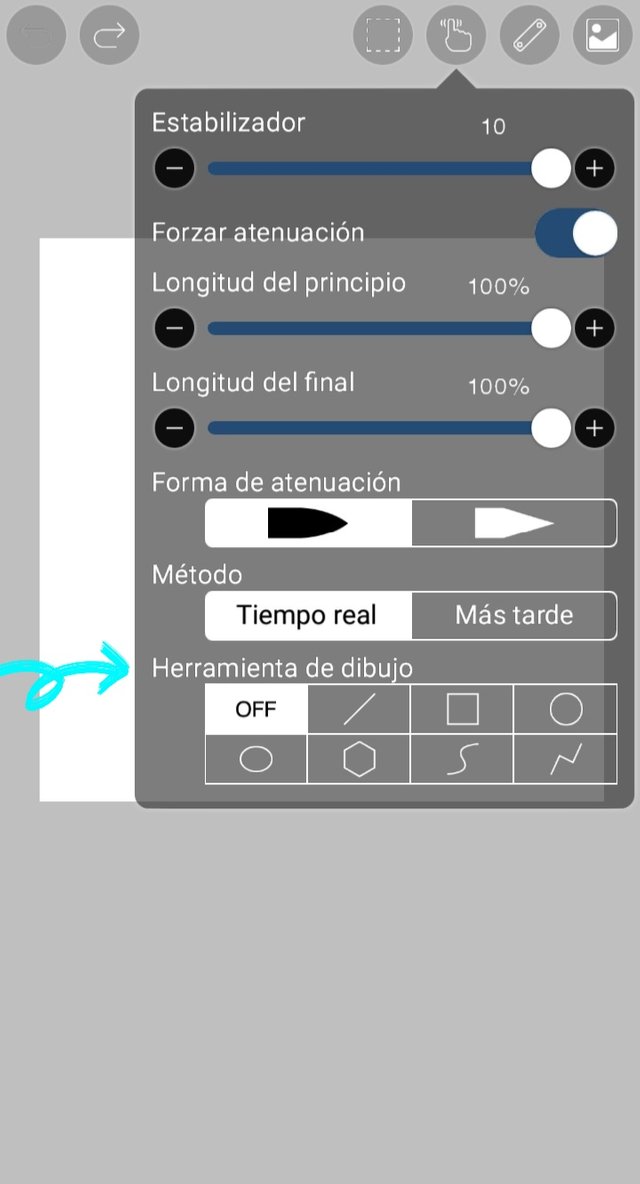
Herramientas de Dibujo (figuras geométricas)
Esta herramienta estoy segura que les ayudará mucho a los que les guste hacer un círculo, cuadrado o línea fácilmente. Esta herramienta permite dibujar variadas figuras geométricas, tal como se observa a continuación:
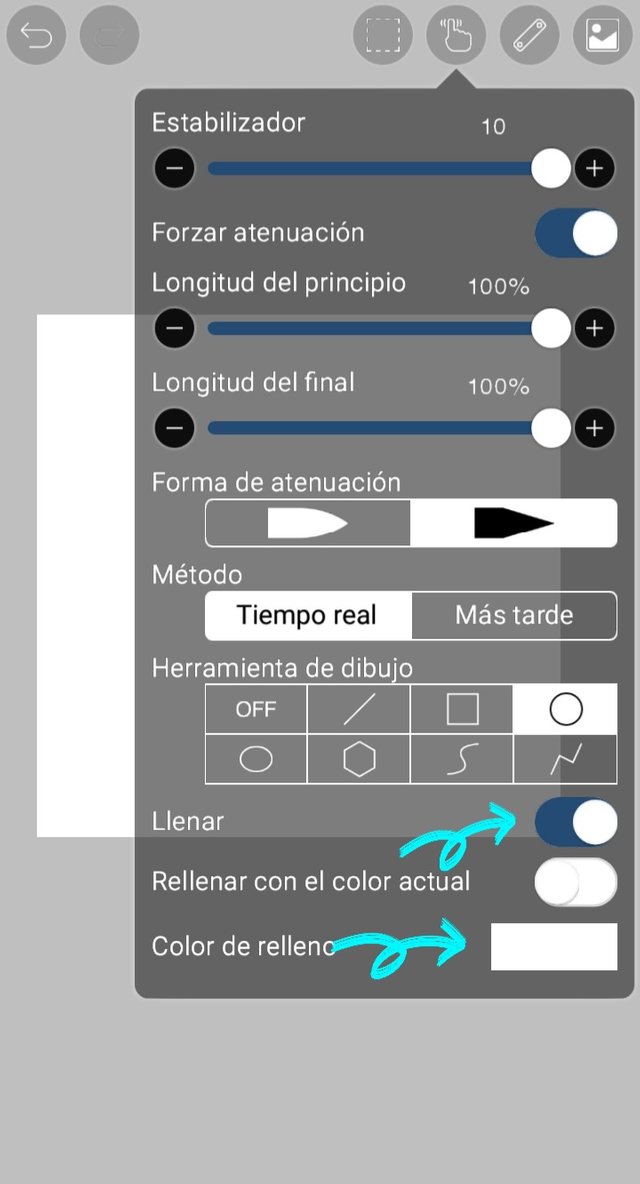
Solo debes hacer clic en la figura que gustes, y en el lienzo la dibujas, definiendo su tamaño. También te aparecerá la opción "Llenar" (primera flecha) la cual puedes activar para rellenar de color la figura, el color lo seleccionas en la opción "Color de relleno" (segunda flecha):
Es importante que desactives esta herramienta si ya no deseas dibujar más formas geométricas. Para ello debes hacer clic en la opción "OFF".
Esta herramienta es genial y facilita el proceso de creación de un dibujo.
Ejemplo General de Uso de todas las Herramientas Explicadas
A continuación presento un dibujo digital donde utilicé todas las herramientas explicadas en esta lección, para que puedan visualizar su uso en el arte digital.
Usé la brocha "Pluma Fuerte", el estabilizador al 10, forzar atenuación con la longitud de principio y final al 50%, y la forma geométrica "circulo".
1. Añadí color al fondo y luego agregué 3 círculos con la herramienta de formas geométricas, y "llenar" para el color.

2. Con la opción "llenar" de la herramienta de formas geométricas, dibujé los ojos y nariz del ratón. Luego desactivé la herramienta anterior y con la brocha dibujé la boca del ratón.
Finalmente agregué color y otros detalles al dibujo, como he explicado en lecciones anteriores:


Tarea para la Casa:
Ingresa a la Aplicación Ibis Paint x, y elabora un dibujo digital libre y a tu preferencia, donde utilices las herramienta explicadas en esta lección, es decir, Estabilizador, Forzar Atenuación y Herramientas de Dibujo (figuras geométricas). Presenta el paso a paso de tu lindo dibujo como desees, por ejemplo: mediante capturas de pantalla desde la aplicación.
Puedes dibujar algo sencillo, tal como yo hice. Te doy algunas ideas: un paisaje, un jarrón de flores, una casa, un animal, entre otros. Todo queda de parte de tu imaginación para hacer este dibujo.
Contenido de Ayuda: Recopilación de mis Lecciones:
🎨Lección 1: LINK
🎨Lección 2: LINK
🎨Lección 3: LINK
🎨Lección 4: LINK
Reglas para hacer tu tarea:
1- Debes ser un niño verificado por la comunidad.
2- Debes realizar tu publicación en la comunidad Steem Kids y dejar el enlace de tu entrada en esta publicación, en la sección de comentarios.
3- Debes pertenecer al club5050, club75 o club100.
4. Tu publicación debe contar con mínimo 300 palabras y los tags adecuados; siendo esencial # steemexclusive.
5. Tu contenido debe ser de autoría propia. Si utilizas información de un tercero, indica las fuentes correctamente para evitar el plagio y sus consecuencias en la plataforma.
6. Utiliza los tags en tu publicación correctamente.
Recomendaciones para hacer tu Tarea:
1. Haz resteem a esta publicación para que más niños puedan unirse a la lección.
2. Si tienes alguna duda, déjamela en los comentarios de esta publicación. ¡Con gusto te responderé!
3. Diviértete y aprende ¡Haz tu publicación sin miedo alguno! Te voy a calificar y corregir con amor y respeto.
Se aceptan las tareas para la casa hasta el vencimiento de esta publicación.
10 % de las recompensas de esta publicación son para la cuenta comunitaria @steemkidss
CC: @patjewell, @ngoenyi
Greetings my dear friends of Steem Kids. 💜🎨
I am pleased to present my fifth publication in the community as a Digital Drawing Tutor. Through my drawing lessons, I will be teaching and guiding you in the wonderful world of colors, based on everything I have learned self-taught. I hope you like my work and that you learn a lot!
Are you new to drawing or already experienced? My dear kid, you can still participate in this lesson and learn more every day, because “You don't need to be an expert to be a great artist” – Rui Torres.
Today I present to you my fifth lesson, related to the Ibis Paint X Drawing Application, which I will be using for the lessons and will be the main protagonist of them. You can download it through the following link: Ibis PaintX
In the LESSON 4, I had the opportunity to read, support, comment and give the respective feedback, to the homework of the following student:
| Student | Homework Link | @madilyn02 | Post |
My student created a beautiful digital drawing using the "Smudge" tool explained in the last lesson. I invited you to see and support her beautiful publication. 💜🎨
I take this opportunity to invite all the children of the community to participate, and those who participated in the 1st lesson with good homework: @kishwarsumbal @madilyn02 @ikramullah430 @ghani12 @leyxi209 @ibtisamwaqas
Now yes! Let's get started with this lesson.
"Stabilizer" Tool
This tool is located at the top of the Ibis Paint X canvas, represented by a hand with one finger:
Clicking on the mentioned icon will bring up the "Stabilizer" tool which is great for those learning to draw digitally, because it gives a better finish to the lines drawn. As its name indicates "stabilizes or gives a better appearance to the lines of the drawing". This tool has a degree of application from 1 to 10, which you can change by moving the circle from right to left, or by using the + and - buttons.
In the next photo you can see the difference between not using the stabilizer (photo 1) and using it at degree 10 (photo 2). In the first photo the heart has slight curves in its lines, unlike in photo two, where the Stabilizer corrected those slight errors in the lines.
In the "Method" section there are two options for using the Stabilizer. The first "Real time" which applies the stabilizer correction at the moment you are drawing your line, and "Later" which applies the stabilizer correction once you finish drawing the line. Both options produce the same result.
"Force Fade" Tool
It is located below the "Stabilizer" tool, and allows you to give a finer or thicker finish to the beginning and end of the lines, as shown in the following image, where the left line does not have the tool applied and the right does:
To use this tool we must activate it, by clicking on the button next to it:
Then the two options below will be activated "beginning length" which is the degree of thick or thin at the beginning of the line, and "end length" which is the same than the previous one, but at the end of the line. We change the degrees of thickness or thinness of the line in each of the two options explained, moving the circle from right to left or using the + and - buttons.
Here's an example where I use a start length of 0% and an end length of 100%:
Another option within the "Fade" tool is the shape. You can choose the one you like the most, but personally I think they are almost the same.
Drawing Tools (geometric figures)
I'm sure this tool will help a lot to those who like to make a circle, square or line easily. This tool allows you to draw various geometric figures, as shown below:
You just have to click on the figure you like, and draw it on the canvas, defining its size. You will also see the "Fill" option (first arrow) which you can activate to fill the figure with color, you select the color in the "Fill Color" option (second arrow):
It is important that you disable this tool if you no longer wish to draw geometric shapes. To do this you must click on the "OFF" option.
This tool is great and makes the process of creating a drawing easier.
General Example of Use of all the Tools Explained
Below I present a digital drawing where I used all the tools explained in this lesson, so you can visualize their use in digital art.
I used the "Strong Pen" brush, stabilizer at 10, force fade with start and end length at 50%, and the geometric shape "circle".
1. I added color to the background and then added 3 circles with the shape tool, and "fill" for the color.
2. With the "fill" option of the geometric shapes tool, I drew the eyes and nose of the mouse. Then I deactivated the previous tool and with the brush I drew the mouth of the mouse.
Finally I added color and other details to the drawing, as I have explained in previous lessons:
Homework:
Enter the Ibis Paint x Application, and create a free digital drawing of your choice, where you use the tools explained in this lesson, that is, Stabilizer, Force Attenuation and Drawing Tools (geometric figures). Present the step by step of your cute drawing as you wish, for example: through screenshots from the application.
You can draw something simple, just like I did. I'll give you some ideas: a landscape, a vase of flowers, a house, an animal, among others. Everything is left to your imagination to make this drawing.
Help Content: Compilation of my Lessons:
🎨Lesson 1: LINK
🎨Lesson 2: LINK
🎨Lesson 3: LINK
🎨Lesson 4: LINK
Rules for doing your homework:
1- You must be a community verified child.
2- You must make your publication in the Steem Kids community and leave the link of your entry in this publication, in the comments section.
3- You must belong to club5050, club75 or club100.
4. Your publication must have a minimum of 300 words and the appropriate tags; being essential # steemexclusive.
5. Your content must be your own. If you use information from a third party, indicate the sources correctly to avoid plagiarism and its consequences on the platform.
6. Use the tags in your publication correctly.
Recommendations for doing your Homework:
1. Please resteem this post so more kids can join the lesson.
2. If you have any questions, leave them in the comments of this post. I will gladly answer you!
3. Have fun and learn Make your publication without any fear! I will grade and correct you with love and respect.
Homework is accepted until the expiration of this publication.
10% of rewards from this post go to the @steemkidss community account
CC: @patjewell, @ngoenyi
Thanks for this wonderful lesson. The kinds will really enjoy learning
Thank you very much, the pleasure is all mine, I'm glad to be able to teach! Greetings. 💜
Have fun! That is the most important thing and I can assure you that with your lessons they are indeed having fun.
Keep up the good work!
Best wishes for a beautiful and joyful week 🐭
Thank you very much, your comments always lift my spirits. Many successes for you too, blessings and beautiful week dear friend. 💜😁
Thank you for contributing to #LearnWithSteem theme. This post has been upvoted by @Reminiscence01 using @steemcurator09 account. We encourage you to keep publishing quality and original content in the Steemit ecosystem to earn support for your content.
Regards,
Team #Sevengers
Thanks a lot. I really appreciate the support for my work, blessings.
Our one and only digital drawing teacher, i really appreciate you for this wonderful lesson. Oir kids will be dropping thier entry soon
Thank you dear. For me it is an honor to be able to provide this knowledge, success for you and happy day.
Excelente clase Carla!! Esas herramientas son excelentes para mejorar el aspecto de cada trazo de los dibujos. Te felicito y te deseo éxitos
Gracias mi querida Aless, te quiero mucho, ya quiero ver tu 1ra lección. Éxitos. 💜
Hello @carlaisl, Your post has been selected as one of the quality posts for the day by steemkids community. Congratulations! Please keep making quality and original contents with us here. We love you so much and will like to read more of your posts.
Please endeavour to resteem, vote and comment on the post of selection. Thank you!
Thank you friends for all the support, I appreciate it very much, God bless you always. I already supported the community post, many successes. 💜
Thank you my beautiful friend for another lesson specially made for us by you. I will sure be submitting my homework. Greetings
Thank you so much my dear friend! Greetings 😁💜
Gran trabajo Carlita, eres una gran tutora de dibujo digital. Éxitos.