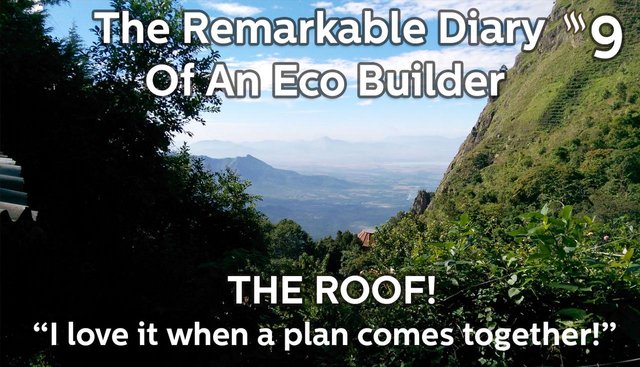
The Remarkable Diary Of An EcoBuilder, #9. The Roof! I love it when a plan comes together!
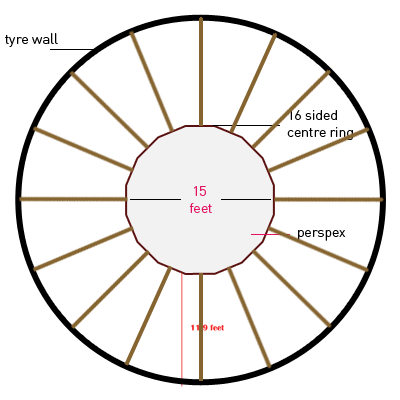
The roof of Earthship Karuna was without doubt the most extravagant, difficult, and expensive part of this build! Not only is it very big, but I also designed it with a 15 foot skylight that opens! That was so important for having good natural light, as well as for improving airflow and ventilation. The entire design and strength was based on my knowledge of Sacred Geometry. This roof is totally unsupported by any central pillars or beams other than the structure itself. It is similar to a reciprocal roof design, but instead of weaving wood sticks, we used very solid beams that were screwed to a central ring. The roof is not round, but is a 16 sided structure, and so the central ring is also 16 sided. The creation of this central ring and skylight was the first step in this mammoth and highly technical task of roofing Earthship Karuna. Luckily, I was blessed with another angel who turned up at just the right time. Ross turned up from Totnes in the UK with his tools and enthusiasm. We had never met before, but he had also heard about the project through facebook. We had a brief chat and before I knew it he was here! Please enjoy the ride, and read the story of the roof unfold!
I had just the right support, and right when I needed it. This was a great blessing on this project, and one that I don't take for granted. I could never have made the start of this roof without Ross. I had never even made anything bigger than a speaker box before out of wood, and was not by any mean a carpenter. This center ring needed to be made using wood cut at VERY precise angles. The exact angle of the sides of this ring was 12.25 degrees. All of the pieces had to be sub-millimeter accurate, whilst not having suitable tools to really make the job possible. I did have a good plan and I knew exactly what was needed to pull it off. The challenge here was the execution and attention to detail! We wouldn't know if we had got it right until we assembled the 4 quarters. The final quarter would either make the circle complete, or simply wouldn't fit! EEEek!
Here is a simple 2-D Plan of the top view of the roof design
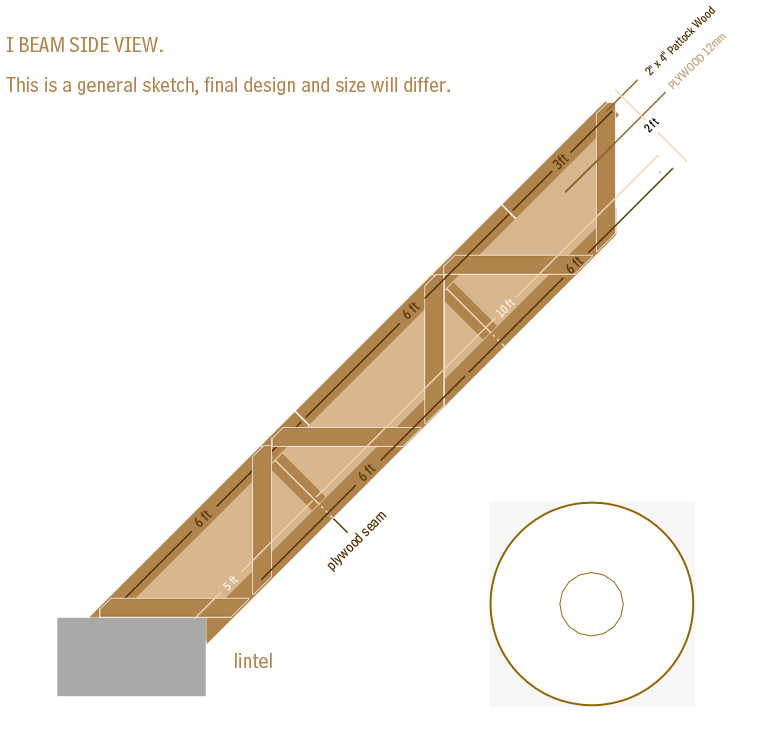
The main beams that make up the frame of the roof would be made out of smaller pieces of wood as below. These are homemade I-Beams and are VERY strong!
Ross and I make the 16 sided center Ring.
This was a bit of a job! lol. Ross stayed with me for around two months in total. We had a great rapport, and it was REALLY nice working with someone from England, my birthplace. We could totally speak the 'same language' and we made a fantastic team. It was a hard job, and we made the ring in four parts. The idea was that we would lift each part up to the platform we had made to support it, and then screw it all together once it was up there. It was simply not possible to lift it up all at once at it was too big and heavy! After much precision work we had made our first quarter. As you can see above, it looked good! We were using very strong wood, which has a lovely deep brown and red colour. It is strong wood, and when made into a 16 sided ring becomes super strong! Finally, after many weeks of wood cutting & precise planing, we had 2 pieces ready to go! I really needed to put these two pieces together to test it, as even 1mm differences would amplify any errors. So we put these two pieces together to see how it looked.
Mmmm. It didn't look right! It was so close, but we could both see that this wouldn't end up being a perfect circle. We were out by just a little bit on all of the pieces. It was clear that we had to find a method of making a better template to mark and cut the pieces. A protractor simply wasn't accurate enough! We had to disassemble them and remake it all. This is always a good time to find out how strong those screws and glue were. Suffice is to say that it was Hard work pulling it all apart due to the glue! Persistence pays off!
The solution came by using Photoshop. I could make a template that would have exactly the right angles marked out, and print it out . Then all we had to do was to mark the wood very accurately and cut it perfectly for it to fit. That is what we did! It felt much better and I could see the difference in the angles.. After weeks of none stop checking I became quite good at visually telling which ones were slightly off or not. Finally we assembled two of the four main pieces and had another look. YES!!! It looked GOOD! I was confident that when we took all four pieces up it would work. I would have LOVEd to have tested this all on the ground, but we didn't have a perfectly flat level big enough to lay it all out on. Well, actually we did, and it was 32 feet up where there was a platform we had made using a dizzying array of wooden sticks. This was our inside scaffolding, and looked pretty crazy. It was the only way we could get this roof up without any machines, and we used 100's of sticks and many meters of coconut rope to tie it up with. It looked a total mess, but it did work!
Ross had to leave before we could finish the ring, and so it was down to me to complete it. The BIG day was when we took the four pieces up to the platform and I put them together. WOULD THE LAST PIECE FIT!!!??? THAT was the burning question and one which would determine the fate of my roof. If they didn't meet, I didn't even know what I was going to do. It simply HAD to work! SO, I'm sure you can imagine the joy that I felt at seeing that the last piece not only fit, but fit perfectly! WOW! What a result!!
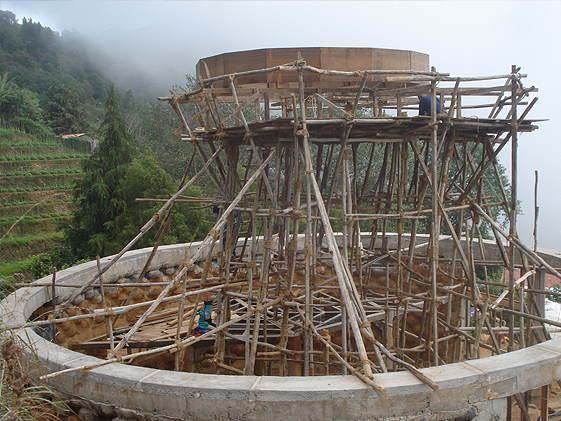
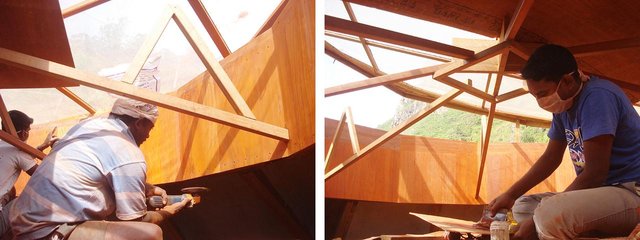
Now we had this center ring in place, we had to install the long main wooden beams that would finally hold this ring up. This was a major carpenter job, and I was doing it with some local carpenters. The job itself needed my very close attention. These guys could work, but were very unpredictable. This was a roof the likes of which they had never seen before, and only I really understood properly. This stage took around 4 months in total. I had to hire and fire several teams as they would be so unpredictable and often turned up drunk. I never allowed them to work when they came drunk!!! So step by step we got there. Here are some good images of this stage to give you a better idea of the work!
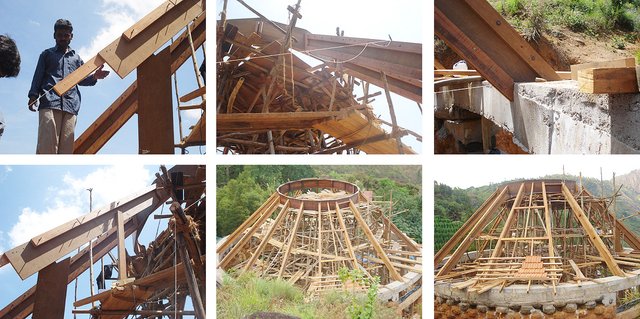
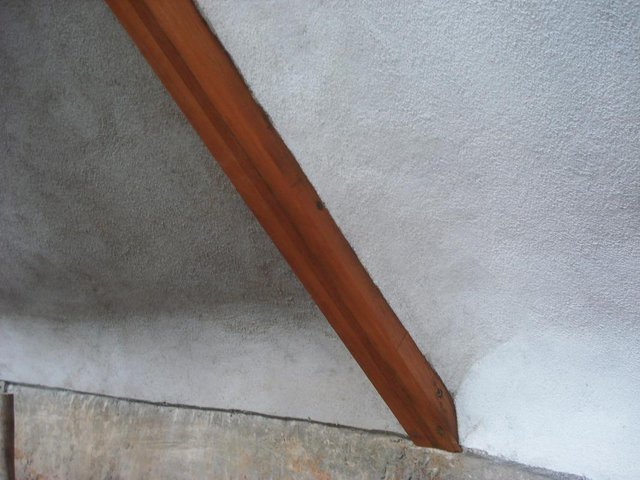
This structure was immense really! That center ring is 32 feet high and the angles of the beams were all at 45 degrees. It was a steep slope that I decided on to ensure the forces where the roof met the walls would be pushing down and not out. Also it would ensure that rain would quickly dump into the gutters, which would reduce the chance of this roof leaking. Our crazy scaffolding worked, and we got used to being high up there on it. Thankfully there were never any accidents, despite it being all to easy to fall from the top. Once we got the 16 main beams up, the final part of the frame was to tie in many smaller cross pieces as you see above. These cross pieces would really lock in the whole frame and turn it into one very strong self supportive structure. I think it would even be possible to remove the ring and the frame would still hold up, but I was not going to test that idea! It looked strong, and everyone I asked wiggled their head in acknowledgment that it was structurally sound.
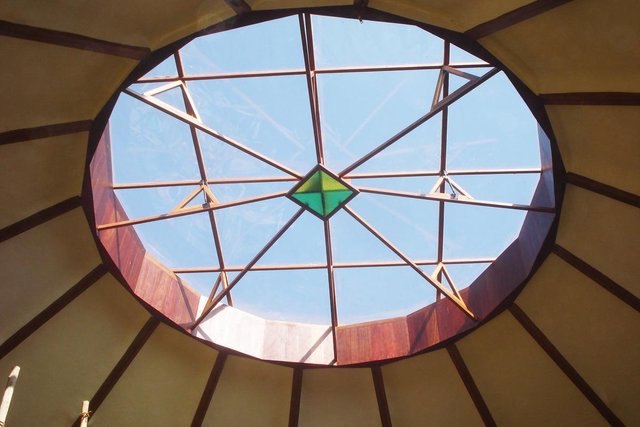
Next came the piece de resistance! The skylight!!! There was no way I was going to install glass that high up, and so I decided to use a polycarbonate material. It is even stronger than Plexiglas, and was potentially available from a guy I had met on line who said he would be able to help me source all of the materials for this skylight. I would need the very best framing and rubber seals to ensure this wouldn't leak. Since I knew that this was of prime importance, I went with it and ordered some German made materials. He sent me a sample of this polycarbonate to check out just to be sure. When I got it I was surprised that it was so thin! This sample was just 3 mm thick! It is safe to say that I put this little piece of plastic through some hard testing. I bent it as hard as I could, and it just bent but never snapped. It also sprang right back with no mark or line where it had been bent. I hit it with a big sledge hammer may times. It was indestructible! The only way to damage it was to grab a simple little hack saw and try cutting it. It cut like butter, which wasn't a surprise and would make fitting it very easy.
There was a great wait at this point. my supplier delayed the whole project for a WHOLE year whilst he kept on promising it would come, but it kept getting delayed. After about 8 months I did want to give up on him, but he kept assuring me it was on the way. I was not prepared to skimp it, or sacrifice the quality if this skylight, and so I waited. In the meantime, I had a good break, and got on with my other life that involved making websites, gardening, and meeting many guests from all over the world who came here for a retreat. Although life was simple here, just managing the basics of cooking,cleaning and washing could take most of my time up each day.
When the materials finally arrived I was 'quite' relieved. Whilst I was waiting, the entire wood framing of the roof was exposed to the elements and they were not looking good The mezzanine was also exposed and many pieces had warped very badly and needed replacing. We couldn't tile it and finish it until this skylight was in place! Luckily the main beams looked fine and there was no chance of them warping because the I-beams were all locked into place.
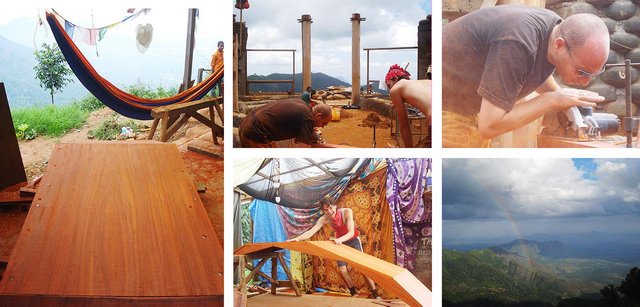
There was no way I could install this skylight using my local labor! It was at this point , that all the volunteers were totally finished and I employed the help of a very good team from Auroville. They were introduced to me by a dear friend Edzhart. He had been a part of Auroville for many years and had even helped to build it. He knew the right people and was able to persuade them to come 800Km to stay with me and get this Earthship finished! These guys were simple amazing. They not only knew what real quality and workmanship was, but also were morally incapable of doing shoddy work. They would always want to exceed even my expectations, which was like a whole new world to me! They did cost me about 4 times as much as local labor, but they were worth every penny. The installation of this skylight took around 3 weeks in total, and was very nerve wracking to watch and be a part of. We worked all day high up on the very top of the Earthship. The views up there were even more breathtaking, and it made the job an awe inspiring experience. Here are some pictures of my shiny new skylight going up.

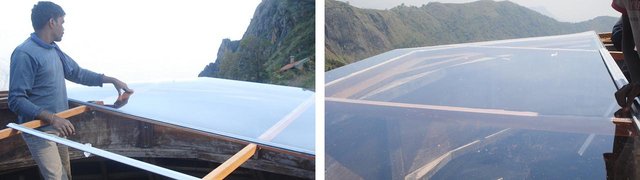
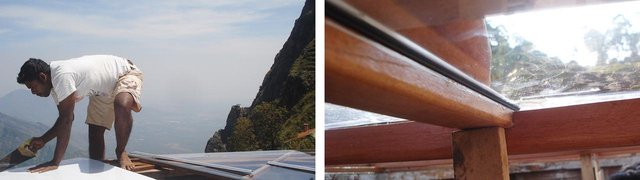

I have to say that it was looking beautiful! These guys knew all the tricks and taught me SO many things. I learned how to finish wood, and the dedication and time it takes to do it properly. Now we FINALLY had the skylight in place! As you can see it opens, and way in which that works is very simple and effective. The whole roof is hinged on the back end with lovely big bearing hinges. I remember having to drive for 13 hours to a nearby city to pick these hinges up! There was no ebay back then, and there was no way I was going to use the local hinges on this roof. They would last a year and rust to pieces.

The way that it actually opens is by the use of three gas springs. These springs can each push about 30Kg when they have loaded. In order to load them up you have to pull them closed using force. The way I achieved this was to install a winch inside the house attached to the roof with steel cables. When I winch the roof closed, it charges up the gas springs and they are ready to push. When I release the cable, due to the pressure in the gas springs, the roof opened up all by itself. Amazing! Actually was is amazing is that it worked. It was always going to need a bit of luck as to whether the roof could be light enough to allow for these gas springs to lift the entire thing up. As luck would have it, they were just the right strength to open the roof up with enough force to keep it open. I can remember when I tested it for the first time and saw it work. I said to myself with a big smile... "I love it When a plan comes together!" It even sounded like a Star Trek door opening, as the gas springs released pressure. This was the climax of something so difficult, and so challenging that I didn't know if any of it would really work until we finished it. My backup plan was just to forget it opening if it didn't work, but happily it never came to that.
Watch Uri Opening the Roof! Press Play on Both of these Videos -)
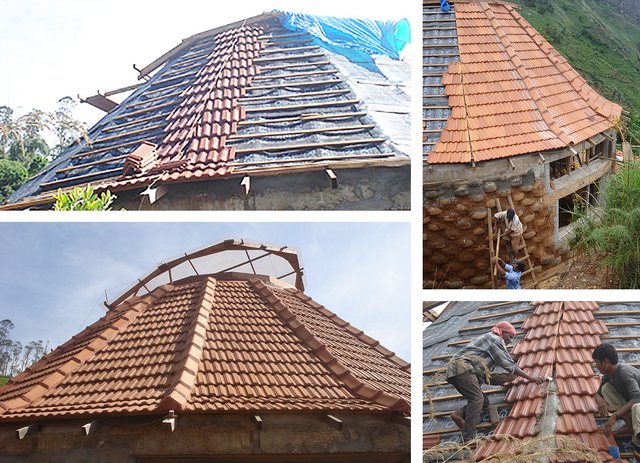
The tiling work happened straight after and despite being quite tricky due to all the edges, we made it work! The most important part was installing all these small wood reapers that supported the tiles. They had to be EXACTLY in the right spot! Luckily 'my boyz' were working like pro's and we didn't have to do it all twice! Clay 'Mangalore' tiles were my choice for many reasons. Since I would be harvesting rainwater, I knew clay was a natural material that could safely catch that water. They also look lovely, and have a long lifetime. I think it took about 2 months to get all these tiles down the hill, since they had to be carried 5 at a time over a long distance. Oh the art of patience, how India teaches that to me time and time again!.
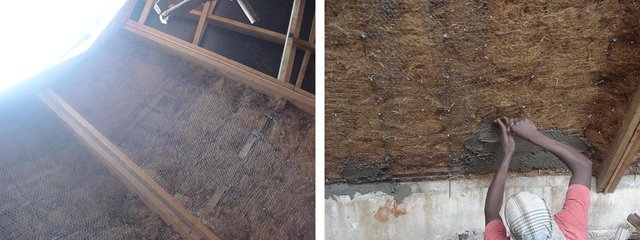
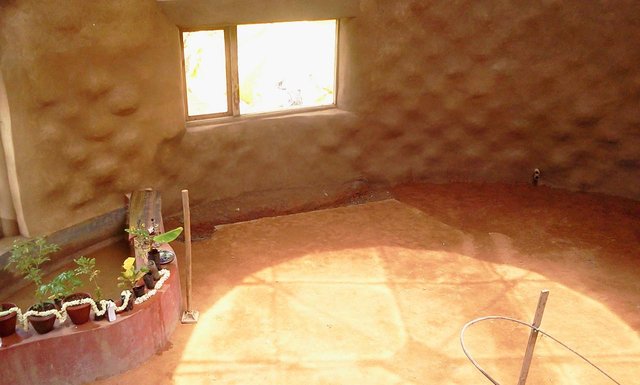
Now we could move on to the interior roof finishing. This was the last stage of the build before I would be able to pull down ALL that scaffolding that had been in place for over a year! What we had to do was totally finish the interior of the roof. We began doing this by adding insulation. I chose to use coconut hair as insulation. It isn't the best material, but is totally natural and super cheap. It also repels bugs and never seems to degrade. What we did was to stuff a whole truck load of coconut hair and retain it using wire chicken mesh. We then plastered the mesh with a thin layer of cement that would later be painted. There were also a lot of thin metal rods nailed into place to help support the mesh and the plaster. This is basically a large ferro-cement wall encasing a 2ft thick layer of coconut hair insulation. You can see this work happening here.
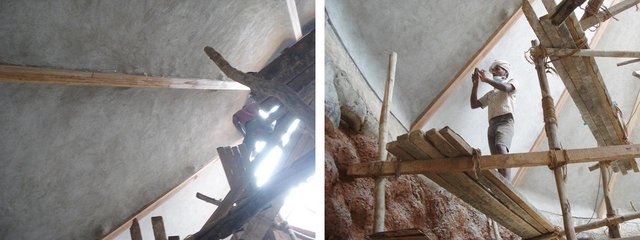
Once we had all the 16 panels cemented and sealed it was time to get those beams sanded and varnished. We also had to paint all the panels with one colour or another. This was a one time commitment! There was no way I was going to be able to change this, especially after the scaffolding was taken down. That would be a major operation. The choice of colour wasn't easy. I'm the kind of person who always ends up painting things twice because I choose a colour that works in my mind but not in practice. I think I went through many ideas, and finally settled on a nice cream colour. Pure white would have been too much, and the cream colour worked really well with the colour of the wood.
It took the best part of 8 weeks to get the inside work completed. We not only had to do all that roof work, but also had to plaster all the interior walls. It was a lot of work and I had a pretty bib team of around 9 guys. This was the most joyful part of the process as the finishing was done so well, and the choices I had made seemed to be working!
The great day came, when we got to remove all the scaffolding. Until that point the inside of the Earthship was very dark. This was because the platform at the top that had supported the ring blocked the whole area from the sun. I was so excited to see what this house would look like without ALL those sticks in the way and with the natural light come in.
It was breathtaking! I can still feel the excitement and AWE that I had looking at this on that great day. It was simply stunning, and really took my breath away. After SO much work, total persistence, and a fearless motivation, we had reached the milestone that I had only dreamed of reaching. There aren't words to explain it. Suffice is to say that I cried writing and remembering that feeling just now, because it was such a powerful moment.
WE SAW THIS RAINBOW ON THE LAST DAY OF WORK!
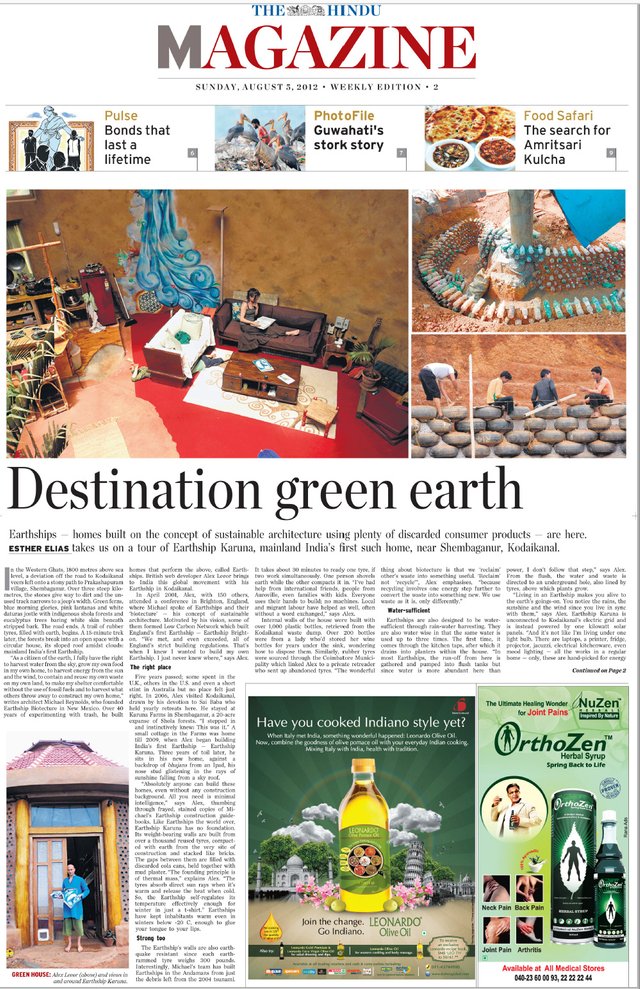
Earthship Karuna has received some very positive attention from the Indian media. In fact I was quite surprised to learn that one Sunday, the Hindu Newspaper had dedicated their entire front page of their Sunday magazine to my Earthship project. This was a real bonus for the cause and it has helped to spread the word about sustainable building far and wide.
If you are interested please click the image below to read the full PDF:
MISSED A PART?
CATCH UP ON PARTS 1-8 HERE:
Part 1: The creation of my life's dream, a totally off-grid self sufficient home - Earthship Karuna
-
Part 2: The dream was born.
-
Part 3: How to accomplish anything in life!
-
Part 4: Finding My Spot in India at Last! The Journey Ends and Starts!
-
Part 5: The Remarkable Diary of an ecoBuilder. A plan and vision was born
-
Part 6: A Diary Of My First Eco-Build Of An Off-Grid Sustainable Earthship: - We Start Building!
-
Part 7: Epic Tales Of An Eco-Builder : The 200 Ft Tree Challenge!
-
Part 8: The Remarkable Diary Of An Eco Builder Part 8: The Show Must Go On!

Click here to see more amazing posts from passengers on the ecoTrain
Hey Alex! Soooo nice to read. I always think I'll go through it quickly as I was there for a lot of it but end up reading the whole thing as it's so much fun! Looking at the stick scaffolding I am laughing my head off. This to me proves there was so much Divine intervention going on, to make it all level and fit together! It's a miracle you have managed to accomplish together with a lot of earthbound and non earthbound angels. You are a true architect! Bravo! p.s. It was so nice seeing little Ori looking for his thumb haha!
@eco-alex what an absolutely incredible story and place. wow, how much would you say you think your total build was or at least the cost of this part?
thank you so much! Your question is a difficult one to answer.. and also a bit meaningless. I would estimate in the region of 150,000 USD all in.. but you cant compare this cost to anything you would build elsewhere. The cost was actually quite high for India, for many reasons including our location as well as the extravagant design!
The roof was made with expensive hard wood, and the many reapers that held the tiles were made from well seasoned dried teak wood. It was quite hard to get and very costly as i had to send guys to find it and bring it all back!
this chapter was probably the most exciting part for me!
can well imagine. when you are in the flow of something like that it becomes a labour of love not money. stunning place.
thanks for your support as always!
That is so beautiful! I love the magazine article too! I am inspired!
thank you @stillwatersart im happy you staying tuned! it got all exciting this week.. but hey maybe it was already too! =) im ALWAYS thrilled to hear people say they are inspired ;+)
I’ve been looking at the pictures on Facebook too. It’s beautiful!
I understand eco and karuna (compassion) are the foundations of the project. How similar or different are you from organizations like Habitat?
i am totally independant .. and uncommercial..Habitat does all kinds of great big projects.. i am more grass roots type of thing ;-)
Thank you! I have the clarity now. :)
Wow wow wow! This is so amazing and inspirational. I am so impressed by this right now.
than you so much @sharoonyasir .. ;-)
Hi @eco-alex, this is so impressive. A quite spectacular achievement.
Reading this reminded me of Fitzcarraldo!
oh THank you @pennsif ! very high praise ;) Im afraid i dont know who Fitzcarraldo is but i guess he makes good round houses!
Fitzcarraldo was a Werner Hertzog film about a man who had a dream to build an opera house in the Amazon jungle. Maybe not a direct correlate to your situation but your undertaking does appear to be quite inspirational!
ahaaa! lol.. it Does sound kind of similar!! i mean i am in the jungle.. and the acoustics of Earthship Karuna are pretty amazing for Opera! ;_)
@eco-alex
That is amazing work. Your post is full of information that needs study.
Your post will surely rank high on good content posts for the day.
I will have to read slowly and study your work.
It is way too much to just roll down the page quickly reading.
Thank you
Francis
thank you @fancisk ! your comments help keep me motivated ;-)
There sure is a lot to look at.. so please come back anytime and you can read this and previous parts!
thank you!
wow that's great

THANK YOU! .. nice GIF!