How I made the Cinemagraph from my last Post (English-German)
Here is a short Tutorial, how I made this Cinmegraph.
Hier ein kleines Tutorial, wie ich diesen Cinemagraph erstellt habe.
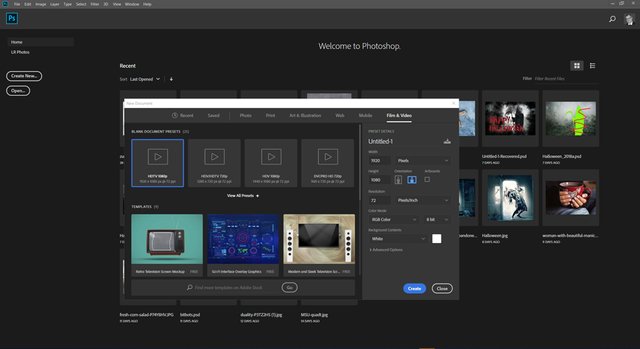
First create a new file in Adobe Photoshop (only work with Version CS6 or higher). I use the size 1920x1080 px. You also can open the video-file directly with Adobe Photoshop.
Zuerst erstellt ihr eine Datei in Adobe Photoshop (geht aber nur mit Version CS6 oder höher). Ich benutze die Größe 1920x1080 px. Man kann auch die Video-Datei direkt mit Photoshop öffnen.
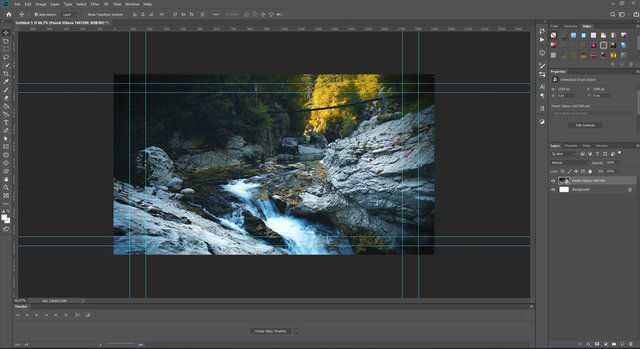
Then I place the video I downloaded from https://videos.pexels.com/ per drag and drop to the canvas.
Dann plaziere ich das Video, welches ich von https://videos.pexels.com/ heruntergeladen habe, per Drag&Drop in der Zeichenfläche.
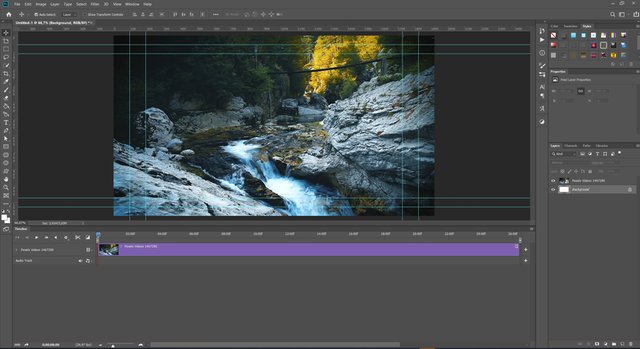
After the placement I create a Video Timeline With the same called button below the canvas.
Danach erstelle ich ein Video Timeline mit dem Button unterhalb der Zeichenfläche.
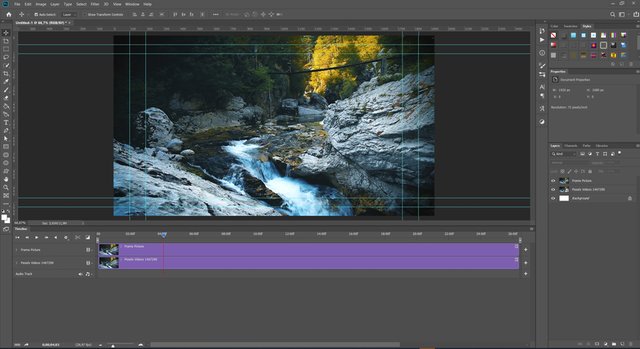
The next step is to select a frame position at the timeline that is used for the static part of the Cinemagraph. This is very important and depends on the used video. In this case I used a position where the walking man on the bridge is not seen yet. But you should not take the first frame. Click mark all and copy and paste it. You now have a new layer above the video layer.
Der nächste Schritt besteht darin sich einen Frame auf der Timeline zu suchen, der für den statischen Teil im Cinemagraph verwendet werden soll. Das ist sehr wichtig und von dem verwendeten Video abhängig. In dem Fall habe ich einen Frame benutzt in dem der Mann, der über die Brück läuft, noch nicht zu sehen ist. Vermeidet aber den ersten Frame. Markiert nun alles und fügt es mit Copy&Paste wieder ein. Ihr habt jetzt eine neue Ebene über der Videoebene.
Next you have to add a mask at the static layer and draw with a smooth brush in black color the part where the motion should be seen.
Als nächste fügen wir eine Maske zu dem statischen Layer und malen mit einem weichen Pinsel über der Bereich in dem die Bewegung zu sehen sein soll.
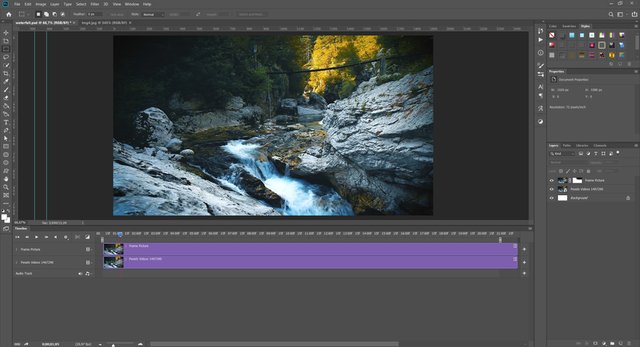
Press the Play-Button at the Timeline and choose all frames you need for the video. Let it play in a loop to see if all is working well.
Drückt dann den Play-Button auf der Timeline und wählt die Frames die für das Video nötig sind. Lasst das Video im Loop laufen um zu sehen ob es auch so funktioniert wie ihr es euch vorstellt.
The final step ist the export as a GIF.
Der letzte Schritt ist dann der Export als GIF.
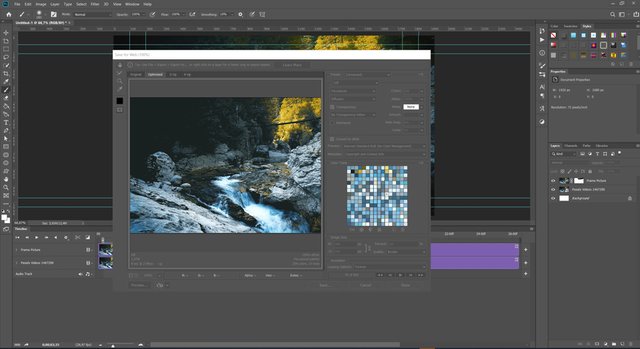
I choose a size of 960x540 px and the Looping Option 'Forever'. That results in an acceptable file size.
Ich wähle die Große 960x540 px und die Abspieleinstellung auf 'Unendlich'. Das erzeugt eine akzeptable File Größe.
Good luck !
Viel Grlück !


I use ScreenFlow for my animations.... It is rather easy... you take your video that you choose to extract. Highlight the timeline. The export as .jpg or .png the selected timeline. I can do it quickly... just takes a few minutes for the export and I am done! :)
Yes, normal animations are done quickly with Adobe Photoshop too. But have you ever tried to make a cinemagraph with ScreenFlow?
No... maybe I am not quite sure the difference. :)
Congratulations,
you just received a 13.20% upvote from @steemhq - Community Bot!
Wanna join and receive free upvotes yourself?

Vote for
steemhq.witnesson Steemit or directly on SteemConnect and join the Community Witness.This service was brought to you by SteemHQ.com
Congratulations @ikarus56! You have completed the following achievement on the Steem blockchain and have been rewarded with new badge(s) :
Click here to view your Board of Honor
If you no longer want to receive notifications, reply to this comment with the word
STOPDo not miss the last post from @steemitboard:
Hello @ikarus56, thank you for sharing this creative work! We just stopped by to say that you've been upvoted by the @creativecrypto magazine. The Creative Crypto is all about art on the blockchain and learning from creatives like you. Looking forward to crossing paths again soon. Steem on!
Thanks a lot for the vote.
Nice! So that's how you did it. Great tutorial! Thanks for explaining it further.
Yes, that's the method for doing the Cinemagraphs. But this was an easy one. And everybody can try to reproduce it. With other videos, it will be more complex to find the right loop.
Congratulations @ikarus56! You have completed the following achievement on the Steem blockchain and have been rewarded with new badge(s) :
Click here to view your Board of Honor
If you no longer want to receive notifications, reply to this comment with the word
STOPTo support your work, I also upvoted your post!
Do not miss the last post from @steemitboard:
Hi, @ikarus56!
You just got a 0.44% upvote from SteemPlus!
To get higher upvotes, earn more SteemPlus Points (SPP). On your Steemit wallet, check your SPP balance and click on "How to earn SPP?" to find out all the ways to earn.
If you're not using SteemPlus yet, please check our last posts in here to see the many ways in which SteemPlus can improve your Steem experience on Steemit and Busy.
Congratulations @ikarus56! You have completed the following achievement on the Steem blockchain and have been rewarded with new badge(s) :
Click here to view your Board of Honor
If you no longer want to receive notifications, reply to this comment with the word
STOPDo not miss the last post from @steemitboard:
Thank you for using Resteem & Voting Bot @allaz Your post will be min. 10+ resteemed with over 13000+ followers & min. 25+ Upvote Different account (5000+ Steem Power).
Your post had been curated by the @buildawhale team and mentioned here:
https://steemit.com/curation/@buildawhale/buildawhale-curation-digest-11-09-18
Keep up the good work and original content, everyone appreciates it!