中英教程: Easy Compile & install steemd on Ubuntu 16.04 by one command: install-steemd.sh / Steem 一键安装脚本 install-steemd.sh: 在 Ubuntu 16.04 上安装 steem
1. Why I wrote install-steemd.sh? / 为什么我要会编写这个安装脚本?
I registered steemit one week ago. I wrote 6 posts in these days and got many upvotes and STEEM, I am very happy. So I decided to create a steem node for studying more knowledge.
When I tried to compile & install steemd, I searched different HOWTO guides, unfortunately, I experienced many failures. Finally I made it on Ubuntu 16.04 LTS x64, so I decided to write this guide, and build the installion codes into a single script - install-steemd.sh.
我在一周前刚刚成功注册到 steemit,是一个不折不扣的新手。这些天,我发了6篇文章,结果得到了非常多的点赞,也赚到了不少 STEEM 币奖励。这让我更有动力去深入研究 Steem。为此我决定自建一个 Steem 节点。
然而,当我搜索了网上各种教程,尝试编译和安装 steemd 的时候,却遭遇了数次失败。当然,最后我还是在 Ubuntu 16.04 LTS x64 搞定了这一切。于是我将安装的详细过程,做成了一键安装脚本 install-steemd.sh,方便大家使用。
2. Compiling & Installiaon Requirement / 安装需求
To compile and install steed, the min memory of 4GB is required. I got failure when I first compiled on an Aliyun 2GB VPS. Finally, I successfully compiled steemd on a Linode 4GB VPS. because Linode is very cheap. Here is a comparison.
要成功编译和安装 steem, 至少需要 4GB 内存。刚开始我不知道这个限制,在阿里云的 2GB VPS 上编译,结果失败了好多次。最终我将 steemd 成功安装在一台Linode 4GB VPS 上了,因为它足够便宜。下面是一个比较图表:
| VPS | Mem | Price/mo |
|---|---|---|
| Linode | 4 GB | 20 USD |
| DigitalOcean | 4 GB | 40 USD |
| Aliyun | 4 GB | 8 USD /319 CNY |
3. Guide for purchasing Linode VPS / Linode VPS 购买教程
If you have a Linux VPS and installed Ubuntu 16.04 LTS x64 already, please ignore this step.
如果你拥有一台已经安装了 Ubuntu 16.04 LTS x64 的 Linux VPS,则可以无视此步骤。
- Visit Linode.com, click Pricing on the top. Select Linode 4GB in pricing page, then check out it.
访问 Linode.com, 点击顶部的 Pricing. 然后在 Pricing 页面选择 Linode 4GB, 然后付款完成购买即可。这个细节过程不再详述。 - After completed the purchasing, click Linodes -> Rebuild, Select 64 bit Ubuntu 16.04 LTS in Image filed, and set a root password, then click Rebuild button.
成功完成购买之后,点击 Linodes -> Rebuild, 然后在 Image 字段中,选择 64 bit Ubuntu 16.04 LTS, 并在 Root Password 设置好 root 密码,点击 Rebuild 按纽即可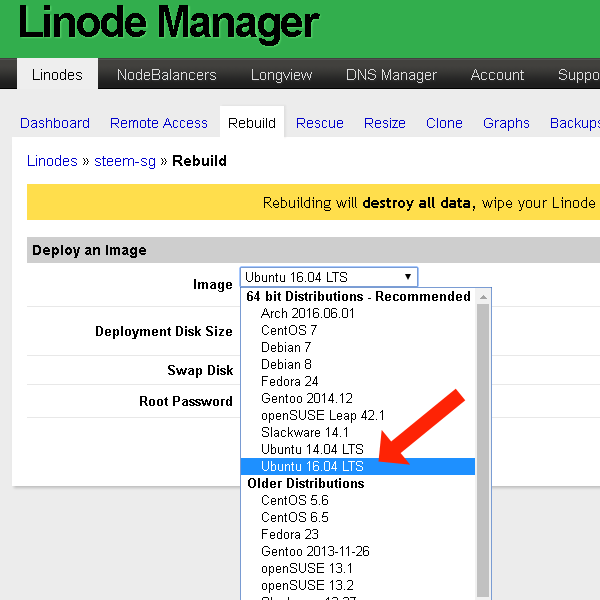
- Click Dashboard, and then click Reboot button. When all complated, the Host Job Queue will show "Success System Boot" as below screenshot:
点击 Dashboard, 然后点击 Reboot 按钮。如果一切正常,那么 Host Job Queue 一这节,将会显示 "Success System Boot" 字样,如下图所示: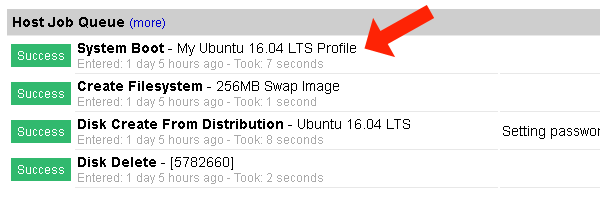
- Click Remote Access, you will get the public IP of your Linode VPS. Then you can use this IP and root password to login into your Linide via a SSH client. I recommend Putty.
点击 Remote Access,你将获取此 Linode VPS 的公网 IP。然后,你可以使用此 IP 以及之前设置的 root 密码,通过 SSH 客户端登录到你的 VPS。我推荐使用 Putty。
4. Easy Compile & install steemd on Ubuntu 16.04 / 使用一键安装脚本轻松安装 steemd
When you logined into your VPS, just copy below scripts and then paste them on SSH shell:
登录成功之后,复制下列脚本到 SSH Shell 窗口即可:
wget https://www.xiaohui.com/imglib2/i1650/id1672/install-steemd.sh
chmod 0777 install-steemd.sh
./install-steemd.sh
Note: Below is the contents of install-steemd.sh. If my site www.Xiaohui.com is down, you can also copy & paste them to a local file, upload it to your VPS, then launch it.
注意:下面就是 install-steemd.sh 的脚本内容。如果我的网站 www.Xiaohui.com 当机了,你也可以将其复制并保存到一个本地文件,然后上传到你的 VPS,直接执行即可。
#!/bin/bash
#
# Compile & Install steem.
# Requirements:
#  MEM: 4GB
#  OS : Ubuntu 16.04 LTS x64
#
# https://steemit.com/@xiaohui
# https://www.xiaohui.com
#

# Upgrade and install requires
sudo apt-get -y upgrade
sudo apt-get -y install git cmake g++ python-dev autotools-dev libicu-dev build-essential libbz2-dev libboost-all-dev libssl-dev libncurses5-dev doxygen libreadline-dev dh-autoreconf screen tree

# remove old installation
rm -rf steem
rm -rf steemd
mkdir steemd

# get codes from git, compile
git clone https://github.com/steemit/steem
cd steem && git checkout master && git submodule update --init --recursive && cmake -DCMAKE_BUILD_TYPE=Release -DLOW_MEMORY_NODE=ON . && make

# install new binaries
cp programs/steemd/steemd ../steemd/
cp programs/cli_wallet/cli_wallet ../steemd/
cd ..

# download blockchain from steemitup.eu
cd steemd/
wget http://www.steemitup.eu/witness_node_data_dir.tar.gz
tar -zxvf witness_node_data_dir.tar.gz
rm witness_node_data_dir.tar.gz

# apply config.ini if available
if [ -f ../config.ini ]
then
    cp -fv ../config.ini witness_node_data_dir/
    # make a backup
    cp witness_node_data_dir/config.ini witness_node_data_dir/config.ini.bak
    # set rpc-endpoint and enable-stale-production parameters
    sed -i "s/# rpc-endpoint =/rpc-endpoint = 127.0.0.1:8091\n# rpc-endpoint =/g" witness_node_data_dir/config.ini
    sed -i "s/enable-stale-production = false/enable-stale-production = true\n#enable-stale-production = false/g" witness_node_data_dir/config.ini
fi

# prep the local blockchain
./steemd --replay
5. Launch steemd in background and set auto launch after Ubuntu rebooted/ 设置后台自动运行,并且设置自启动
When you see the local blockchain is completed the sync to about 99% from Shell Window, just press Ctrl + C to stop the program.
当你观察到 Shell 窗口输出的本地 blockchain 已经同步完成 99% 左右的时候,就可以按下 Ctrl + C 停止同步了。
- If you won't become a miner, and want to launch it as a steem node only, please launch below command:
如果你不想挖矿,仅仅想提供一个 Steem 节点,请运行下列命令:
nohup /root/steemd/steemd&
You can also add above command to file /etc/rc.local. It will be auto launched in background after Ubuntu rebooted. Note: I used full path in this section. If you steemd is not located in /root/steemd, please replace it.
同时,你也可以将上述命令,加入到 /etc/rc.local,将它会随系统重启而自动运行。注意:在这一节,我使用了绝对路径。如果你的 steemd 没有在 /root/steemd/ 目录,请注意替换它们。下同。 - If you want to become a miner, please launch below command(Do not forget to set your account and password):
如果你想成功矿工,请执行下列命令(注意设好帐号和密码)
/root/steemd/steemd —miner='["accountname","${WIFPRIVATEKEY}"]' —witness='"accountname"' —seed-node="52.38.66.234:2001" —mining-threads=2
If all things are Okay, just press Ctrl + C to stop it, and the launch below command, it will launch it in background:
如果一切正常,那么请按下 Ctrl + C 中上程序,然后运行下列命令,它会将程序在后台运行。
nohup /root/steemd/steemd —miner='["accountname","${WIFPRIVATEKEY}"]' —witness='"accountname"' —seed-node="52.38.66.234:2001" —mining-threads=2&
You can also add above command to file /etc/rc.local. It will be auto launched in background after Ubuntu rebooted.
同时,你也可以将上述命令,加入到 /etc/rc.local,将它会随系统重启而自动运行。
6. Updating / 更新
If we have to re-install steemd, just re-launch the script:
如果你不得不重装 steemd,重新执行下列命令即可
./install-steemd.sh
7. Feedback / 反馈
I am a Chinese and I tried to write article to steemit by English. If there exists syntax errors, please let know me. If you like this tutorial or have any suggestions or questions, don't hesitate to click upvote button or leave a comment. Thank you!
我是一个中国人,开始尝试在 steemit 上用英文写作。如果文章有任何语法错误,欢迎指正。如果你喜欢这篇文章,或者有任何意见或疑问,欢迎点赞或留下你的意见。非常感谢!
8. Reference / 参考
9. Hot resources / 中文区热门讨论
欢迎加入 Steemit 微信群 / Welcome to Steemit WeiXin Chat Group
欢迎加入 Steemit QQ 群 434624757, 260917779 / Welcome to Steemit QQ Chat Group 434624757, 260917779
新手提问专用贴 / FAQ for Chinese Newbie
Big news: wang's robot is fall in love, she is voting on every posts of xiaohui | 大事件:xiaohui 被 wang 的机器人宠幸了
北京的朋友看过来,下面这个五天四晚北京游的安排合理不? / 5-Day Beijing Tour
我准备在 Steemit 上写一个连载小说,龙套角色欢迎报名 / I'm ready to write a continued story on streemit
强烈建议 Steemit 增加 QQ 或微信完成注册验证 / Stongly suggest to dan & ned that steemit support for QQ or Wechat verifieation
steem小白教程:人民币购买steem,及steem卖出教程(图文,详细) / steem Tutorial: purchase steam coin in RMB from china
The Chinese are coming
Updated on July 30:
To launch steemd in miner mode, please execute below command:
要将 steemd 运行在挖矿模式,将执行下列命令:
Note / 注意:
accountname: Your steemit username。 这里填你的 steemit 用户名WIFPRIVATEKEY: Your Active Key in steemit wallet. You can get it by clicking Wallet -> Permissions. 你在 steemit 钱包里的 Active Key. 可以通过访问页面 Wallet -> Permissions 获取。多谢,明天回来实验
sh脚本异常:/bin/sh^M:bad interpreter: No such file or directory
在Linux中执行.sh脚本,异常/bin/sh^M: bad interpreter: No such file or directory。
分析:这是不同系统编码格式引起的:在windows系统中编辑的.sh文件可能有不可见字符,所以在Linux系统下执行会报以上异常信息。
解决:1)在windows下转换:
利用一些编辑器如UltraEdit或EditPlus等工具先将脚本编码转换,再放到Linux中执行。转换方式如下(UltraEdit):File-->Conversions-->DOS->UNIX即可。
2)也可在Linux中转换:
首先要确保文件有可执行权限
#sh>chmod a+x filename
然后修改文件格式
#sh>vi filename
利用如下命令查看文件格式
:set ff 或 :set fileformat
可以看到如下信息
fileformat=dos 或 fileformat=unix
利用如下命令修改文件格式
:set ff=unix 或 :set fileformat=unix
:wq (存盘退出)
最后再执行文件
#sh>./filename
可以这样
tr -d '\n' <the_bad_file >the_good_file
已经搞定了。上传了最新的版本。重新 wget 一下即可
2501665ms th_a main.cpp:154 main ] wdata.ws_server: ws://localhost:8090
0 exception: unspecified
Underlying Transport Error
{"message":"Underlying Transport Error"}
asio websocket.cpp:444 operator()
我已经运行了nohup /root/steemd/steemd&
Good job, xiaohui!
Your lover @wang 's robot voted for you again, yeah!
yes, @wang love @xiaohui :)
我刚发的最近的那个贴子,还没有被他宠幸。
She is just enjoying the foreplay.
step 4? ,你应该还在编辑 :)
之前用本地编辑好的 HTML 版本复制过去有问题。改了好久。
Very well, you can help more people like me, thanks.
GOOD JOB,MAN!
好像在此运行install-steem.sh的话会覆盖witness_data下面的config.ini。
会将默认的 config 复制到 witness_node_data_dir,并生成一个 BAK