Cold Metal Storage, Guide for Metal DIY Crypto backups.
Make your own Metal Crypto Wallets, backups and business cards.
This is a half guide, half show and tell. This is also an opportunity for you to be creative, go off script and etch, emboss, engrave whatever some cool crypto designs onto metal.
My first experiments with this was creating offline vanity addresses, and in order to keep them offline I wanted to back them up securely. Paper seems to be most peoples go-to, but I wanted a timeless backup. Stainless steel was my choice due to melting point (in case of fire), corrosion resistance/waterproof and hard-wearing.
Some examples:
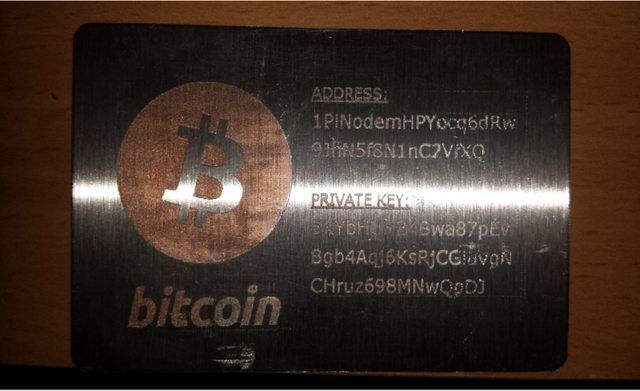
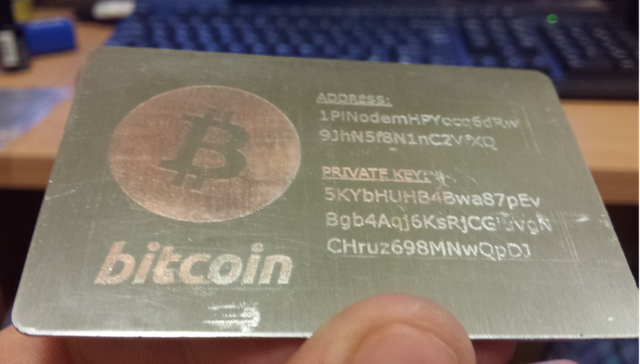
- Bitcoin with copper plated logo and vanity address+priv key
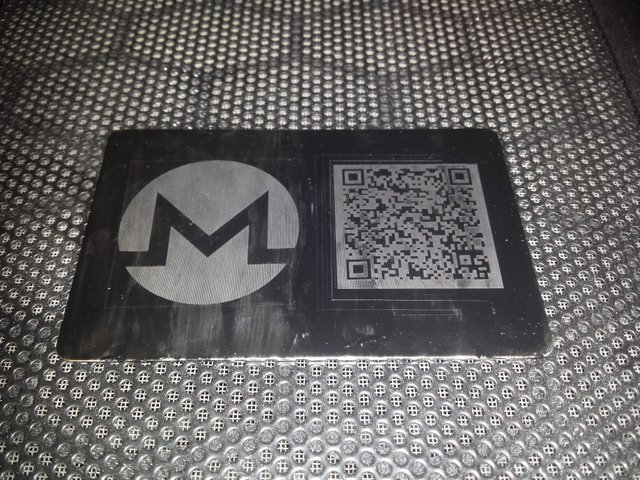
- Monero business card with receiving address QR code
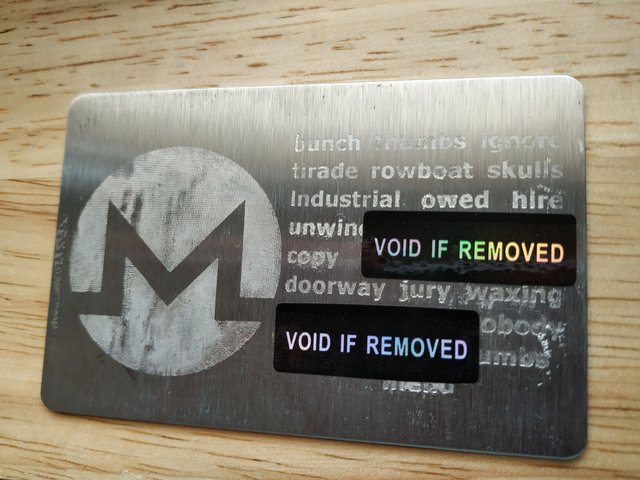
- Monero with 25 word seed
The Monero example uses a wallet recovery seed. This can be obtained when setting up a wallet with the GUI or there are other tools available to generate a wallet completely offline. https://moneroaddress.org/ (Use with caution) or https://mymonero.com/#/ has a downloadable wallet.
The Bitcoin example uses a test vanity address. VanityGen makes private keys in base-58 and can be imported into bitcoin-core using the "importprivkey" function in the debug window. The key format can be converted, but as I said, this is intended to be kept offline. Do a google search for 'Vanity Address Generator' page if custom addresses interest you.
The whole process is a 4 stage project:
- Cleaning - to remove oils from the metal
- Transfer the design onto the metal
- Etch the metal with ordinary salt water and a bit of electricity into areas that aren't protected by mask (ink/paint/vinyl)
- Clean up again
The bulk of this page will outline a few methods to transfer the design onto the metal ready for etching. Depending of what materials and budget you have available to apply the design will determine the quality of the end result. The etching itself is very straight forward, you're just accurately applying corrosion.
Not my usual guide -
I'm going to try something new here, and not sure if the style/formatting of this will work but here goes.
If this sort of project is completely new to you take a quick look at the 2 min video bellow, it doesn't waste any time showing you the idea behind this. In his video the design is pre-cut into stickers. What I focus on here is how to get your Crypto design onto the metal ready for that last etching step.
Because there are so many ways of marking the metal I'm going to split this into three categories, Budget, Hobbyist and Amature production, classed by entry price of the equipment needed to produce the end result. Once your design is applied the etching step is very straight forward, so your options: -
Method (1) Budget - £3 approx setup fee
You'll need:
Metal to etch
Discount store Nail polish
Sewing needle
Apply the nail polish and allow to dry, then simply remove the polish from the areas you want to etch with the needle. The end result will greatly depend on your artistic prowess but gives a fast and functional backup.
Aesthetics * * (skill dependent)
Function * * * * *

Method (2) Budget - £3 approx setup fee
http://www.instructables.com/id/A-Stainless-Steel-Bitcoin-Wallet/
You'll need:
Metal to etch
Access to a lazer toner printer/photocopier (v common)
Old glossy magazine and household Iron
I cant take credit for this one, nor have I tried it. Use the link above and it will detail how to use a standard laser toner printer to create a design negative. This image is then printed on glossy magazine paper (bear with me) because when it is applied to the metal and heated - with a household iron - the print toner is released onto the metal.
The design is then etched.
I would expect mixed result on this one but in theory can give a detailed printed design. Try experimenting with toner density and different papers.
Aesthetics * * *
Function * * *
Method (3) Hobby level - £3 -£15 setup
You'll need:
Metal to etch
Handheld engraver £3-15
To avoid chemical etching altogether and for speed, electric hand engravers could be used. Similar pros and cons as with the most budget method. Your end result with rely on your artistic skill and patience if you want a professional look.
However if you need a permanent way to jot down a backup...
Aesthetics * * (skill dependent)
Function * * * * *

Method (4) Amature Production level - approx £70 setup
Materials per backup less than £5
Tools setup cost less than £70
I opted to buy a home CNC Laser engraver, (ebay £55) mainly because it sounded cool and who doesn't want a burning laser. Since CNC beds have become cheap to build the price of these has plummeted. A really cool gadget!
This is the method I keep usnig because it gives so much control over the design. Nail polish is applied to the metal card and the laser etcher burns away the design to be etched. It's fast, consistent and repeatable when I have a design I like.

Adding the design - Method 4 cont.
First paint the metal card with black nail polish. The laser isn't powerful enough to etch the metal directly, but it will burn through the nail polish. Nail polish also doesn't conduct electricity and is easy to remove with it's remover.
The etcher comes with easy to use software. Just drag and drop images. What is shown as black here is what will be removed and therefore etched into the metal later.

Aesthetics * * * * *
Function * * * *
Only giving a 4 for function as it's easy to over complicate a design which wont etch well. You'll see in my fire test below how detail can become distorted. QR codes are pretty but should not be relied upon for backups.
The etching solution:
Online it says to use table salt and it works great. Just dissolve as much as you can into enough water (it helps if the waters warm).
On my second go I thought I'd get fancy and add copper sulphate too to add copper to the piece.
I used 3 teaspoons of copper sulphate and 5 teaspoons of table salt and approx a pint of water.
Or using salt water work great for a plain etch.

I've found for etching that using a crocodile clip to grip the head of a cotton bud (Q tip in USA?) wetted with salt water works great as a brush as in the video at the top of this page.
I also tried another method shown to the right that I though may give a more even etch on a large piece. In this method I have immersed the whole piece in a bath of salt water.
There is a piece of scrap metal in the liquid with a wire attached at the top of the picture (yellow tape) to act as an electrode. The piece to be etched is submerged.
I put the metal card with design into the liquid and make sure the two pieces of metal in the "bath" don't touch. Connect the scrap metal to the (-) of the battery and the designed metal to the (+).
I used a 12v 2.2A battery from my quadcopter. Most batteries will do, just be careful that a battery doesn't get warm or puff up. LiPo batteries can be dangerous, it was just all I had to hand. This does apparently work wit 9v batteries, it just takes longer.
It took mine 2 minutes to get the depth of etch I wanted.
The scrap piece of metal will bubble, apparently the gas is flammable too?
Disconnect the battery then fish it out of the chemical soup.

Last step clean up:

This picture is from my first attempt, the text is too small, still covered in nail polish, after the etching "bath"

I found the easiest way to clean them was to wrap in cling film with some nail polish remover and leave to soak for 30mins, them scrub with a dry dish sponge, (not too abrasive)
End result again :)
The next one I make will be clearer and I'll etch in two stages. First a bath of just salt for a little over 2 minutes. Then a second, separate bath of Copper Sulphate with the electrodes reversed for the copper plating. I think this would give a deeper etch for better definition, and a more even copper plating.
Also I'd like to try and add the QR codes to the back.
Update: - Fire testing
Not much to say, just pictures really. The weather was cold enough to have a house fire lit so I added the test piece from above. It was left in all night and removed the next morning.


The Next morning
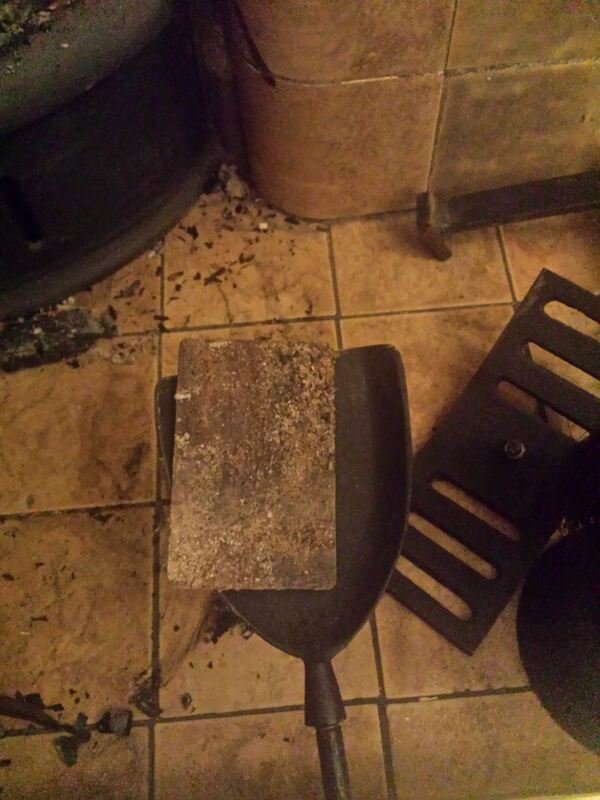
Taken a beating

Lightly brushed to remove soot. Text unclear.

Washed with soapy water. Text impression visible but unclear.

Srubbed with scourer and nearly all text readable. Letter 'j' confused with 'i'.
Results and final notes:
Test was a success but I learnt:
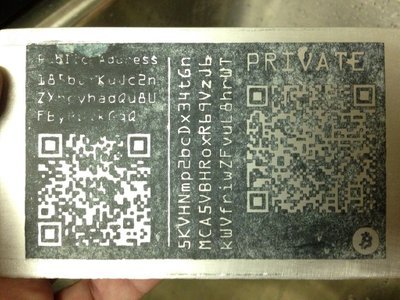
- Using private key to recover not seed words opens the possibility of miss-reading text. Letter 'j' could easilty be confused with 'i' for example. solution is to use seed words like in the Monero example. No chance of confusion then.
- For the above reason QR codes are likely to be nonviable even if configured with maximum error correction.
- Backup medium has to be steel for it's higher melting point. This was just a small house fire and it can be seen that the copper plating has melted from the embossed logo and stained the text (Red-ish stain).
I'm confident crypto can be saved with this method or cold wallets created that could be passed to another user.
Congratulations @shermand100! You have completed the following achievement on the Steem blockchain and have been rewarded with new badge(s) :
You can view your badges on your Steem Board and compare to others on the Steem Ranking
If you no longer want to receive notifications, reply to this comment with the word
STOPVote for @Steemitboard as a witness to get one more award and increased upvotes!
Congratulations @shermand100! You received a personal award!
You can view your badges on your Steem Board and compare to others on the Steem Ranking
Do not miss the last post from @steemitboard:
Vote for @Steemitboard as a witness to get one more award and increased upvotes!