How to Create a Digital Model of a Human Head - From a Box
In this tutorial, the software used was Lightwave 3D
This process is mostly the same in any other polygon modeling app; Maya, Cinema 4D, 3D Max, etc...
Each app will use different names for the same functions or 'tools', and some have tools that others don't, allowing for nifty short cuts.
But nothing I did with this model would be difficult to do in the other model building apps.
And although this method and the steps I use works well, it is by far not the only way to accomplish this outcome.
This is just my favorite way to go, and the process I'm personally quickest at.
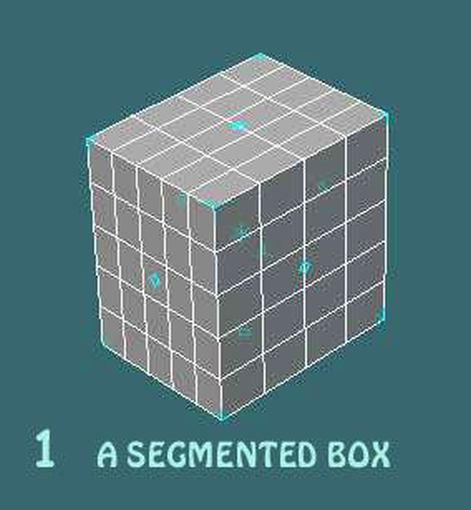
Fig 1 - A Segmented Box
I started out this time with more segments than I usually did. As I became more proficient at the process, having more segments to begin with seemed less daunting. This one has 20 polygons (or polys) per side. Sides with a 3x3 or 3x4 segmentation have worked nicely for starters, but beginning with fewer means needing to create more in the modeling process. This time I wanted top see if beginning with a few more, may lead to some time savings.... it didn’t seems to matter much.
Since the advent of Computer Generated Imagery (CGI), the models used for character animations or any flexible surface needs - like skin, fabric, or rubber would be seen as "soft patches" rather than "hard surfaced" polygons. The general term is "sub-division surfaces" vs "polygonal faces".
In the beginning, all soft models needed to be all "quads" - four sides made of four points (or "vertexes"). A quad can be a square, rectangle, any shape that simply has four sides. This isn't really a limitation. But code writers will add what features they can, and today a soft flexible model can be made of triangles, hexagons, you name it.
But I stick with quads.
Using quads only will prevent unwanted surface artifacts from popping up.
When animating, these will show. And it can be a real hassle trying to remedy them.
In my opinion, its better to stick with all quads.
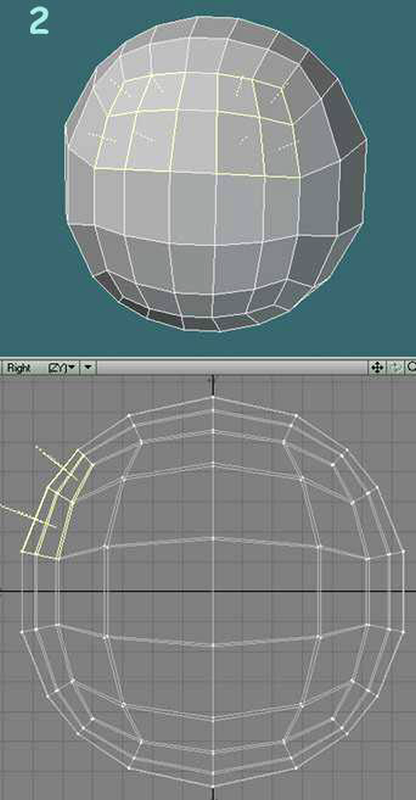
Fig 2 The Quad Sphere.
Using the "Spherize" function in Lightwave's Modeler, the square box became a ball made from quads.
This isn’t a necessary step; one could always re-arrange the points manually, making it into an egg shape for starters. Spherize gives me a head start at it, and then by selecting horizontal rows of points and using the Stretch tool (from the front or side views) the points can be brought more in line again... making symmetrical selection a bit easier.
I always find it easier throughout the process if the basic layout of the points lie in an organized grid pattern.
I selected four polys to either side of the center line for basic eye socket placement.
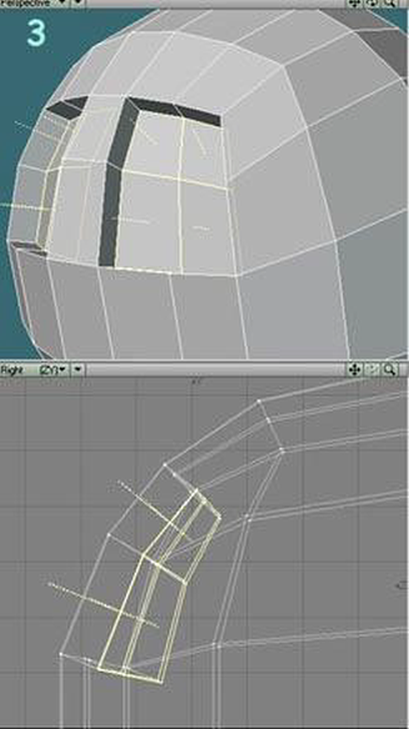
Fig 3 First Eye Socket Segmentation
In Modeler, the way to extrude a selection of polygons is to "Smooth Shift". A rather cryptic named for "extrude". Other apps will most likely call this an "extrude" function.
I Smooth Shifted the left eye socket once, and the right followed. Then I moved the two groups of four polys, inward, from the side view. When the entire selection is extruded, a rim of new polygons are added to the outside edge of the highlighted group of polys.
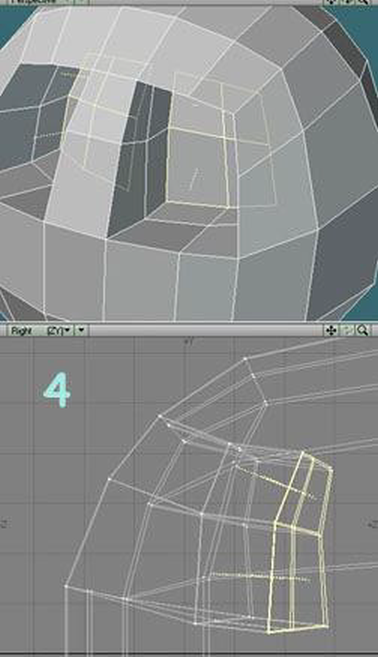
Fig 4 Second Eye Socket Smooth Shift
I then Smooth Shifted the selection again, producing my second row of quads. Then I Moved them back
into the ball.
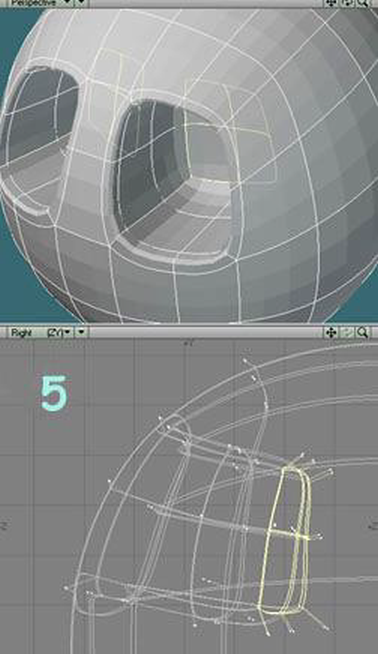
Fig 5
I hit the ‘tab’ key, which "sub-patched" the model; meaning it changes the way it is viewed from an angular polygon face model to a rounded shape, giving the model a subdivided look, and turning the faceted edges into curves.
From this point on, I never hit tab again. I kept it in this mode.
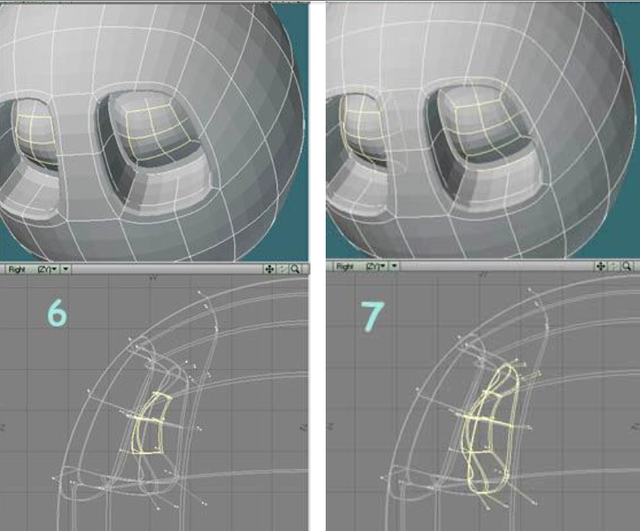
Fig 6
In symmetry mode, with the cursor placed in the middle of the left eye socket, I Stretched the selection inward, making it smaller. I then Moved them forward a bit.
Fig 7 Expand Selection
Most 3d Modeling apps will have a method, a hotkey, etc, that will expand or contract your selection.
This is what I did here. It was a new feature in '01, at the original time of my writing this tutorial.
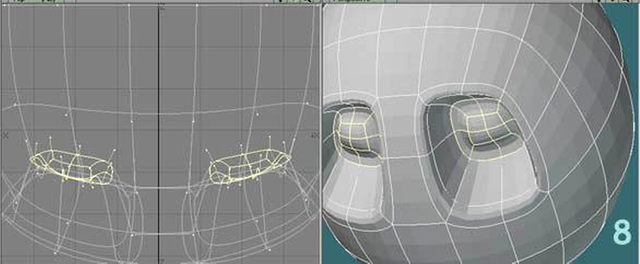
Fig 8
Another Stretch inward; to shrink the selection. I then Moved them forward for the next image.
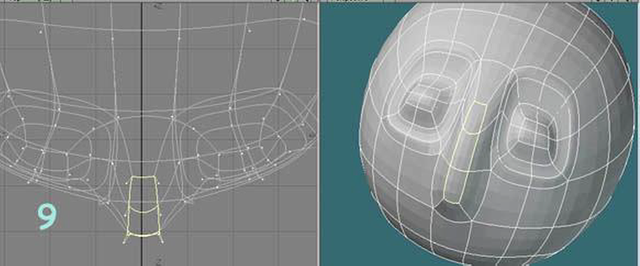
Fig 9
To block out the nose, I chose the three polys lying in the center. I Smooth Shifted those three, and then Moved them outward, to expose the eight new polygons along the edge of my selection.
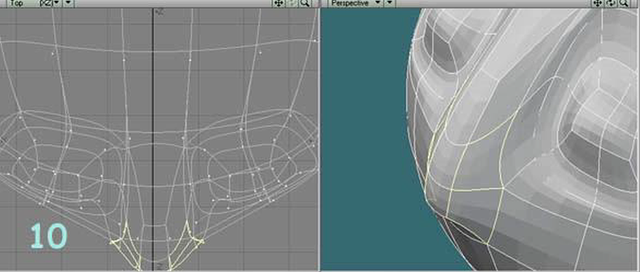
Fig 10
By selecting the two lowest polys on the sides of the nose, I Stretched them smaller, giving a more angled slope to the face.
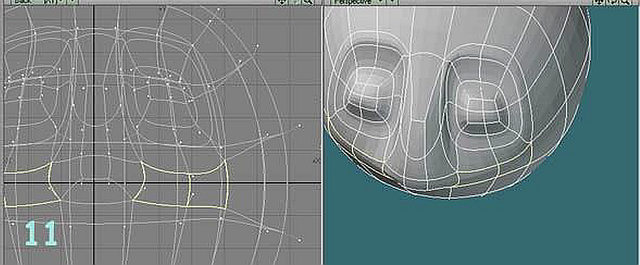
Fig 11
I then selected the two polys at the lower edge off the eye socket and Stretched them thinner. The quicker I can begin to see this as a face, the less confused I become!
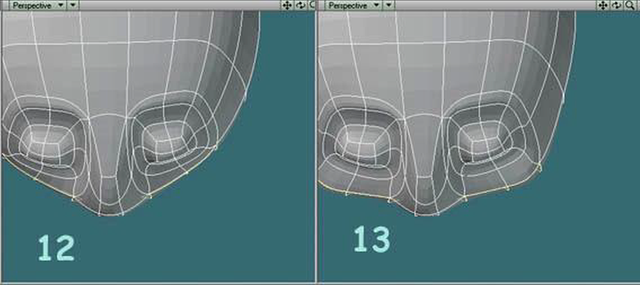
Fig 12 and Fig 13
With the same selection, I Rotated it outward from the top view, to better emulate the shape of a cheekbone.
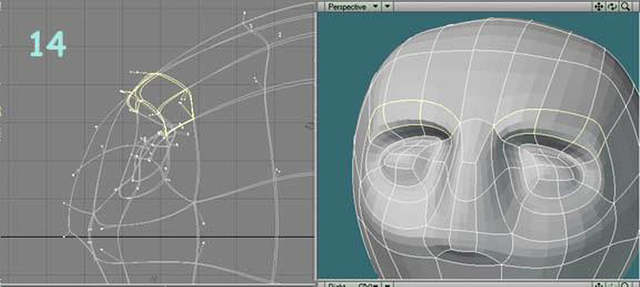
Fig 14
I angled the sides of the cheekbones back a bit and worked a bit on forming the rest of the outer eye socket.

Fig 15 and Fig 16
By continuing to select the polygons further up the forehead, I bring them forward. I move up each row and bring them forward to complete the forehead shape. The lines of "flow" are already beginning to follow the hairline and curve around the face, just as they should.
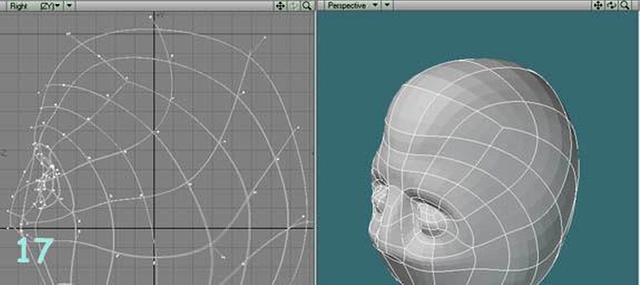
Fig 17…
…is the result of selecting each subsequent row of points from the crown to the lower back of the cranium, and Moving them up and around the head.
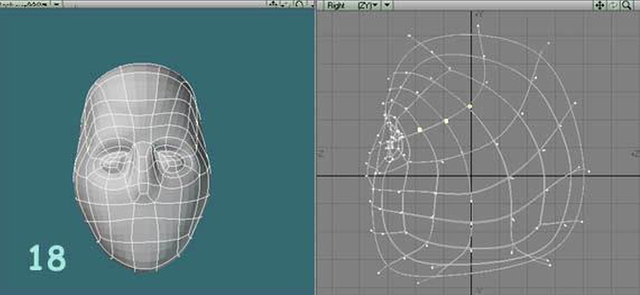
Fig 18
I Moved the chin and jaw points out to create a more head-like profile. Then, I selected the temple points and symmetrically Moved them inward to sink the sides in a bit. At this point, the cage is pretty much set to form a skull from. I may use it for a project like that in the future, so I began saving theses forms as primitive versions.
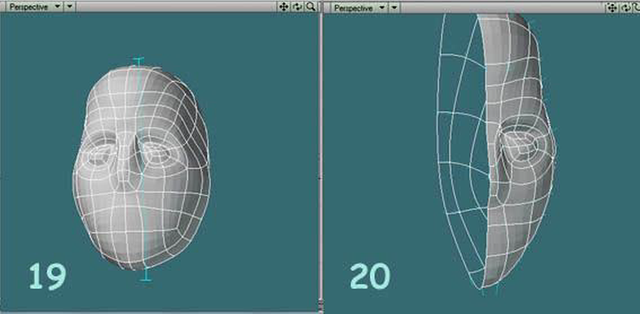
Fig 19 and Fig 20
From time to time, especially when working fast, you can throw off the symmetry. When that occurs,
I'll select a spot on the left side and the corresponding spot of the right side won't select, its very annoying.
So I Knifed the head down the middle and deleted the right half.
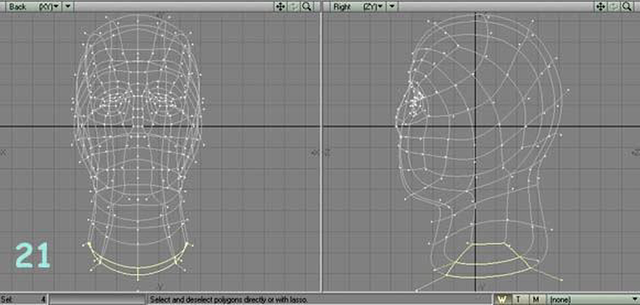
Fig 21
After Mirroring, I once again had a complete head form. By selecting four polys on the bottom, I Smooth Shifted them a few times, Moving the selection downward between each Smooth Shift.

Fig 22
I realized that I wanted more points around the nostril/upper lip area as well as the region around the mouth and jaw.... so I did two Smooth Shifts (each separately) with the two selections shown here, highlighted together for illustration purposes
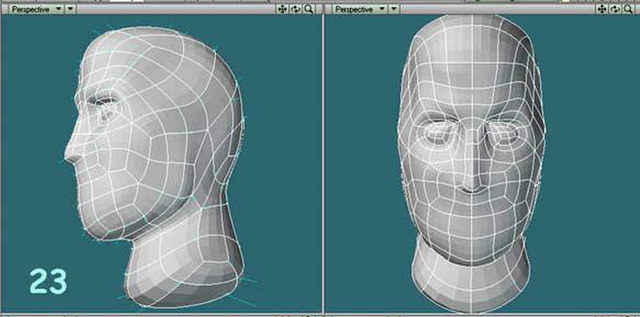
Fig 23 Spin Quads
The last couple of moves broke up the nice flow that was happening around the jaw line so I used the Spin Quads tool by selecting pairs of polys that unorganized and clicked the tool until they rotated to a better orientation.
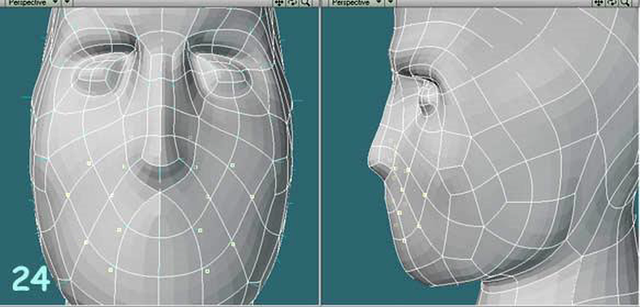
Fig 24
More Spin Quads and point adjustments.
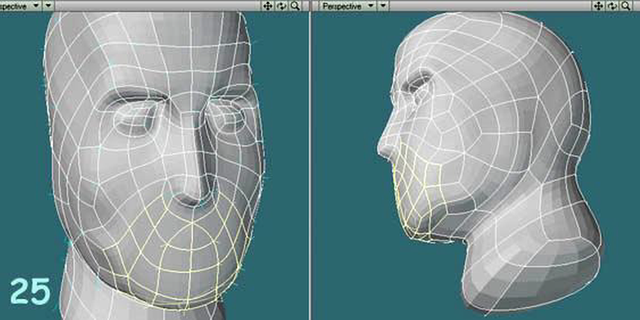
Fig 25
Another Smooth Shift for more additional polygon geometry.
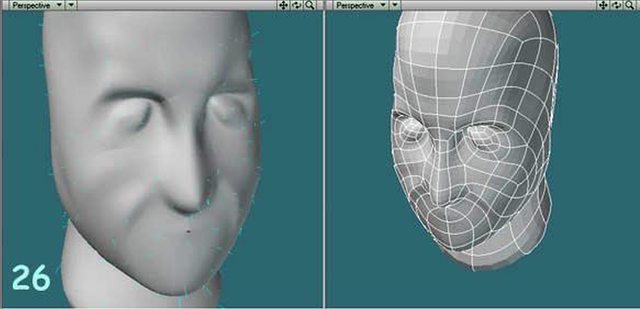
Fig 26
After more Spin Quad and point adjustments, the additional geometry around the mouth is beginning to take shape.
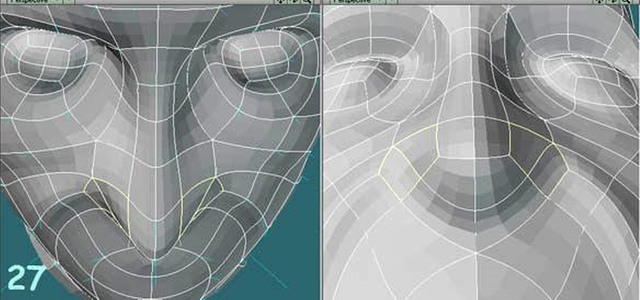
Fig 27
Selecting the polys that lie in the basic area of the ‘nasal labia’.
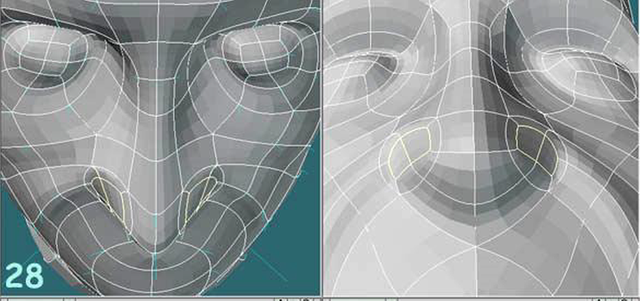
Fig 28
One Smooth Shift....
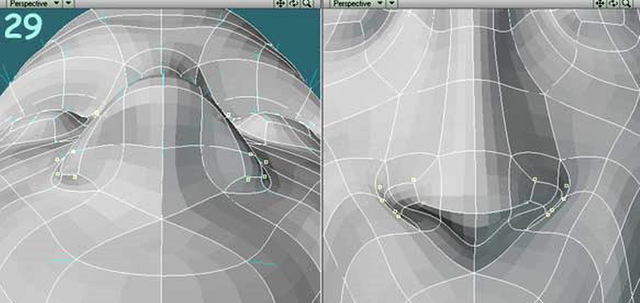
Fig 29
...And the points get Moved outward a bit and adjusted to taper the shapes.
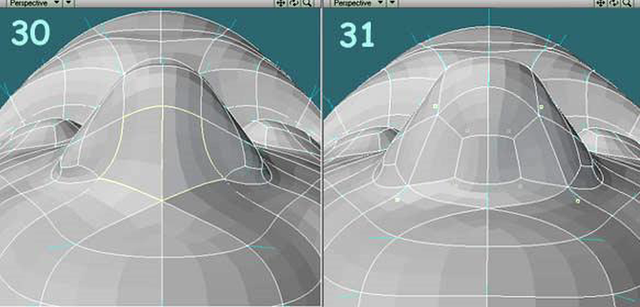
Fig 30 and 31
Planning to make the nostril holes, I realized I could do with a few more small polygons around their rims to better shape the area. So I chose to Smooth Shift the middle area to give me the extra geometry. Afterwards, I spread the points outward on the polys I decided to use as the nostrils.
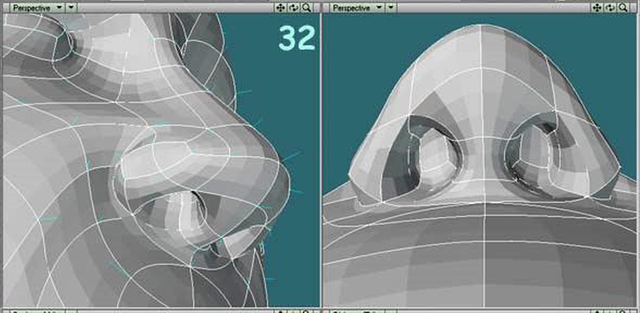
Fig 32 Bevel (set at zero inset and zero shift)
I extrude the nose holes and Moved the selected polys up inside the nose. At this point the nose would suffice for a child’s nose or a small feminine nose.
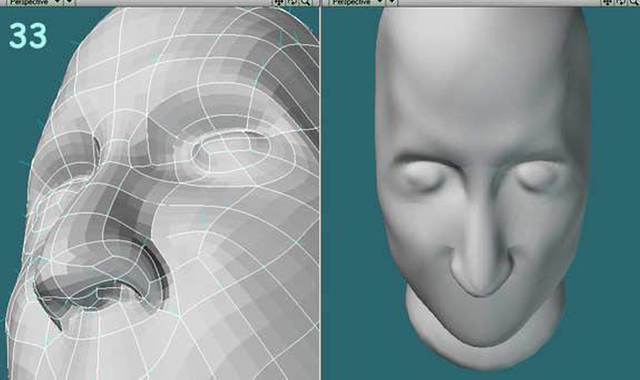
Fig 33
After more Spin Quad and point adjusts, the nose looks less child-like.
Further adjustments to the points on the forehead and brow ridge, made a subtle set of shapes that include the ‘ball’ of the brows and the set of muscles that motivate forehead and brow motions. It looks as if the skeletal structure can be seen though the flesh, I became happy with these shapes pretty quickly.
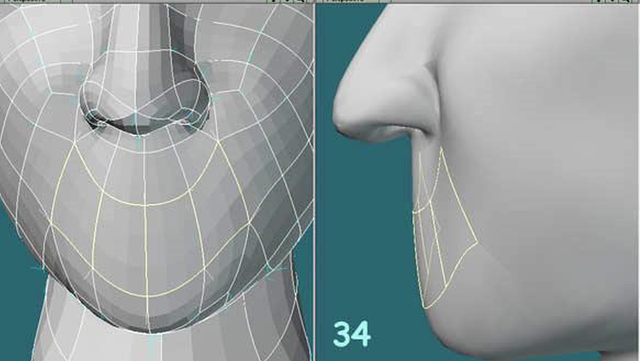
Fig 34
Selecting polys for Smooth Shifting the mouth cavity.
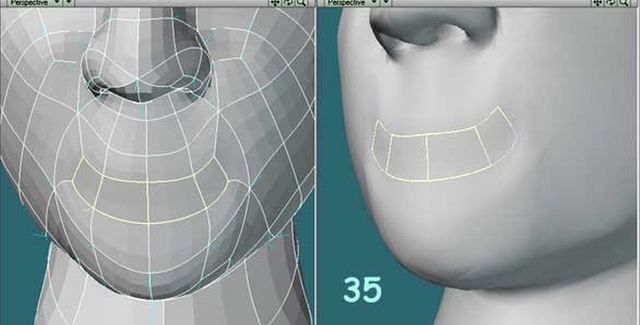
Fig 35
Smooth Shifted and Stretched smaller.
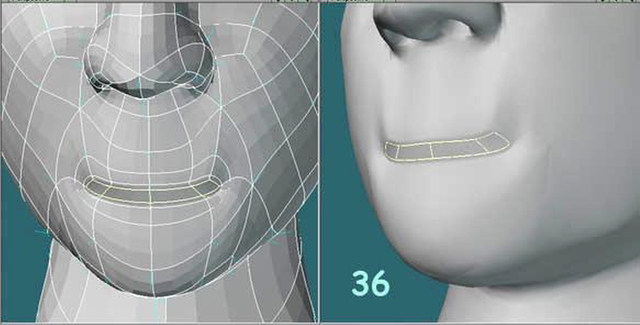
Fig 36 through Fig 39
Smooth Shift, Move inward, and again. For the inner mouth, you may wish to perform this a few times.
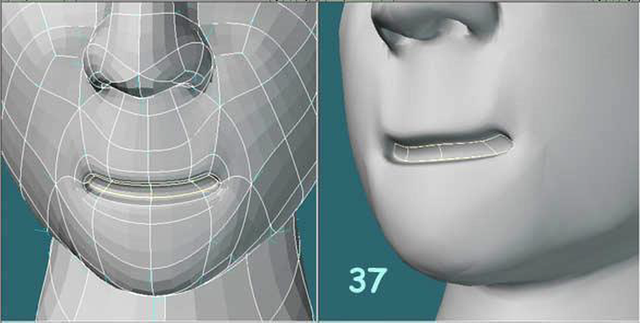
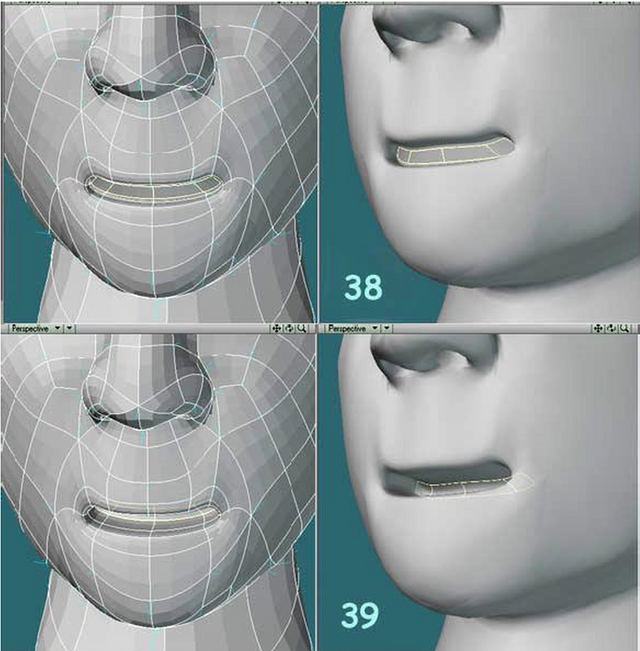
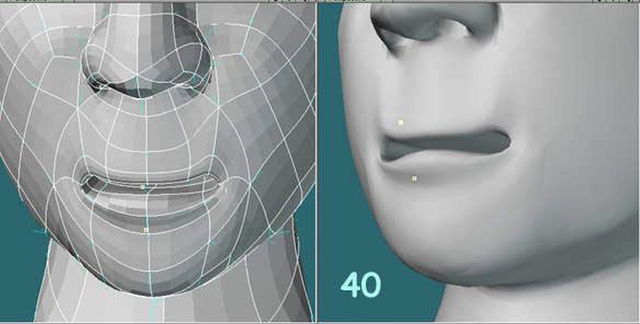
Fig 40
I began to pull some of the new points out from the mouth interior to form a basic lower lip shape.
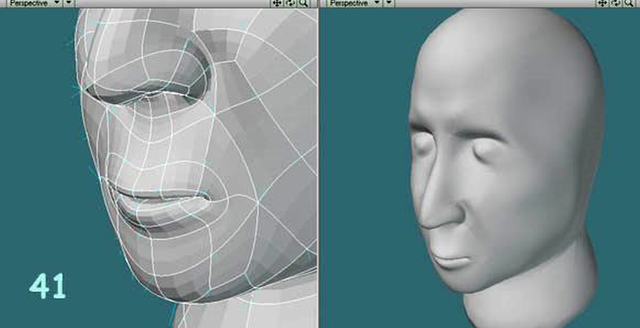
Fig 41
After shaping the upper lip a bit, I realized I needed more points to arrive at a shape I could be pleased with.
Here, it looks a little like a young Pete Townsend from The Who! Well, kinda...
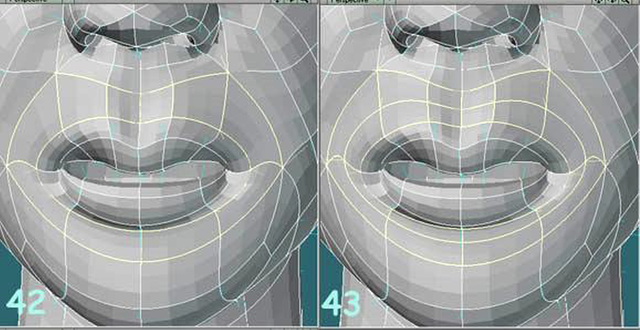
Fig 42 and Fig 43
This was the most I could achieve with the points available to me, so I decided to segment an additional ring of points by splitting this selected ring.
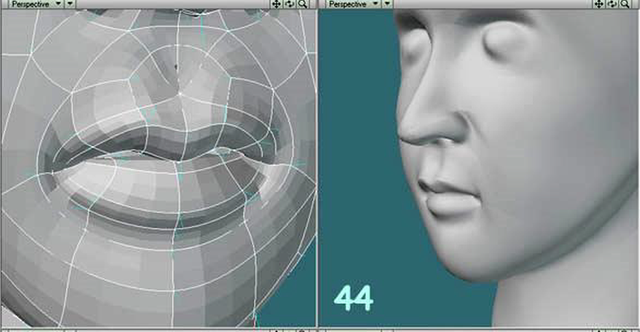
Fig 44
After just a few more Spin Quads and some point tweaking, the lips look much better.

Fig 45
I selected the row of polys I intended to use to separate the eyelids.
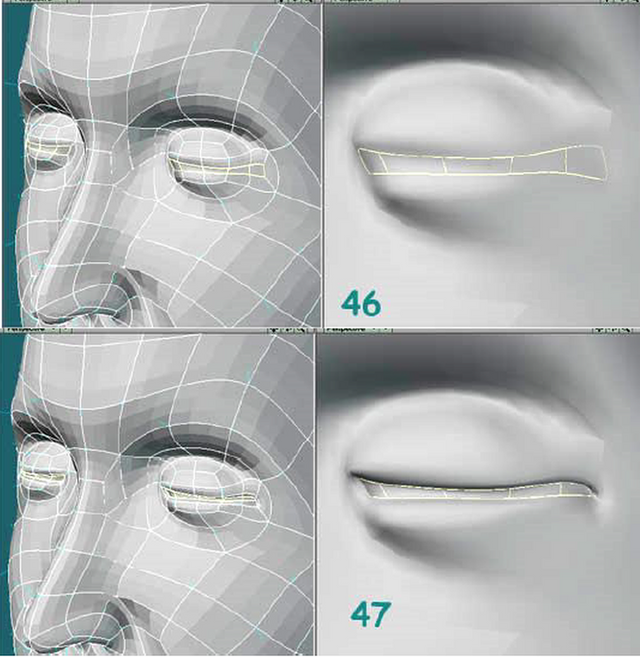
Fig 46 and Fig 47
After one Smooth Shift, I Stretched them narrower, Moved them inward, then Smooth Shifted a second and a third time to create the eye cavity.
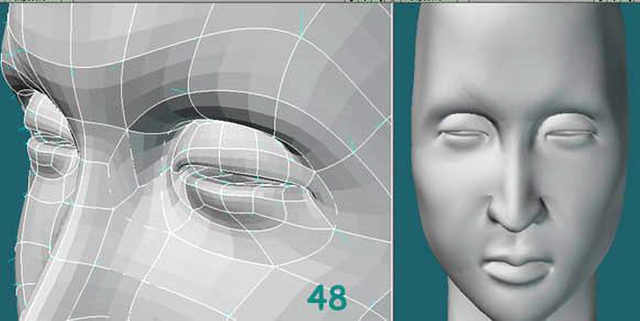
Fig 48
I adjust the points to shape the tear ducts and lid edges, Here; they look a bit Asian, later I adjusted the points some more. This head was made using no reference photos, I just let it all happen the way it wanted to. However, I now see a resemblance (around the mouth and jaw line) to a young Elvis Presley or ‘Duran Duran’s Simon LeBon!
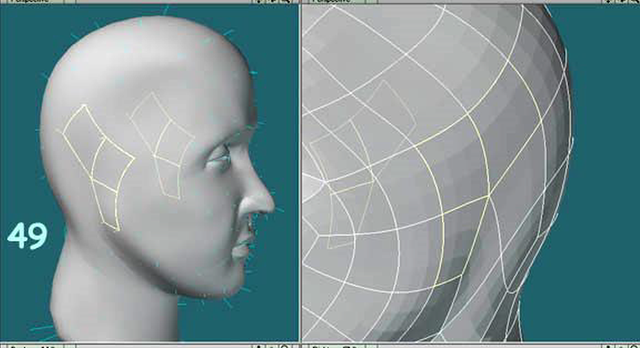
Fig 49
Here I selected the polys that would make up the base of the ear. It could also be done with two polys instead of three, but I have plans for these ears.
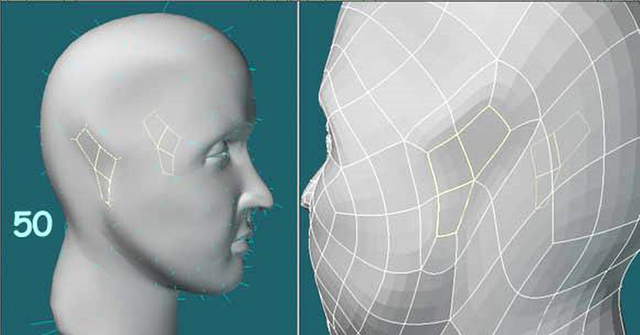
Fig 50
Smooth Shift and Stretch inward.
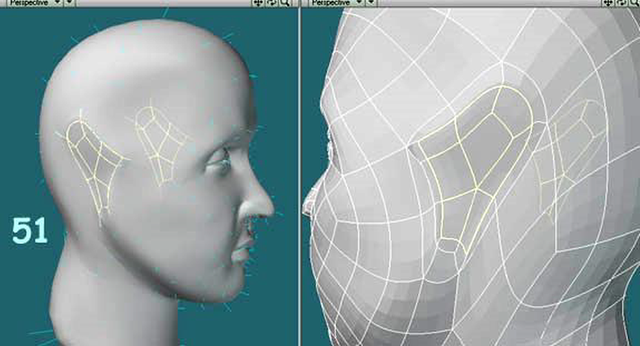
Fig 51
I did another Expand Selection, and then deselected a few of the polys from the front edge.
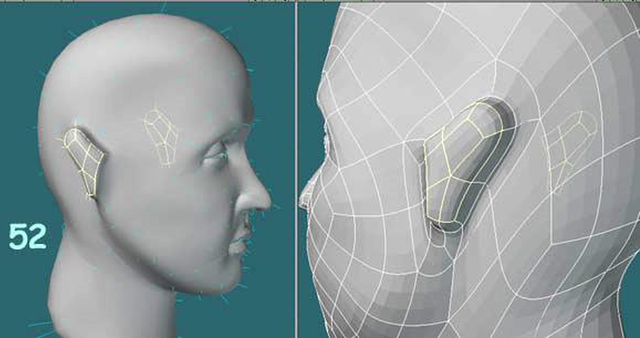
Fig 52
Smooth Shifting these and Moving them outward from the head give me a bump to work with.
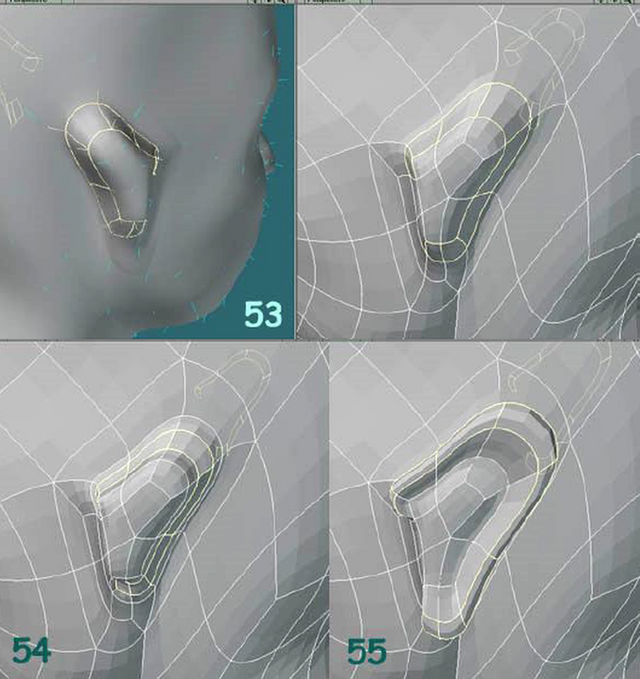
Fig 53 through 55
I Stretched the selection smaller, deselected everything, and then selected the new row of polys around the back of the ear. Smooth Shifted and then Stretched the selection outward, expanding the rim of the ear from the top portions, to the lobe.
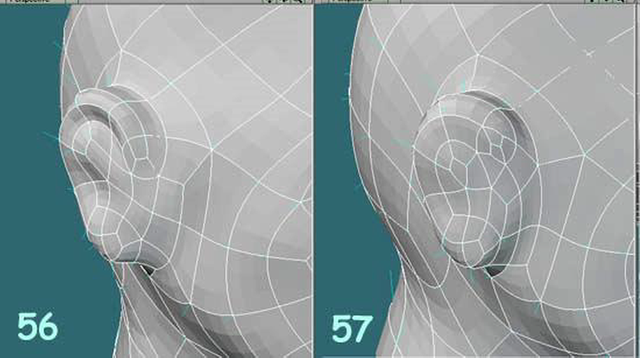
Fig 56 and Fig 57
Feeling pretty proud of myself for creating the basic ear form so quickly, I then adjusted a few points... only to realize that I had many more to deal with than I would’ve ideally needed or wanted!
So I tried a few more Spin Quad moves and got an arrangement that helped point to a few different directions I could take from here.
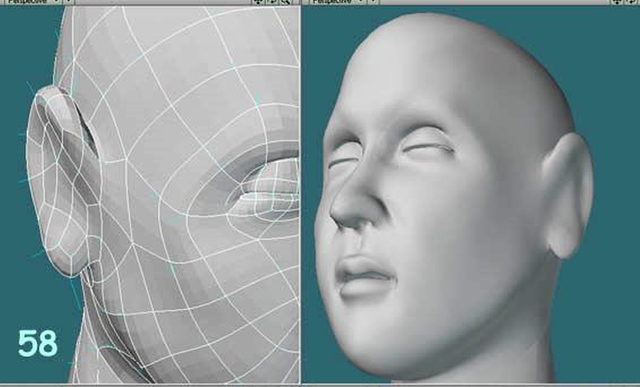
Fig 58
I decided to Remove some of the extraneous polys to simplify matters. After Welding the holes back together, I was left with an arrangement I could handle.
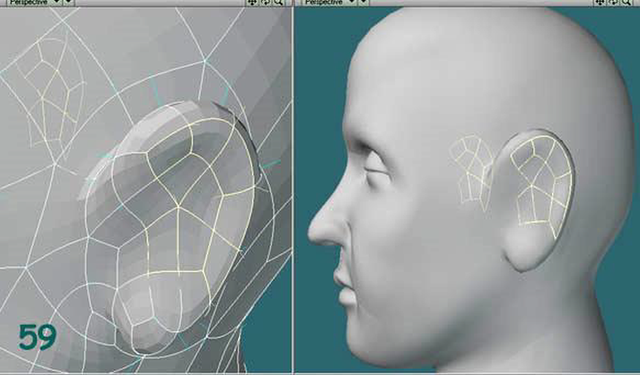
Fig 59 through Fig 61
I select the polys I wished to use to work the convoluted twists and curves of the cartilage.
I Smooth Shifted and Moved them slightly inwards three times, to create the thin rows of poly needed to create a thin lip around the ear rim.
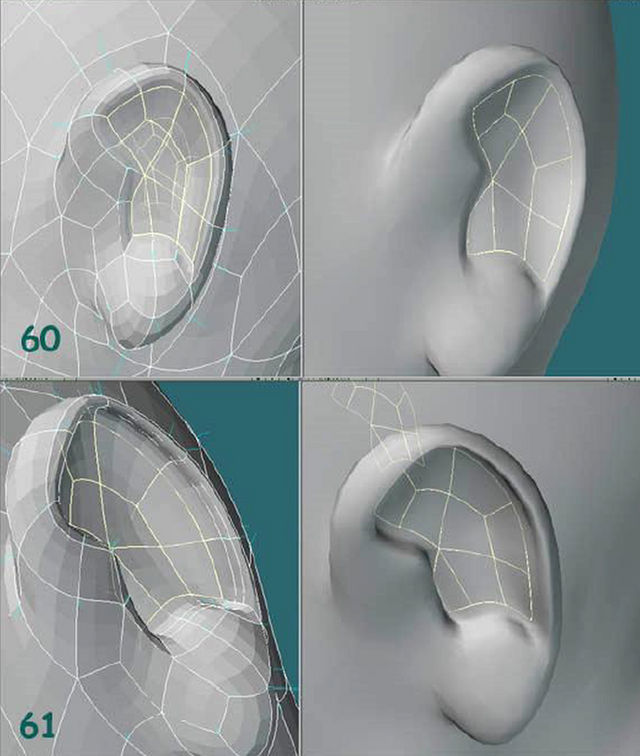

Fig 62 and Fig 63
I then deselected the outer polys of the current selection, leaving just three inner ones, and Moved them outward a bit, to give a bulge to the area. Then, deselecting again, to leave myself with just one polygon, I Moved it outward to round out the bulge.
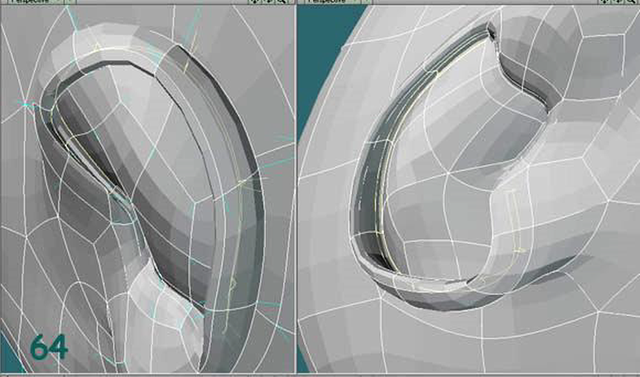
Fig 64
I then, carefully selected the thin ring of polys that lay deepest inside the channel, and Moved them slightly toward the head to deepen the groove.
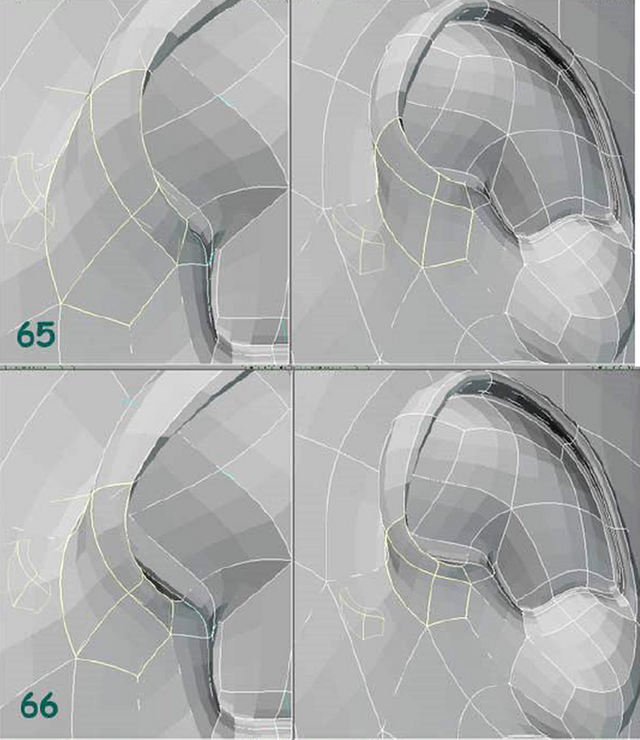
Fig 65 and Fig 66
I defined the forward edge of the cartilage, by selecting four polys and Stretching them smaller.
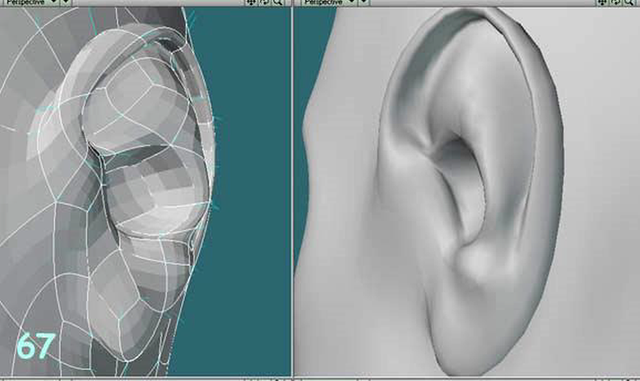
Fig 67
After adjusting the points available to me, the ear took shape.
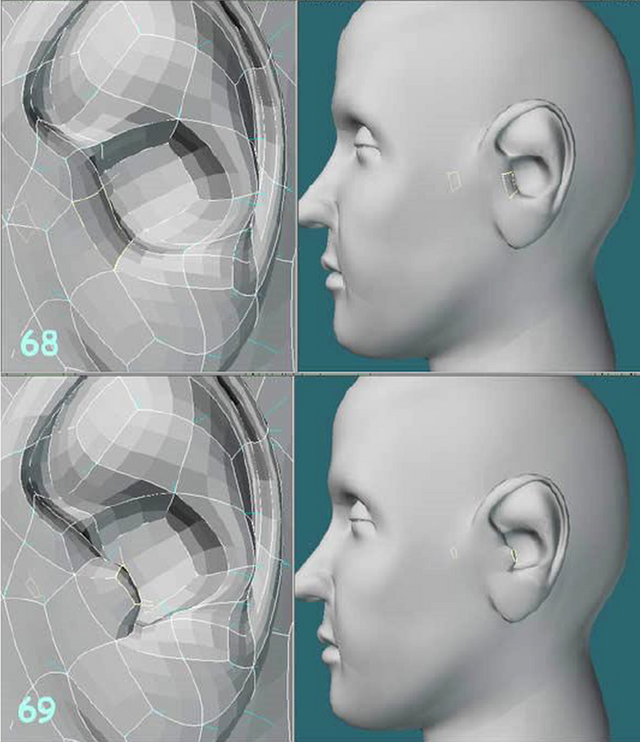
Fig 68 and Fig 69
The only detail left was the little nub (?technical name?) that covers the forward wall of the inner ear opening.
For this, I simply selected the poly that lay at that spot, and did one bevel.
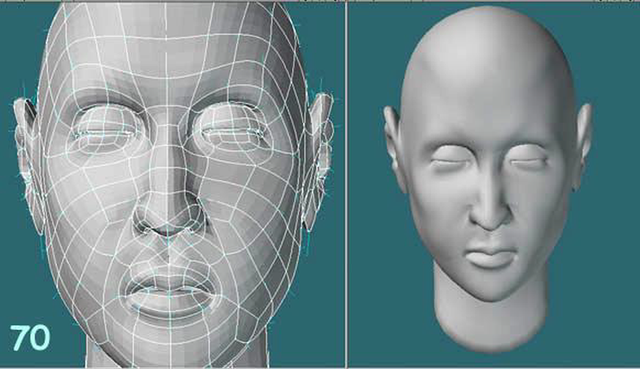
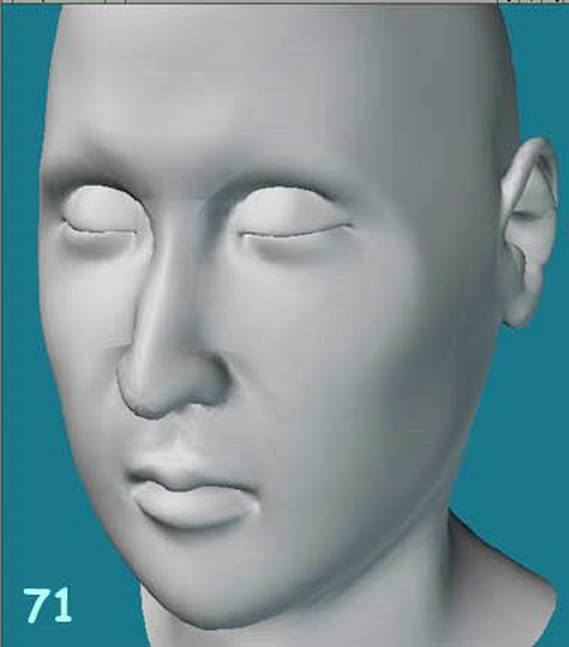
Fig 70 and Fig 71
Adjusted a few points, and Stretch / shrank the entire ear down to a better size.
This object was built over one weekend in an approximate accumulated 5 or 6 hours of actual modeling.
I tried many new tools and a few new techniques, and took a few directions I wound up backing away from.
I wound up using this model over the years as a starting point for several other character heads.
With a 3D model stored as a digital file, you can always recycle them into countless other forms.
But if you enjoy the process, like I do, you'll usually start off fresh.
Hope you enjoyed the tutorial!!
Please up vote if so and may you ALL have a FANTASTIC WEEK AHEAD.
~DM
Wow. Very interesting. I did some Autocad 3D architectural design way way back in the day (about 25 years ago) ... nothing as detailed as this though. Fascinating to follow the whole creative procedure. I create and sell music courses through various online platforms such as Udemy, Skillshare, Curious and others. Do you, or have you thought of this? Might be an extra revenue stream? Loving your posts! You have a knack for teaching btw. I found your tutorial very easy to follow as a 'teacher' myself.
I'd never heard of any of those platforms... hmm - does sound interesting. Thanks!
This post has been linked to from another place on Steem.
Learn more about linkback bot v0.3
Upvote if you want the bot to continue posting linkbacks for your posts. Flag if otherwise. Built by @ontofractal
Very cool! It looks like a lot of work. I have dabbled a little with organic shapes using maya. Not easy. Good to see 3d work on here. Cheers
Good work, but please next time share video
thanks, I hope this comes in useful when I start to play with Blender.
I noticed a steem member on the chat mention wanting to do a Blender version of this.
I've seen the Blender selection style, it reminds me of Modo a little.
Its more streamline than LW, less hotkeys to hit, more controls in the various handles.
Like Maya too.
Once you select multiple polygons the common center is where your controls are placed.
So when you want to scale (or whatever) your selection just grab the axis you want and pull.
In LW you hit 'h' and click/drag in the window with the axis you want. There's no handle.
I really like Modo.
Thanks for the additional info. I search for the Blender post. :-)
Really great step by step showing how to model a head. smooth shift is your best friend here =)
really nice tutorial - thanks for that