Build A Blog Site With React, Redux Firebase And MaterializeCSS (Part 6)

Repository
React
https://github.com/facebook/react
Material-ui
https://github.com/mui-org/material-ui
My Github Address
This Project Github Address
https://github.com/pckurdu/Build-A-Blog-Site-With-React-Redux-Firebase-And-MaterializeCSS-Part-6
What Will I Learn?
- You will learn how to add data to firestore using the
react -reduxstructure. - You will learn how to import data from the firestore using the
react-reduxstructure. - You will learn to access the component's own props from the function associated with the store.
- You will learn
firestoreConnectmodule in react-redux-firebase. - You will learn
composemodule in redux. - You will learn
firestoreReducerin redux-firestore. - You will learn
Linkin react-router-dom. - You will learn how to access data with firestoreReducer.
- You will learn
match.paramsin component props. - You will learn the firestore
add()function. - You will learn how to capture the result of adding data in firestore.
Requirements
- text editor (I used visual studio code editor)
- Basic javascript information
- Basic react information
Difficulty
- Basic
Tutorial Contents
Hello to everyone,
In previous tutorials, we have made redux use of our react application and have made connection settings for firebase.
In this tutorial, we will add data to firestore using the react-redux structure and we will use these data in the application components. We'll use the console screen a lot to see where the data comes from thus, we can better understand the redux and firebase structure in react applications.
First, we'll remember how the CreateProject component works. This component is important because we want to add data to the firebase. We were sending the data from this component to the store with the help of action. Using projectActions, we will add data to the firestore and will also be sent the added data to store.
We will use firestoreReducer to get the data added to the firestore in the application. This reducer will allow us to access the firestore. On the Dashboard component, we performed the process of displaying the data in the store. We will use different modules for firestore data and list firestore data in this component.
Finally, to access the project's detail information, we will display the data in the ProjectDetails component. We will access store and get the data in store use this component.
To better understand the topics I have outlined above, it is always good to break into sections. The following is a list of sections:
- Adding data to firestore with redux
- Getting data from firestore with redux
- Edit ProjectDetails component according to firestore data
Let’s start and enjoy.
1-Adding Data to Firestore With Redux
In this section we will learn how to add data to firestore using redux-actions.
Let's take a look at what we are doing to add projects without making changes in the projectActions that we created:
We wanted the title and content fields of the project from the user with the CreateProject component. This component was communicating with the store with the help of the reducer added data and saving it to the store via action. So we can save the data to firestore while sending it back from action. If the data is successful in firestore, we can send the data to the store or If the data insertion process fails, we will not add it to the store.
In projectActions.js
  return (dispatch,getState,{getFirebase,getFirestore})=>{
        //asynchronous operation with dispatch.
        //We're accessing the firestore.
        const firestore=getFirestore();
        //We are adding data to the projects collection.
        firestore.collection('projects').add({
            ...project,
            authorName:'pckurdu',
            authorId:123,
            createdAt:new Date()
        })
    }
Using getFirestore, we access the firestore and do the insertion process.
Because of the process of adding projects, we wrote projects in the collection() function. Thus, we have added that we will add data to the previous collection of projects.
We also created authorId and authorName properties so that we know who added the project when adding the project. We did not perform authorization operations in the application so we added a fixed author.
Writing these codes is enough to add data to firestore but we will send data to the store in this action, we should know that the data was added successfully in firestore.
We use the then() function to understand that the data was successfully added to firestore. If the data has been successfully added, we should send the data to the store, otherwise data will not be generated in the store.
firestore.collection('projects').add({
            ...project,
            authorName:'pckurdu',
            authorId:123,
            createdAt:new Date()
        }).then(()=>{
            //If data is added successfully to firestore
            dispatch({type:'CREATE_PROJECT',project});
        })
We should not send data to the store if it failed to add data to firestore. We can use the catch() function to understand this. The catch () function will work if the data insertion into the firestore fails.
}).then(()=>{
            //If data is added successfully to firestore
            dispatch({type:'CREATE_PROJECT',project});
        }).catch((err)=>{
            //If data isn't added successfully to firestore
            dispatch({type:'CREATE_PROJECT_ERROR',err});
        })
With dispatch() function, we send the data to reducer we want to send to the store with the type information. We need to arrange the reducer according to the type information, so that the information is transferred to the store.
In projectReducer.js
//create reducer with state and action parameters
const projectReducer = (state = initState, action) => {
    //Set reducer by action type
    switch (action.type) {
      case 'CREATE_PROJECT':
        console.log('create project', action.project);
        return state;
      case 'CREATE_PROJECT_ERROR':
      console.log('create project error', action.project);
      return state;
      default:
      return state;
    }
  };
Process of adding project title and content through the application:

The final version of the firestore after adding projects through the application:

2- Getting Data From Firestore With Redux
In this section we will show the data added to the firestore on the Dashboard page.
We were bringing data from the store in the dashboard component. With mapStateToProps we have uploaded the data in store to the props object in the Dashboard component. If we examine this props object, we can see that the data contained in the store within the projects object has been accessed.

We can use firestoreReducer to access the data found in firestore. Let's combine rootReducer with other reducers so that firestoreReducer can be used by the store.
In rootReducer.js
//Let's import firestoreReducer
import {firestoreReducer} from 'redux-firestore';

//Let's do the merge using combineReducer.
const rootReducer=combineReducers({
    auth:authReducer,
    project:projectReducer,
    //With firestore we access firestoreReducer.
    firestore:firestoreReducer
});
We can now access the data in firestore from the store. then let's write this data on the dashboard page.
We used connect to connect to the store on the Dashboard page. To access firestore, we must use firestoreConnect.
In Dashboard.js
//connect firestore
import { firestoreConnect } from 'react-redux-firebase';
//to merge
import { compose } from 'redux';
We need to merge firestoreConnect and connect modules to use them in a component. we need to use the compose module for the merge operation.
export default compose(
  connect(mapStateToProps),
  firestoreConnect([
    {collection:'projects'}
  ])
)(Dashboard)
We can do the merge process when exporting the component. When using firestoreConnect, we must specify which collection we should access in the firestore.
const mapStateToProps=(state)=>{
  console.log(state);

  return {
    projects:state.project.projects
  }
}
The state of the Dashboard component is now updated with the addition of firestore data to the store. We have shown what data we can access with the following state:
and console screen:
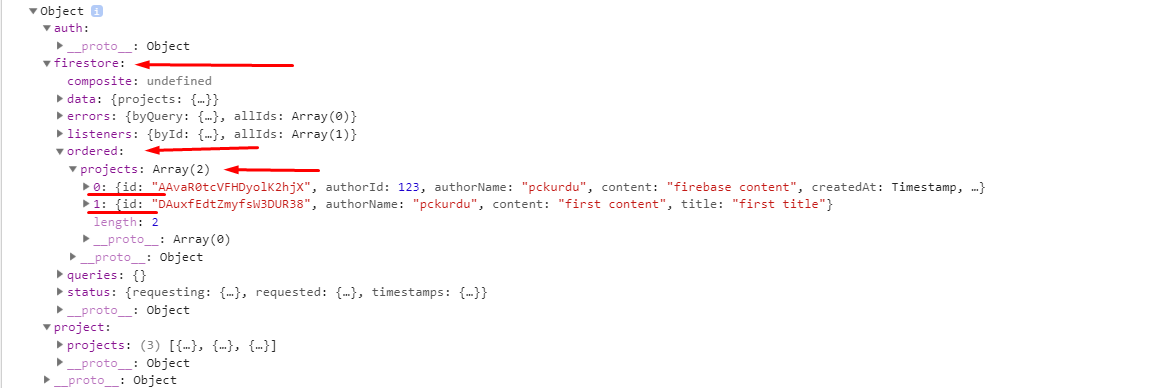
We can show the firestore data on the Dashboard page using the appropriate objects in the firestore.
//function that gets data from store
const mapStateToProps=(state)=>{
  console.log(state);

  return {
    //Let's get the data from the firestore.
    projects:state.firestore.ordered.projects
  }
}
The dashboard page appears as follows.

3- Edit ProjectDetails Component According to Firestore Data
In this section, we will edit the ProjectDetails component according to the firestore data.
We have listed the projects on the ProjectList page. We need to give each project a clickable feature and we need to redirect the page to the ProjectDetails component.
import {Link} from 'react-router-dom';
…
//We are forwarding with project.id.
return (
 <Link to={'/project/'+project.id}
   <ProjectSummary project={project} key={project.id}/>
 </Link>
)
Since the data comes from firestore, the ids will be a guid value.

We've redirected to the ProjectDetail component, so we can call data from firestore by id.
In ProjectDetails.js
//import connect module
import {connect} from 'react-redux';

//connect firestore
import { firestoreConnect } from 'react-redux-firebase';
//to merge
import { compose } from 'redux';
Since we will use the connect module and the firestoreConnect module to access the store, we have to import it and we need to use the compose module to combine this module and use it in this component.
//function that gets data from store
const mapStateToProps=(state,ownProps)=>{
  //the first value written to the console comes from the store.
  console.log(state);
  //the second value written to the console comes from this component's props.
  console.log(ownProps);

  return {

  }
}

export default compose(
  connect(mapStateToProps),
  firestoreConnect([
    {collection:'projects'}
  ])
)(ProjectDetails)
In this component, we access the store and firestore as in the same Dashboard ccomponent. unlike Dashboard here we need to know id. We need props for this component to find the id of the project.

and console screen:
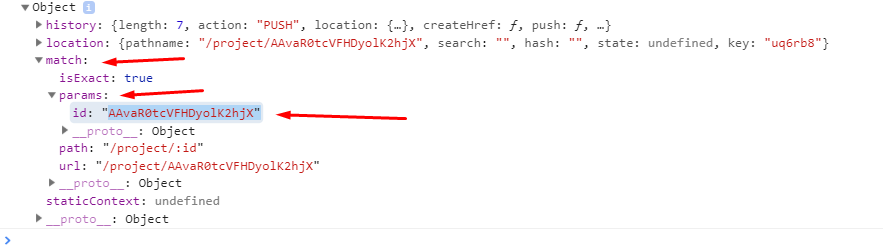
We can encode how we need to access the id of the project.
//function that gets data from store
const mapStateToProps=(state,ownProps)=>{
  //the first value written to the console comes from the store.
  //console.log(state);
  //the second value written to the console comes from this component's props.
  //console.log(ownProps);

  const id=ownProps.match.params.id;
  const projects=state.firestore.data.projects;
  const project=projects?projects[id]:null;
  return {
    project:project

  }
}
We can access the project in component props.
const ProjectDetails = (props) => {
    const id = props.match.params.id;
    console.log(props)
…
}

We can now access data from firestore. On ProjectDetails, let's show this project information.
const ProjectDetails = (props) => {
    const {project}=props;
  if(project){
    return (
      // details of a project into the card structure.
      <div className="container section project-details">
        <div className="card z-depth-0">
          <div className="card-content">
            <span className="card-title">{project.title}</span>
            <p>{project.content}</p>
          </div>
          <div className="card-action grey lighten-4 grey-text">
            <div>Posted by {project.authorName}</div>
            <div>2nd September, 2am</div>
          </div>
        </div>
      </div>
    )
  }else{
    return(
      <p>Loading project</p>
    )
  }
}
We can create the ProjectDetails page by accessing the project object in props. We did a little control here, and if there was a project, we showed a message if there was no project.
Curriculum
Proof of Work Done
https://github.com/pckurdu/Build-A-Blog-Site-With-React-Redux-Firebase-And-MaterializeCSS-Part-6
Thank you for your contribution @pckurdu.
After analyzing your tutorial we suggest the following points:
Very well explained and detailed tutorial.
The presentation of the results during the tutorial looks great. In addition it shows in detail results in the inspector.
Thank you for your work in developing this tutorial.
Looking forward to your upcoming tutorials.
Your contribution has been evaluated according to Utopian policies and guidelines, as well as a predefined set of questions pertaining to the category.
To view those questions and the relevant answers related to your post, click here.
Need help? Chat with us on Discord.
[utopian-moderator]
Thank you for your comment.
Thank you for your review, @portugalcoin! Keep up the good work!
Hi @pckurdu!
Your post was upvoted by @steem-ua, new Steem dApp, using UserAuthority for algorithmic post curation!
Your post is eligible for our upvote, thanks to our collaboration with @utopian-io!
Feel free to join our @steem-ua Discord server
Congratulations @pckurdu! You have completed the following achievement on the Steem blockchain and have been rewarded with new badge(s) :
You can view your badges on your Steem Board and compare to others on the Steem Ranking
If you no longer want to receive notifications, reply to this comment with the word
STOPTo support your work, I also upvoted your post!
Do not miss the last post from @steemitboard:
Vote for @Steemitboard as a witness to get one more award and increased upvotes!
Hey, @pckurdu!
Thanks for contributing on Utopian.
We’re already looking forward to your next contribution!
Get higher incentives and support Utopian.io!
Simply set @utopian.pay as a 5% (or higher) payout beneficiary on your contribution post (via SteemPlus or Steeditor).
Want to chat? Join us on Discord https://discord.gg/h52nFrV.
Vote for Utopian Witness!