Build A Blog Site With React, Redux Firebase And MaterializeCSS (Part 5)
Repository
React
https://github.com/facebook/react
Material-ui
https://github.com/mui-org/material-ui
My Github Address
This Project Github Address
https://github.com/pckurdu/Build-A-Blog-Site-With-React-Redux-Firebase-And-MaterializeCSS-Part-5
What Will I Learn?
- You will learn to create firebase application
- You will learn how to add and create a collection in firestore.
- You will learn to create firebase config within the react application.
- You will learn how to build infrastructure to use firebase in redux.
Requirements
- text editor (I used visual studio code editor)
- Basic javascript information
- Basic react information
Difficulty
- Basic
Tutorial Contents
Hello to everyone,
We created our project with react and redux in previous tutorials. We can now gradually start using firebase in our application.
In this tutorial, we will create a firebase project and create our infrastructure to use firebase in redux.
In order to use firebase, we must first create a firebase project and connect the project with this application.
First, we will create a firebase project and create a firestore and add our first collection. Then we will download this firebase package and use it in index.js. We will reorganize the store we have created according to the firebase settings.
I've subdivided tutorials for a better understanding. The following is a list of chapters:
- Create Firebase Project
- Create Firestore and Add First Collection
- Setting Up The Infrastructure For Firebase Connection With Redux
Let’s start and enjoy.
1-Create Firebase Project
In this section we will learn to create a firebase project. We will also make the necessary settings to use this project in our react application.
Let's visit the firebase web page to create a firebase project.
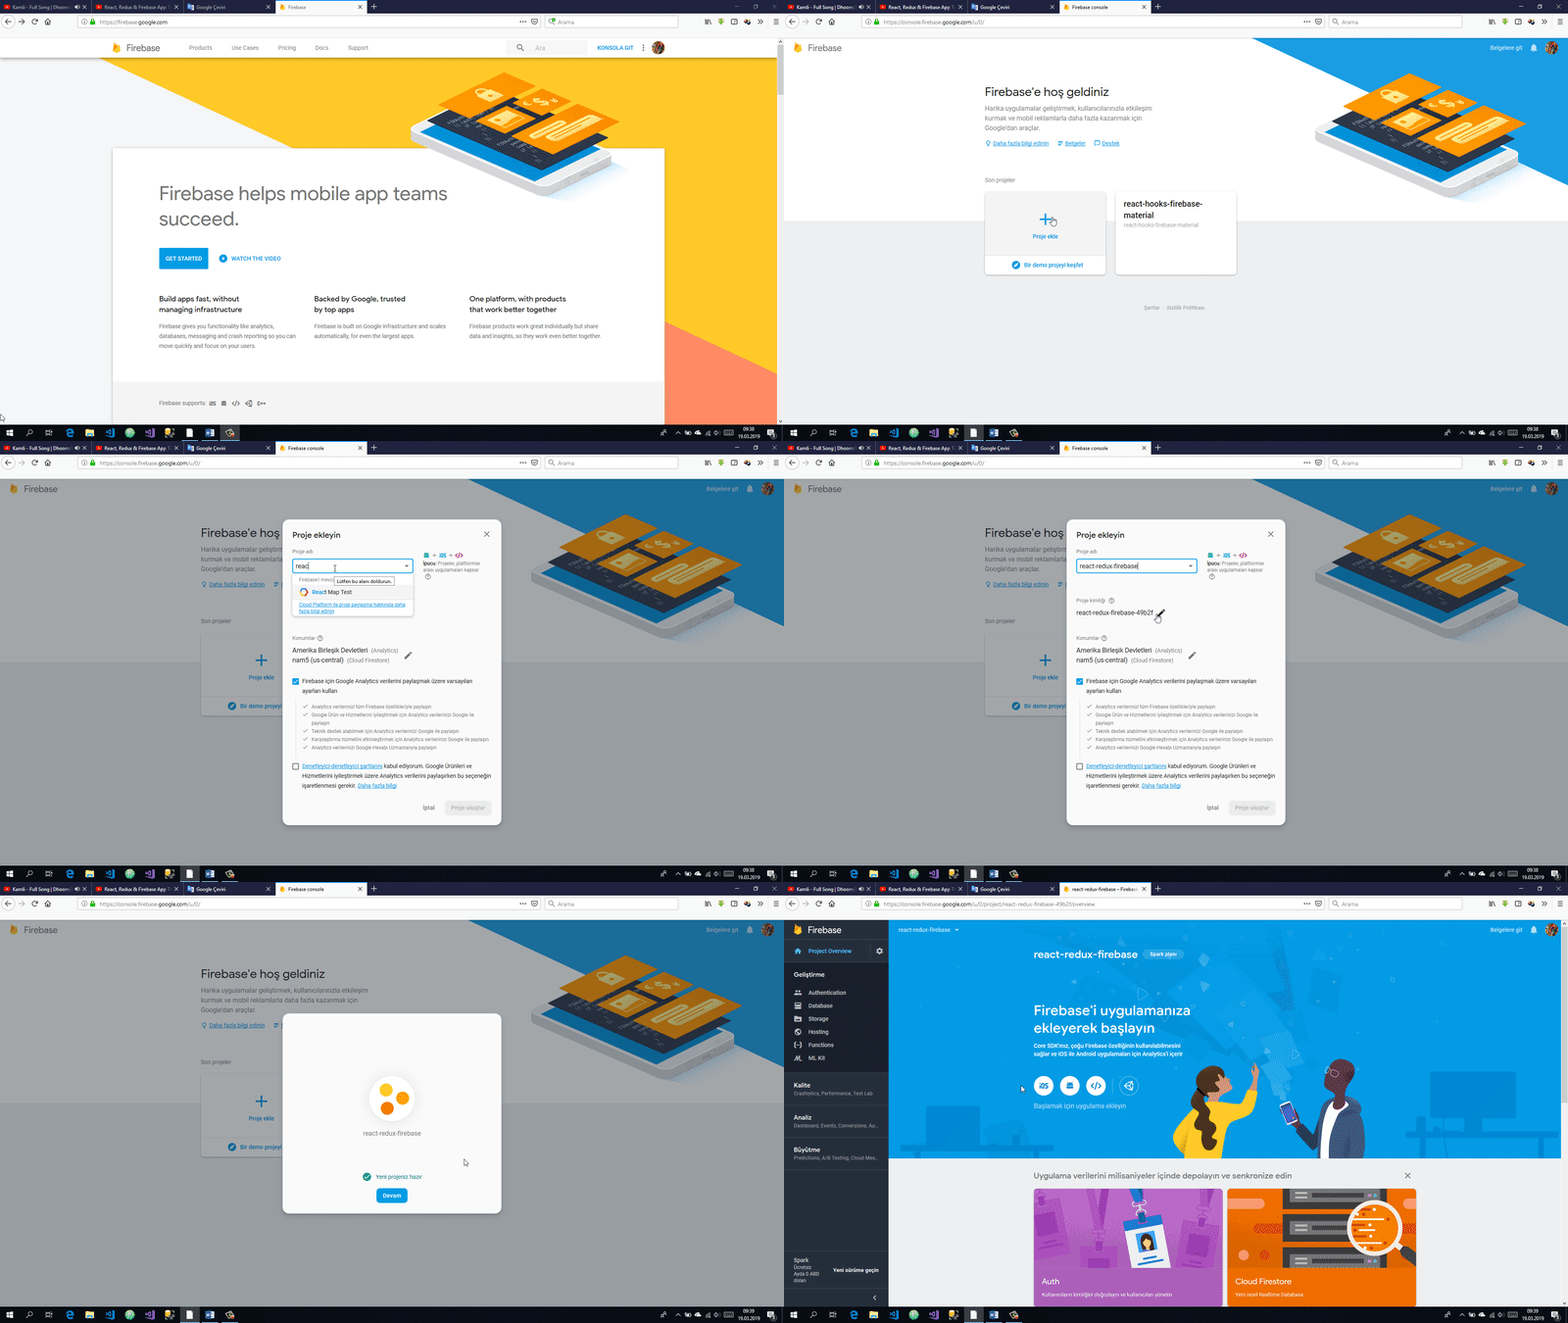
It is very easy to create project in firebase. The following gif will help you in creating your project.

After creating the project, firebase will produce the config object required to use in our application. In this config object, every information is available for our application to connect and interact with the firebase project. This information is firebase api key, the required domain address for logon, the database address, etc.
We need to access this information and place it in the config file of our application.

As we copy this information, we can create a file that will keep the config information.
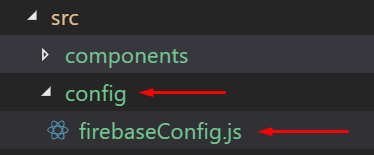
We will create a config folder in the src folder and add the firebaseConfig.js file into the config folder.

We will paste the config object for the firebase that we copied into the file we created.
In firebaseConfig.js
//firebase setting information
var config = {
    apiKey: "your_api_key",
    authDomain: "your_auth_domain",
    databaseURL: "your_database_url",
    projectId: "your_project_id",
    storageBucket: "your_storage_bucket",
    messagingSenderId: "your_message_sender_id"
  };
  //We are adding settings to the firebase object.
  firebase.initializeApp(config);
When we do this we need an object to create the firebase application. Thanks to this object, we can use firebase properties in our application.
We need firebase packages to produce the firebase object, and we haven't downloaded these packages yet. I will use the yarn package installer to install these packages. You can also use npm if you want.
yarn add firebase
After downloading firebase packages, we can call modules where we want.
In order to use firebase in our application, we need firebase application, also we will use the firebase's auth and firestore features, so we have to import them.
In firebaseConfig.js
//firebase application to use
import firebase from 'firebase/app';
//firebase firestore to use
import 'firebase/firestore';
//firebase auth to use
import 'firebase/auth'
We can initialize the firebase as included in the file.
Firestore returns dates in seconds by default and this leads to complexity in our application. To avoid this complexity, we need to set the timesnaps setting to true, so the time values will return as the date but in the future this value will be true by default.
//we are setting firestore
  firebase.firestore().settings({timestampsInSnapshots:true});

  export default firebase;
Thus, we have created a firebase project and we have created firebase settings in our application so our application can use firebase settings.
2-Create Firestore and Add First Collection
In this section we will create cloud firestore on the firebase and add our first collection.
To access firestore properties from application, we must first create firestore. We can create firestore in two different ways, these are locked mode and test mode. In test mode, we will create a test mode because there is no security rule.
We will learn to write the safety rules on the firestore in the next tutorials. Let's create in a non-rule mode for preparing a tutorial.

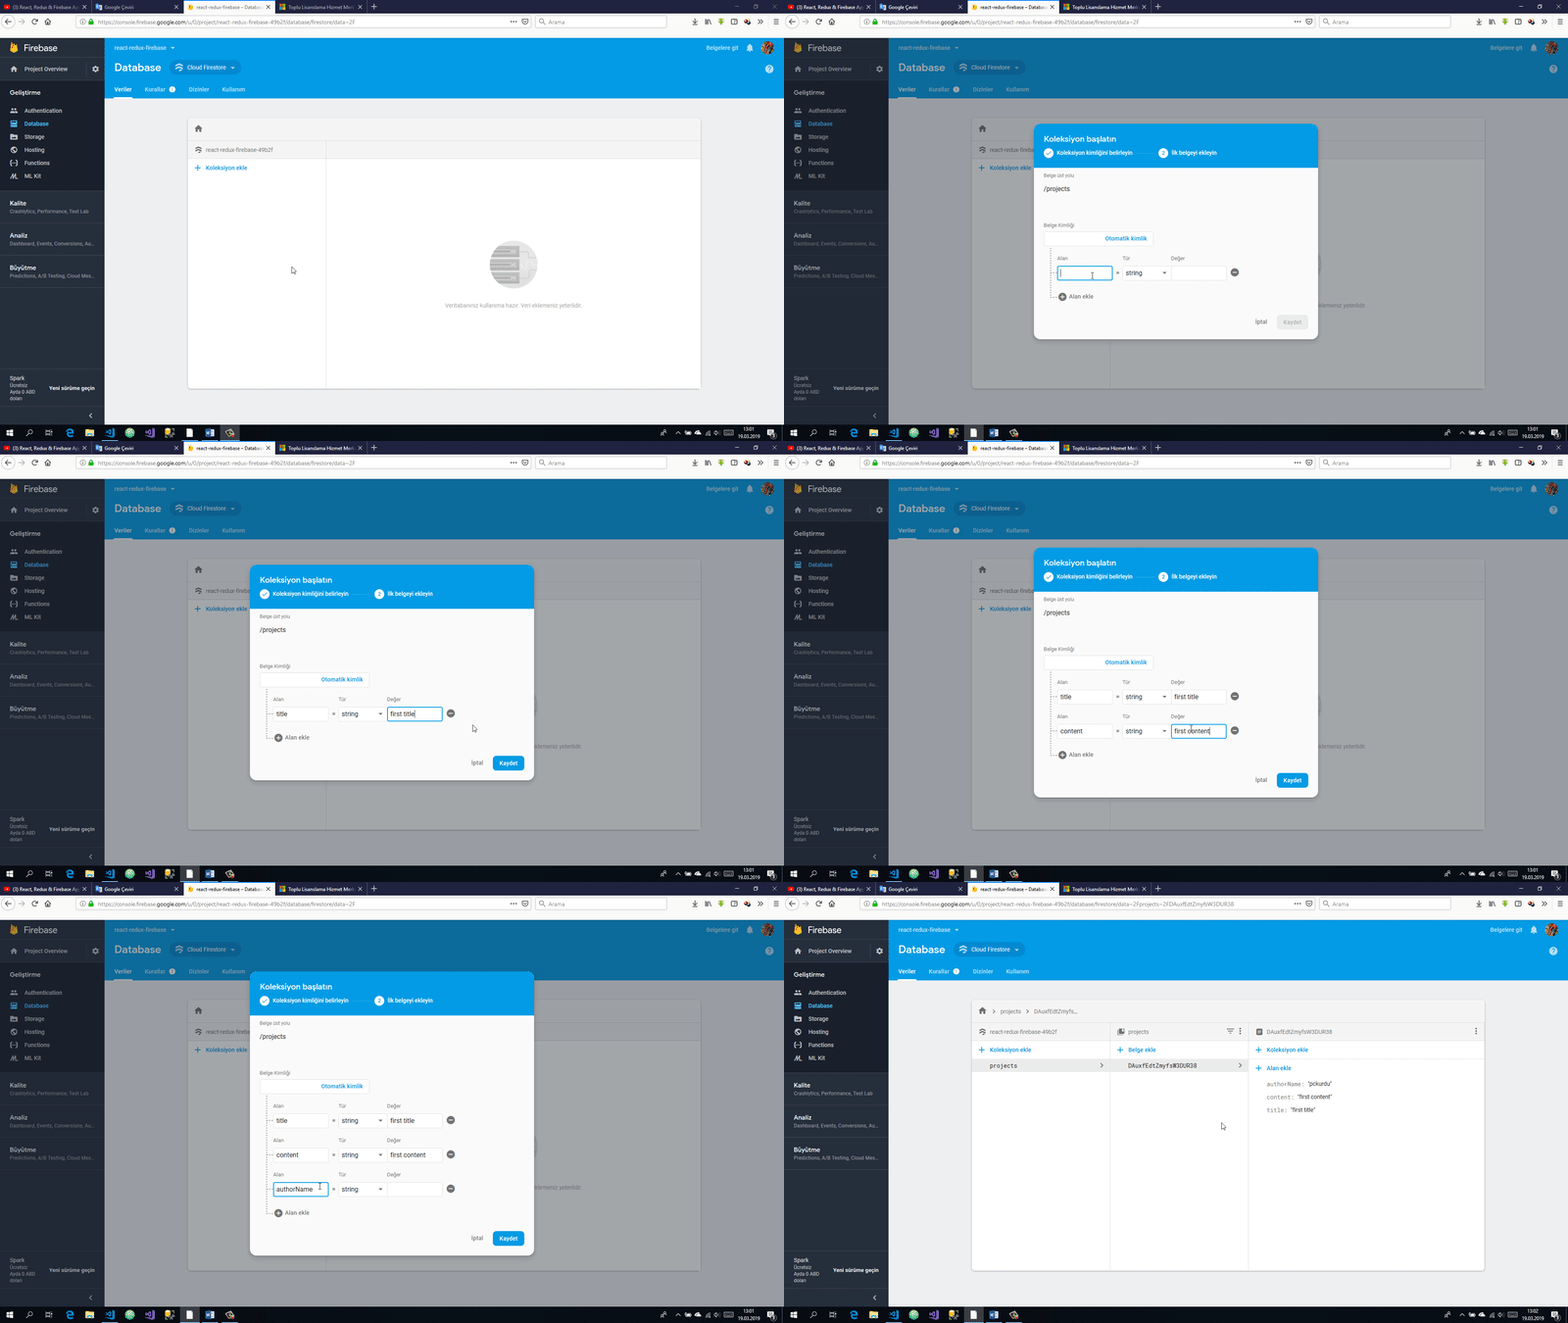
So we created the database. To add a collection into it, all you have to do is click the Add Collection button.
In firestore we should place the same type of data in the same collection. We can store data with documents in collections.
Let us add our projects collection for our application and create our first document.

When we add the document to the firestore the id of the document automatically occurs in a value of guid. In the future we will do this through our application and again the document id will occur automatically.
3-Setting Up The Infrastructure For Firebase Connection With Redux
Using the config settings we created in this section, we will create the necessary infrastructure for redux actions to reach the firebase.
We used our index.js file as the main control file of the application. We created a store in this file and using the thunk structure of the action and reducer were communicating with this store then we should use this file to use firebase settings.
To access the firebase with redux, we need to use the react-redux-firebase and redux-firestore packages. We will load the firebase settings using the required modules in these packers and access the firestore.
yarn add react-redux-firebase redux-firestore
We need to import the reduxFirestore and getFirestore modules in redux-firestore packages in the index.js file. We should also import the reactReduxFirebase and getFirebase modules included in the react-redux-firebase packages.
In index.js
//for firebase connection
import {reactReduxFirebase,getFirebase} from 'react-redux-firebase';
import {reduxFirestore,getFirestore} from 'redux-firestore';
We will use the reactReduxFirebase and reduxFirestore modules to load the firebase settings in redux. We will use getFirebase and getFirestore modules to access firebase and firestore from actions.
We have created action before. Since we'll access firebase through action, let's use these getFirebase and getFirestore modules as parameters in the projectActions.js file.
In projectActions.js
//We create action called createProject
export const createProject=(project)=>{
    //We'll access the firestore.
    return (dispatch,getState,{getFirebase,getFirestore})=>{
        //asynchronous operation with dispatch.
        dispatch({type:'CREATE_PROJECT',project});
    }
}
In order to use these modules on action, we must move these modules with thunk structure. We use the withExtraArgument() function to move the module in thunk structure.
In index.js
const store=createStore(
    rootReducer,
    applyMiddleware(thunk.withExtraArgument({getFirebase,getFirestore}))
    );
When we write our code, the action is ready to access the firebase. but there are shortcomings in our code. Our application does not know which firebase to access yet. We have to use the settings that we prepare in the config file.
We need to import the index.js file in order to use the config setting that we created in firebaseConfig.js.
//for firebase config
import firebaseConfig from './config/firebaseConfig';
Finally, we must combine these settings with thunk structure to produce the store. we need the compose module for the merge process. compose module is included in redux packages.
//to use the middleware structure and merge process
import {createStore,applyMiddleware,compose} from 'redux';
The result of the merge is that the createStore() function is as follows.
//We create a store using createStore.
//Let's give  reducer as parameter
//store, thunk will be used to provide information
const store=createStore(
    rootReducer,
    //firebase and firestore setting process with thunk merge
    compose(
    applyMiddleware(thunk.withExtraArgument({getFirebase,getFirestore})),
    reactReduxFirebase(firebaseConfig),
    reduxFirestore(firebaseConfig)
    )
  );
Curriculum
Proof of Work Done
https://github.com/pckurdu/Build-A-Blog-Site-With-React-Redux-Firebase-And-MaterializeCSS-Part-5

Thank you for your contribution @pckurdu.
After analyzing your tutorial we suggest the following points:
We really like how you present your results. Thanks for the elaboration of the GIFs.
Thanks for following our suggestions, your tutorial is very well structured and explained. Good job!
Looking forward to your upcoming tutorials.
Your contribution has been evaluated according to Utopian policies and guidelines, as well as a predefined set of questions pertaining to the category.
To view those questions and the relevant answers related to your post, click here.
Need help? Chat with us on Discord.
[utopian-moderator]
Thank you for your review, @portugalcoin! Keep up the good work!
Hi @pckurdu!
Your post was upvoted by @steem-ua, new Steem dApp, using UserAuthority for algorithmic post curation!
Your post is eligible for our upvote, thanks to our collaboration with @utopian-io!
Feel free to join our @steem-ua Discord server
Hey, @pckurdu!
Thanks for contributing on Utopian.
We’re already looking forward to your next contribution!
Get higher incentives and support Utopian.io!
Simply set @utopian.pay as a 5% (or higher) payout beneficiary on your contribution post (via SteemPlus or Steeditor).
Want to chat? Join us on Discord https://discord.gg/h52nFrV.
Vote for Utopian Witness!