Victorian house entrance hall way redesign. Part 3 'Doorway to a Kingdom'.
Hi everyone,
This is my favourite part of the whole project.
In a previous post I described how I had been asked to redesign and make an entrance hall way in a Victorian house.
Just to recap,
The design had to incorporate;
A utility with cabinets, sink, washing machine and tumble drier.
These were to match the existing kitchen which I made part of.
You can read that post here
A coat rack and shoe bench.
A large room divider in oak with stained glass and opening doors (which I had to design as well.)
A small staircase which would lead to the main floor, the rise was only about four foot.
An under stairs cupboard to replace the existing one.
A Hall mirror and shelf.
You can read the first parts here:
Victorian house entrance hall way redesign. Part 1
Victorian house entrance hall way redesign. Part 2
Today's post is;
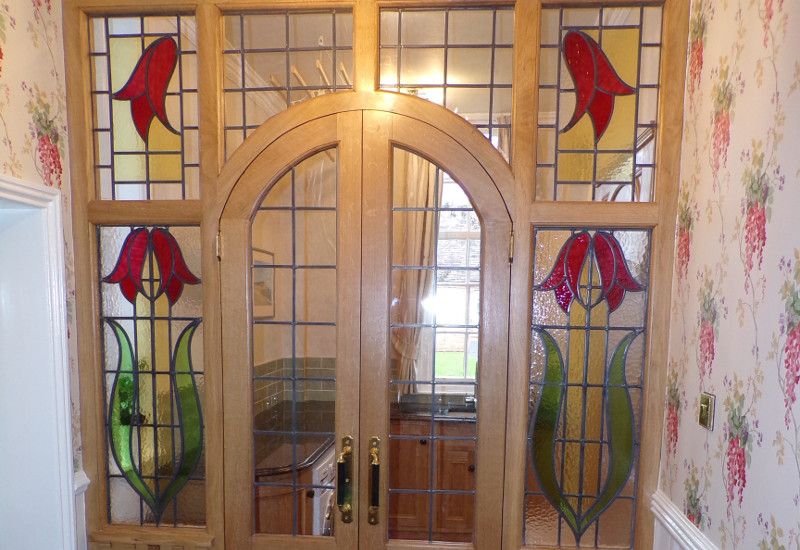
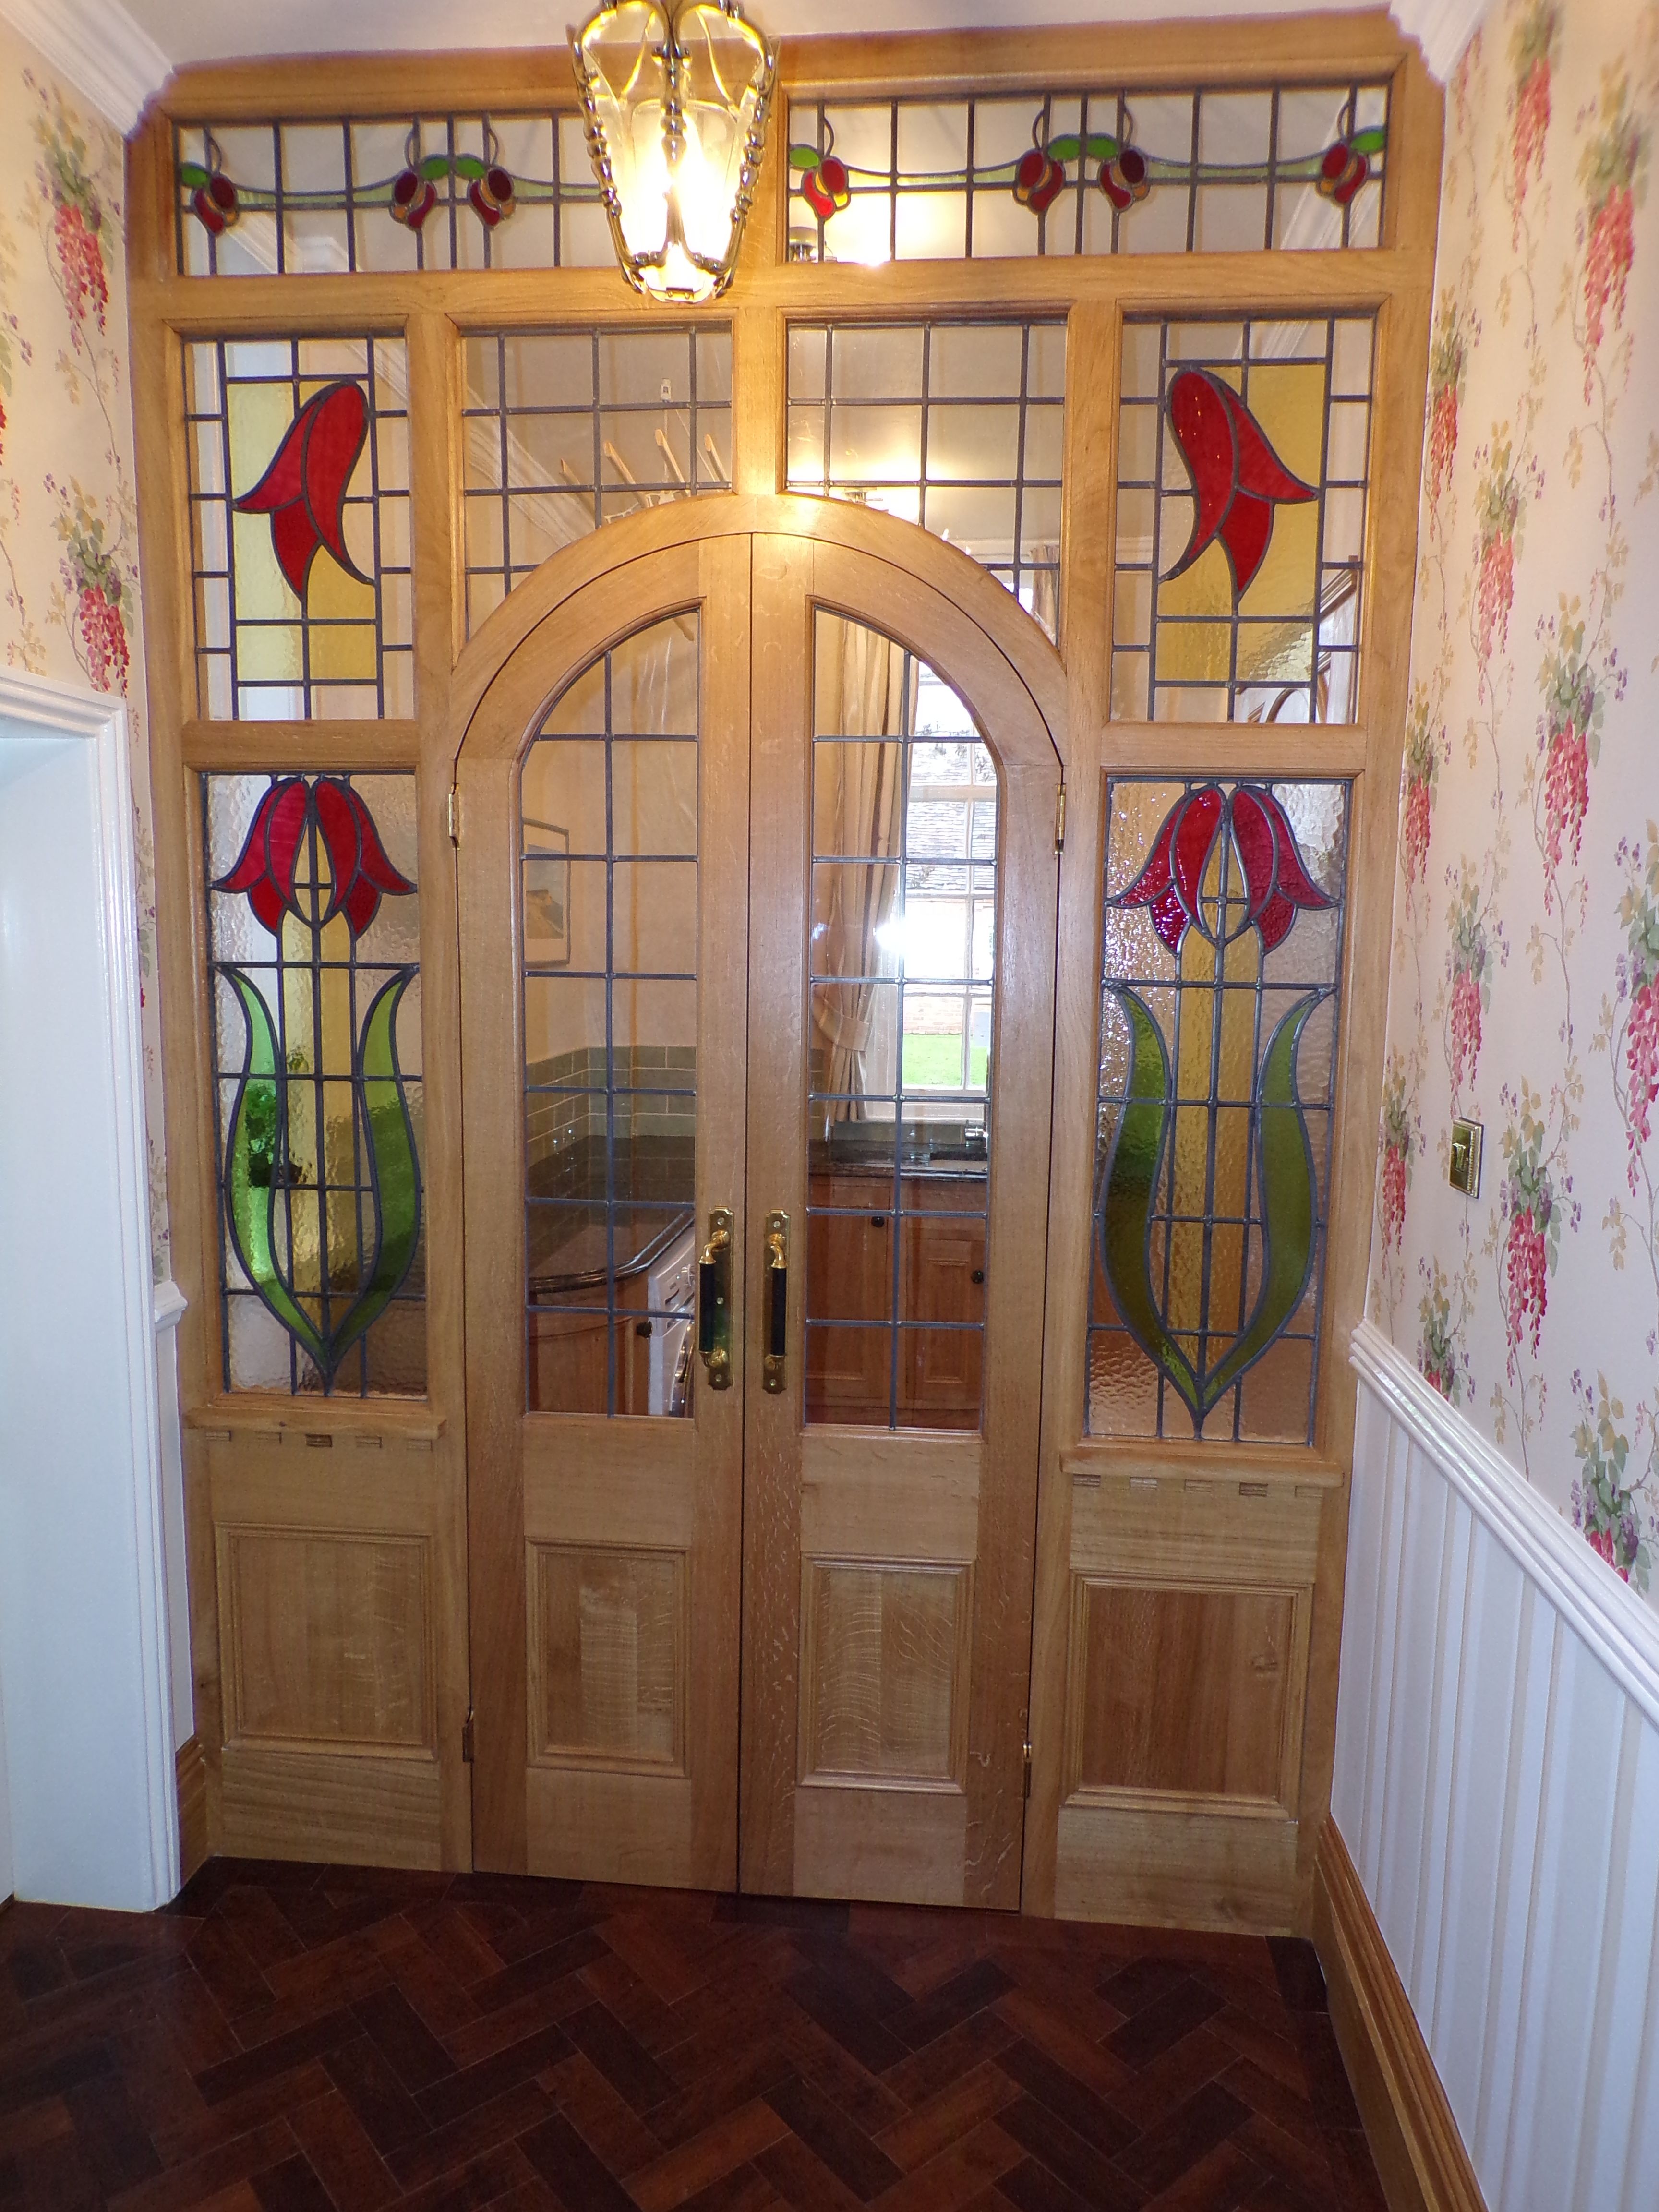
A large room divider in oak with stained glass and opening doors.

The Design.
I really got my teeth stuck into this one.
The client's criteria was a room divider with stained glass windows., they also liked the idea of an arch.
There was a plaster arch by the entrance and it made sense to mimic it.
I had established Oak as the timber and I had the opening measurements.
I had to now tinker with various ideas and get the proportions correct.
The doors would be viewed from, and had to look impressive from both sides.
I needed to take into account that part of the utility side would be obscured by cabinets, a coat rack and shoe bench.
Light was the other consideration and I visited the house at different times of the day to assess light levels. This was to avoid making the room look dimly lit.
The width of each door was quite narrow so for the design to work both doors would have to open for someone to pass through.
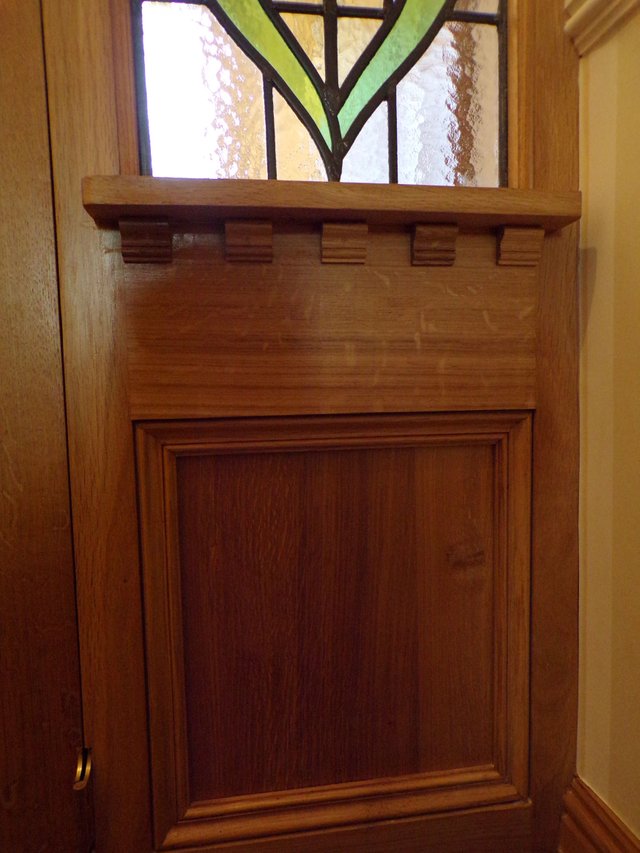
I added a small ledge as an arts and crafts/ victorian feature. Totally impractical as a shelf but it compliments the rest of the design and helps to bring the eye down from the high focal point. It creates a triangle almost for the eye to follow.
The focal point and where the design leads the eye is very important in my opinion.
I used a moulding around the panels which was through out the house.
I wanted to really create an entrance like a 'Doorway to a kingdom'.

Making the Room Divider.
I made the decision to use 3" oak (finished size) in order to create a very strong structure.
The doors are tall and narrow but I wanted to avoid any vibrations every time they were shut.
As you can see from the photos I made the frame to fit exactly to the opening.
I had some room height wise but width wise I kept it tight.
I measured every thing because I would deliver the frame in sections .
The frame had an ovolo moulding on one side and a rebate on the other for the glass and corresponding ovolo beading.
I asked my timber yard to machine up the sections purely because of the size.
I also strictly stated that I wanted quarter sawn oak, this was for aesthetics and stability.
A pair of doors that twist in opposite directions will be a disaster so always choose your grain carefully.
When I picked up the machined timber everything was quartered, and just as I had asked.
The door pieces had heavy medullary rays and the frames visible face was crown grain.
This was to make the centre of the doorway the focal point.
( Even the handles which are original Victorian brass and ebony aided this. They cost £800!)
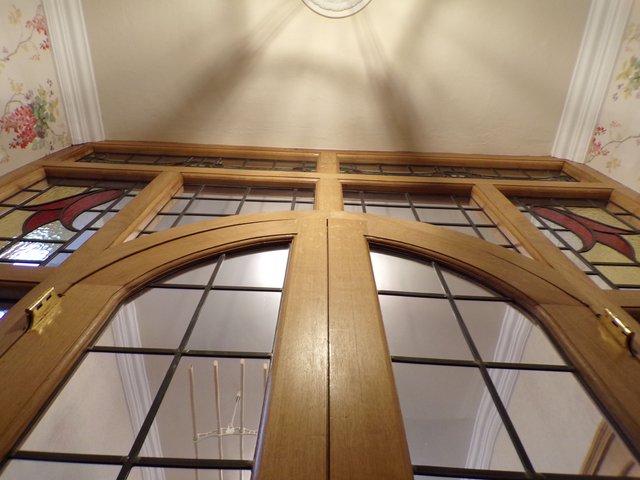
I first made the frame arch. All my other final dimensions would come from this datum point.
It was made from two pieces joined in the middle by a bridal joint. I chose the grain length to maximise the strength.
I shaped it , glued it together and rebated it.
With this information I could then rebate all the other relevant pieces.
The rest of the frame joints were hand fitted mortise and tenon joints with mitred corners.
It was summer so I could lay everything flat outside. I like to dry fit and sand every joint before I arrive on site.
.JPG)
The arch frame and door joints were very challenging but they all needed to line up on site.
The panels were made from 1/2" oak and set in a groove.
The panel moulding was attached to the frames and NOT the panels to allow for movement.
I assembled and glued the outer frame panels and sanded them.
I then dry assembled the frame and took accurate measurements and templates for the doors.
The doors were mortise and tenoned with panels set in a groove.
I made sure they were almost fitted before I arrived on site.
I sealed all the components and loaded them for delivery.
Installation.
I arrived on site and assembled the main part of frame on the floor.
I had measured the walls and on the utility side the walls splayed out by 1".
This meant I could lift the top of the frame up from the floor and almost wedge it in position in the desired place.
That worked out well , I used Pva glue to give me some time, you only get one chance at something like that.
I screwed the main part of the frame to the wall and then fitted the last top part of the frame to the ceiling , making sure it was all level.
The best way to see if you have a level frame out of twist is to eye one upright against another.
The level can be misleading by a degree or two and this can cause problems.
I also left the frame fixing screws accessible if I needed to adjust them later.
I hung the doors with parliament hinges. ( Hinges that stand proud so a gap between the door and frame is maintained when the door is fully opened).
When I knew the doors fitted correctly I could fully tighten the frame screws.
I left the doors on the tight side so they could settle.
The Stained Glass.
Now this is a strange one.......
We discussed at length what the design should look like.
I was then asked to design the glass and I did.
I produced some full scale watercolour designs including red tulips.
( I had picked out the tulips from the garden and it was an early 1900's design )
I submitted them and they were agreed and sent of to a stained glass maker.
I then got a phone call from the client who were on holiday in the north of England and had stumbled upon a reclamation yard.
Something caught there eye.
My design in stained glass from the correct period and almost (within an inch) the correct size.
When they showed me the pictures it was uncanny, the way the tulips pointed and the shape of the leaves.
We were all staggered.
I accept that I had designed my glass from a suitable design period but to have the proportions and sizes is fate.
You can see the effect as the light shines through the glass, it is a bit special.
I then fitted the glass and applied the beading.
Next time I will be writing about the coat rack and shoe bench.
We have started a woodworking community here on steemit and would welcome you. We have a discord channel, link here: Woodworking on Steem Discord Channel And a weekly woodworking post competition ,
you can read the post here
If you have any questions about woodwork, furniture or being self employed as a craftsperson let me know.
I know my wood and I have spent years teaching myself furniture making , furniture history as well as living it as a self employed cabinet maker .
I am also in the process of writing a
'How to series: Setting up a Woodworking Business'
Which you can read here;
Part 1: Workshop
Part 2: Tools and machinery
Part 3: Finding a good timber yard
Part 4: Deciding what type of woodwork you are going to do.
Part 5: Advertising and getting customers
Part 6: Dealing with Customers.
Still I am learning every day and the journey is the point.
@woodworkcurators is a daily curation service for the woodworking community.


Many thanks for reading,
Until next time,
This post has been resteemed by @woodworkcurators
Perfection at it's best! You sir are a master of your craft.
Thanks I do try my best. It helps when you love what you do.
As usual the craftsmanship us outstanding........
Thanks Man, I was quite proud of that one.
That is absolutely stunning.
Thank you @motinkergnome
I've always had a thing for Victorian architecture and workmanship, and you've captured it perfectly, and what a gorgeous result!
Absolutely stellar work. Bravo!
Thank you very much.
You're welcome!